VentMed CPAP User manual

User Guide
CPAP/Auto CPAP/BIPAP ST25 /
ST30
User Guide

User Guide
Product
The DS-5 is VentMed's Positive Airway Pressure (CPAP) device.
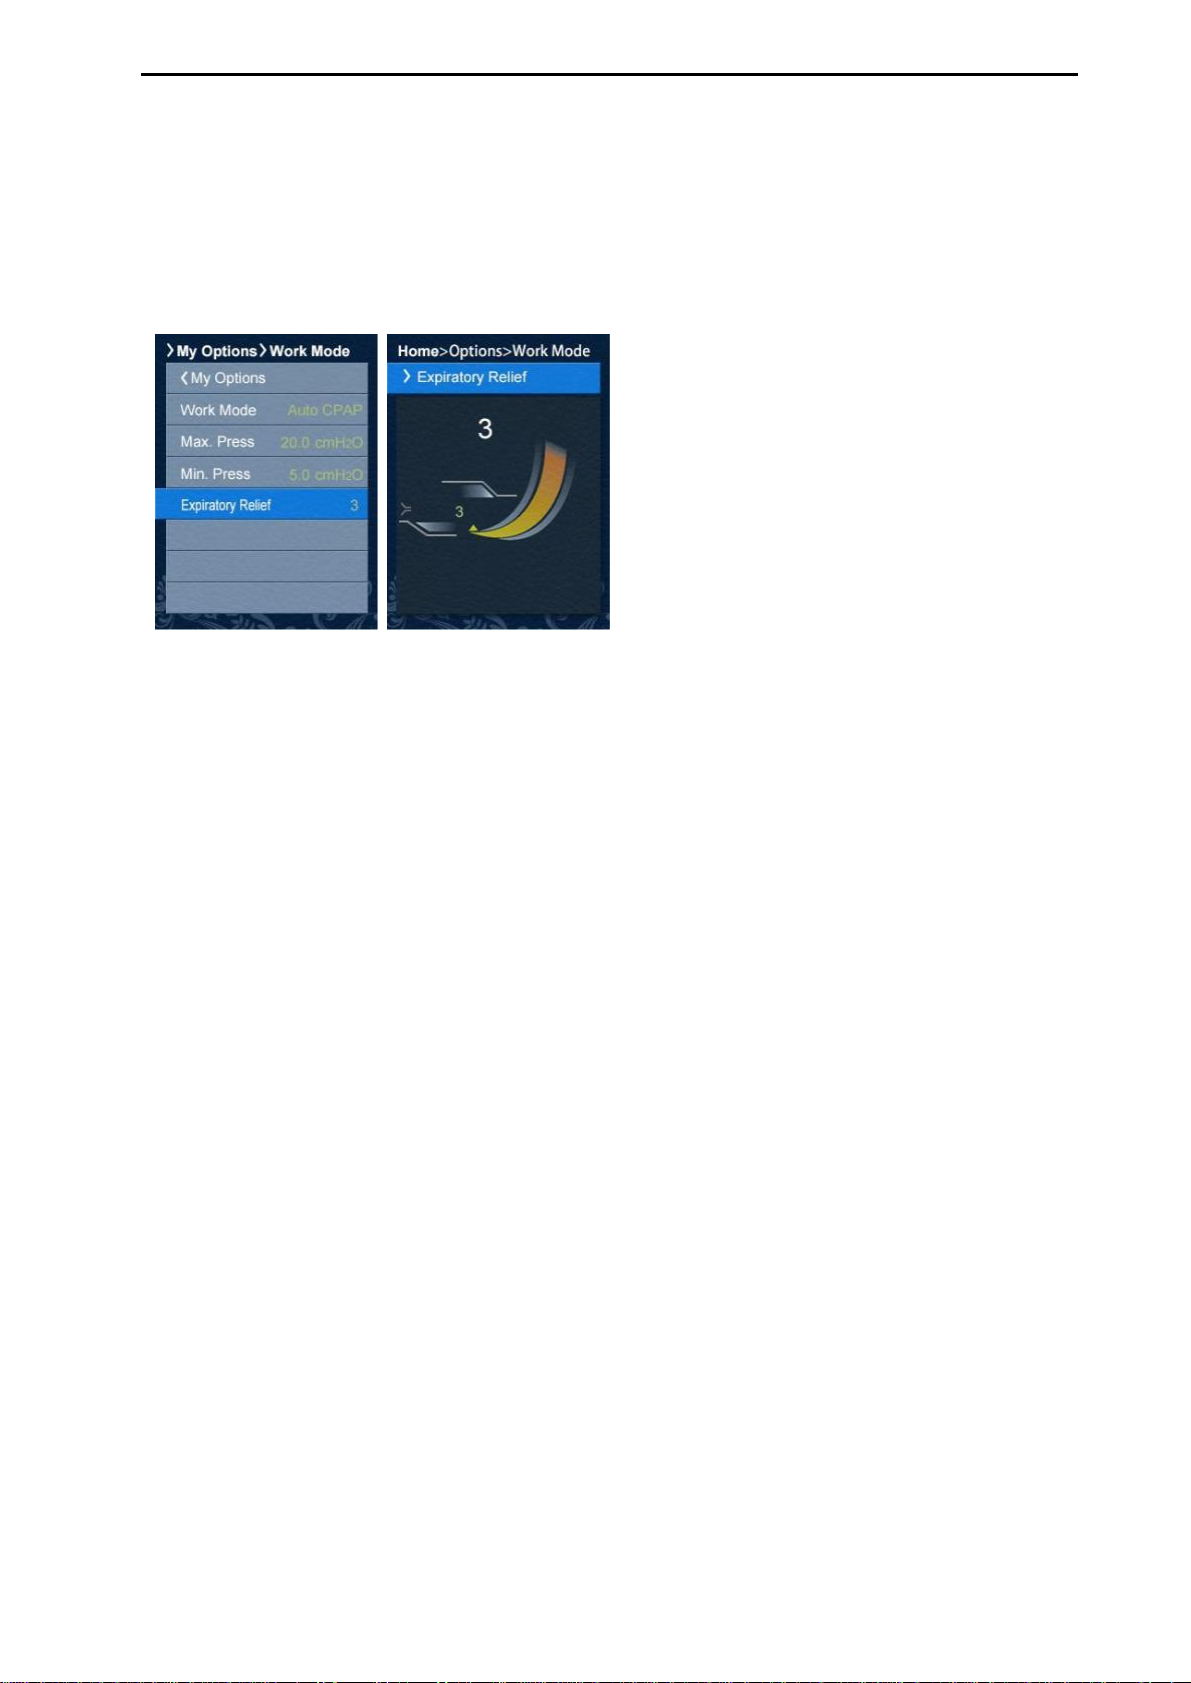
The DS-6 is VentMed's Auto-adjusting Pressure (Auto CPAP) device.
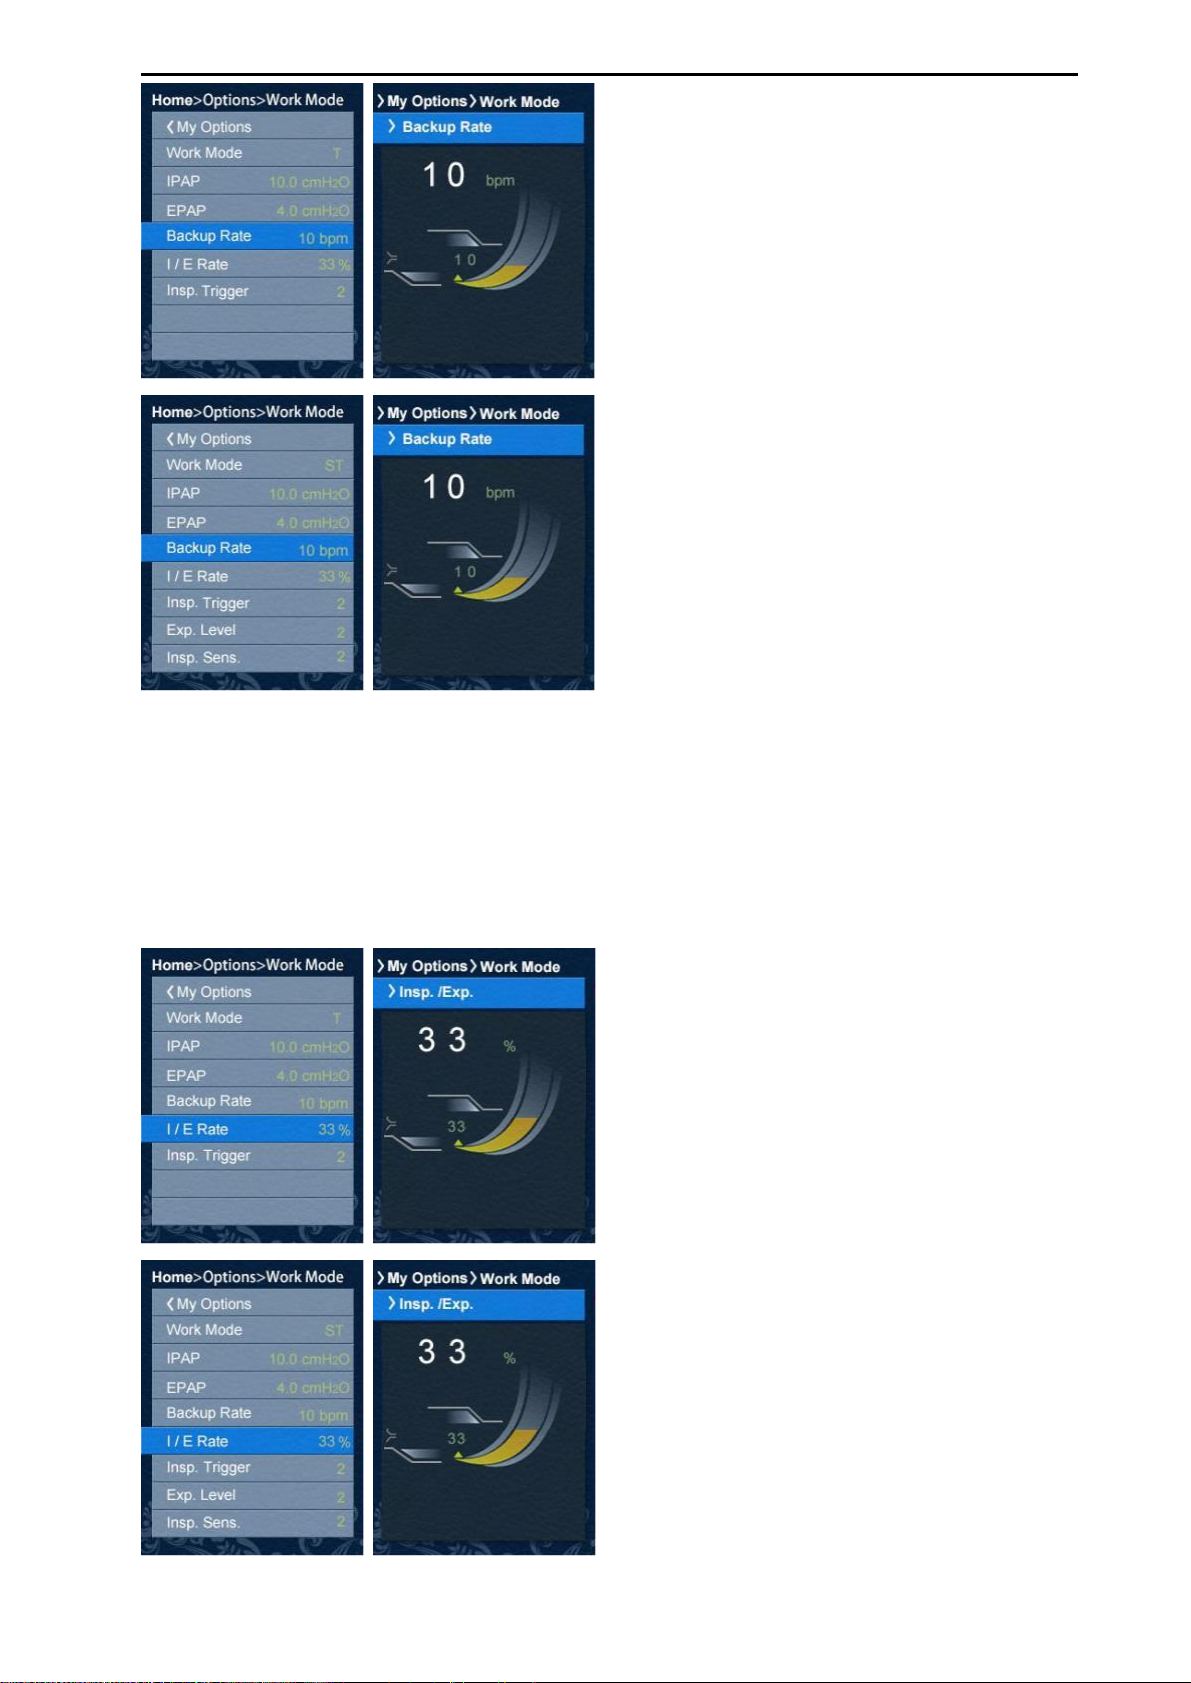
The DS-7 is VentMed's Bilevel Positive Airway Pressure ST25 (BIPAP ST25)
device. The DS-8 is VentMed's Bilevel Positive Airway Pressure ST30 (BIPAP
ST30) device.
CPAP mode provide same inspiratory and expiratory therapy pressure in one
breathing cycle, Bilevel mode provide different inspiratory and expiratory therapy
pressure.
WARNING
Read this entire guide before using the device.
CAUTION
In the US, Federal law restricts this device to sale by or on the order of a physician.
Indications for use
The VentMed CPAP and Auto CPAP is indicated for the treatment of obstructive
sleep apnea (OSA) in patients weighing more than 66 lb (30 kg). The humidifier is
integrated in device.
The VentMed BIPAP ST25 and BIPAP ST30 are indicated for the treatment of
obstructive sleep apnea (OSA)/ central sleep apnea (CSA)/ mixed sleep apnea
(MSA) in patients weighing more than 66 lb (30 kg). The humidifier is integrated
in device.
Adverse effects
You should report severe headache, unusual chest pain or increased breathlessness
to your prescribing physician. An acute upper respiratory tract infection may
require temporary discontinuation of treatment.
The following side effects may arise during the course of therapy with the device:
drying of the nose, mouth, or throat
nosebleed
bloating
ear or sinus discomfort
eye irritation
1

User Guide
skin rashes.
Contraindications
Positive airway pressure therapy may be contraindicated in some patients with the
following pre-existing conditions:
pneumothorax
dehydration
severe bullous lung disease
pathologically low blood pressure
cerebrospinal fluid leak, trauma recent, or cranial surgery.
Packing list of the device
Device with integrated humidifier
Water tank
Power supply unit
Travel bag
Measuring cup
Contact your care provider for a range of accessories available for use with the
device including: Air tubing/Air filter/Mask
Use the mask/air tubing that complies with ISO17510/ISO80601-2-70/EN
ISO10993.
WARNING: Failure to use a mask or accessory that minimizes rebreathing of
carbon dioxide or permits spontaneous breathing can cause asphyxiation.
2

User Guide
About device
1 Air outlet
5 Water tank
2 SD card slot
3 Power inlet
4 Air filter cover
6 Water tank open switch
7 Screen
8 Start/Stop button: Press to start/stop therapy
About the control panel
Start/Stop button
Up button
Press to start/stop therapy.
Press to select previous item.
Down button
Enter button
Press to select next item.
Press to enter the selected item.
Different icons may be displayed on the screen at different times including:
Machine is working
Humidifier Level
Ramp time
SD Card
Setup
3

User Guide
CAUTION
Do not overfill the water tank as water may enter the device and air
tubing.
1. Place the device on a stable level surface.
2. Plug the power connector into the rear of the device. Connect one end of the
power cord into the power supply unit and the other end into the power outlet.
3. Connect the air tubing firmly to the air outlet located on the rear of the device.
4. Open the water tank cover and fill it with distilled water up to the maximum
water level mark. Do not fill hot water in the water tank.
5. Close the water tank cover.
6. Connect the free end of the air tubing firmly onto mask. For detailed
information, read the mask user guide.
7. Physician should ensure the compatibility of the equipment and all of the parts
and accessories used to connect to the patient before use; should ensure that the
therapeutic pressure settings were determined for the patient individually with
the configuration of the equipment to be used, including accessories; and should
4

User Guide
periodically reassess the setting(s) of the therapy for effectiveness.
8. The equipment must not be covered or positioned in such a way that the
operation or performance of the equipment is adversely affected.
Starting therapy
1. Fit your mask.
2. Press Start/Stop button.
3. You will know that therapy is on when the air fan icon is rotated
The current treatment pressure is shown in white words.
.
During ramp time the pressure is gradually increasing and you will see a blue
triangle icon on the screen once the prescribed pressure is reached.
The screen will go black automatically after a short period of time. You can press
any button to turn it back on.
Stopping therapy
1. Remove mask.
2. Press Start/Stop button, therapy will stop automatically after a few seconds.
The Sleep Report now gives you a summary of therapy session.
Compliance/Week Avg: H--Indicated the number of hours of therapy you received
in one week.
H Today--Indicated the number of hours of therapy you received today.
Compliance/Month: H--Indicated the number of hours of therapy you received in
one month.
5

User Guide
Sleep Report
1. In work interface, press Up or Down button to check sleep report date and
waveform.
W M: Work Mode
Insp T: Inspiratory Time
Time
Press: Therapy Pressure
M V: Minute Volume
T V: Tidal Volume
Exp T: Expiratory
Leak: Air Leakage
BPM: Breaths Per Minute
My Options
The device has been set up for your needs by your care provider, but you may want
to make small adjustments to make your therapy more comfortable.
Highlight My Options and press Up/Down button to see current setting. You can
personalize your options.
Ramp Time
Designed to make the beginning of therapy more comfortable, Ramp Time is the
period during which the pressure increases from a low start pressure to the
prescribed treatment pressure. You can set Ramp Time from 0 to 60minutes.
6

User Guide
To adjust Ramp Time:
1. In Options, press enter button to highlight Ramp Time.
2. Press up/down button to adjust the ramp time to your preferred setting.
3. Press enter button to save the change.
Humidity Level
The humidifier moistens the air and is designed to make therapy more comfortable.
Can set the Humidity Level to off (0) or between 1 and 5, where 1 is the lowest
humidity setting and 5 is the highest humidity setting.
To adjust the Humidity Level:
1. In Options, press enter button to highlight Humidity Level.
2. Press up/down button to adjust humidity level.
3. Press enter button to save the change.
7

User Guide
Work Mode
CPAP mode for DS-5 CPAP.
CPAP, Auto mode for DS-6 Auto CPAP.
CPAP, Auto, S, T, ST mode for DS-7 BIPAP ST25.
CPAP, Auto, S, T, ST, APCV mode for DS-8 BIPAP ST30.
To Unlock Woke Mode parameters
1. Work Mode parameters will be locked automatically after setting in 15
minutes.
2. Long press enter button over 5 seconds to highlight the column to unlock.
To adjust the working pressure
1. In work mode CPAP, press enter button to highlight Pressure. Press up/down
button to adjust working pressure. You can set pressure 4-20 cmH2O for CPAP
mode.
8

User Guide
2. In work mode Auto CPAP, press enter button to highlight Pressure. Press
up/down button to adjust Max and Min working pressure. You can set pressure
4-20 cmH2O for Auto CPAP mode.
3. In work mode S, T, ST, press enter button to highlight IPAP (Inspirate Positive
Airway Pressure) . Press up/down button to adjust IPAP working pressure. You
9

User Guide
VentMed
can set pressure 4-25 cmH2O for DS-7 BIPAP ST25 and 4-30 cmH2O for DS-8
BIPAP ST30
4. In work mode S, T, ST, press enter button to highlight EPAP (Expirate Positive
Airway Pressure). Press up/down button to adjust EPAP working pressure.
You can set pressure 4-20 cmH2O for DS-7 BIPAP ST25 and DS-8 BIPAP
ST30.
Attention: Inspirate pressure must be higher than expirate pressure.
To adjust Backup Rate
Designed to set device inspirate and expirate therapy times in 1 minute. You can
set 5-50bpm in mode T & ST.
10

User Guide
VentMed
TO adjust I/E Rate
Designed to set device different inspirate and expirate therapy percentage in a
whole therapy duration. You can set 10%-80% in mode T & ST.
11

User Guide
VentMed
TO adjust Inspirate Trigger
You can set 1-5 in mode S/T/ST, “1” is the most sensitive, “5” is the slowest.
TO adjust Expirate Level
You can set 1-5 in mode S & ST, “1” is the most sensitive, “5” is the slowest.
12

User Guide
VentMed
TO adjust Inspirate Sensitivity
You can set 1-5 in mode S & ST, “1” is the most sensitive, “5” is the slowest.
13

User Guide
VentMed
To set APCV mode
In APCV mode, you can set IPAP/EPAP/Backup Rate/Inspirate Trigger/ Expirate
Level/Inspirate Sensitivity, the adjust process is same as ST mode.
To adjust Inspirate Duration
You can set from 0.5 seconds to 4 seconds.
TV. V. Switch
Designed to set target tidal volume ON or OFF.
14

User Guide
VentMed
To adjust TV.V.
Designed to set target tidal volume, you can set from 200ml to 1200ml.
To adjust Max. IPAP
Designed to set maxium IPAP (Inspirate Positive Airway Pressure), you can set
from 10 cmH2O to 30 cmH2O.
To adjust Min. IPAP
Designed to set minimum IPAP (Inspirate Positive Airway Pressure), you can set
from 4 cmH2O to 20 cmH2O.
15

User Guide
VentMed
Auto ON
Designed to make the device start automatically in a while after you wear mask.
Auto OFF
Designed to stop the device work automatically in 10seconds after you take mask
away.
Time Setting
16

User Guide
VentMed
Pressure Relief
The device already automatically set EPR (Expiratory Pressure Relief) function;
you may find it easier to breathe out. This can help you get used to therapy.
Can set the expirtory pressure relief Level to off (0) or between 1 and 3, where 1 is
the lowest expiratory pressure relief and 3 is the highest setting.
Caring for device
It is important that you regularly clean the device to make sure device work
normally. The following sections will help you with disassembling, cleaning,
checking and reassembling the device.
Disassembling
1. Open the water tank cover, take water tank away from the device.
2. Open the water tank and discard any remaining water.
3. Hold the cuff of the air tubing and gently pull it away from the device.
Cleaning
Clean the device weekly as described. Refer to the mask user guide for detailed
instructions on cleaning your mask.
1. Wash the water tank and air tubing in warm water using mild detergent. Do not
wash in a dishwasher or washing machine.
17

User Guide
VentMed
2. Rinse the water tank and air tubing thoroughly and allow to dry out of direct
sunlight and/or heat.
3. Wipe the exterior of the device with a dry cloth.
Checking
Regularly check the water tank, air tubing and the air filter for any damage.
1. Check the water tank:
Replace it if it is leaking or has become cracked, pitted or cloudy.
Replace it if the seal is cracked or torn.
Remove any white powder deposits using a solution of one part household
vinegar to 10 parts water.
2. Check the air filter and replace it at least every six months. Replace it more
often if there are any holes or blockages by dirt or dust.
18

User Guide
VentMed
To replace the air filter:
Open the air filter cover and remove the old air filter. The air filter is not
washable or reusable.
Place a new air filter then close the air filter cover.
Make sure the air filter is fitted at all times to prevent water and dust from
entering the device.
3. Check the air tubing and replace it if there are any holes, tears or cracks.
Reassembling
When the water tank and air tubing are dry, can begin to reassemble the parts.
1. Connect the air tubing firmly to the air outlet located on the rear of the device.
2. Fill the water tank with distilled room temperature water up to the maximum
water level mark.
3. Put water tank into the device. Close the water tank cover.
4. Connect the free end of the air tubing firmly onto the mask.
Therapy data
The device records therapy data for you and your care provider so they can view
and make changes to your therapy if required. The data is recorded via a SD card.
You can send SD card to your care provider by mail. When instructed by your care
19
This manual suits for next models
7
Table of contents