Venus GSPACE 8.5 ECO COMFORT User manual

BEFORE YOU START
It is important to read through, understand, and adhere to all the instructions
and safety warnings in this manual before charging and operating this scooter.
Upon receiving and opening your box, please inspect the contents for signs of damage or loose screws
from transport. If something doesn’t feel right, please take a few pictures and contact your place of purchase
immediately.
Your scooter comes with a 180-day limited warranty against manufacturing defects. In case of any issues
beyond this time frame, we will still help you but we may need to charge for spare parts or repairs.
Make sure you understand and adhere to local rules and regulations for riding electric scooters. Riding an
electric scooter comes with inherent risks and hazards. To minimize the risk of falling or being injured, make
sure you understand how to operate and control this scooter safely.
Always use good judgement, common sense, and protective gear.
TABLE OF CONTENTS
GENERAL SAFETY WARNINGS ................................................................ 1
OVERVIEW OF VENUS ............................................................................... 2
What's in the Box .................................................................................................... 2
Technical Specifications ......................................................................................... 3
Key Components .................................................................................................... 4
CHARGING AND BATTERY SAFETY ......................................................... 5
Charging the Venus ................................................................................................ 5
Battery Maintenance ............................................................................................... 5
Battery Disposal ...................................................................................................... 6
Charging Warnings and Battery Safety Warnings .................................................. 6
OPERATIONS .............................................................................................. 9
Assembling Venus .................................................................................................. 9
Folding Your Scooter .............................................................................................. 9
Your First Ride ........................................................................................................ 9
Braking Correctly .................................................................................................. 10
Mechanical Disc Brake Check .............................................................................. 10
DISPLAY& KEY SETTINGS....................................................................... 11
Turn Signals/Mode Switch .................................................................................... 11
Driving Mode Selection ......................................................................................... 11
Display Settings .................................................................................................... 12
SCOOTER MAINTENANCE & TRANSPORT ............................................ 15
DECLARATION OF CONFORMITY ........................................................... 16

1 2
GENERAL SAFETY WARNINGS
Always wear a helmet and protective safety equipment when riding.
Wear closed shoes without heels and ensure your laces are tied.
Do not ride with more than one rider or exceed the weight limit of 120kgs / 265lbs in any other way.
Only use your scooter in line with its intended purpose.
Check your scooter for any loose parts or screws, flat tires, signs of damage or excessive wear before
every ride. Stop operation immediately and contact your place of purchase if something does not feel right.
Start riding slowly to familiarize yourself with the operation of your scooter. Start in Gear 1 and slowly try
out the brakes. Always slow down when riding over bumps or on rough road conditions. Keep the scooter
away from children. It is not a toy. Riders must be age 16+ only.
Do not use your electric scooter in heavy rain, or on surfaces covered by more than ½ inch of water. Do not
submerge the scooter in liquid or let any liquid near the battery or electrical components.
Do not lend your scooter to anybody unfamiliar with its operation. Ensure any new riders are familiar with
these instructions and are wearing proper safety gear.
Once riding in public space, you are subject to the risks faced by all traffic participants just like when you
are riding a bike.
Other traffic participants may not obey traffic regulations or may ride carelessly. The faster you ride
your scooter, the longer it will take you to stop.
The scooter may slip on slippery surfaces leading to subsequent injuries to the rider. Pay special
attention crossing train tracks and/or when it is wet.
Due to the slippery road surface in wet weather, it will take longer to stop, pay special attention when
riding in wet weather.
Always use caution, adapt your speed to road and traffic conditions and keep distance from other
traffic participants.
Watch out for pedestrians. Do not use your scooter in any way that could harm pedestrians. Slow
down when you are passing them to avoid accidents.
You must follow all local traffic rules and regulations.
Always check the lights and road conditions when riding in the night.
Different materials and components react to wear and fatigue differently. The appearance of cracks,
scratches or change of color on the components means that their expected life span exceeds, please
change them immediately. The electric scooter will break down and harm the rider under such
conditions.
OVERVIEW OF VENUS
What's in the Box
Electric Scooter*1 User Guide*1 Charger*1
Lightstrip Controller*1
Screwdriver Set*1

3 4
Rear Suspension
Technical Specifications
Key Components
Rear Brake Lever
Handle Grip
Light & Horn Switch
Handle Bar Fixing Part
& Folding Hook
Display
Index-finger accelerator
Front Brake Lever
ECO/Turbo & Single/Dual
Switch
Rear Fender
Footboard (Battery Inside)
Kickstand
Front Suspension
Front Fender
Motor
Rear Brake Disc
Folding Buckle
Steering Bar
Charging Port
Rear Deck for fastening
the folding hook

5 6
CHARGING AND BATTERY SAFETY
Charging the Venus
(Scan the QR code to watch instruction video on YouTube)
1. Turn your electric scooter off.
2. Locate the charging port.
3. Open the charging port-cover.
4. Connect the charger to the electric scooter's charging port.
5. Plug in the charger to the wall power outlet.
The LED on the charger will turn red while charging and turn green when the electric scooter is ready for
use. Remove the charger and cover the charging port. Charging time with the included 2A charger is 5
hours for the Venus 10 Ah version, 6.5 hours for Venus 13 Ah version and 10 hours for the Venus PRO 24
Ah version. Charging time with the included 4A charger is 2.5 hours for the Venus 10 Ah version, 3.5 hours
for Venus 13 Ah version and 5 hours for the Venus PRO 24 Ah version.
Battery Maintenance
We suggest to charge your scooter after every use. This is not required but recommended.
A lithium-ion battery is a consumable device. Please replace with a new battery once capacity drops below
50% of what you experienced initially. Contact your place of purchase for a replacement.
Make sure the battery is charged and that the scooter is turned off before storing your scooter for extended
periods at a time.
Store your scooter in a dry and cool place. Do not keep it outdoors or in outdoor sheds for extended periods
of time, as excessive cold temperatures, heat, sunlight, rain, or other environmental conditions may impact
safe operation and reduce the scooter’s lifespan.
Charge your battery at minimum every 3 months to prevent it from running completely empty. Once the
battery runs completely empty due to slow discharge while in storage, it may have to be replaced.
Batteries perform poorly at low temperatures. For instance, if the temperature is around 0°F
(-18°C), battery capacity reduces by 50%. Capacity will restore to normal when temperatures rise.
Battery life and riding ranges will vary depending on usage, climate, road conditions, rider’s weight, and/or
riding style, proper care, and maintenance.
Battery Disposal
Do not dispose of your battery by way of landfilling, incineration, or household trash.
We recommend disposing your battery through a local recycling program suitable for lithium-ion batteries.
Contact your local waste management service for more information.
Mishandling of used batteries may do tremendous harm to the environment. You must abide by local laws
and regulations to properly dispose of used batteries.
Charging Warnings and Battery Safety Warnings
Use caution when using outlets to prevent electric shock.
Do not leave the charger plugged in for extended period of times (>24 hours).
Only charge your scooter in a safe, clean, and dry environment. Keep the charger and scooter away
from inflammable materials as they may get hot.
Only use the original battery packs and the original charger supplied with your electric scooter.
Contact your place of purchase if you need a replacement. Use of other models or brands may not
be safe.
Do not touch any part of the USB charging prongs and keep them away from metal objects to prevent
short circuiting which may result in battery damage or physical injuries, and/or death.
Do not place the battery in direct contact with heat or near high temperatures. Do not expose the
battery to direct sunlight. Do not leave the scooter in a car where the battery might get hot.

7 8
Do not pierce the battery with sharp objects. Do not subject it to impact or force.
Stop charging if the battery fails to recharge within the approximate charging time. This will prevent
the battery from overheating, rupturing, or igniting.
Do not charge the battery in temperatures below 32°F (0°C) or above 104°F (40°C) as this can
hamper performance, result in breaking, overheating, rupturing, or igniting and could cause personal
injury or property damage.
Do not charge your scooter if the charging port on the scooter is damaged or wet. Do not charge if
there is excessive heat, odor or leakage coming from the battery or it looks abnormal in any way.
If the battery leaks and you accidentally get in touch with the liquid, rinse immediately and thoroughly
with water and then seek medical care.
Never attempt to disassemble, modify, perform repairs or maintenance on the battery. You run the
risk of damaging the protective and safety components that prevent incidents, personal injury or
property damage.
Mishandling or misuse of the battery can result in lower performance, shorter lifespan, rupturing,
igniting, or other incidents and could increase the risk of serious personal injury.
Do not discharge the battery with any other product than the scooter it comes with. Doing so could
result in damage to the other product or the battery, and reduced lifespan of your scooter. The battery
could overheat, rupture, or ignite and cause personal injury or property damage.
Rated Capacity: 48V 10AH Input: 54.6V 2A
WARNING! Please turn on the vehicle when charging!
WARNING! Do not charge the flooded scooter and check with a professional!
WARNING! Do not charge the scooter when no one is present or while sleeping!
WARNING! Do not charge the scooter when you find an electric shock and check with a professional!
WARNING! Do not charge or leave the battery storage under a high-temperature above 45°C!
WARNING! Do not touch the charging port with wet hands!
WARNING! Do not charge near fire!
WARNING! Do not use the pressure washer to wash the scooter!

9 10
OPERATIONS
Assembling Venus
Carefully open the box and take the scooter out with both hands. Do not pull the handle bar out by itself,
as it is attached to the rest via the cable work. Also pay attention not to lose the metal plaque which you will
need to screw on to secure the handle bar to the steering bar.
1.
2.
Place the scooter on the floor and secure it by pulling out the kickstand.
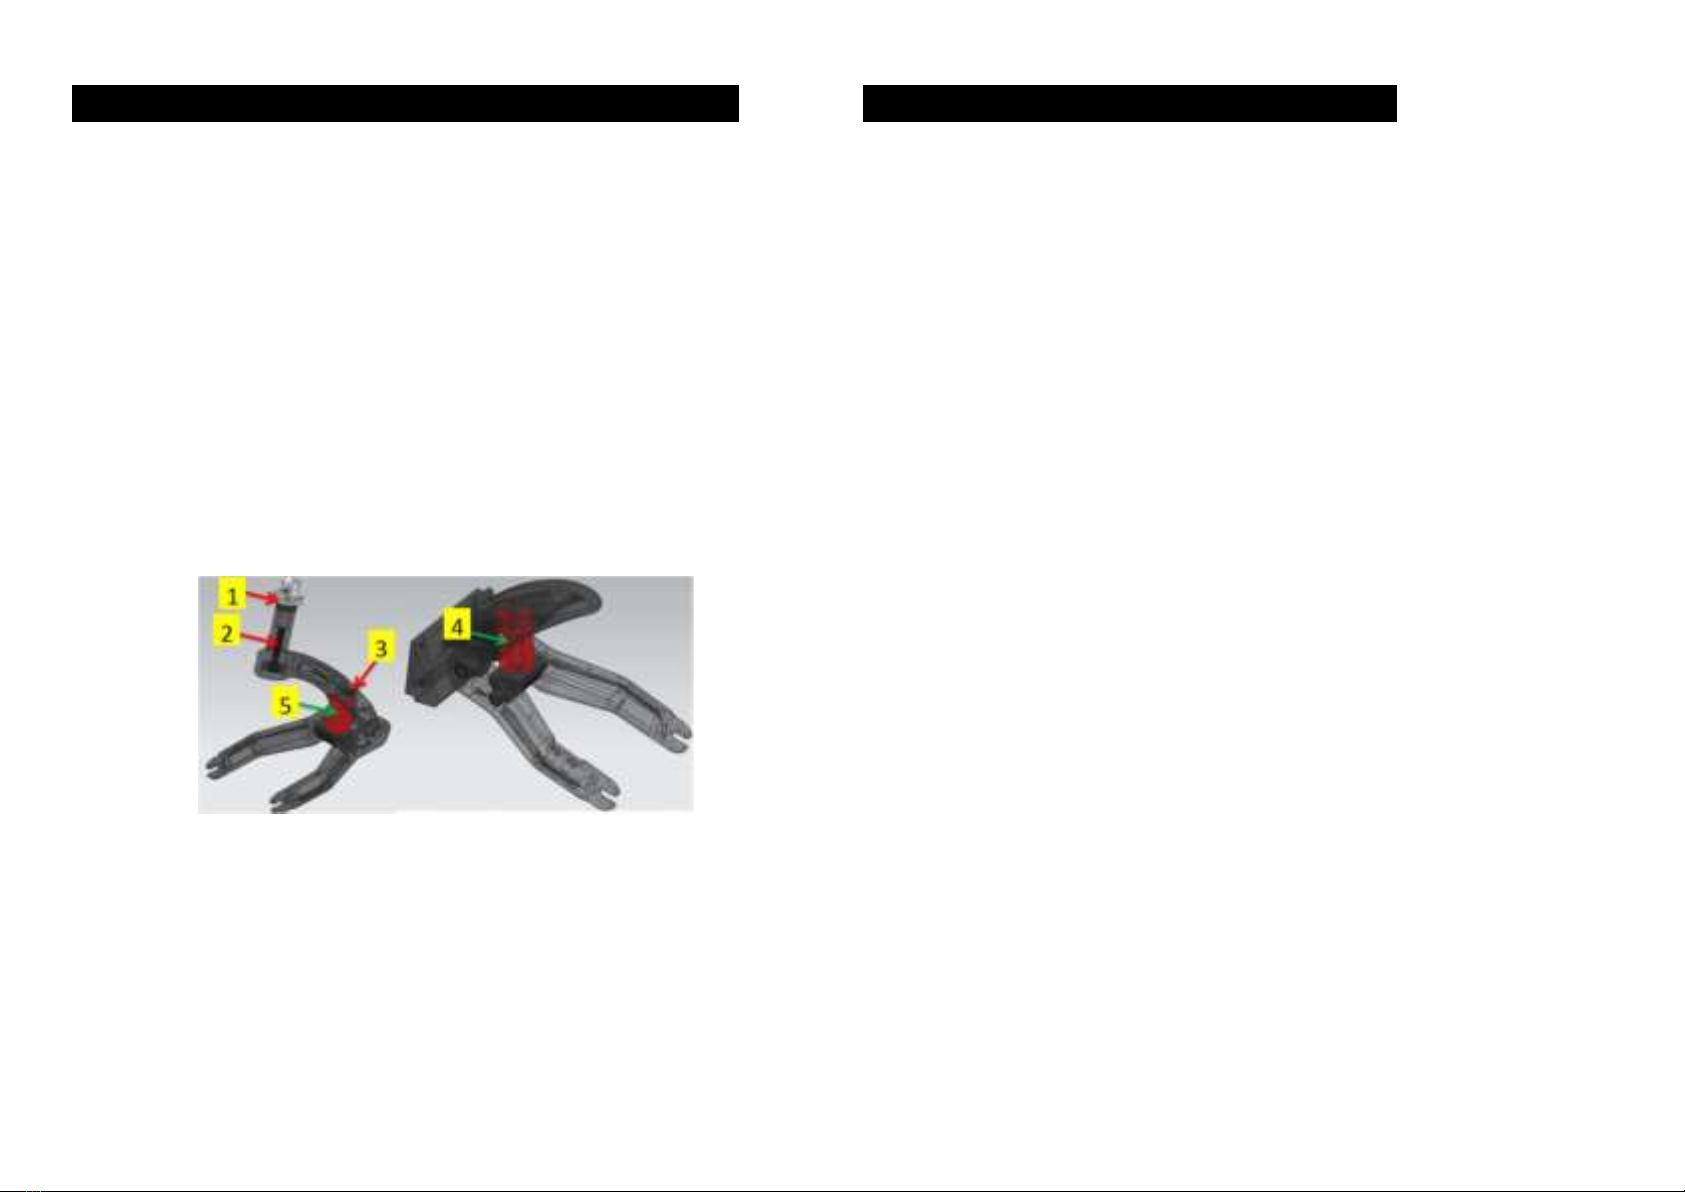
Lift the steering bar into a vertical position and lift the locking buckle up so that the steering bar
connects to the board. Before every ride, make sure the buckle is locked tightly. Pay attention that
the handle post is not yet fixed to the steering bar but only loosely connected via the cable work.
Place the handle bar onto the steering bar and screw the metal plaque
onto it with the screws and screwdriver set provided.
For the most comfortable riding position, we recommend you place the
handlebar in the most upward position when tightening the screws.
(Scan the QR code to watch instruction video on YouTube)
3.
Folding Your Scooter
*Always pull out the kickstand before folding the scooter to ensure it won’t fall off.
1.
2.
Hold the steering bar with one hand and lift the locking buckle upwards with the other hand.
Fold the handle post downwards until the folding hook touches the rear deck and lock it with the hook
in the deck. This will lock the handle post in folded position and enable you to carry your scooter with
hands while folded.
Your First Ride
Before using your scooter, make sure to visually inspect it for any signs of damage or loose parts/screws.
Every scooter is individually tested before shipping from the factory, but we recognize that it has travelled
far and in rare cases, it can get damaged during transport. If something does not feel right, contact your
place of purchase before riding your scooter.
Pull the brake levers and ensure there is sufficient tension on the brakes BEFORE your first and any
subsequent ride.
Ensure you have sufficient run way ahead of you. Do not use the scooter indoors.
Make sure the buckle that connects steering bar and board are locked tightly.
Put both of your hands on the handle bar.
Do not hang anything on the handle while riding because it will influence the balance of the scooter
and cause personal injury or property damage.
Step with one foot on the scooter, kick it lightly with the other foot to bring it slightly in motion.
Step with your second foot onto the board, hold on tight and pull the accelerator.
Do prepare for strong acceleration and start slowly.
Braking Correctly
The Venus scooter has dual front and rear disc brakes.
For braking, use the rear brake (the left braking lever on the handle bar) first for decelerating before
engaging the front brake (the right lever) to come to a full stop.
When travelling at high speed, exercise caution when braking as the brakes are sensitive. This is especially
true for the front brake as you risk falling over the handle bar if your center of gravity is too high while
performing a hard stop with the front brake alone.
Mechanical Disc Brake Check
Pull the brake lever and ensure there is sufficient tension on the disc brake
before riding. Check frequently to ensure brakes are working properly.
(Scan the QR code to watch instruction video on YouTube)
In case there is not sufficient tension on the brake, you can tighten it a little
with the barrel adjuster (the plastic turning bolt at the end of the brake cable,
just before it enters the caliper):
To increase brake tension, turn the barrel adjuster backwards so that the caliper arm moves closer to
the barrel adjuster.
Don’t forget to tighten the nut afterwards so that the barrel adjuster stays safely in place.
If this does not do the trick or you have any doubts or concerns, please reach out to your place of purchase.

11 12
DISPLAY & KEY SETTINGS
Turn Signal / Mode Switch
The switch has the following functions: light, turn signal, and horn button.
When the light button is pressed, the front and rear deck light will turn on.
When the turn signal button is pressed, the front and rear deck light will turn on and
flash.
When the horn button is pressed, the horn will start to work.
When multiple buttons are pressed, the priority for the function from highest to lowest is turn signals, brake,
and then light.
Driving Mode Selection
Located underneath the main display on the right side of the handle bar, you can find
two switches to control driving modes:
The ECO/TURBO switch regulates the power of your scooter. By pressing down the
button, the indicator light is on, which means TURBO mode is activated and there is
no restriction of power. When the button is not pressed, ECO mode is activated, which will reduce torque
and top speed to maximize range.
The SINGLE/DUAL switch toggles between single or dual motor drive. By pressing down the button, the
indicator light is on, which means DUAL (both front and rear) motor drive is activated. When the button is
not pressed, only SINGLE (rear) motor drive is activated.
For Maximum range, select ECO mode and SINGLE motor drive. While for maximum power and speed,
select TURBO mode and DUAL motor drive.
Display Settings
The Venus scooter is equipped with the following display:
Gear change. To change the Gear (1=slow, 2=medium, 3=fast), while the scooter is powered ON, press
power button [3] first, then press Mode Button [5] to switch between Gears.
Speedometer [1]: Shows the speed at which you are travelling.
Battery Indicator [2]: Shows the level of your battery. Charge your scooter frequently, and do not let it
run out. As a rough guideline, charge at or below 2 bars.
Power Button [3]: To turn the scooter on or off, press the button for 2 seconds.
Accelerator [4]: Pull to accelerate. The stronger you pull, the faster it accelerates. The scooter is
delivered in “Non-Zero Start” default setting (Kick-And-Go is ON), i.e., the accelerator only works if
the scooter is already in motion.
Mode Button [5]: Press to select various display options, detailed options are shown in the below
chart:
MODE Description
TIME Time since powering on the scooter.
TRIP Distance travelled since powering on the scooter.
ODO Total distance travelled.
VOL Current battery voltage.
CH2:00
Charging mode. Time (2 hours) scooter stays ON (overrides auto
-switch off) so you can use the display’s USB port to also charge things,
such as your phone.

13 14
Detailed P-settings mode. To access P-settings to make various advanced changes, press POWER [3]
and MODE [5] simultaneously for 2 seconds, then input the passcode 1500 to enter P-settings.
*1500 is the default 4-digit numeric passcode for all electric scooters
and cannot be changed, press MODE [5] to input the number and
press POWER [3] to jump to the next digit.
(Scan the QR code to watch instruction video on YouTube)
Scan through the P-settings using the MODE button. To select a P-setting in order to make changes, press
the POWER button. Change the value (up or down) using the MODE (Up) and POWER (Down) buttons.
To return to the P-settings menu after changing a value, wait 2 seconds. To return to operating mode, wait
a further 2 seconds.
P-SETTINGS
P0 Tire diameter (8 for Venus 8, 10 for Venus 10). Do not change.
P1 System voltage. Default 48V/52V. Do not change.
P2 Motor magnetic pole setting. Default is 30. Do not change. (Venus 10)
Motor magnetic pole setting. Default is 20. Do not change. (Venus 8)
P3 Speed signal selection. Default is 0. Do not change.
P4 Distance / speed unit. 0=km, 1=miles
P5 Start setting.1=non-zero start (Kick-and-Go), accelerator won’t work if scooter is not in motion;
0=immediate start (CAUTION while using this)
P6 Cruise control. 0=cruise control OFF, 1=cruise control ON.
P7 Initial acceleration. 0=soft, 1=strong.
P8 Electric (regenerative) braking (E-ABS). 0=E-ABS off, 1=E-ABS on
P9 Speed limit as % of top speed, i.e., 100=no speed limit.
PA Clear total distance travelled (ODO). Only work one time.
PB Scooter auto-turn off time in minutes.
PC Display brightness (1=low, 2=medium, 3=high)
Cruise Control [P6]. Cruise control allows you to maintain your driving speed automatically without
continuing to hold down the accelerator. In order to enter Cruise Control, activate it first in the P-settings
[P6].
While riding, keep the accelerator steady for a few seconds until Cruise Control kicks in and scooter travels
at a constant speed without driver holding down the accelerator. When you activate the brakes, Cruise
Control will be cancelled.
*CAUTION: Ride in a position where you can immediately access the brake to cancel Cruise Control
if necessary.

15 16
SCOOTER MAINTENANCE & TRANSPORT
Never perform maintenance on this product while the unit is powered on or charging. Always power off
before performing maintenance. Do not attempt to perform repairs or modify the scooter by yourself but
contact your place of purchase or refer to a professional repair facility.
Clean stains on your scooter’s body with a damp cloth. Do not use alcohol, gasoline, kerosene, or other
corrosive and volatile chemicals. Do not wash with high pressure cleaners. Make sure the scooter is turned
off and unplugged during cleaning and ensure no moisture enters the charging port.
When transporting your scooter, please take into account that it contains lithium-ion batteries that are
considered a hazardous material.
Always exercise caution and follow applicable rules and regulations when transporting your scooter. It is
very likely that you will not be allowed to take your scooter and battery on an airplane.
NOTE: The screws in 1. 2. 3. 4. 5 (position shown in the figure) in order to prevent metal fatigue accidents,
please replace these 5 pcs of screws each year or when it reaches 5,000 kilometers, please check and
maintain every three months at the nearest after-sale maintenance store.
Please check the tires, brake discs and cables before each ride, please reach out to the maintenance store
if you find cracks or damages on them so as to prevent personal injury or property damage.
DECLARATION OF CONFORMITY
NOTE: INFORMATION, SPECIFICATIONS, WARNINGS AND ALL OTHER DETAILS INCLUDED IN THIS
MANUAL ARE SUBJECT TO CHANGE AT ANY TIME, WITHOUT PRIOR WRITING. INQUIRE WITH THE
VENDOR'S AFTER-SALES DEPARTMENT FOR MORE INFORMATION.

17 18
MEMO
This manual suits for next models
3
Table of contents