VeriFone Vx-520 Series APACS 40 User manual

Terminal and Account User Guide
Verifone VX520 EMV Cash Advance
Merchant #:
Merchant ame:
Visa/MC Voice Authorization:
Acumen Help-Desk:

Contents
Installation Guide......................................................................................................................... 1-2
Powering On................................................................................................................................... 3
avigating the Terminal...................................................................................................................4
Adding Static IP Address................................................................................................................. 5
EMV Chip Technology and Contactless Payments.........................................................................6
Integrated Contact/Contactless Chip Card Transactions................................................................7
Performing Transactions............................................................................................................ 8-12
Additional Transaction Prompts.................................................................................................... 13
Cash Advance Procedures............................................................................................................14
Cash Advance General Information..............................................................................................14
Communication Processing/Error Messages................................................................................15
Bank Responsibilities.................................................................................................................... 16
Alternate Authorization.................................................................................................................. 16
Refund/Credit a Cash Advance.....................................................................................................16
Address Verification System (AVS)...............................................................................................17
First View Setup............................................................................................................................ 18
PCI DSS........................................................................................................................................ 18
Acumen Equipment Terms............................................................................................................ 19

Installation Guide
VX520 Contactless
1
AD
C
B
Paper Load
Remove Back Cover
B
A
Powering On
A
B

2
Connect Communication Method
B
B
A
RJ-45
RJ-11
Phone
Comms
nternet
Comms
A
Attach PinPad (Optional)
RS-232
AB
Replace Back Cover

Powering On
3
CommServer
Select the function key for
SOFTPAY-TSYS to activate
the credit card application.
Powering On:
After powering on, or after
power interruption the
terminal will display the
VMAC menu.
03/31/17 16:00
SOFTPAY-TSYS

Navigating the erminal
4
Function Keys:
Use function keys to
select from the menu.
03/31/17 16:00
Settlement
CS
O
P
E
Batch:
Displays when batch
is open. Cash Advance
Hot Key Functions:
Use hot keys beneath
the display to select
additional functions.
Void
1234
Command Keys:
Use command keys to
Direct terminal.
E TER KEY:
Press to continue
BACKSPACE KEY:
Remove incorrect value
CA CEL KEY:
Return to main menu
Smartcard Reader:
Insert card face up
with chip towards
terminal .

Adding Static IP Address
If your POS terminal communication method is internet and you have assigned a Static IP Address, you must enter the address
information into the terminal before first use. (Contact your IT support if needed).
Press ØThis column intentionally left blank
Press F2 CommServer
Press Purple Key under
Press F2 IP
Press F3 Edit
Press F1 Static
Press F2 ext
Press F3 Edit
Type Static IP address (press 1 then Alpha for period) press E TER
Press F2 ext
Press F3 Edit
Type Subnet Mask (press 1 then Alpha for period) press E TER
Press F2 ext
Press F3 Edit
Type Gateway IP Add (press 1 then Alpha for period) press E TER
Press F2 ext
Press F3 Edit
Type D S1 IP Address (press 1 then Alpha for period) press E TER
Press F2 ext
Press F3 Edit
Type D S2 IP Address (press 1 then Alpha for period) press E TER
Press F4 Exit
Save Changes? Press F1 Yes
Press Ø
Press F3 SOFTPAY-PAYT
5
S OP!

EMV Chip echnology and Contactless Payments
WHA IS EMV CHIP ECHNOLOGY?
(EMV) Europay, MasterCard, Visa is a global standard for interoperability between chip based payment
applications and acceptance terminals for secure credit and debit payments. All EMV cards (smartcards) are the
same size and thickness as magstripe cards and are embedded with a micro computer chip that stores information
required to authenticate, authorize, and process transactions, increasing security and reducing fraud. When the
card is inserted into a POS terminal a metal contact in the reader provides power to the microchip and then both
devices are able to communicate.
CON AC PAYMEN S
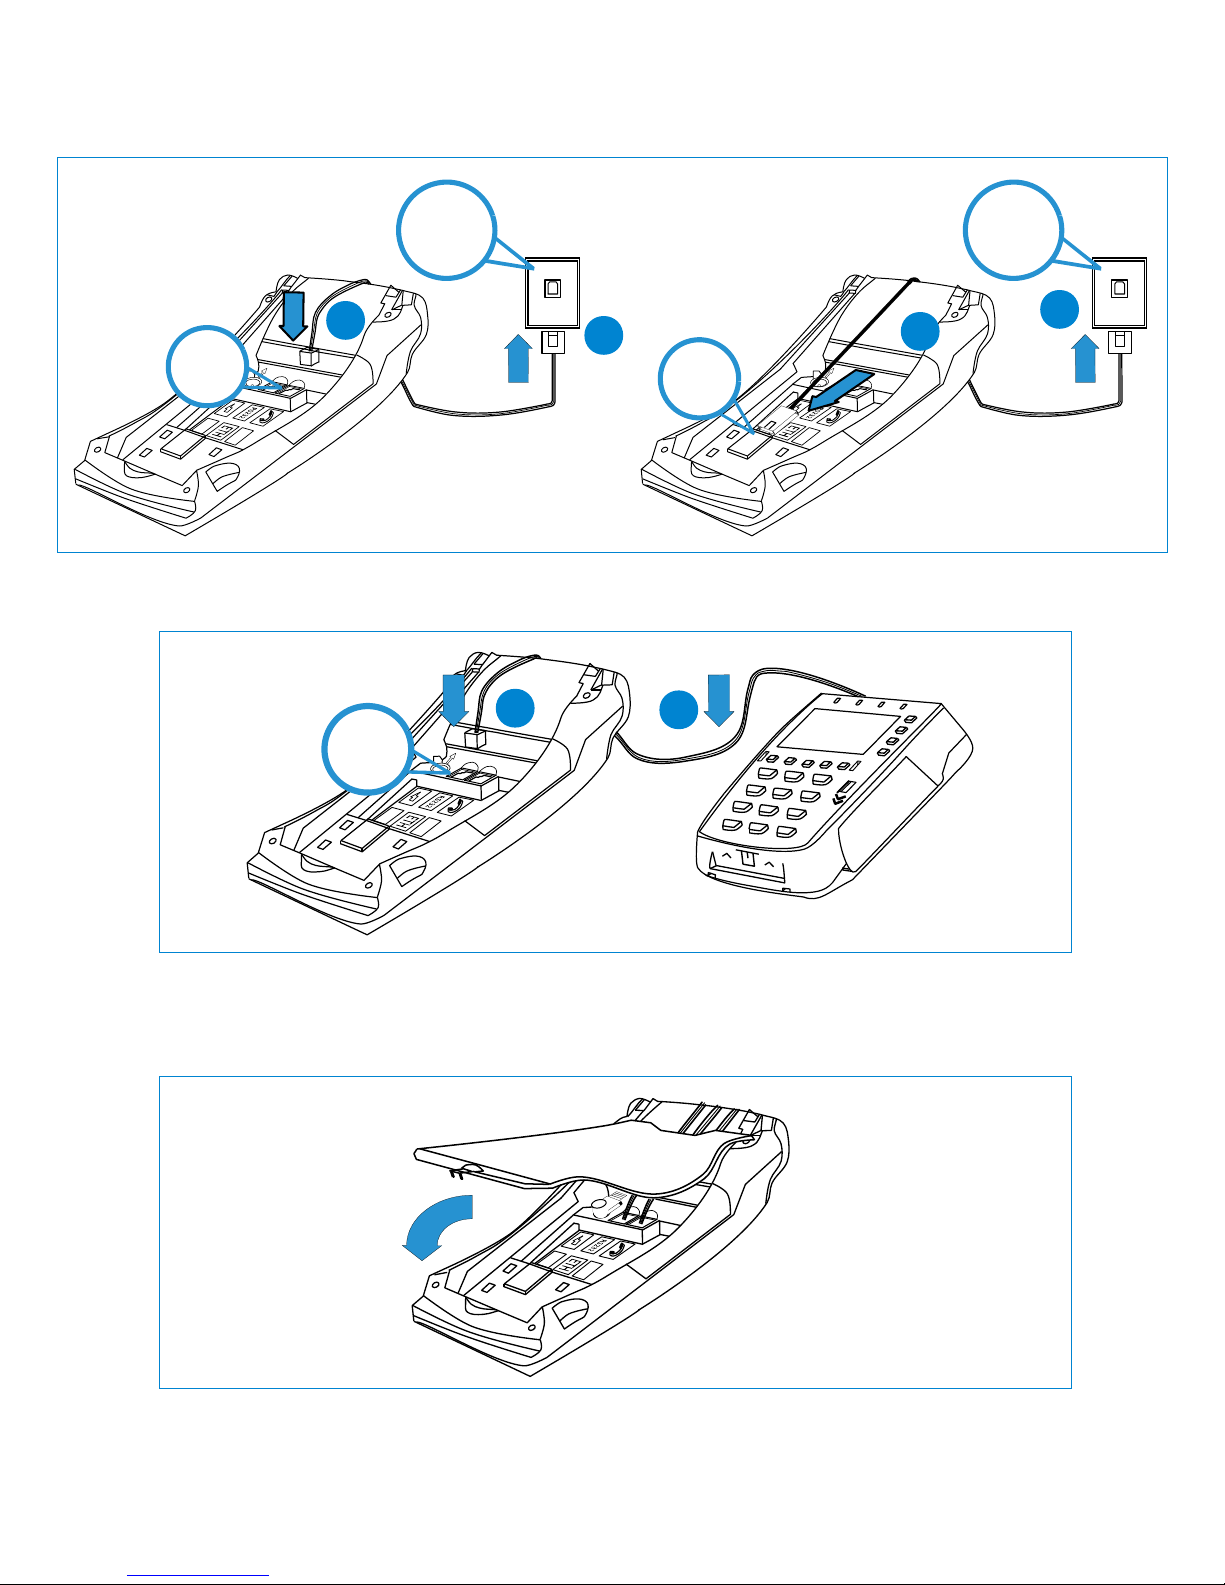
Your Verifone terminal supports smartcard contact payments. When a customer presents a smartcard you should
initiate a sale and then pass the terminal to the customer (where practical, or if you do not have an attached PI
pad). The customer should insert their card into the chip reader at the bottom of the terminal where it will remain
until the transaction is complete. Your terminal will instruct the customer when to remove their card.
CON AC LESS PAYMEN S
Your Verifone terminal may also support contactless payments. Some customers may present a dual interface card
(a card capable of both contact and contactless transactions), a fob, or may want to use their mobile phone to pay.
You should initiate a sale and them pass the terminal to the customer, when the contactless symbol is displayed
the customer will tap or hold their contactless device above the display, your terminal will process the transaction
the same as if a card were inserted. In most cases a separate PI pad may be attached to your terminal allowing
your customers to complete contact or contactless transactions with a customer facing device.
CUS OMER VERIFICA ION ME HODS
Depending on the card, customer identity verification is completed with either a customer signature on the receipt
or by the customer entering a PI number. Your terminal will recognize the card and prompt you and the customer
to follow the required verification process.
FORGO EN PINS
If a customer has forgotten their PI , instruct them to contact their card-issuing bank to have their PI reset. You
should ask for another payment method to complete the sale.
RESOLVING LOCKED PINS
If the wrong PI has been entered too many times in a row the PI will lock and render the card temporarily
unusable. Your terminal display will inform you whether the transaction can be completed using a signature or if
the customers needs to provide a different method of payment. Instruct the customer to contact their card-issuing
bank to unlock the PI .
MAGNE IC S RIPE CARDS
You can continue to accept cards that do not have an embedded micro chip (magnetic stripe only). All smartcards
will also be embedded with a magnetic stripe to meet international requirements as well as fall back for some cards
where the chip has malfunctioned and a swipe of the card is allowed.
6

Integrated Contact/Contactless Chip Card ransactions
CON AC PAYMEN S
When a customer presents a chip card, you should initiate a sale and then pass or turn the POS terminal to the
customer* (if you do not have an external PI pad). The customer inserts their card into the chip reader at the
bottom of the terminal where it should remain until the transaction completes. Your terminal will instruct the customer
when to remove their card and return the terminal to you. Follow the prompts to complete the sale. This ensures that the
card never leaves the customer’s possession.
*Where practical
CO TACT CHIP CARD TRA SACTIO
CON AC LESS PAYMEN S
When a customer presents a contactless device (card, fob, phone), you should initiate a sale and at the contactless
symbol instruct your customer to tap or hold their device next to or above the terminal and follow terminal prompts. In
many cases, a separate PI pad can be attached to your terminal, for customer convenience. As an added security
measure, transaction amounts over a pre-set threshold will require a card insert or swipe.
CO TACTLESS CHIP CARD TRA SACTIO
7
1. I SERT CARD 2. FOLLOW PROMPTS 3. REMOVE CARD
1. LOOK FOR CO TACTLESS SYMBOL 2. TAP OR HOLD 3.COMPLETE SALE
CO TACTLESS SYMBOL

Performing ransactions
CASH ADVANCE (CON AC /CON AC LESS):
TERMI AL DISPLAY OPERATOR ACTIO
Date & Time
Cash Advance
Settlement
Void
Amount:
$ 0.00
Type Cash Advance Amount Press E TER
Cash Advance Yes
Total:
$ 0.00 o
Press F1
Cash Advance
$
Card Entry/Acct #:
Tap or Hold Contactless Card, Fob, Phone
Insert Card (Swipe if no chip)
Cash Advance E GLISH
Select SPA ISH
Language
Press F1 E GLISH
OR
Press F2 SPA ISH
Cash Advance Drvr LIC
Passport
Type of Military ID
ID: Other
Press F1 Drivers License
Cash Advance
Carholder ID:
Enter Drivers License umber with no Letters or Hyphens
Press E TER
Cash Advance
State Code:
Enter Two Letter State Abbreviation
Press Corresponding umbers on key pad and
Use the Alpha button to progress to the correct letters
Press E TER
Cash Advance
ID Exp. Date (MMYY):
Enter Drivers License Expiration Date in MMYY format
Press E TER
Transmitting...Receiving
Remove Card
Remove Card from terminal
Prt Customer Copy?
Press F1 Yes
Press F2 o
8
Press F2 Cash Advance
0.00
OR
Yes
o

CREDI /DEBI CASH ADVANCE (HAND KEYED):
TERMI AL DISPLAY OPERATOR ACTIO
Date & Time
Cash Advance
Settlement
Void
Press F2 Cash Advance
Amount:
$ 0.00
Type Cash Advance Amount Press E TER
Cash Advance Yes
Total:
$ 0.00 o
Press F1 Yes
Cash Advance
$
Card Entry/Acct #:
Type Card umber Press E TER
Cash Advance
Exp Date (MMYY):
Type Expiration Date Press E TER
Cash Advance
Card Present
Press F1 Yes
Press F2 o
Cash Advance
Total:
V-Code
Type CVV2 from back of card Press E TER
Cash Advance
Address:
Type Street # of Address Only Press E TER
Cash Advance
Zip Code:
Type 5 Digit Zip Code Press E TER
Cash Advance Drvr LIC
Passport
Type of Military ID
ID: Other
Press F1 Drivers License
Cash Advance
Carholder ID:
Enter Drivers License umber with no Letters or Hyphens
and Press E TER
Cash Advance
State Code:
Enter Two Letter State Abbreviation
Press Corresponding umbers on key pad and
Use the Alpha button to progress to the correct letters
Press E TER
Cash Advance
ID Exp. Date (MMYY):
Enter Drivers License Expiration Date in MMYY format
Press E TER
Transmitting...Receiving
Approved XXXXXX
o Action While Processing
Cash Advance
Prt Cust Copy?
Press F1 Yes
Press F2 o
9
Yes
o
0.00
Yes
o

AU HORIZA ION REVERSAL:
TERMI AL DISPLAY OPERATOR ACTIO
Date & Time
Cash Advance
Settlement
Void
Press
Cash Adv Force
Reversal
Help
Press F2 Reversal
REVERSAL Full
Partial
Press F2 Full (full amount reversed)
Press F3 Partial (partial amount reversed)
Full/Partial Reversal Inv#
Retrieve By: Amt
Press F1 Inv#
Full/Partial Reversal
Invoice umber:
Enter Invoice umber for Authorization Reversal
Press E TER
Full/Partial Reversal
Inv #: X
VISA
Cash Advance
XXXX
$ 0.00
Transmitting...Receiving
Approved XXXXXX
o Action While Processing
Full/Partial Reversal
Prt Cust Copy?
REPRIN :
TERMI AL DISPLAY OPERATOR ACTIO
Date & Time
Cash Advance
Settlement
Void
Press
REPRI T
Last Receipt
Any Receipt
Press F2 for Last Receipt
Press F3 for Any Receipt
(Follow additional prompts for any receipt)
Reprint Last / AnyRcpt
Print Cust Copy?
10
Yes
o
3
1
Press F1 Yes
Press F2 o
Press F3 ext
Yes
o
ext
Press F1 Yes
Press F2 o
Yes
o
Press F1 Yes
Press F2 o

CASH ADVANCE FORCE: WARNING: Do not use this function without a valid Authorization Code
call Help-Desk for assistance
TERMI AL DISPLAY OPERATOR ACTIO
Date & Time
Cash Advance
Settlement
Void
Press
Cash Adv Force
Reversal
Help
Press F1 Cash Advance Force
Cash Adv Force
Amount:
$ 0.00
Type Cash Advance Amount Press E TER
Cash Advance Force Yes
Total:
$ 0.00 o
Press F1
Cash Advance Force
$
Card Entry/Acct #:
Type Card umber Press E TER
Cash Adv Force
Exp Date (MMYY):
Type Expiration Date Press E TER
Cash Adv Force
Transaction ID:
Enter 15 digit Transaction ID
Given by Authorization Center
Press Enter
Cash Adv Force
Appr Code:
Enter Approval Code
Given by Authorization Center
Press Enter
Cash Advance Drvr LIC
Passport
Type of Military ID
ID: Other
Press F1 Drivers License
Cash Advance
Carholder ID:
Enter Drivers License umber with no Letters or Hyphen
and Press E TER
Cash Advance
State Code:
Enter Two Letter State Abbreviation
Press Corresponding umbers on key pad and
Use the Alpha button to progress to the correct letters
Press Enter
Cash Advance
ID Exp. Date (MMYY):
Enter Drivers License Expiration Date in MMYY format
Press Enter
Transmitting...Receiving
Approved XXXXXX
o Action While Processing
Cash Advance Force
Prt Cust Copy?
Press F1 Yes
Press F2 o
11
1
0.00
Yes
o

REPOR S:
TERMI AL DISPLAY OPERATOR ACTIO
Date & Time
Cash Advance
Settlement
Void
Press Reports
REPORTS
Totals Report
Detail Report
Store Fwd Rpt
Press F1 Totals Report Totals by card type
Press F2 Detail Report All transactions
Press F3 Store Fwd Rpt ot applicable
SE LEMEN : (END OF DAY)
TERMI AL DISPLAY OPERATOR ACTIO
Date & Time
Cash Advance
Settlement
Void
Press F3 Settlement
Settlement
Cash Advance:
Total:
Enter to Confirm
Press E TER
Settlement Response
OK XXX XXX XXXX
Settle Successful
Settlement Report Prints
o Action Required
12
$ 0.00
$ 0.00
4

eller Setup
Accessible through the
Enter Key, the teller
setup feature allows you
to manage ID's and passwords
Add Teller
Log On/Off Teller
Delete Teller
Modify Teller
Clear Teller
Changing the Date & ime Changing the Date & Time
13
Use this function to log on
tellers as their shifts begin,
and log them off at the end
of their shift.
Use this function to add new tellers to
your terminal. You will be prompted to
create an ID and a password for each
new teller. The teller ID may be up to
four digits in length and the password
may be 5-10 digits in length.
Use this function to remove a
single teller from the terminal.
This function is used to modify
tellers.
This function is used to clear
teller totals from the tellers
internal totals file.
Press the Enter key, press F2 Setup.
Type the password 1AA66831 [A=Alpha
Key]. Press the purple key under the
down arrow 5 times, press F2
Date/Time and follow the prompts.
Manager Password: 1AA66831 [A=Alpha Key]

Cash Advance Procedures:
Following cash advance procedures is critically important to the safety of your bank. If all the required steps
are not followed, your bank may be liable for any fraudulent transactions.
1. Cash disbursements may only be made after reviewing a valid identification, generally a driver’s license.
Review the ID to insure that the recipient of the cash is the cardholder. Check the physical description of
the cardholder and compare the signature on the ID to the signature on the card. If there is no signature
on the card, the cardholder must sign the card before receiving a cash advance. The card is not valid
without a signature. If the cardholder refuses to sign the card do not perform a cash advance.
2. Examine the card carefully. Compare the first four digits of the embossed number to the four digits
printed below the number they should be the same. Look for signs of tampering on the card. Always
check the “valid from” and or the “valid thru” dates. If the card or cardholder is suspicious in any way,
call the voice authorization center at 1-844-309-7601 and ask for a Code 10 authorization. You will be
asked a series of yes/no questions to determine if the card is fraudulent. If the embossed number is not
the same as the encoded number or the voice operator instructs you to keep the card, follow these steps
Decline the transaction
▪Attempt to retain the card by reasonable and peaceful means. Do not endanger yourself.
▪ote the physical description of the cardholder.
▪otify Acumen/Police as soon as possible.
▪If all appears normal, follow your terminal reference guide to perform a cash advance.
Cash Advance General Information:
1. You may set a limit of $25.00 minimum to no less than $5000.00 for a cash advance.
2. If you receive a call or call center message when attempting a cash advance, you must call the Voice
Authorization Center for approval. Imprint the card on a cash advance draft write the authorization
number in the authorization box on the draft. Fill out the draft and have the cardholder sign the draft.
Compare signatures then perform the Cash Advance Force instructions located in your cash advance
user guide.
3. o not call the cardholders issuing bank for an approval. You must call the Voice Authorization
Center for an approval.
4. Any card that cannot be read by your terminal must be imprinted on a cash advance draft.
5. If for any reason you void a cash advance, the transaction will not post to the cardholders account. The
outstanding authorization will expire according to payment brand rules (typically within 24 hours. To
attempt a If you would like to have the authorization released please call the help desk with the first six
digits of the card. We will obtain the issuing bank information and attempt to help you in getting the
authorization released. Please keep in mind some banks will not release an authorization for any
reason.
6. Do not forget to perform Force on voice authorized transactions. Failure to do so will result in the bank
not receiving funds for the cash advance.
7. If a cash advance transaction receives a decline, instruct the cardholder to contact their issuing bank.
o not attempt a voice authorization for a declined transaction, it will not be honored.
14

Communication Processing/Error Messages:
MESSAGE EXPLANA ION SOLU ION
AUTH DECLI ED 200-500
Messages
The issuer has declined the authorization
request
Cash advance cannot be completed,
advise cardholder to contact card issuer.
(Call the number on the back of the card).
BAD ACCOU T # Card number does not pass the LUH
check
Retry transaction. If error persists card
may be fraudulent, (call the help-desk).
CARD SWIPE ERROR
ERROR READI G CARD
READ CARD ERR
Card reader detected an error Swipe card again, or manually enter the
card number. If error persists perform a
card reader test.
Press F2 and F4 at the same time. Type
the password then E TER. Press the
down arrow 4 times and select F4. Swipe
the card.
If TRK 1 and/or TRK 2 state “Valid Data”
the mag stripe and card reader are
functioning normally
If TRK 1 and TRK 2 state “ o Data” mag
stripe or card reader is bad.
Swipe another card. If TRK 1 and TRK 2
still state “ o Data” card reader is bad. If
TRK and 1 TRK 2 state “Valid Data”
original cards mag stripe is bad.
EXPIRED CARD The cards expiration date has passed Verify the expiration date. If expiration
date has not passed, verify the terminals
date and time. If incorrect (call the help-
desk).
I VALID ACC T O The last four digits keyed are incorrect or
do not match the account number after
card has been swiped.
Re-key the last four digits. If error
persists card may be fraudulent. (Call the
help-desk)
CARRIER TIME OUT
COMM ERROR
LOST CARRIER
O HOST RESPO SE
Terminal and host lose communication
before issuer response is received.
Authorization request may have been
accepted and approval response sent by
issuer. (Call the help-desk for
instructions).
15

Bank Responsibilities:
1. Swipe or imprint credit card. If your terminal cannot read a card, you must imprint the card on a manual
imprinter and have the cardholder sign the imprinted draft.
2. Maintain a manual imprinter, merchant plate and a supply of cash advance drafts. his is your backup
system.
3. Do not accept a credit card before its valid from date, or after its expiration date, on the card. Do not
accept a credit card that is not signed.
4. Maintain your terminal and printer to insure legible sales draft receipts. Keep copies of credit card
receipts, for a minimum of 18 months. Store receipts in a secure location.
5. Do not store the 3-digit security code (V-Code) with the card number and expiration date.
6. Respond within 7 days to all retrieval requests for a copy of a cash advance draft.
7. Call your voice authorization number and ask for a “code 10” if you are suspicious of a card or
cardholder.
8. Authorizations are good for 7 days only. If you have not submitted authorized transactions within 7 days
you must re-authorize.
Inform Acumen of any of the following:
1. Checking account changes
2. Address change
3. Ownership or Incorporation change
4. Telephone System change
Alternate Authorization:
Should your terminal at any time become inoperable, or if the authorization network is unavailable, follow the
steps below to continue accepting credit/debit cards for cash advance.
1. Should your terminal become inoperable, you must call the Voice Authorization Center at 1-844-309-
7601 to obtain authorization for a transaction. If the card is present, you must make an imprint of the
card using your manual imprinter. When your terminal is repaired or replaced you will need to capture
your voice-authorized transactions, by following the Cash Advance Force instructions located in this
user guide.
These steps are necessary for your protection, and your ability to continue to accept credit cards for cash
advance. You must have and maintain.
1. An Imprinter
2. Sales drafts
3. Proper merchant plate for your imprinter
If you do not have any of these please contact the Help Desk number located on your reference guide.
Refund/Credit a Cash Advance: (Settled ransactions Only)
1. Bank may issue a cashier's check made payable to the cardholder and the issuing bank (one check with
both names on it). Cardholder can then take it to the issuing bank if local for endorsement and
application to their card account, otherwise it must be mailed to the issuer. (Bank should never issue a
check in the cardholders name only).
OR
2. Bank may advise the cardholder to contact their issuer and initiate a chargeback (required in writing and
letter serves as a credit letter, or slip).
16

Address Verification System (AVS) Response Codes:
The Address Verification System (AVS) is a feature that adds fraud protection on card-not-present
transactions. The numeric portion of the customer’s street address and the ZIP code are compared against
the information on file with the card-issuing bank.
Code Description Visa MC Amex Disc
X
Match-Address and 9-digit Zip Code
Y
Match - Address and ZIP code (for Discover,
address only matches)
APartial - Address matches, ZIP code does not (for
Discover, both address and ZIP match)
W
Partial - 9-digit ZIP code matches, address does
not (for Discover, no data from issuer)
Z
Partial - ZIP code matches, address does not
N
o match - either address nor ZIP code match
U
Unavailable - AVS system unavailable or issuer
does not support AVS
R
Retry - Issuer’s system unavailable or timed out
S
ot supported - AVS not supported by issuer at
this time
17

First View Setup: (Access your merchant statement online)
To access your Merchant Statement, Authorization, Settlement, and Chargeback reports for your merchant account, you
must complete setup of the First View online reporting tool. Please follow the below instructions for access to First View.
1. Go to www.firstview.net
2. Enter the User ame for your account
3. Enter the Password
4. Select Login
You will be prompted to enter user setup information including a new user name, password and security questions.
Once complete you will no longer use the below information to login to your First View account.
USER AME PASSWORD
Payment Card Industry Data Security Standards – PCI DSS (What it means to you)
By keeping your systems secure your customers can trust you with their sensitive payment card information.
When you stay compliant with the payment brands security standards you join the global response to fighting
payment card data compromise. Merchants are highly encouraged to visit www.pcisecuritystandards.org to
obtain the latest Requirements and Security Assessment Procedures.
Acumen Connections has partnered with Security Metrics a leading provider of PCI DSS audit and scanning
services. After approval and setup of your merchant account, you will receive an email from Security
Metrics, select the embedded link and establish a password for your account. Follow the prompts to
complete your audit, SAQ and if necessary a network scan. After successfully validating your compliance
you can download a copy of your Attestation of Compliance (AOC) for your records. Validating your
compliance must be performed once a year and you will receive an email notification from Security Metrics
when your due date is near.
Please contact us if you need assistance with completing validation.
18
Other manuals for Vx-520 Series APACS 40
25
Table of contents
Other VeriFone Cash Register manuals