manuals.online logo
Brands
  1. Home
  2. •
  3. Brands
  4. •
  5. Veris
  6. •
  7. Accessories
  8. •
  9. Veris HWL Series Operating and maintenance instructions

Veris HWL Series Operating and maintenance instructions

VERIS INDUSTRIES ™
environmental SenSorS inStallation GUiDe
Z202637-0Y PAGE 1 ©2010 Veris Industries USA 800.354.8556 or +1.503.598.4564 / suppor[email protected] 09101
Alta Labs, Enercept, Enspector, Hawkeye, Trustat, Veris, and the Veris ‘V’ logo are trademarks or registered trademarks of Veris Industries, L.L.C. in the USA and/or other countries.
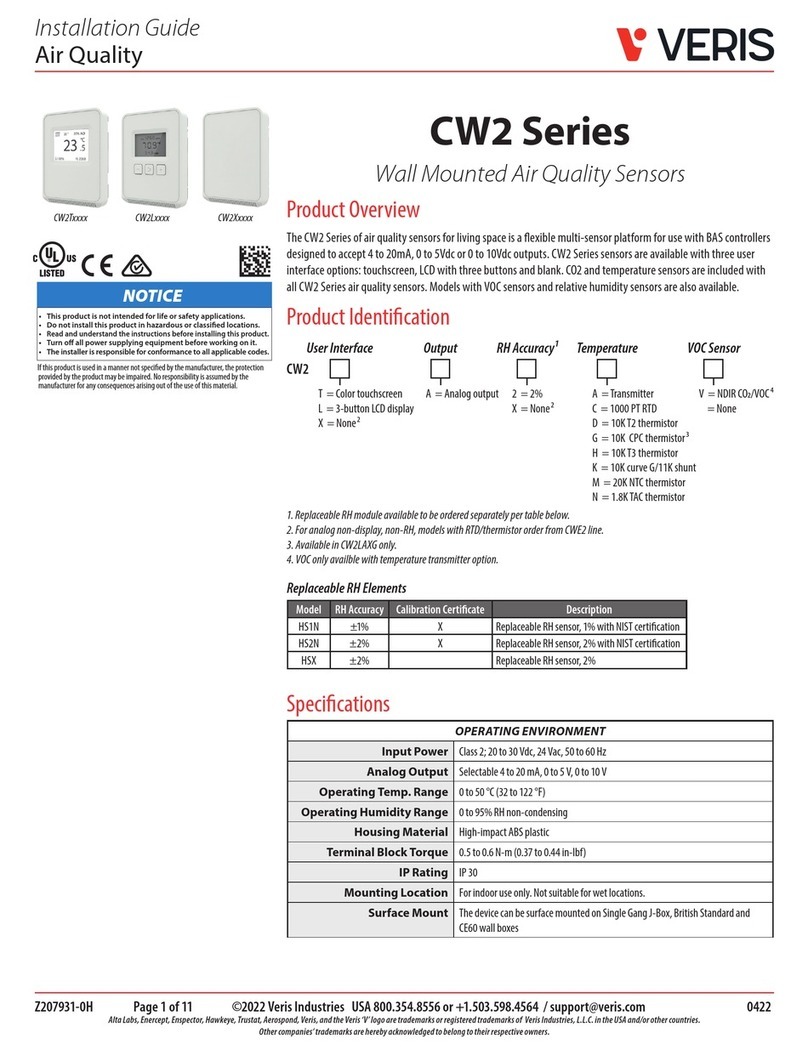
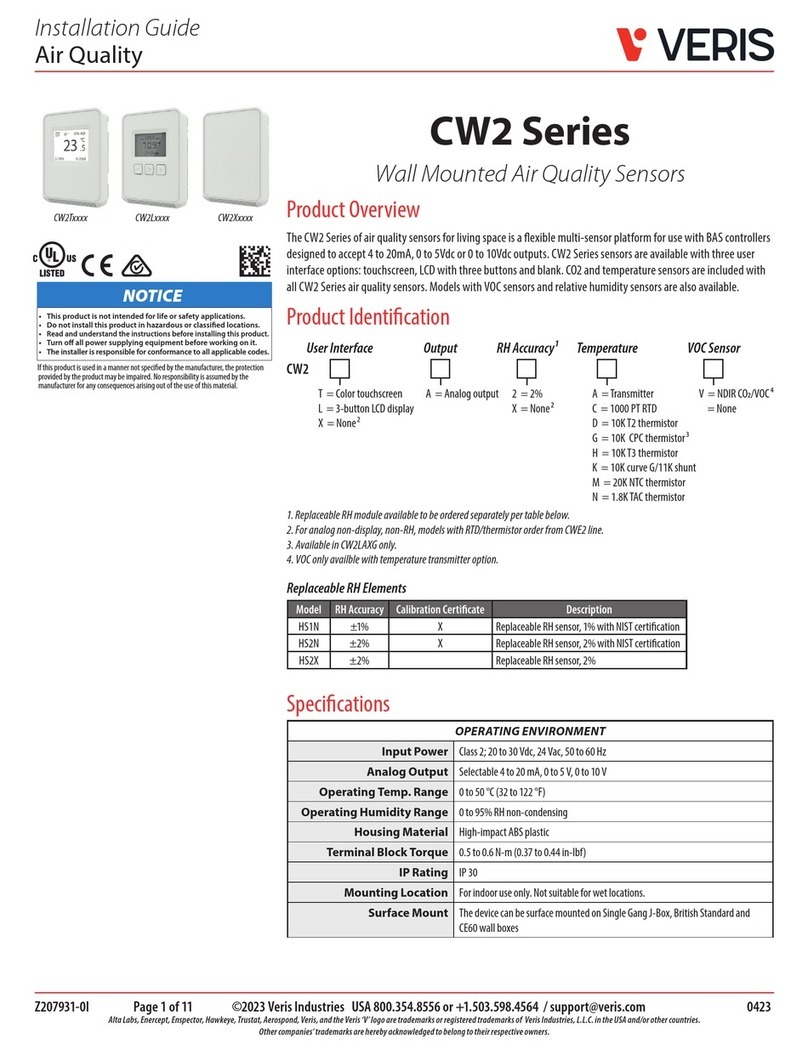
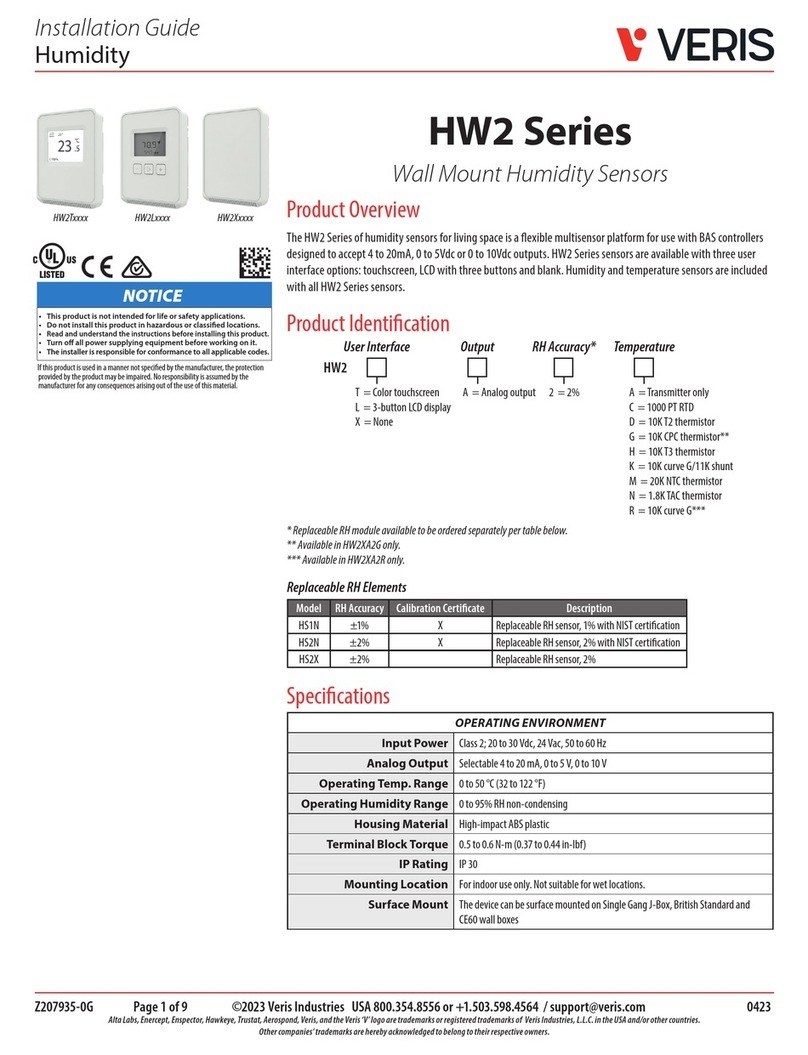
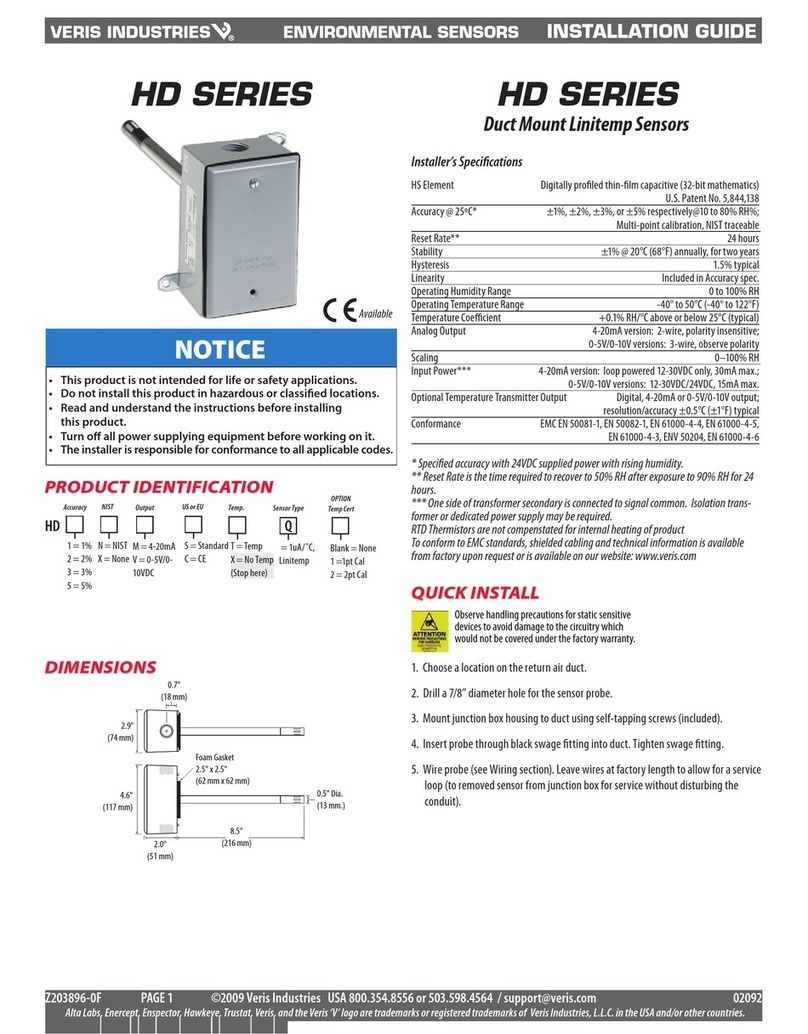
Wall Mount Humidity Sensor
Installer’s Specifications
HS Element Digitally profiled thin-film capacitive (32 bit mathematics)
U.S. Patent 5,844,138
Accuracy at 25°C from 10-80% RH* 2%, 3%, or 5% models;
±1% at 12-60% RH in voltage output mode;
±1% at 12-60% RH in mA output mode with temp. transmitter;
±1% at 20-40% RH in mA output mode
(Multi-point calibration, NIST traceable)
Reset Rate** 24 hours
Stability ±1% @ 20°C (68°F) annually, for two years
Operating Humidity Range 0 to 100% RH (non-condensing)
Hysteresis 1.5% typical
Linearity Included in Accuracy spec.
Temperature Coefficient ±0.1% RH/°C above or below 25°C (typical)
Analog Output 4-20mA version: 2-wire, polarity insensitive, (clipped and capped)
0-5V/0-10V versions: 3-wire, observe polarity
Scaling 0-100% RH
Operating Temperature Range 10° to 35°C (50° to 95°F)
Input Power*** 4-20mA version: loop powered 12-30VDC only, 30mA max.
0-5V/0-10V versions: 12-30VDC/24VAC, 15mA max.
Optional Temperature Transmitter Output Digital, 4-20mA, (clipped and capped) or
0-5V/0-10V output; accuracy ±0.5°C (±1°F) typical
EMC Conformance – CE Option EN 50081-1, EN 50082-1, EN 61000-4-4, EN 61000-4-5, EN
61000-4-3, ENV 50204, EN 61000-4-6
*Specified accuracy with 24VDC supplied power with rising humidity. RTD/Thermistors are not
compensated for internal heating of product.
**Reset Rate is the time required to recover to 50% RH after exposure to 90% RH for 24 hours.
***One side of transformer secondary is connected to signal common, so an Isolation transformer
or dedicated power supply may be required.
Shielded cabling is required for conformance to EMC standards. Technical information is available
from factory upon request or is available on our website: www.veris.com
HWL SerieS HWL SerieS
NOTICE
• This product is not intended for life or safety applications.
• Do not install this product in hazardous or classified locations.
• Read and understand the instructions before installing
this product.
• Turn off all power supplying equipment before working on it.
• The installer is responsible for conformance to all applicable codes.
Available
Dimensions
quick install
Select a mounting location away from ventilation sources. The sensor should be1.
mounted on a vertical wall, about 4 ½ feet above the floor.
Affix the backplate to the wall.2.
Wire the device. Refer to wiring diagram.3.
Install Cover.4.
3.5"
(89 mm)
4.8"
(122 mm)
1.2"
(30 mm)

VERIS INDUSTRIES ™
inStallation GUiDe
HWl SerieS
Z202637-0Y PAGE 2 ©2010 Veris Industries USA 800.354.8556 or +1.503.598.4564 / suppor[email protected] 09101
Alta Labs, Enercept, Enspector, Hawkeye, Trustat, Veris, and the Veris ‘V’ logo are trademarks or registered trademarks of Veris Industries, L.L.C. in the USA and/or other countries.
1. Remove the cover by pressing the tab at the top of the sensor while pulling
outward from the top of the cover.
3. Punch out openings in the backplate.
installation
2. Remove the backplate by unfastening the sensor from the bottom of the backplate
and pivoting the sensor outward.
correct incorrect
4. Position the sensor vertically on the wall, 4 ½ feet above the floor.
ProDuct iDentification
* In order for unit to display both temp and RH, use the
TA or D temp selection.
Temp displayed on LCD is read from temperature
transmitter, not resistive element.
NIST US or EU Temp. Sensor TypeDisplay Accuracy
S = Standard
C = CE
A = Transmitter: 10° - 35°C (50°
- 95°F and 0° - 50°C (32° - 122°F)
(switchable)
B = 100R Platinum, RTD
C = 1k Platinum, RTD
D = 10k T2, Thermistor
E = 2.2k, Thermistor
F = 3k, Thermistor
G = 10k CPC, Thermistor
H = 10k T3, Thermistor
J = 10k Dale, Thermistor
K = 10k with 11k shunt, Thermistor
M = 20k NTC, Thermistor
N = 1800 ohm TAC, Thermistor
Q = 1uA/C, Linitemp
R = 10k US, Thermistor
S = 10k 3A 221
T = 100k, Thermistor
U = 20k “D”, Thermistor
1 = 1%
2 = 2%
3 = 3%
5 = 5%
= No
HW Temp Cal Cert Option Value
A = 1k
F = 10k
G = 20k
K = 50k
M =100k
Options Available
X = No Cert
1 = 1pt Cal
2 = 2pt Cal
1 = Push Button Override
2 = Set Point Slider
3 = Push Button Override
and Set Point Slider
T = Temp*
X = No Temp
(Stop here)
N = NIST
(1% and 2% only)
X = No
(2%, 3%, and 5% only)
X
NIST US or EU Temp. Sensor TypeDisplay Accuracy
S = Standard
C = CE
None = Select for TA temp option only
B = 100R Platinum, RTD
C = 1k Platinum, RTD
D = 10k T2, Thermistor
E = 2.2k, Thermistor
F = 3k, Thermistor
G = 10k CPC, Thermistor
H = 10k T3, Thermistor
J = 10k Dale, Thermistor
K = 10k with 11k shunt, Thermistor
M = 20k NTC, Thermistor
N = 1800 ohm TAC, Thermistor
Q = 1uA/C, Linitemp
R = 10k US, Thermistor
S = 10k 3A 221
T = 100k, Thermistor
U = 20k “D”, Thermistor
1 = 1%
2 = 2%
3 = 3%
5 = 5%
= LCD
HW
N = NIST
(1% and 2% only)
X = No
(2%, 3%, and 5% only)
T = Temp*
TA = Transmitter
only
D = Transmitter
and resistive
element
X = No Temp
(Stop here)
LTemp Cal Cert Option Value
A = 1k
F = 10k
G = 20k
K = 50k
M =100k
Options Available
X = No Cert
1 = 1pt Cal
2 = 2pt Cal
1 = Push Button Override
2 = Set Point Slider
3 = Push Button Override
and Set Point Slider
VERIS INDUSTRIES ™
inStallation GUiDe
HWl SerieS
Z202637-0Y PAGE 3 ©2010 Veris Industries USA 800.354.8556 or +1.503.598.4564 / suppor[email protected] 09101
Alta Labs, Enercept, Enspector, Hawkeye, Trustat, Veris, and the Veris ‘V’ logo are trademarks or registered trademarks of Veris Industries, L.L.C. in the USA and/or other countries.
7. Install and configure the sensor.
8. Install the cover and snap into place.
VOLTS
OUTPUT SELECT
mA
RH OUT
10V 5V 10V 5V
50/95 32/122 CF
T OUT
T RANGE T SCALE
WARNING: Output select must be
correct before applying power.
RH
SENSOR
TEMP
SENSOR
VOLT S
OUTPUT SELECT
mA
RH OUT
10v 5v 10v 5v
50/95 32/122 ºCºF
T OUT
T RANGE T SCALE
6. Wire the backplate.
POWER SOURCE
15 to 30VDC or 24 VAC
DIGITAL CONTROL
RH Return
Temp Return
Thermistor/RTD Override
Setpoint Slider
-
-
-
+
RTD/Thermistor
RTD/Thermistor
Temp Transmitter OUT (4-20mA RTN)
Slider Right
Slider Wiper
Slider Left
RH OUT (4-20mA RTN)
POWER SOURCE
15 to 30VDC or 24 VAC
DIGITAL CONTROL
RH IN (0-10V)
Temp IN (0-10V)
Thermistor/RTD Override
Setpoint Slider
-
-
-
+
GND
RTD/Thermistor
RTD/Thermistor
Temp OUT
Slider Right
Slider Wiper
Slider Left
RH OUT
Current Output (2 wire, 4-20mA)
Voltage Output (3 wire, 0-10V)
5. Mount the backplate onto the wall using the screws provided.
Five screwholes available; use a mini-
mum of two for secure mounting.

Other Veris Accessories manuals

Veris CWV2 User manual

Veris

Veris CWV2 User manual

Veris CWE2 Series User manual

Veris

Veris CWE2 Series User manual

Veris HAWKEYE 708 User manual

Veris

Veris HAWKEYE 708 User manual

Veris TW Series User manual

Veris

Veris TW Series User manual

Veris CW2T User manual

Veris

Veris CW2T User manual

Veris HW2T Series User manual

Veris

Veris HW2T Series User manual

Veris CW2LA2A User manual

Veris

Veris CW2LA2A User manual

Veris HD series User manual

Veris

Veris HD series User manual

Veris CW2 Series User manual

Veris

Veris CW2 Series User manual

Veris HW2 Series User manual

Veris

Veris HW2 Series User manual

Veris TW2 Protocol Series User manual

Veris

Veris TW2 Protocol Series User manual

Veris CW2 Series User manual

Veris

Veris CW2 Series User manual

Veris MSCD2000D User manual

Veris

Veris MSCD2000D User manual

Popular Accessories manuals by other brands

goliath TR-12-P21-B instruction manual

goliath

goliath TR-12-P21-B instruction manual

RELAXUS 517211 user manual

RELAXUS

RELAXUS 517211 user manual

GB Future perfect Rain cover Short instructions

GB

GB Future perfect Rain cover Short instructions

NuAire 5 Series Operation and maintenance manual

NuAire

NuAire 5 Series Operation and maintenance manual

MC3 CDLR Operation and maintenance manual

MC3

MC3 CDLR Operation and maintenance manual

Bticino 393017D quick start guide

Bticino

Bticino 393017D quick start guide

Propel Trampolines Jump-N-Jam user manual

Propel Trampolines

Propel Trampolines Jump-N-Jam user manual

Swann HOME Series instruction manual

Swann

Swann HOME Series instruction manual

EVGA GeForce GTX 580 FTW Hydro Copper 2 installation guide

EVGA

EVGA GeForce GTX 580 FTW Hydro Copper 2 installation guide

Philips DLP6100V user manual

Philips

Philips DLP6100V user manual

Waterpik Water Flosser WF-06 quick start guide

Waterpik

Waterpik Water Flosser WF-06 quick start guide

Schulte EVOline Customer's operating and assembly instructions

Schulte

Schulte EVOline Customer's operating and assembly instructions

Stiga 79-2500-01 Assemble, instruction manual

Stiga

Stiga 79-2500-01 Assemble, instruction manual

TJERNLUND 950-0685 SS1 DRIP DEFLECTOR KIT 8504065 REV... installation instructions

TJERNLUND

TJERNLUND 950-0685 SS1 DRIP DEFLECTOR KIT 8504065 REV... installation instructions

Auzone Pro-Sensor manual

Auzone

Auzone Pro-Sensor manual

Omron ZFV-A25-04 user manual

Omron

Omron ZFV-A25-04 user manual

ROSE DISPLAYS ECONOSTAND WITH ANOMULTI instruction sheet

ROSE DISPLAYS

ROSE DISPLAYS ECONOSTAND WITH ANOMULTI instruction sheet

Carefree MIRAGE installation manual

Carefree

Carefree MIRAGE installation manual

manuals.online logo
manuals.online logoBrands
  • About & Mission
  • Contact us
  • Privacy Policy
  • Terms and Conditions

Copyright 2025 Manuals.Online. All Rights Reserved.