manuals.online logo
Brands
  1. Home
  2. •
  3. Brands
  4. •
  5. VEVOR
  6. •
  7. Commercial Food Equipment
  8. •
  9. VEVOR S16-XV1 User manual

VEVOR S16-XV1 User manual

Other VEVOR Commercial Food Equipment manuals

VEVOR JKH-100 User manual

VEVOR

VEVOR JKH-100 User manual

VEVOR SJ-TLI User manual

VEVOR

VEVOR SJ-TLI User manual

VEVOR XRJF-21 User manual

VEVOR

VEVOR XRJF-21 User manual

VEVOR S1C-242413 User manual

VEVOR

VEVOR S1C-242413 User manual

VEVOR KSR-27B1 User manual

VEVOR

VEVOR KSR-27B1 User manual

VEVOR JKH100130150 User manual

VEVOR

VEVOR JKH100130150 User manual

VEVOR M110 User manual

VEVOR

VEVOR M110 User manual

VEVOR FP23 User manual

VEVOR

VEVOR FP23 User manual

VEVOR TK-12MT User manual

VEVOR

VEVOR TK-12MT User manual

Popular Commercial Food Equipment manuals by other brands

Costco 5P-08WT manual

Costco

Costco 5P-08WT manual

Beper BT.651Y manual

Beper

Beper BT.651Y manual

Blue Seal EF30 Installation & operation manual

Blue Seal

Blue Seal EF30 Installation & operation manual

Tecfrigo Snelle 400 GS installation instructions

Tecfrigo

Tecfrigo Snelle 400 GS installation instructions

Follett PFT Series Operation and maintenance manual

Follett

Follett PFT Series Operation and maintenance manual

MEFE CAT 206 PTR User manual and maintenance

MEFE

MEFE CAT 206 PTR User manual and maintenance

Diamond AL1TB/H2-R2 Installation, Operating and Maintenance Instruction

Diamond

Diamond AL1TB/H2-R2 Installation, Operating and Maintenance Instruction

Salva IVERPAN FC-18 User instructions

Salva

Salva IVERPAN FC-18 User instructions

Allure Melanger JR6t Operator's manual

Allure

Allure Melanger JR6t Operator's manual

saro FKT 935 operating instructions

saro

saro FKT 935 operating instructions

Hussmann Rear Roll-in Dairy Installation & operation manual

Hussmann

Hussmann Rear Roll-in Dairy Installation & operation manual

Cornelius IDC PRO 255 Service manual

Cornelius

Cornelius IDC PRO 255 Service manual

Moduline HSH E Series Service manual

Moduline

Moduline HSH E Series Service manual

MINERVA OMEGA DERBY 270 operating instructions

MINERVA OMEGA

MINERVA OMEGA DERBY 270 operating instructions

Diamond OPTIMA 700 Installation, use and maintenance instructions

Diamond

Diamond OPTIMA 700 Installation, use and maintenance instructions

Diamond G9/PLCA4 operating instructions

Diamond

Diamond G9/PLCA4 operating instructions

Cuppone BERNINI BRN 280 Installation

Cuppone

Cuppone BERNINI BRN 280 Installation

Arneg Atlanta Direction for Installation and Use

Arneg

Arneg Atlanta Direction for Installation and Use

manuals.online logo
manuals.online logoBrands
  • About & Mission
  • Contact us
  • Privacy Policy
  • Terms and Conditions

Copyright 2025 Manuals.Online. All Rights Reserved.

Operating Instruction
Please read this instruction carefully before use
CONTENES
Machineconstruction..........................................................1
ⅡSafetyattention.....................................................................2
ⅢWorkcondition.........................................................................2
ⅣInstallation................................................................................2
ⅤOperatinginstruction............................................................3
ⅥMaintenance............................................................................5
ⅦSpecificationandelectricaldiagram............................8
1
Machine Construction
Single Cylinder Series
No. Name No. Name No. Name
1 Drip dray 10 Beater 19 Evaporetor
2 Grate for drip tray 11 Beater cover 20 Machine base
3 Operation mask 12 Cover 21 Condenser
4 Front panel 13 Motoreductor 22 wire
5 Expect nib 14 Inner cover 23 Fan
6 O-Ring 15 Bush for motoreductor 24 Back panel
7 Tap 16 Rear agitator 25 Side panel
8 Spring 17 Tank 26 Compressor
9 handle 18 Tank gasket 27 Motoreductor
25
28
1
2
3
4
27 26
24
22
23
20
19
18
17
16
15
14
13
12
21
5
6
7
8
10
9
11
I
2
Safety attention
Do not touch the machine with wet hands and do not ever insert any part of
your body into any part of the machine while it is plugged in or operating, as
serious injury may occur.
Do not wear loose fitting clothing when operating the machine, as serious in
jury may occur.
Do not operate the machine in a wet or damp environment, as electric shock
may occur.
Do not open the top of the machine with the machine running, as the moving
parts may cause harm to you.
Do not use the equipment barefoot.
Do not permit incapable person or children to operate the machine.
Do not leave the equipment outdoors or otherwise exposed to the inclement
or wet weather.
Do not operate the machine with water water or other mix that does not have
the appropriate sugar content for slush, as damage to the machine may occur.
Do not operate the machine if the machine has been dropped or otherwise
damaged in any way. Contact your local service center before using the
machine again.
Do not open any of the side, front, or back panels of the machine, as electric
shock may occur, and you will void the warranty on the machine.
Work condition
1! ambient temperature 5~35 !
2! ambient humidity less than 90%
3! mixing temperature less than 35 !
4! voltage range 220V" 10% 115V" 10%
5! Hz 50" 1Hz 60" 1Hz
Installation
Remove the machine from the packing and check for any visible signs of damage
II
III
IV
3
that may have occurred during the shipping .Remove the protective coverings
(plastic bags, etc.) and insure that they are stored out of the reach of children. The
equipment must never be lifted by the tank or plastic components when being
moved, and improper handling may damage near the machine .Always lift the
machine by the bottom of the machine near the legs and hold the machine on both
sides when lifting and carrying.
Prior to operating the machine, check that the power supply is adequately
grounded, as required by law ,and corresponds to the power specifications printed
on the label equipment located on the inside panel of the machine or as printed in
this manual. Plug the machine either directly into an outlet or into a single
approved extension cord of not more than 10 feet long. Do not use multiple power
adapters or extension cords, as they may damage the machine and void the
warranty.
If you are in any way unsure about the power supply or the power
requirements of the machine, have the machine and the power supply
inspected by a qualified technician prior to using the machine.
The manufacturer and all distributors are not responsible damage to the machine,
property, or the operators resulting from
improperly connecting or installing the
machine. Also before operating the
equipment, clean the machine as directed in
the Cleaning # Maintenance section.
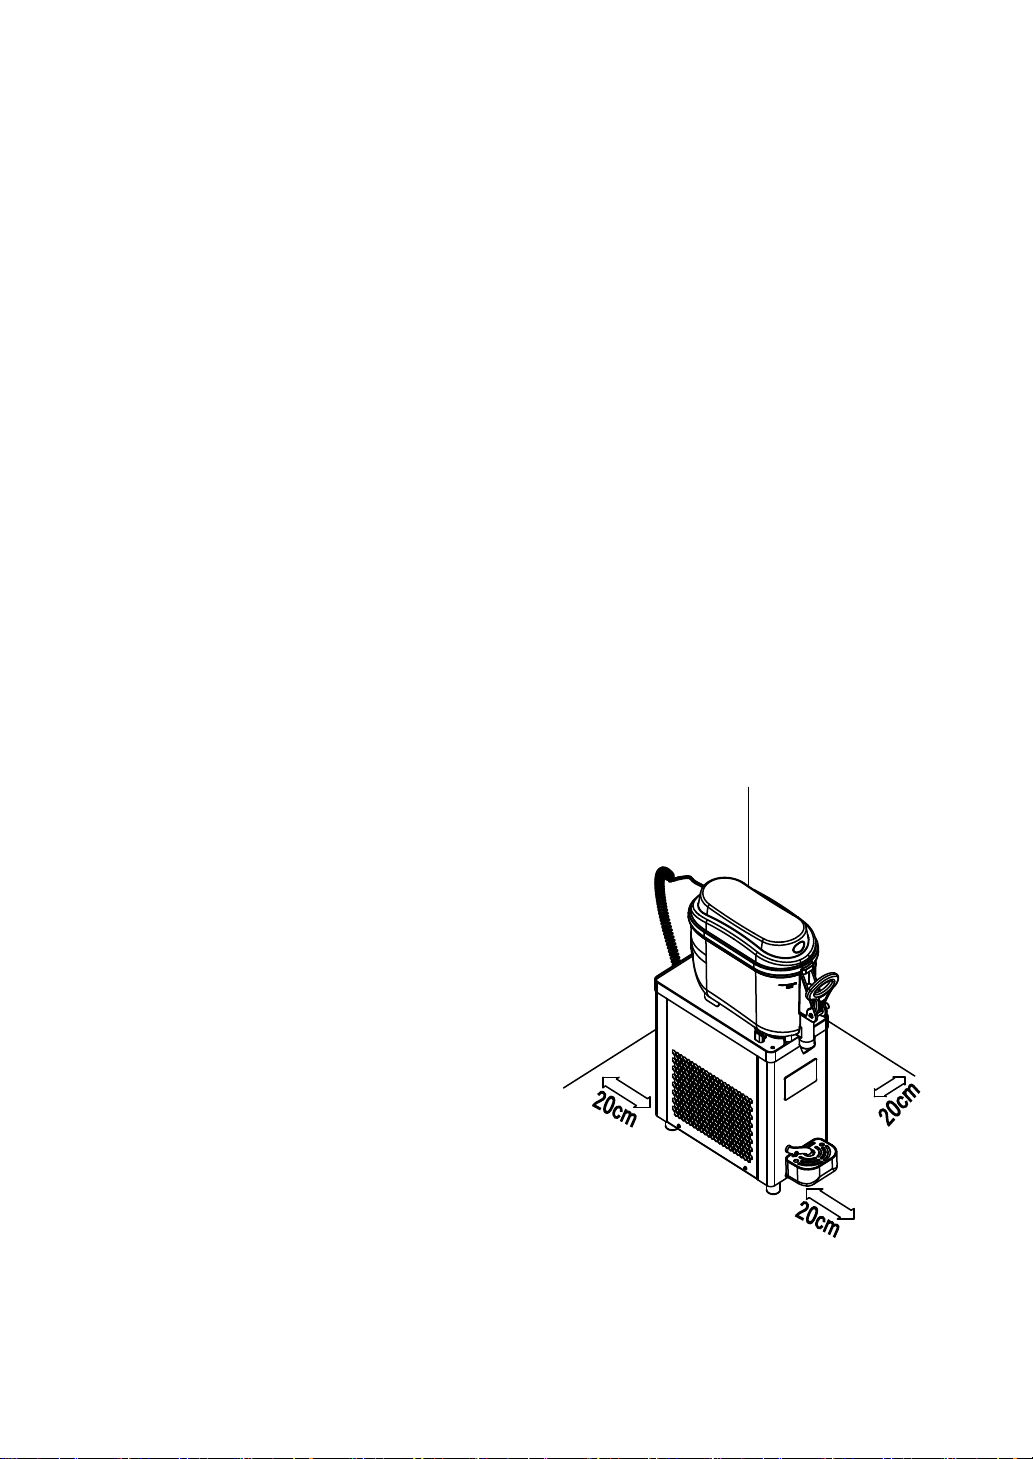
$Install the equipment away from heat
sources and leave sufficient space around
the machine to ensure adequate cooling by
air circulation. There should be at least
20cm inches of open air on each side of the
machine
Operating instruction
Before filling the tank, carefully clean and rinse all surfaces that will be exposed
20cm
20cm 20cm
V
4
tothedrink.Fillthetankswithmix,butnomorethanuptothemaximumlevel,and
replacethecovertopcoveronthebowl
WARNING
:
theequipmentisnotdesignedforsugar-freeliquids.Ifyouusea
naturaljuiceormixproduct,thenthesugarcontentmustbebetween15%and
25%.Ifyouuseacommercialfrozendrinkmixesfollowthemanufacturer s
instructions.
1、Setgearparameters
Pressandholdthe"SETkey"for2
secondstoenterthegearparameter
settingstate.Atthistime,clickthe
"SETkey"toswitchgears(range1~
10). After 5 seconds without
operating the key, exit and
automaticallysavethesetvalue.
2、Setfactoryparameters
Inthegearsettingstate,pressandholdthe"settingkey"for5secondstoenterthe
factoryparametersettingstate.Atthistime,pressthesettingkeytochangethesetting
object,pressthe"pluskey"tochangethevalue,anddonotoperatethekeyfor10
seconds,exitandautomaticallysavethesettingvalue.
CODE PARAMETERS NOTE
F0 50 rpmGearratio
F1 1100 rpmAmplitudeofalarmspeed
F2 3 pointsSolenoidvalveprotectiontime
3、Faultdisplay:
NLisdisplayedwhenthemotorspeedistoolow,and"-"isdisplayedwhenthemotor
islocked
5
WARNING: before to attempting and cleaning or maintenance, turn off the machine
and remove the power plug from the power outlet. Pull the power outlet. Pull the
power plug and not the wire cable It s imperative that machine components having
direct contact with the products are cleaned thoroughly. Carry out cleaning as per the
illustrations.
4"Online speed measurement:
In the cleaning state, long press the cleaning key for 5 seconds to enter the online
speed measurement mode. At this time, all indicator lights flash and prompt, and the
screen displays the current motor speed. After 20 seconds, the speed measurement
ends. If the speed measurement is successful, the screen displays the word end, and
the refrigeration light flashes and prompts for 3 seconds. If the speed measurement
fails, the screen displays the word err, and the fault light flashes for 3 seconds.
5"View real-time speed:
Jog the setting key to display the real-time speed value on the screen.
VI Maintenance
Remove the covers before,
Fig.1
6
Empty the tanks;
Fill the tanks with tepid water to remove the
product;
Residue and rinse outTo remove the paddle,
turn it counter clockwise and after pull it as
in the picture. (Fig.2)
To remove the tank, pull it as in
the picture. (Fig.3)
In some cases, during the get off
of the tank, the tank gasket it
can remain on the cylindric
evaporator, in this case remove
as in picture (Fig.3) take care
for not to
Fig.3
Fig.2
7
To clean the dispensing nozzle:
Remove the lever safety plug pull
in it indicate direction
Remove the lever as in
picture(Fig.4)
Remove the lever it will be
possible to extract tap and the
spring
To reassemble the tank, is necessary to the tank gasket. The gasket may be
installed on the bottom of the bowl or on the evaporator. (Fig.5)
Fig.4
Fig.5
8
Every30daysthedustthataccumulatedonthecondensershouldbe
removed/cleaned.Toremovethedust,unplugthemachine,removetherightpanel,
andvacuumorlightlydistthecondensertoremovethedust.Reinstallthepanel
beforeoperatingorplugginginthemachine.
ⅦSpecificationandelectricaldiagram
★findthespecificationinthenameplate
★findtheelectricaldiagraminthesidepanel
PCB PrintedCircuitBoard
BT Transformer
YJ Compressor
MF FanMotor
M1 DCMotoreductor
M2 ACMotoreductor
KM RelayContact
SO Sensor