VEVOR C#8 User manual

Support and E-Warranty Certificate www.vevor.com/support
MANUAL MEAT GRINDER
INSTRUCTION MANUAL
We continue to be committed to provide you tools with competitive price.
"Save Half", "Half Price" or any other similar expressions used by us only represents an
estimate of savings you might benefit from buying certain tools with us compared to the major
top brands and doses not necessarily mean to cover all categories of tools offered by us. You
are kindly reminded to verify carefully when you are placing an order with us if you are
actually saving half in comparison with the top major brands.


- 1 -
MODEL:
C#8 S#8 S#10 S#12
Have product questions? Need technical support? Please feel free to
contact us:
CustomerService@vevor.com
NEED HELP? CONTACT US!
This is the original instruction, please read all manual instructions
carefully before operating. VEVOR reserves a clear interpretation of our
user manual. The appearance of the product shall be subject to the
product you received. Please forgive us that we won't inform you again if
there are any technology or software updates on our product.
MANUAL MEAT GRINDER

- 2 -
This manual covers a variety of specifications, please users according to
the actual corresponding product description and use.
IMPORTANT ASSURANCE
WARNING: Before operating this device, please read this instruction
manual completely and keep it handy for future reference. Always follow
basic safety precautions when using these devices. These include:
1.Do not allow children younger than 14 years old to use the machine. This
product may only be used or maintained by children 14 years of age or older,
individuals with reduced physical, sensory, or mental capacities, or unskilled
individuals with adequate adult supervision. Children must not play with the
device.
2.For optimal operation and service life of the device, please follow the
instructions.
3.Food acids will corrode the metal. Always clean this food preparation
equipment immediately after every use. To maintain the appearance and increase
the service life, clean it daily.
4.The use of accessories or modifications not provided by the manufacturer may
cause hazards. This product must only be used for its intended purpose and in
the manner indicated in the instructions. All other types of use shall be
considered inappropriate and hazardous. The manufacturer shall not be
responsible for any improper or incorrect use and installation damage.
5.Don't put the meat into the feed inlet with your hands. Press down with the stick.
SAVE THESE INSTRUCTIONS
SCHEMATIC DIAGRAM&CONFIGURATION
This diagram applies to :C#8 ,S#10 S#12

- 3 -
This diagram applies to :S#8
Other Accessories:
Sausage Tubes
Cookie Attachment
Grinding Head
Push Rod
Brush
Plate Cutter
*The fittings and configuration of each model may be different, in-kind shall
prevail.
CONFIGURATION:
Model
Caliber
Material
Accessories
C#8
#8
Body:Cast iron
Spindle:Cast iron
Knife:Steel
Plate Cutter:Steel
Screw Ring:Cast iron
Sausage Tubes:Plastic
Plate Cutter*(1+1)
Sausage Tubes*3
Push Rod*1

- 4 -
S#8
#8
Body:Stainless steel
Spindle:Stainless steel
Knife:Stainless steel
Plate Cutter:Stainless steel
Screw Ring:Stainless steel
Sausage Tubes:Stainless steel
Plate Cutter*(1+1)
Sausage Tubes*1
Push Rod*1 Brush *1
Cookie Attachment*1
Grinding Head*1
S#10
#10
Plate Cutter*(1+1)
Sausage Tubes*1
Push Rod*1 Brush *1
S#12
#12
Plate Cutter*(1+1)
Sausage Tubes*1
Push Rod*1 Brush *1
Cookie Attachment*1
OPERATION INSTRUCTIONS
Installation (C#8 S#10 S#12)
Clip the machine along the table's edge (the maximum thickness is not more than
5 cm), and tighten the fixing screw at the bottom so the machine can clamp the
table and fix it firmly.
●.Assemble the worm, crossed knife, plate cutter and nut in sequence:
1.A crossed knife has a blade that faces outwards.
2.Make the groove of the plate cutter and the protruding part of the body coincide.
3.Don't tighten the nut too tightly.
4.Install handle, handle outwards, aim at the end slot of the worm
Installation (S#8)
●Suction cup type fixation and steel clip type fixation two ways:

- 5 -
1.Place the meat grinder near the table's edge, press down the sucker wrench,
and stick the meat grinder tightly to the table.
2.Use a steel clip to tighten the steel clip set screws on the body and bottom so
that the machine can clamp the table fixed firmly.
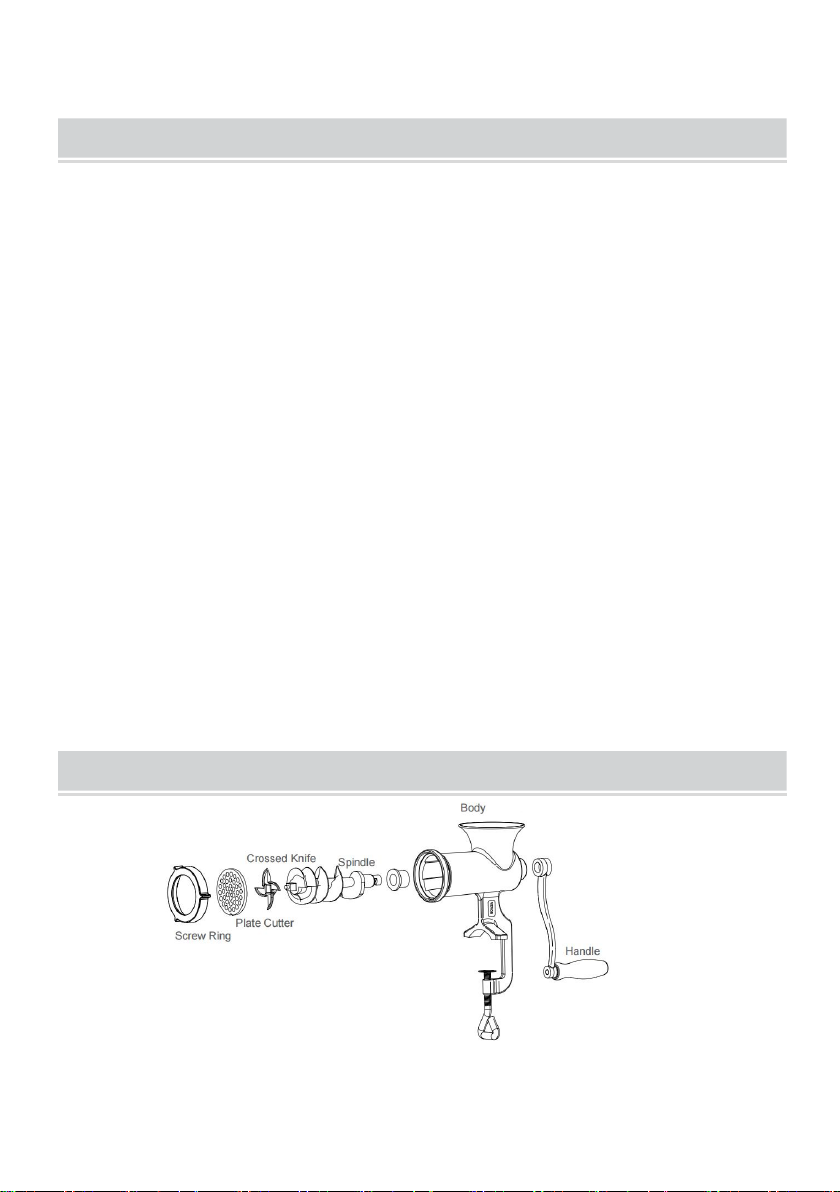
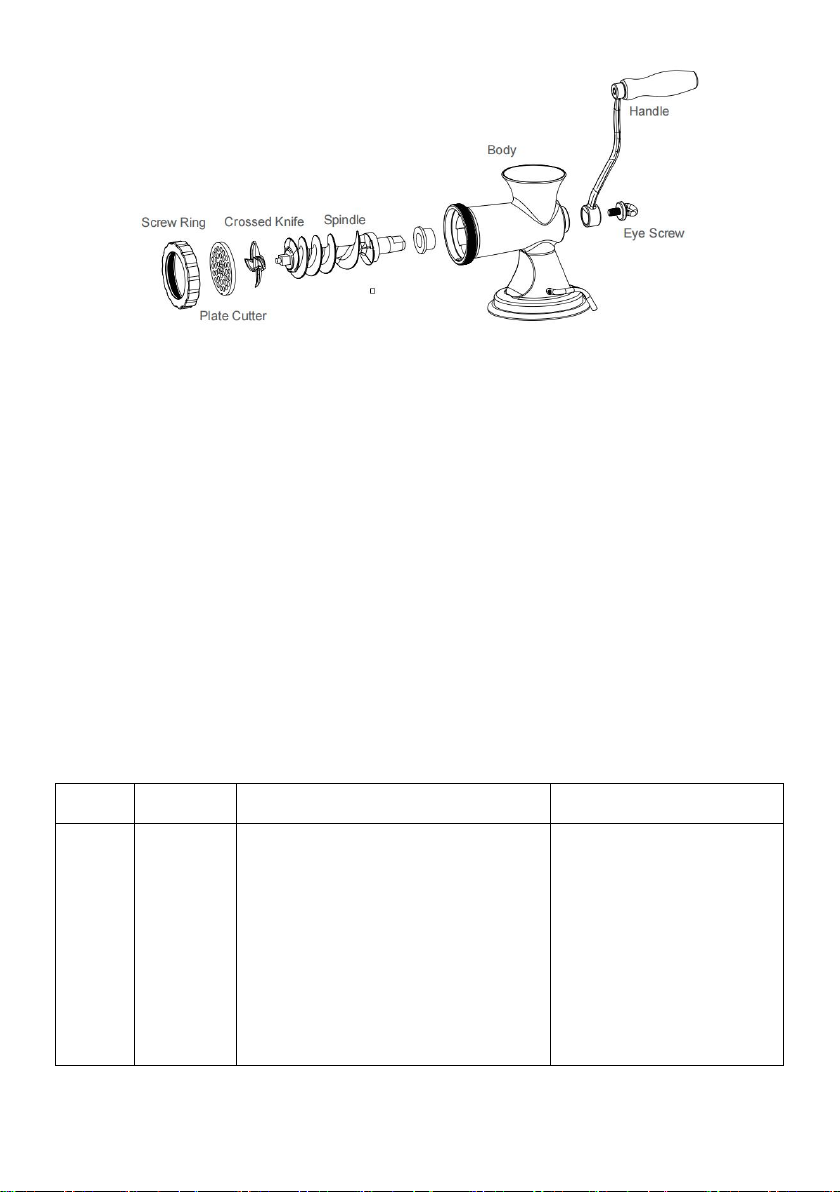
●Assemble the worm, crossed knife, plate cutter and nut in sequence:
1.A crossed knife has a blade that faces outwards.
2.Make the groove of the plate cutter and the protruding part of the body coincide.
3.Don't tighten the nut too tightly.
4.Install the handle, handle outwards, and aim at the end slot of the worm.
Ground meat
●First, wash the meat grinder with detergent and hot water because the machine
was smeared with oil during production.(Meat works better when refrigerated;
remove skin, tendons, and bones before mincing meat. Then Cut the meat into
long strips(about 2cm wide), add meat step by step from the inlet, turn the handle
clockwise, and mince the meat.
●If the meat grinder appears jam fault or handles rotation difficulty, turn the
handle counterclockwise to clear the blockage, loosen the nut, and remove the
meat plate and blade for cleaning.
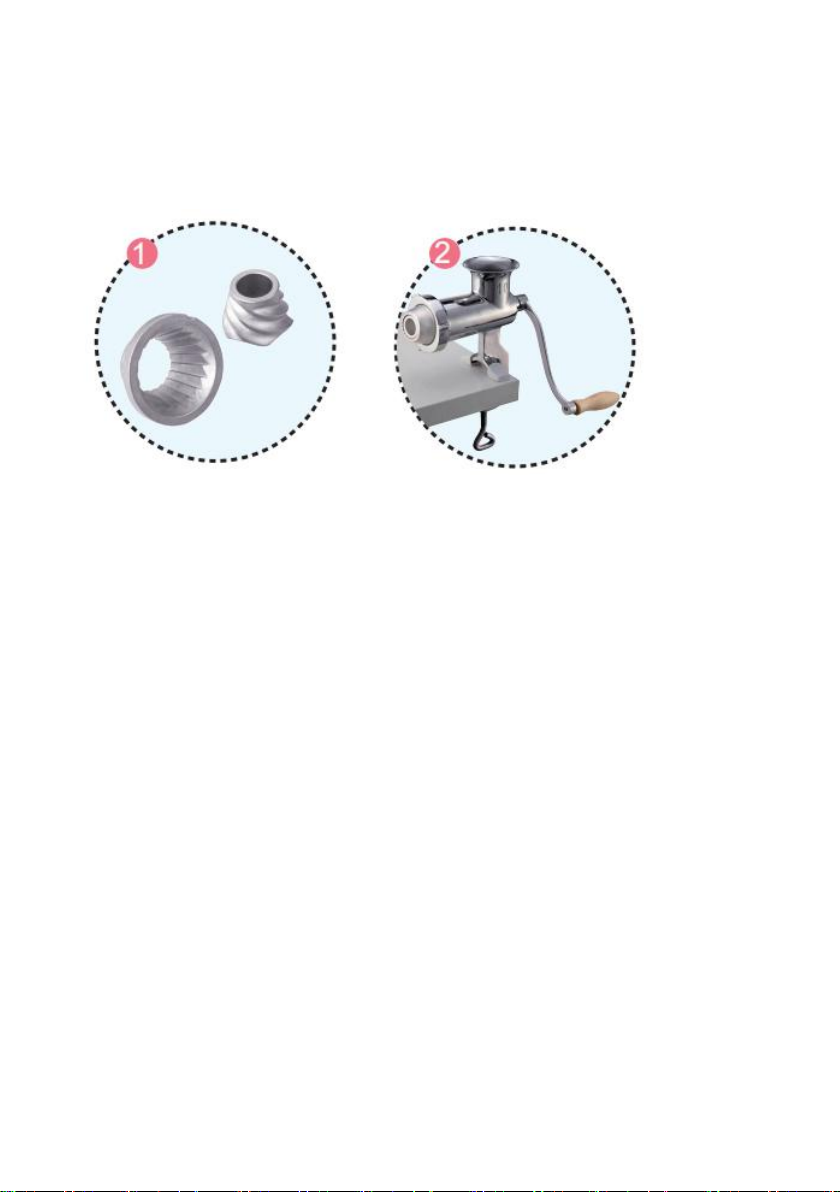
Sausage making
1.Remove the Crossed Knife and Plate Cutter, Install the Sausage Tubes, and
put the casings over them.
2.To pickle the minced meat with condiments for 1 to 2 hours.
3.Take the salted prepared food in the inlet,turn the handle clockwise.

- 6 -
4.Tie the sausage with cotton thread every 10cm.
Grinding
1. Remove the Crossed Knife and Plate Cutter, Install the Grinding Head.
2. Take the food such as Coffee Beans in the inlet,turn the handle clockwise.
Cookies making
1.Remove the Crossed Knife and Plate Cutter, Install the cookie Attachment.
2.Take the Dough in the inlet,turn the handle clockwise.
Scope of application
●Pork, beef, mutton, chicken and other meat.(Beef or mutton have tendons must
be freezing before mincing them.)
●Spiny fish, chicken skeleton and duck skeleton will be ok. The solid fish spine will
be harder to mince.
●Pepper, radish, mushroom, garlic, celery, etc., can be mixed with minced meat.
●Shelled walnuts, peanuts, beans, nuts, etc.
Do not mince the following foods
● A soft food that is hard to cut off, such as the skin and sinews etc.
● Pig bones and other hard bones.
● If you wish to try other unlisted foods, you must bear the loss caused.

- 7 -
TROUBLESHOOTING
Problems
Solution
The
minced
meat
doesn't
work well
Check if the blade is mounted upside down, whether the meat
tendons are too entangled with the blade, unscrew the nut and
remove the meat tendons. Cut the meat into long strips (about
2cm wide), and dry the moisture on the surface of the meat.
Grind hard
Check if the nut is too tight, check if meat take skin or bone,
whether the meat tendons are too entangled with the blade.
Slow
speed of
making
sausage
Check if the plate cutter and crossed knife are taken out. Check
if the casing is too thin.
The shaft
sleeve is
leaking
There is a gap between the shaft sleeve and the worm to ensure
smooth rotation and water leakage cannot be avoided. Check
whether the meat has excess moisture.
CLEAN AND MAINTENANCE
1.After using the meat grinder, disassemble the parts, and rinse them with warm
water. Dry and assemble the.
2.If the plate cutter is not easy to clean, grind some carrots before cleaning.

- 8 -
Address: Baoshanqu Shuangchenglu 803long 11hao 1602A-1609shi Shanghai
Imported to AUS: SIHAO PTY LTD, 1 ROKEVA STREETEASTWOOD NSW 2122
Australia
Imported to USA: Sanven Technology Ltd., Suite 250, 9166 Anaheim Place,
Rancho Cucamonga, CA 91730
REP
UK
Pooledas Group Ltd
Unit 5 Albert Edward House, The Pavilions
Preston, United Kingdom
REP
EC
SHUNSHUN GmbH
Römeräcker 9 Z2021, 76351
Linkenheim-Hochstetten, Germany
MADE IN CHINA

This manual suits for next models
3
Table of contents
Other VEVOR Meat Grinder manuals