VGE Blue lagoon SALTWATER UV-C 75 WATT User manual

UV-C and Pool equipment
SALTWATER UVC
75 WATT
40 WATT
40 WATT SHORT
www.bluelagoonuvc.com
MEMBER OF:

2| BLUE LAGOON SALTWATER UVC

BLUE LAGOON SALTWATER UVC |3
UV-C and Pool equipment
MANUAL BLUE LAGOON SALTWATER UVC
BLUE LAGOON SALTWATER UVC EN 9 - 11
BLUE LAGOON SALTWATER UVC DE 12 - 15
BLUE LAGOON SALTWATER UVC FR 16 - 19
BLUE LAGOON SALTWATER UVC NL 20 - 22
BLUE LAGOON SALTWATER UVC ES 23 - 26
BLUE LAGOON SALTWATER UVC PT 27 - 30
BLUE LAGOON SALTWATER UVC RU 31 - 34

4| BLUE LAGOON SALTWATER UVC
6
5
4
3
2
1
N
1 2
K
M
U
I
T
L
P
O
P

BLUE LAGOON SALTWATER UVC |5
UV-C and Pool equipment
3 4

6| BLUE LAGOON SALTWATER UVC
EN: Do not disassemble! The quartz glass connection cannot and may not be dismantled. Disassembly
attempts can lead to leakage, glass breakage or personal injury. Damage to the UV-C device as a result of
dismantling is not covered by the warranty.
DE: Nicht zerlegen! Die Quarzglasverbindung kann und darf nicht zerlegt werden. Demontageversuche
können zu Undichtigkeiten, Glasbruch oder Verletzungen führen. Schäden am UV-C-Gerät durch
Demontage fallen nicht unter die Garantie.
FR: Ne démontez pas! La connexion en verre de quartz ne peut pas et ne peut pas être démontée. Les
tentatives de démontage peuvent entraîner des fuites, des bris de verre ou des blessures. Les dommages à
l’appareil UV-C résultant du démontage ne sont pas couverts par la garantie.
NL: Niet demonteren! De kwartsglasverbinding kan en mag niet worden gedemonteerd.
Demontagepogingen kunnen leiden tot lekkage, glasbreuk of persoonlijk letsel. Schade aan het UV-C
apparaat als gevolg van demontage valt niet onder de garantie.
ES: No desarme! La conexión de vidrio de cuarzo no puede y no puede desmontarse. Los intentos de
desmontaje pueden provocar fugas, rotura de cristales o lesiones personales. El daño al dispositivo UV-C
como resultado del desmantelamiento no está cubierto por la garantía.
PT: Não desmonte! A conexão de vidro de quartzo não pode e não pode ser desmontada. Tentativas de
desmontagem podem causar vazamento, quebra de vidro ou ferimentos pessoais. Danos ao dispositivo
UV-C como resultado da desmontagem não são cobertos pela garantia.
RU: Не разбирать! Соединение из кварцевого стекла не может и не может быть демонтировано. Попытки
разборки могут привести к утечке, поломке стекла или травме. Повреждение устройства UV-C в
результате демонтажа не покрывается гарантией.
WALL SKIMMER
PUMP
HEATER
SALT
ELECTROLYSIS
PH CHLORINE
DOSING FILTER
BOTTOM DRAIN

BLUE LAGOON SALTWATER UVC |7
UV-C and Pool equipment
POSSIBLE INSTALLATION AND FLOW DIRECTION:
MULTIPLE INSTALLATION EXAMPLES:
POSSIBLE INSTALLATION:
EN: Make sure the flow always goes from bottom to top, to prevent air inclusion.
DU: Achten Sie darauf, dass die Strömung immer von unten nach oben verläuft, um Lufteinschlüsse zu vermeiden.
FR: Assurez-vous que le débit va toujours de bas en haut pour éviter la présence d’air.
NL: Zorg ervoor dat de flow altijd van beneden naar boven gaat. Om luchtinsluiting te voorkomen.
ES: Asegúrese de que el flujo siempre vaya de abajo a arriba para evitar entradas de aire.
PT: Certifique-se de que o fluxo vá sempre de baixo para cima para evitar a inclusão de ar.
RU: Убедитесь, что поток воды всегда идет снизу вверх, чтобы не образовалась воздушная пробка.
WALL SKIMMER
PUMP
HEATER
SALT
ELECTROLYSIS
PH CHLORINE
DOSING FILTER
BOTTOM DRAIN
BLUE LAGOON SALTWATER UV-C
Technical specifications
SALT WATER SHORT 40W SALTWATER UV-C 40W SALTWATER UV- C 75W
Type 40.000/40W 40.000 /40W 75.000 /75W
Item code BE07402 BE06402 BE06752
Barcode 8714404044394 8714404043489 8714404043496
Rec. ow for 30 mJ/cm2 8 m³/h 9 m³/h 14 m³/h
Max. pressure 2 bar 2 bar 2 bar
Max. ow 23 m³/h 23 m³/h 23 m³/h
Diameter unit Ø 70 mm 70 mm 70 mm
Length unit 48 cm 100 cm 100 cm
Diameter in-outlet Ø 63mm / 50mm / 1 ½"63mm / 50mm / 1 ½"63mm / 50mm / 1 ½"
Housing PVC PVC PVC
Electronic ballast 230V 230V AC 50/60Hz 230V AC 50/60Hz
Maximum current 0,8 A 0,42A 0,8A
Lamp power 40W 40W 75W
Lamp VGE T5 40W 365mm Philips Smart Cap 40W Philips Smart Cap 75W
Lifespan lamp 9.000 h 9.000 h 9.000 h
Weight 2,5 Kg 3,0 Kg 3,2 Kg
Packing size 33 x 12 x 55 cm 106 x 26 x 11 cm 106 x 26 x 11 cm
Quantity full pallet 40 pcs 30 pcs 30 pcs
Advantages of the Blue Lagoon Saltwater UV-C
• A built-in electronic ballast to ensure an efficient and stable power supply
• Especially developed for saltwater pools
• Philips T5 Smart Cap lamp included
• PVC-housing
• Easy installation and maintenance
• Including adapters Ø 63mm to Ø 50mm, 1½” female threaded
• Made in the Netherlands
Operation
The Blue Lagoon Saltwater UV-C is especially
developed for saltwater and seawater pools (salt
electrolysis). Thanks to the special white PVC-housing
the salt has no corrosive influence. The device comes
with an electronic ballast which minimizes current
fluctuations to protect the lamp. With the Blue
Lagoon Saltwater UV-C you can disinfect your water
in an efficient and save way. The result is an excellent
water quality. The connection at the bottom allows
360° connection flexibility. This is ideal for corner
installations, or for combination with other lamps.
Saltwater UV-C
Installation examples
PVC
The Blue Lagoon Saltwater is especially developed for disinfection
of saltwater. Therefore, the disinfection system is besides
chlorinated water also very suitable for salt- and seawater pools.

8| BLUE LAGOON SALTWATER UVC
TECHNICAL SPECIFICATION
Salt Water Short 40W Saltwater UV-C 40W Saltwater UV-C 75W
Type 40.000/40W 40.000 /40W 75.000 /75W
Item code BE07402 BE06402 BE06752
Barcode 8714404044394 8714404043489 8714404043496
Rec. ow for 30 mJ/cm28m³/h 9m³/h 14m³/h
Max. pressure 2 bar 2 bar 2 bar
Max. ow 23m³/h 23m³/h 23m³/h
Diameter unit Ø 70mm 70mm 70mm
Length unit 48cm 100cm 100cm
Diameter in-outlet Ø 63mm / 50mm / 1½" 63mm / 50mm / 1½" 63mm / 50mm / 1½"
Housing PVC PVC PVC
Electronic ballast 230V 230V AC 50/60Hz 230V AC 50/60Hz
Maximum current 0,2A 0,2A 0,38A
Lamp wattage 40W 40W 75W
Lamp VGE T5 40W 365mm Philips Smart Cap 40W Philips Smart Cap 75W
Lifespan lamp 9.000h 9.000h 9.000h
UVC SYSTEM TYPES
Article number: BE06752 Blue Lagoon Saltwater UV-C 75.000 / 75 Watt
Article number: BE06402 Blue Lagoon Saltwater UV-C 40.000 / 40 Watt
Article number: BE07402 Blue Lagoon Saltwater Short UV-C 40.000 / 40 Watt
REPLACEMENT LAMPS
Article number: B280005 Philips T5 Smart Cap lamp 75 Watt
Article number: B280006 Philips T5 Smart Cap lamp 40 Watt
Article number: F980068 LightTech 40 Watt Short

EN
BLUE LAGOON SALTWATER UVC |9
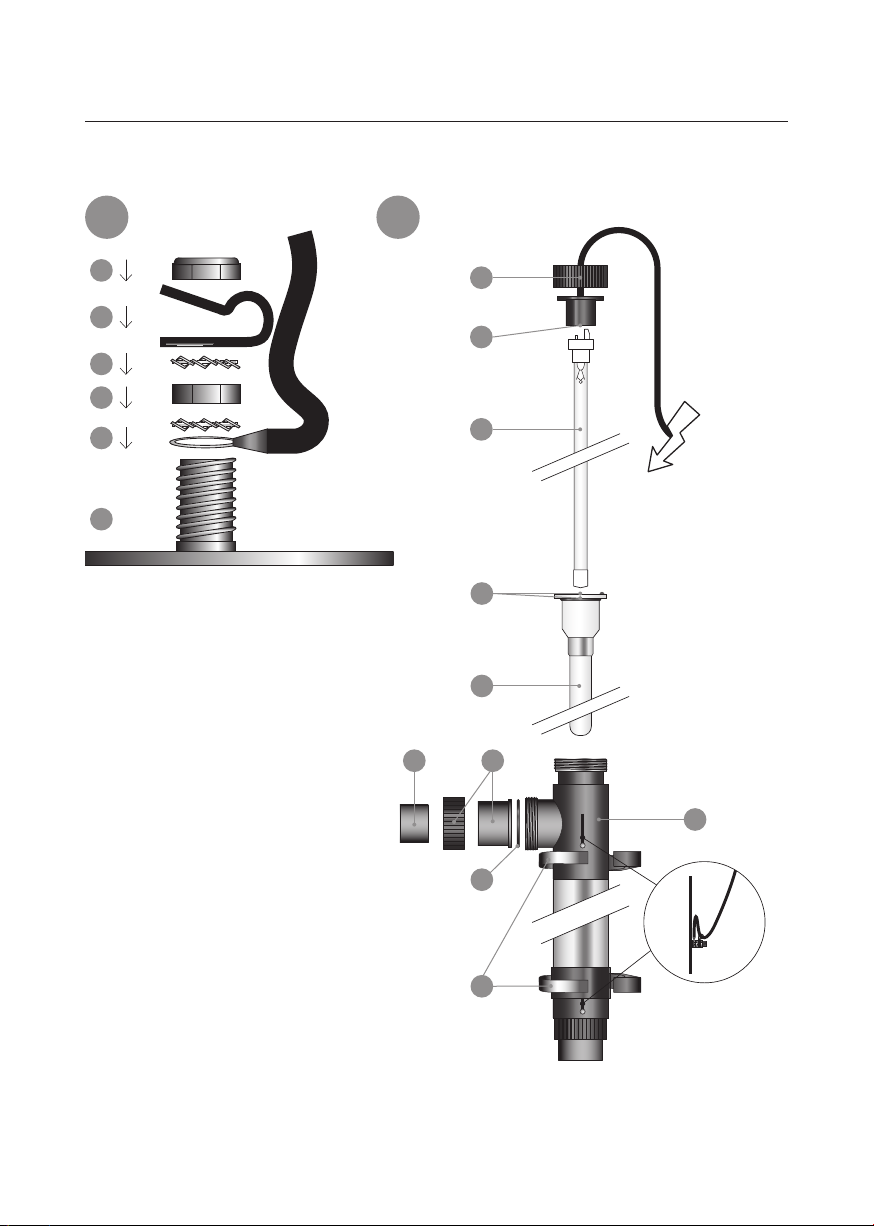
UV-C and Pool equipment
OPERATION
The Blue Lagoon Saltwater UV-C is specially designed for saltwater (salt chlorinated) swimming
pools. In the Blue Lagoon Saltwater UV-C, a UV-C radiation with a wavelength of 253.7 nm is
generated by the special UV-C lamp, ensuring a lethal effect on bacteria, viruses and moulds
(including Legionella bacteria and Cryptosporidium). The Blue Lagoon Saltwater UV-C will ensure
that your pool water is clean, fresh and clear in an efficient and environmentally-friendly manner.
The water is led through the UV-C device via a pump. The UV-C radiation neutralizes bacteria,
viruses and other microorganisms and stops them from multiplying. The Blue Lagoon Saltwater
UV-C has a built-in electronic ballast. This ballast ensures optimum performance of the lamp. Thanks
to the Blue Lagoon Saltwater UV-C, your swimming pool water will be disinfected efficiently and
safely, and the quality of your water will remain excellent.
ATTENTION!
Your pool requires less chlorine because this UV-C device disinfects the pool water during the
passage of the UV-C lamp. Your salt chlorinator device can therefore produce less chlorine than
when there is no UV-C device installed to the pool. By bringing down the salt level in your pool
your salt chlorinator device will produce less chlorine. The advantage is that the water will taste less
salty and the effects of combined chlorine like irritation to eyes, skin and the respiratory tract are
significantly reduced. Always check what the minimum salt content for your salt electrolysis device
may be before you reduce the salt level in your pool. Inform your supplier if necessary. At a too low
salt level your salt chlorinator device or the electrode may malfunction. On average, the minimum
salt content is 3 kilo per 1.000 litters of pool water.
CAUTION:
Carefully read these instructions before installing this device.
Always make sure to have a correct
grounding. When in doubt about the
grounding of the electrotechnical
installation in general, always consult a
licensed electrotechnical mechanic.
It’s not permitted to flow a liquid through
the reactor or to add additions to the
water that has to be treated, which can
have a negative effect on corrosion
or degradation on the used materials.
This to avoid dangerous situations or
damage to the reactor and surrounding
installations and/or to the flora and fauna.
Radiation of this ultraviolet lamp is
dangerous for eyes and skin.
Always free the device of tension
first during maintenance! Risk of an
electric shock. Connect only to a
grounding type receptacle protected
by a ground- fault circuit-interrupter
(GFCI). Do not use an extension cord.
The quartz glass and the UV-C lamp will
stay warm for quite some time after the
device has been switched off. It has a
cooling time of at least 15 minutes.
Wear gloves to protect the quartz glass
and UV-C lamp against fingerprints.
Fingerprints can burn into the quartz
glass and UV-C lamp while turned on,
causing reduction of the disinfection.
The UV-C lamp should never be
turned on when there’s no flow.
Wear safety glasses during
maintenance and installation.
Please read through these instructions for use
carefully before installing this device.
BLUE LAGOON SALTWATER UVC

EN
10 | BLUE LAGOON SALTWATER UVC
INSTALLATION OF THE EARTH DRAWING 1
1. Pull the cable (2) through the strain relief (4) before fitting the synthetic strain relief (4) onto the earth
bolt (1). Position the strain relief (4) at approximately 10 cm from the eye (2) of the earth cable.
2. Place the eye (2) of the cable onto the earth bolt that is fitted to the housing.
3. Then place a toothed lock washer (3).
4. Fit the strain relief (4), creating a loop of Ø5 cm.
5. Finally place the second toothed lock washer (5) and the lock nut (6) onto the earth bolt.
6. Once the parts have been placed onto the earth bolt in the correct sequence, they can be tightened
with a spanner or a ring spanner number 8.
7. Do this on both sides.
DEVICE INSTALLATION FIGURE 2
Decide where you want to mount the device. Never install the UV-C unit after the pH controller, chlorine
dispenser or salt electrolysis system in the swimming pool installation. The best place to install the device
is directly after the filter. See the schematic diagram in the operating instructions. Make sure there is
always water flowing through the device when the lamp is on. Never install the device in direct sunlight.
Install the device in a dry, well-ventilated area. The device can be installed either horizontally or vertically,
provided that the water flow is from bottom to top (see schematic diagram at the beginning of the
instructions for use). At least one metre of unobstructed space must be left on the side with the lamp
connection for convenient future replacement of the lamp (K) without having to disconnect the entire
device.
CAUTION: All connections and couplings must be hand-tight. Do not tighten them with tools.
Otherwise damage may occur.
1. Unscrew the nut (N) from the housing (U). Remove the UV-C lamp (K) from the supplied tube (see
packaging) and carefully slide the lamp into the quartz sleeve (M). Place the lamp (K) with the contact
pins in the lamp fitting (L) and then tighten the nut (N) on the housing (U).
2. Fit the supplied pipe clamps (O). Then insert the unit into the pipe clamps. Tighten the threepiece
coupling (I) firmly, while ensuring the correct position of the sealing rings (P), both at the connections
and the quartz sleeve (see figure 2).
3. Mount the unit in the circuit by means of the three-piece coupling (I). The glue connections of the
three-piece coupling are Ø63 mm or 2”. If the pipes are smaller than Ø63 mm or 2”, use the Ø63 x
50 mm (T) or 2” x 1.5” x 1” adapter. This can be glued in the three-piece coupling. The inside of the
adapter (T) has internal screw threads at one end, making it possible to fit a hose tail adapter (not
included) with sealing ring. ATTENTION: Allow the glued parts to evaporate for 8 hours.
4. Insert the plug of the UV-C device into an earthed wall socket that is protected by a residual current
device.
5. Look through the transparent parts of the device to make sure the lamp is lit.
6. The device is shut off when power is disconnected from the device.

EN
BLUE LAGOON SALTWATER UVC |11
UV-C and Pool equipment
DISASSEMBLY/MAINTENANCE
Always disconnect the power supply during maintenance/disassembly of the device.
The device must be cleaned at least twice a year. When there is a significant amount of algal growth and/
or lime build-up in the unit the quartz sleeve (M) must be cleaned.
The special lamp must be replaced after the number of hours of operation has elapsed. The inside of the
reactor can be cleaned with a soft brush.
1. Let the water flow out of the device.
2. Unscrew the nut (N) and remove the lamp (K) from the fitting (L). Remove the lamp from the quartz
sleeve, and replace the special lamp (K) if necessary. Caution is advised as these are very delicate parts.
3. Carefully remove the quartz sleeve (M) (see figure 3). Never use force! CAUTION: Always wear
protective gloves and glasses.
4. Clean the quartz sleeve with an appropriate cleanser. Always use a soft cloth to clean the sleeve and
avoid scratches.
5. Place the quartz glass (M) (drawing 3) back in the reactor (U). Never force! CAUTION: always wear safety
gloves and glasses.
6. Carefully place the lamp back in the quartz sleeve (M), fit the O-ring (P) back onto the quartz sleeve
and connect the lamp (K) to the fitting (L). Screw the nut (N) back onto the housing.
If the housing or the electrical section must be replaced, the earthing must first be disconnected from the
housing. Please read the Installation and Disassembly section before installing a new housing or electrical
section. Make sure you save the various separate parts for the earth connection. These are not supplied
with a new housing or electrical section. If in doubt about the connection, consult a qualified installer.
For the safety instructions and terms of guarantee we would like to
refer to the general UV-C manual from VGE B.V.

DE
12 | BLUE LAGOON SALTWATER UVC
FUNKTIONSWEISE
Die Blue Lagoon Saltwater UV-C wurde speziell für Salzwasserschwimmbäder entwickelt
(mit Salz Elektrolyse). Im Blue Lagoon Saltwater UV-C erzeugt die UV-C Speziallampe eine UV-C-
Strahlung von 253,7 nm Wellenlänge, die eine bakterien-, viren- und schimmeltötende Wirkung
(u.a. Legionella-Bakterie und Cryptosporidium) hat. Der Blue Lagoon Saltwater UV-C sorgt auf
effiziente und umweltfreundliche Weise für sauberes, frisches und klares Wasser. Das Wasser wird
mit einer Pumpe durch das UV-C Gerät geführt. Die UV-C-Strahlung neutralisiert Bakterien, Viren
und andere Mikroorganismen und verhindert ihre Fortpflanzung. Der Blue Lagoon Saltwater
UV-C hat einen eingebauten elektronischen Ballast. Dieser Ballast sorgt für eine optimale Leistung
der Lampe. Mit dem Blue Lagoon Saltwater UV-C wird Ihr Wasser auf effiziente und sichere Weise
desinfiziert, und die Wasserqualität bleibt hervorragend.
ACHTUNG!
Da dieses UV-C Gerät das Schwimmbadwasser desinfiziert während das Wasser die UV-C
Lampe passiert, wird weniger Chlor im Schwimmbad benötigt. Ihr Salzelektrolyse Gerät muss
daher weniger Chlor produzieren, als ohne UV-C Gerät am Schwimmbad. Durch Verringern des
Salzgehaltes im Wasser, produziert Ihr Salzelektrolyse Gerät weniger Chlor. Der Vorteil ist, dass
das Wasser weniger salzig schmeckt und die Folgen des gebundenen Chlors wie Reizungen an
Augen, Haut und Atemwegen sich stark verringern. Achten Sie beim Reduzieren von Salz jedoch
auf den minimalen Salzgehalt den das Gerät zu Salzelektrolyse benötigt. Informieren Sie falls
nötig Ihren Händler. Bei einem zu geringen Salzgehalt kann Ihr Salzelektrolyse Gerät oder die
Elektrode schaden nehmen. Durchschnittlich sollte der minimale Salzgehalt 3 Kg pro 1.000 Liter
Schwimmbadwasser liegen.
VORSICHT:
Lesen Sie aufmerksam diese Anweisungen, bevor Sie das Gerät installieren.
Achten Sie stets darauf, dass eine korrekte
Erdung vorliegt. Bei grundsätzlichen
Zweifeln in Bezug auf die elektrotechnische
Installation sollten Sie sich immer an einen
zugelassenen Elektrotechniker wenden.
Es ist nicht gestattet, eine Flüssigkeit durch den
Reaktor zu leiten oder dem zu behandelnden
Wasser Zusätze beizumischen, die sich durch
Korrosion oder Zersetzung nachteilig auf
die verwendeten Materialien auswirken
könnten. Dadurch sollen gefährliche
Situationen und Schäden am Reaktor und
den umgebenden Installationen und/oder
der Flora und Fauna verhindert werden.
Die strahlung dieser uv-lampe ist
für augen und haut gefährlich.
Machen sie das gerät bei der wartung
zunächst immer spannungsfrei! Gefahr
eines Stromschlags. Nur an eine
Erdungssteckdose anschließen, die durch
einen FI-Schutzschalter abgesichert ist.
Kein Verlängerungskabel benutzen.
Lesen Sie diese Gebrauchsanweisung vor dem
Installieren des Geräts sorgfältig durch.
BLUE LAGOON SALTWATER UVC

DE
BLUE LAGOON SALTWATER UVC |13
UV-C and Pool equipment
Das Quarzglas und die UV-C-Lampe bleiben
nach dem Ausschalten des Geräts für
längere Zeit noch warm. Die Abkühlungszeit
beträgt mindestens 15 Minuten.
Benutzen Sie Handschuhe, um das Quarzglas
und die UV-C-Lampe vor Fingerabdrücken
zu schützen. Fingerabdrücke können sich
bei eingeschalteter Lampe in das Quarzglas
und die UV-C-Lampe einbrennen und
die Desinfektionsleistung reduzieren.
Die UV-C-Lampe darf keinesfalls eingeschaltet
werden, wenn keine Strömung vorhanden ist.
Tragen Sie bei Installations- und
Wartungsarbeiten stets Handschuhe.
INSTALLATION DER ERDUNG ZEICHNUNG 1
1. Bevor Sie die Kunststoff-Zugentlastung (4) am Massebolzen (1) anbringen, müssen Sie erst das
Kabel (2) durch die Zugentlastung (4) ziehen. Die Zugentlastung (4) in ca. 10 cm Abstand zu Öse
(2) des Massekabels anbringen.
2. Die Öse (2) von Kabel über Massebolzen anbringen, der am Gehäuse befestigt ist.
3. Anschließend eine Spannscheibe (3) anbringen.
4. Zugentlastung (4) befestigen, so dass eine Schleife von Ø 5 cm entsteht.
5. Zuletzt die zweite Sicherungsscheibe (5) und die Sicherungsmutter (6) an Massebolzen
anbringen.
6. Wenn die Teile in der richtigen Reihenfolge an Massebolzen angebracht wurden, kann dieser
mit einem 8er Steck- oder Ringschlüssel festgezogen werden.
7. Mach das auf beiden Seiten.
INSTALLATION GERÄT ZEICHNUNG 2
Bestimmen Sie einen Ort, an dem das Gerät montiert werden soll. Installieren Sie die UV-C
niemals in der Nähe vom pH Regler, Chlordosierung oder Salzelektrolyse-Systems der
Schwimmbadinstallation. Der beste Ort um dieses Gerät zu installieren ist direkt nach dem Filter.
Siehe hierzu das Schema in der Gebrauchsanleitung. Sorgen Sie immer für ausreichend Durchfluss
(zwecks Kühlung) wenn das Leuchtmittel brennt. Installieren Sie das Gerät nicht in der prallen
Sonne. Installieren Sie das Gerät immer in einem trockenen und gut belüfteten Raum. Das Gerät
kann sowohl horizontal als auch vertikal montiert werden, solange der Wasserdurchfluss immer
von unten nach oben geht. (Siehe Zeichnung in der Gebrauchsanweisung). An der Seite des
Lampeneinschubes sollte mind. 1 Meter Platz sein, um das Leuchtmittel (K) problemlos entnehmen
oder ersetzten zu können.
ACHTUNG: Um Schäden zu vermeiden, sollten alle Verbindungen und Kupplungen Hand-Fest
angezogen werden, also ohne Hilfsmittel wie Schraubenschlüssel, fest gedreht werden.
1. Drehen Sie die Mutter (N) vom Gehäuse (U) ab. Holen Sie das UV-C Leuchtmittel (K) aus der
mitgelieferten Hülle (siehe Verpackung) und führen dieses Leuchtmittel vorsichtig in das
Quarzglas (M). Stecken Sie das Leuchtmittel (K) mit den Kontaktpins in den Lampenfitting (L)
und schrauben dann die Mutter (N) wieder auf das Gehäuse (U).

DE
14 | BLUE LAGOON SALTWATER UVC
2. Montieren Sie die im Lieferumgang enthaltenen Rohrklemmen (O). Platzieren Sie dann das
Gerät in den Rohrklemmen. Drehen Sie die dreiteilige Kupplung (I) fest. Achten Sie unbedingt
auf die korrekte Lage der Dichtungsringe (P) bei den Anschlüssen als auch beim Quarzglas
(siehe Zeichnung 2)
3. Montieren Sie das Gerät durch Hilfe der dreiteiligen Kupplung (I). Die Klebeverbindungen der
dreiteiligen Kupplung haben einen Durchmesser von 63 mm bzw. 2“. Sollte die Leitung kleiner
sein als 63 mm bzw. 2“, kann die Reduzierung von 63 / 50 bzw. 2“ auf 1,5“ genutzt werden. Diese
Reduzierung kann in der dreiteiligen Kupplung (I), bzw. in der Klebemuffe zur Nutzung des
Flow-Switch* verklebt werden. An der Innenseite vom Reduzierstück (T) befindet sich an einer
Seite ein Gewinde, was die Möglichkeit bietet eine Stufenschlauchtülle inkl. Dichtring (nicht im
Lieferumfang) zu verwenden. Lassen Sie die geklebten Teile 8 Stunden lang verdunsten.
4. Stecken Sie den Stromstecker der UVC Lampe in eine geerdete Steckdose mit die mit einem FI
gesichert ist.
5. Eine Kontrolle ob das Leuchtmittel brennt, kann durch die transparenten Teile des Gehäuses
erfolgen.
6. Das Gerät schaltet sich ab, sobald die Stromspannung vom Gerät getrennt wird.
DEMONTAGE / WARTUNG
Bei Wartungs- oder Demontagearbeiten nehmen Sie das Gerät immer vom Stromnetz. Das
Gerät muss mindestens zwei mal jährlich gereinigt werden. Wenn das Algenwachstum oder
die Kalkschicht in der Einheit zunimmt, muss das Quarzglas (M) gereinigt werden. Das spezielle
Leuchtmittel soll nach Ende der empfohlenen Leuchtdauer gewechselt werden. Die Innenseite der
Reaktorkammer kann mit Hilfe eine weichen Bürste gereinigt werden.
1. Lassen Sie das Wasser aus dem Gerät
2. Schrauben Sie die Mutter (N) los und entnehmen das Leuchtmittel (K) aus dem Fitting (L).
Nehmen Sie die Lampe aus dem Quarzglas und ersetzten Sie diese (K) falls nötig. Achtung:
Zerbrechliche Glasmaterialien.
3. Entfernen Sie vorsichtig das Quarzglas (M) – siehe Zeichnung 3. Niemals mit Gewalt! ACHTUNG:
Tragen Sie immer Schutzhandschuhe und eine Schutzbrille.
4. Reinigen Sie das Quarzglas sorgfältig – wenn nötig entkalken Sie es. Kalk sieht man häufig nur
auf getrocknetem Glas. Nutzen Sie ein weiches Tuch, um Kratzer zu vermeiden.
5. Setzen Sie das Quarzglas (M) (Zeichnung 3) wieder in den Reaktor (U) ein. Wenden Sie keinesfalls
Gewalt an! VORSICHT: Tragen Sie stets Sicherheitshandschuhe und eine Schutzbrille.
6. Montieren Sie Quarzglas und Lampe wieder im Gehäuse. Platzieren Sie den O-Ring (P) wieder
auf dem Quarzglas und verbinden das Leuchtmittel (K) im Lampenhalter (L). Drehen Sie die
Mutter (N) wieder auf das Gehäuse.
Sollte das Gehäuse oder der Trafo ersetzt werden müssen, muss die Erdung zuerst vom Gehäuse

DE
BLUE LAGOON SALTWATER UVC |15
UV-C and Pool equipment
gelöst werden. Bei der Montage eines neuen Gehäuses oder eine Trafos (elektrischen Teils) lesen
Sie bitte zuerst das Hauptstück Installation und Demontage. Achten Sie darauf das alle Kleinteile
der Erdung aufgehoben werden. Diese werden nicht mit einem Ersatzteil wie Gehäuse oder Trafo
zusammen geliefert. Bei Zweifeln fragen Sie bitte einen anerkannten Installateur.
Für die Sicherheitsbestimmungen und Garantiebedingungen verweisen
wir auf unsere allgemeinen UVC Anleitung von VGE B.V.

FR
16 | BLUE LAGOON SALTWATER UVC
FONCTIONNEMENT
Blue Lagoon Saltwater UV-C a été développé spécialement pour les piscines à eau salée
(avec électrolyse sel). Dans le Blue Lagoon Saltwater UV-C, un rayonnement UV-C d’une longueur
d’onde de 253,7 nm est généré par la lampe UV-C spéciale, ce qui détruit les bactéries, virus
et moisissures (comme la bactérie de la légionellose (maladie des vétérans/légionnaires) et
Cryptosporidium). Le Blue Lagoon Saltwater UV-C garantit, de manière efficace et écologique, une
eau propre, fraîche et limpide. L’eau est acheminée dans l’appareil UV-C au moyen d’une pompe.
Le rayonnement UV-C neutralise les bactéries, les virus et des micro-organismes et empêche leur
prolifération. Le Blue Lagoon Saltwater UV-C est doté d’un ballast électronique intégré. Ce ballast
garantit des performances optimales de la lampe. Grâce au Blue Lagoon Saltwater UV-C, votre eau
est désinfectée de manière efficace et sûre et la qualité de votre eau reste excellente.
ATTENTION!
Étant donné que cet appareil UV-C désinfecte l’eau de piscine lors de son passage le long de la
lampe UV-C, vous devez ajouter moins de chlore à votre piscine. Par conséquent, vous pouvez
laisser votre appareil d’électrolyse sel produire moins de chlore que lorsqu’aucun appareil UV-C n’est
raccordé à la piscine. En abaissant la teneur en sel dans votre piscine, votre appareil d’électrolyse
sel produit moins de chlore. L’avantage est que l’eau a un goût moins salé et que l’irritation des
yeux, de la peau et des voies respiratoires diminue considérablement. Avant de réduire la quantité
de sel dans votre piscine, prêtez toutefois attention à la teneur en sel minimale requise pour votre
appareil d’électrolyse sel. Au besoin, consultez votre fournisseur. Si la teneur en sel est trop basse,
votre appareil d’électrolyse sel ou l’électrode peut présenter un dysfonctionnement. En moyenne, la
teneur en sel minimale est de 3 kilos par 1.000 litres d’eau de piscine.
CAUTION:
Lire attentivement la notice avant d’installer cet appareil.
Assurez-vous toujours d’avoir une mise à la
terre correcte. En cas de doute sur la mise
à la terre de l’installation d’alimentation
de l’appareil, consultez toujours un
professionnel électricien agréé.
Il est interdit de faire circuler un liquide
dans le générateur UVc ou d’ajouter un
additif dans l’eau à traiter, ce qui peut
avoir un effet générateur de corrosion
ou la dégradation des matériaux en
contact. Ceci afin d’éviter des situations
dangereuses ou des dommages sur
le générateur UVc et aux installations
environnantes et / ou à la faune et la flore.
Le rayonnement de la ou des
lampes ultraviolet est dangereux
pour les yeux et la peau.
Toujours debrancher l’alimentation generale
de l’appareil avant toute intervention ou
toute maintenance! Risque d’électrocution.
Connectez uniquement à une prise de terre
reliée à la terre protégée par un disjoncteur
de fuite à la terre (GFCI). Ne pas rallonger le
câble ni d’utiliser de rallonge électrique.
Avant d’installer cet appareil, lire attentivement cette notice d’utilisation.
BLUE LAGOON SALTWATER UVC

FR
BLUE LAGOON SALTWATER UVC |17
UV-C and Pool equipment
Le verre de quartz et la lampe UV-C
resteront chauds pendant un certain temps
après la mise hors tension de l’appareil.
Respecter un temps de refroidissement
d’au moins 15 minutes à l’air frais.
Portez des gants pour protéger la gaine
quartz et la lampe UV-C contre les
traces de doigts. Les traces d’empreintes
digitales peuvent brûler sur le verre de
quartz et la lampe UV-C lorsqu’elles sont
allumées, ce qui réduit la désinfection.
La lampe UV-C ne doit jamais être allumée
sans débit d’eau dans le générateur.
Portez des lunettes de sécurité lors
de l’entretien et de l’installation.
INSTALLATION DU CÂBLE DE MISE À LA TERRE FIGURE 1
1. Avant de monter le serre-câble plastique (4) sur la vis de mise à la terre (1), il faut tirer le câble (2)
à travers le serre-câble (4). Placer le serre-câble (4) à environ 10 cm de l’oeil (2) du câble de mise
à la terre.
2. Placer l’oeil (2) du câble sur la vis de mise à la terre fixée sur le logement.
3. Placer ensuite une bague de retenue dentée (3).
4. Fixer le serre-câble (4) de sorte à constituer une boucle de Ø 5 cm.
5. En dernier lieu, poser la deuxième bague de retenue dentée (5) et l’écrou autobloquant (6) sur le
boulon de mise à la terre.
6. Lorsque les pièces sont placées dans l’ordre correct sur le boulon de mise à la terre, elles
peuvent être serrées au moyen d’une clé à fourche ou polygonale numéro 8.
7. Faites ceci des deux côtés.
INSTALLATION DE L’APPAREIL FIGURE 2
Déterminez la position souhaitée de l’appareil. N’installez jamais l’unité UV-C en aval du régulateur
de pH, du dosage de chlore ou du système d’électrolyse sel dans l’installation de la piscine.
L’emplacement idéal pour l’appareil est directement en aval du filtre. Voyez le schéma dans le mode
d’emploi. Veillez à ce que de l’eau circule toujours à travers l’unité lorsque la lampe est allumée.
N’installez jamais l’appareil en plein soleil. Installez toujours l’appareil dans un local sec et bien
ventilé. L’appareil peut être monté horizontalement ou verticalement à condition que le flux d’eau
circule du bas vers le haut (voyez le schéma au début du mode d’emploi). Du côté du raccord de
lampe, il faut laisser un espace d’au moins 1 m afin de pouvoir remplacer sans problème la lampe (K)
sans devoir démonter l’ensemble de l’appareil.
ATTENTION : toutes les connexions et tous les raccords doivent être serrés à la main, donc sans
outil. Ceci afin d’éviter tout dommage.
1. Détachez l’écrou (N) du corps (U). Sortez la lampe UV-C (K) de l’étui livré (voyez l’emballage) et
glissez-la avec précaution dans le verre de quartz (M). Placez la lampe (K) avec les broches de
contact dans le culot de lampe (L) et vissez ensuite l’écrou (N) sur le corps (U).
2. Posez les colliers (O) faisant partie de la livraison. Placez ensuite l’unité dans les colliers. Serrez
le raccord trois pièces (I), en veillant au positionnement correct des bagues d’étanchéité (P) à
l’endroit tant des raccords que du verre de quartz (voyez figure 2).

FR
18 | BLUE LAGOON SALTWATER UVC
3. Monter l’unité au moyen du raccord trois pièces (I). Les connexions collées du raccord trois
pièces présentent un diamètre de 63 mm ou 2”. Si les conduites présentent un diamètre
inférieur à 63 mm ou 2”, utilisez le réducteur 63 x 50 mm (T) ou 2” x 1,5” x 1”. Celui-ci peut être
collé dans le raccord trois pièces (I) et dans la gaine de colle pour le contacteur de débit (V
*Uniquement pour Amalgaam). La section interne du réducteur (T) comporte d’un côté un
filetage qui permet de poser éventuellement un tulle de réduction avec bague d’étanchéité
(pas livrés). Laisser les parties collées s'évaporer pendant 8 heures.
4. Insérez la fiche de l’appareil UV-C dans une prise murale avec une mise à la terre et un
interrupteur de défaut de terre.
5. Assurez-vous que la lampe est allumée par le biais des pièces transparentes de l’appareil.
6. L’appareil se désactive lorsque la tension vers celui-ci est coupée.
DÉMONTAGE/ENTRETIEN
Lors du démontage/de l’entretien de l’appareil, coupez toujours l’alimentation de courant.
L’appareil doit être nettoyé au moins 2 fois par an. Lorsque la croissance des algues et/ou
l’entartrage dans l’unité augmente(nt), nettoyez le verre de quartz (M).
La lampe spéciale doit être remplacée après expiration des heures de service. La section interne du
réacteur se nettoie au moyen d’une brosse douce.
1. Laissez l’eau s’écouler de l’appareil.
2. Desserrez l’écrou (N) et désolidarisez la lampe (K) du culot (L). Retirez la lampe du verre de
quartz et, le cas échéant, remplacez-la (K). Procédez avec prudence car ces pièces sont
particulièrement fragiles.
3. Déposez avec précaution le verre de quartz (M) (voyez figure 3). Ne forcez jamais ! ATTENTION
: portez toujours des gants et des lunettes de protection.
4. Nettoyez le verre de quartz avec un produit approprié. Utilisez toujours un chiffon doux pour
nettoyer le verre, évitez toute rayure.
5. Remettre le verre de quartz (M) (schéma 3) dans le générateur (U). Ne jamais forcer !
ATTENTION: toujours porter des gants et des lunettes de sécurité.
6. Placez à nouveau la lampe avec précaution dans le verre de quartz, posez à nouveau le joint
torique (P) sur le verre de quartz et posez la lampe (K) dans le culot (L). Vissez à nouveau
l’écrou (N) sur le corps.
En cas de remplacement du corps ou de la section électrique, débranchez d’abord la mise à la terre

FR
BLUE LAGOON SALTWATER UVC |19
UV-C and Pool equipment
du logement. Lors du montage d’un corps neuf ou de la section électrique, veuillez lire au préalable
le chapitre Installation et Démontage. Conservez soigneusement les diverses pièces de la mise à
la terre. Celles-ci ne sont pas livrées avec un corps neuf ou une section électrique neuve. En cas de
doute concernant le branchement, consultez un installateur agréé.
Pour les instructions de sécurité et les conditions de garantie,
veuillez consulter le manuel général UV-C de VGE B.V.

NL
20 | BLUE LAGOON SALTWATER UVC
WERKING
De Blue Lagoon Saltwater UV-C is speciaal ontworpen voor zoutwater zwembaden (met zout
electrolyse). In de Blue Lagoon Saltwater UV-C wordt een UV-C straling gegenereerd van 253,7 nm
golflengte door de speciale UV-C lamp, welke zorgt voor een dodende werking op bacteriën, virussen
en schimmels (o.a. legionella en Cryptosporidium). De Blue Lagoon Saltwater UV-C zorgt op efficiënte
en milieuvriendelijke wijze voor schoon, fris en helder water. Het water wordt d.m.v. een pomp door
het UV-C apparaat gevoerd. De UV-C straling neutraliseert bacteriën, virussen en andere micro-
organismen en stopt de voortplanting ervan. De Blue Lagoon Saltwater UV-C heeft een ingebouwde
elektronische ballast. Deze ballast zorgt voor optimale prestaties van de lamp.Dankzij de Blue Lagoon
Saltwater UV-C zal uw water op een efficiënte en veilige wijze worden gedesinfecteerd en behoudt u
een uitstekende waterkwaliteit.
ATTENTIE!
Omdat dit UV-C apparaat het zwembadwater desinfecteert tijdens het passeren van de UV-C lamp is
er minder chloor nodig in uw zwembad. Uw zoutelektrolyse apparaat kunt u daarom minder chloor
laten produceren dan wanneer er geen UV-C apparaat op het zwembad is aangesloten. Door het
zoutgehalte in uw zwembad naar beneden te brengen maakt uw zoutelektrolyse apparaat minder
chloor aan. Het voordeel is dat het water minder zout smaakt en de gevolgen van gebonden chloor
zoals irritatie aan ogen, huid en luchtwegen sterk verminderen. Let bij het verminderen van zout wel
op wat het minimale zout gehalte voor uw zoutelektrolyse apparaat mag zijn. Informeer indien nodig
uw leverancier. Bij een te laag zoutgehalte kan uw zoutelektrolyse apparaat of de zoutcel defect raken.
Gemiddeld is het minimale zout gehalte 3 kilo per 1.000 liter zwembadwater.
LET OP:
Leest u voor het installeren van dit apparaat eerst zorgvuldig deze gebruiksaanwijzing.
Zorg altijd voor een correcte
aarding. Bij twijfel over de aarding
of de elektrotechnische installatie
in het algemeen, altijd een erkend
elektrotechnisch monteur raadplegen.
Het is niet toegestaan om een vloeistof door
de reactor te laten stromen, of toevoegingen
aan het te behandelen water te doen,
welke een negatief effect kunnen hebben
op corrosie of degradatie van de gebruikte
materialen. Dit, om gevaarlijke situaties
en schade aan de reactor en omliggende
installaties en/of flora en fauna te voorkomen.
Straling van deze ultraviolet lamp is
gevaarlijk voor ogen en huid.
Bij onderhoud het apparaat altijd
eerst spanningsvrij maken! Risico op
elektrische schokken. Sluit alleen aan
op een geaard type contactdoos
beschermd door een aardlekschakelaar
(ALS). Gebruik geen verlengsnoer.
Leest u voor het installeren van dit apparaat eerst
zorgvuldig deze gebruiksaanwijzing.
BLUE LAGOON SALTWATER UVC
This manual suits for next models
2
Table of contents
Languages:
Popular Swimming Pool Filter manuals by other brands

Hayward
Hayward Saline C HCSC60EU user guide

Evolution
Evolution evoclear TRIM Series Installation and operation manual

Hayward Pool Products
Hayward Pool Products Dream Line S170TSCPE owner's manual

AQUATECH
AQUATECH AquaTech Operation & service manual

hecht
hecht 302112 manual

Polaris
Polaris AutoClearPLUS Installation and maintenance guide