VGP DExx-vd-isl User manual

DExx-vd_isl
Quick Start Guide
This document is copyright © VGP Media Ltd 2022
All rights reserved worldwide
VideoGameperfection com is a trading name of VGP Media Ltd
Registered in Republic of Ireland number 637539

Dexx-vd_isl Quick Start Guide VideoGamePerfection com
DExx-vd_isl – Quick Start Guide
Contents
Important safety information 3
Overview 4
Connectors and external controls 5
Remote control 6
Getting started 7
Preparing the SD card 10
Powering on and testing 14
Getting to know your DExx 16
One scaler, three modes 16
Changing modes 17
Connecting a console, PCB or other hardware 17
Scanlines 18
Setting output resolutions 18
Framelock 20
Scaling algorithm 20
Interlace video and the DExx 20
Fine tuning the image 21
Audio input and output 21
Firmware updates 21
Troubleshooting 22
More information 23
Disposing of your DExx 23
Thank you for purchasing the DExx-vd_isl board (DExx for short) Please take time to read through
this short document before you start using the unit
Page 2

Important safety information
Please observe the following safety precautions when using your DExx-vd_isl board
Follow the instructions for your DE10 Nano – Ensure you are using the correct power supply for
your DE10 Nano and following all relevant safety guidelines as supplied with your DE10 Nano kit
Turn off the power before connecting/disconnecting the board – To prevent damage to the DExx
board or your DE10 Nano board, always turn off and disconnect the power before connecting or
disconnecting the device
Turn off the power before connecting/disconnecting devices – To prevent damage to the DExx
board always turn off and disconnect the power to both your device and your DE10 Nano before
connecting or disconnecting any devices to the SCART port
Do not expose to oisture – Droplets of moisture may contact the PCB and cause a short circuit
Never submerge the unit in water
Please supervise children – This product is not a toy and is not designed for use by children
Please supervise children if they use the DExx-vd_isl
Beware of using the bob deinterlace ode on sources that display static graphics or text for a
long period of ti e – This deinterlacing mode produces a constant flickering effect This can cause
image retention/burn-in to occur faster than normal We recommend using the scaler mode and
motion adaptive deinterlacing where possible, see page 20 for more details

Dexx-vd_isl Quick Start Guide VideoGamePerfection com
Overvie
Page 4

Connectors and external controls
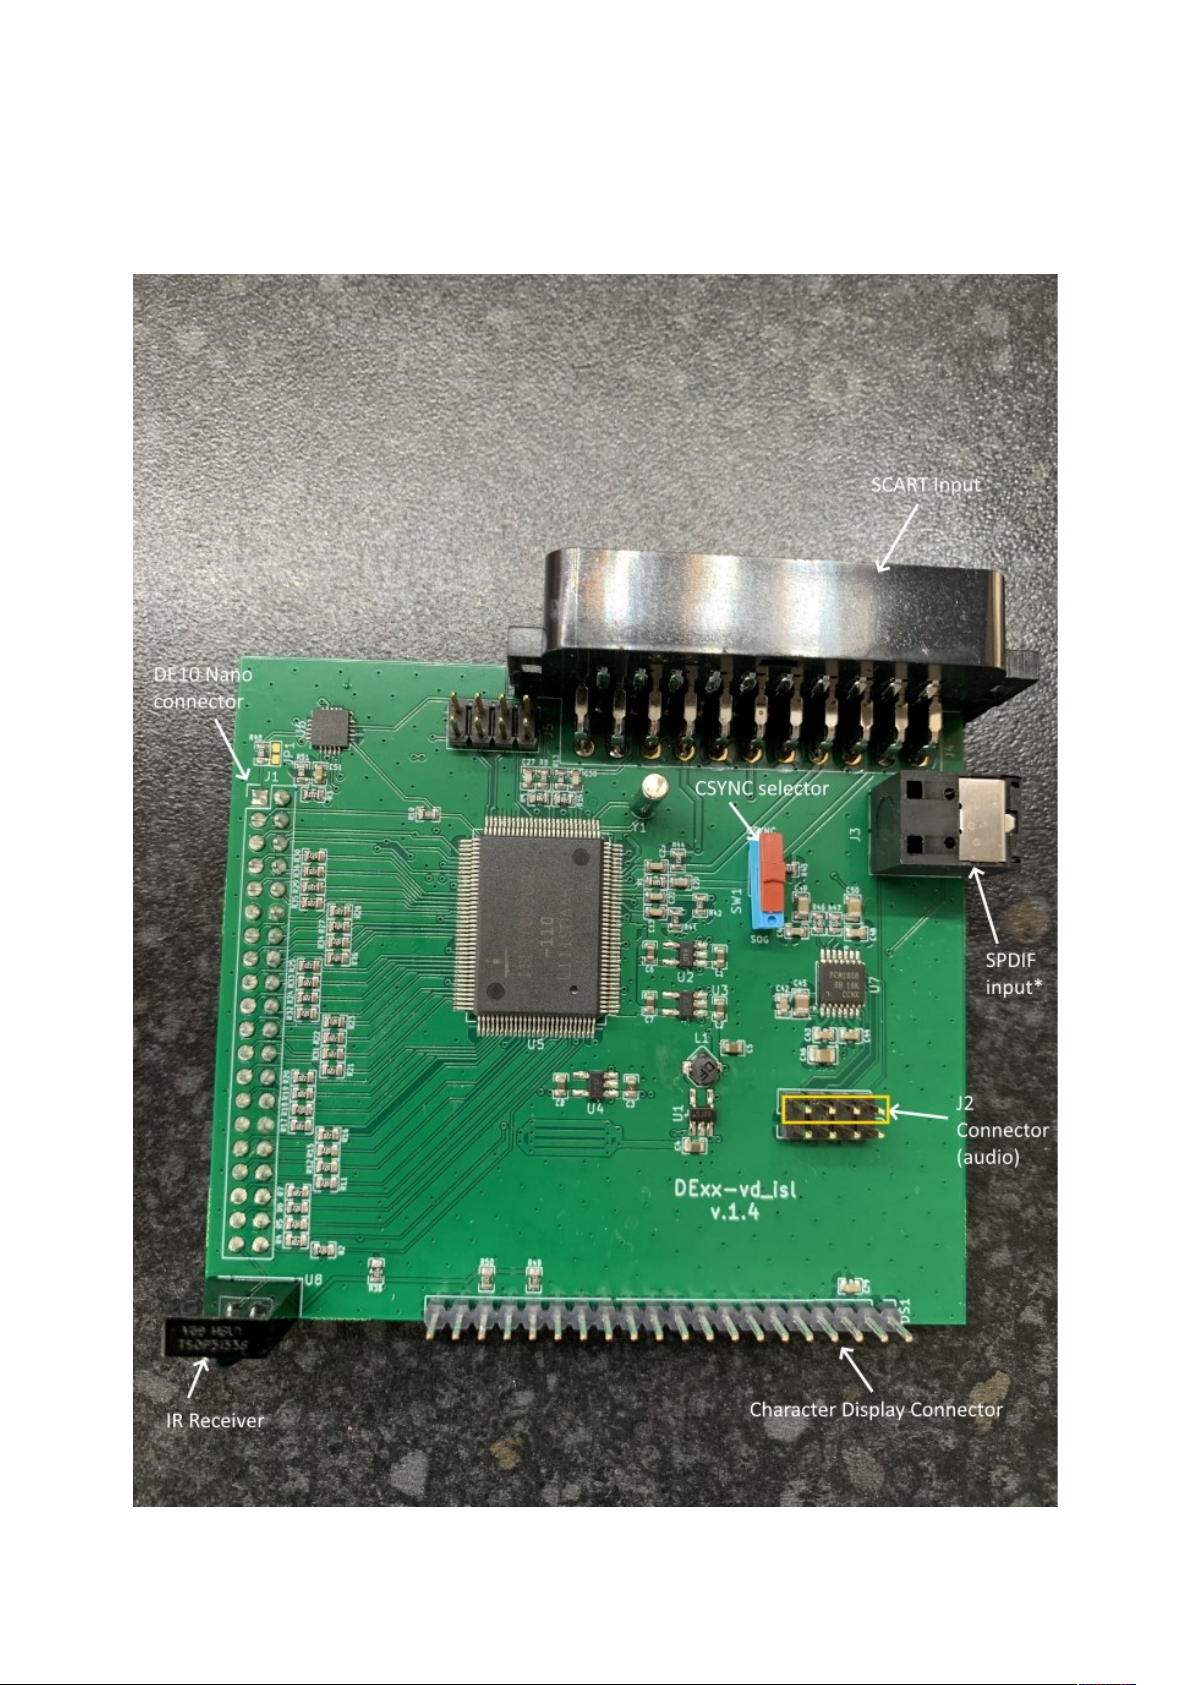
In the overview picture you can see the following features on your DExx-vd_isl board
SCART Input – Connect an RGB SCART source to this input Note the input must be RGB or
YPbPr, S-video and composite SCART sources are not supported and require transcoding into RGB
first Only European spec RGB SCART cables are supported, the less common Japanese JP21
cables must be used with a converter, a suitable one can be purchased here:-
https://videogameperfection com/products/jp21-to-scart-adapter/
The SCART input is referred to as AV1 in the DExx’s on screen menus
CSYNC Selector – Choose between standard RGB with composite sync or sync on green (SOG)
Note that you should use the SOG setting if connecting component video (YPbPr) via an adapter
SPDIF Input – For connecting high quality digital audio input from compatible consoles or
devices
*Note, SPDIF input requires a hardware modification to the DE10 Nano board Details of how to
perform this modification will be posted to the Wiki here:-
https://junkerhq net//xrgb/index php?title=DExx-vd_isl#Toslink
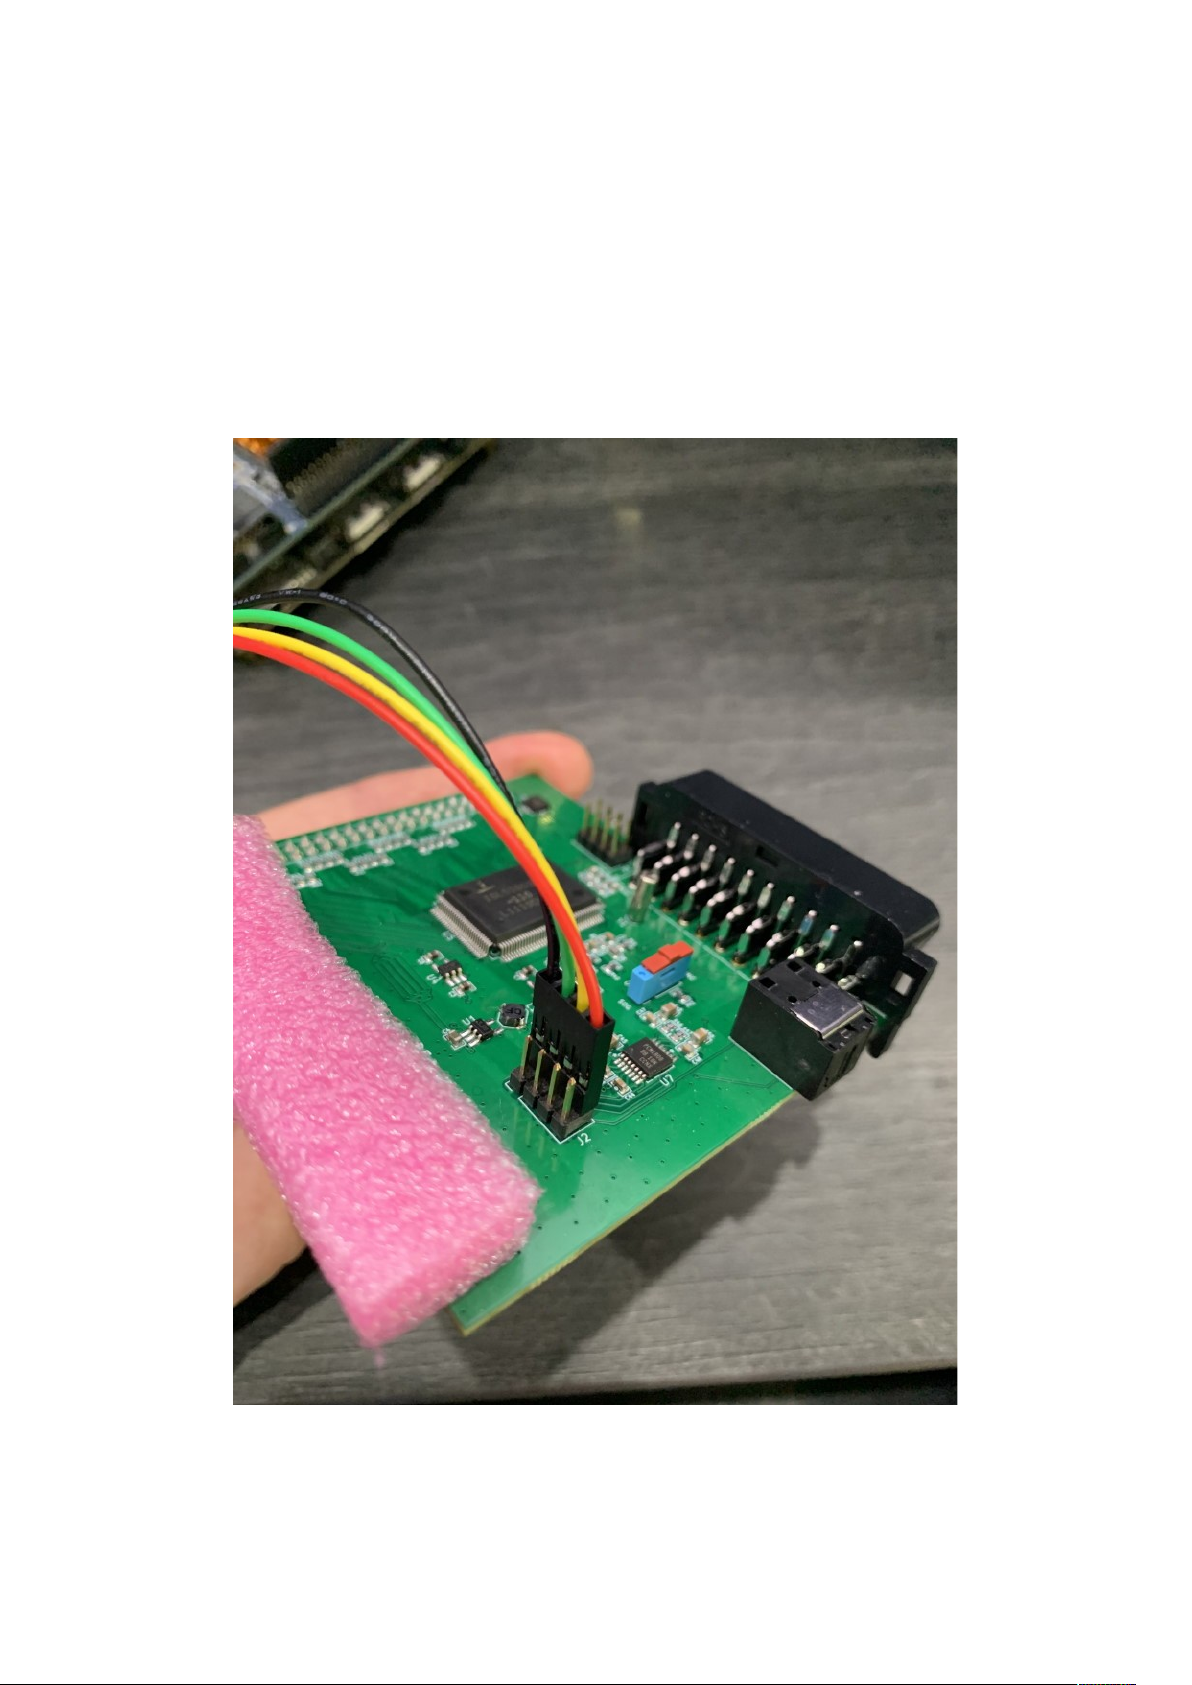
J2 Connector – J2 carries digitized analogue audio and SPDIF and must be connected in order to
get audio from your source device The supplied jumper cable should be connected to the J2 pins
highlighted in yellow in the picture
Character Display Connector – Connect an optional character display to this pin header The
required components for the display can be purchased from the links below:-
https://newhavendisplay com/2x16-character-red-slim-oled-module/
https://www digikey com /en/products/detail/sullins-connector-solutions/PPTC201LGBN-RC/
775914
The pin sockets must be soldered to the character display, this requires soldering skills and
equipment
MicroSD Card Slot – For updating the devices firmware, see “Firmware Updates” on page 21
IR Receiver – Receives commands from the remote control unit Line of sight is required
DE10 Nano Connector – Connect the DExx to the DE10 Nano using this connector

Dexx-vd_isl Quick Start Guide VideoGamePerfection com
Remote control
The DExx-vd_isl uses the same IR remote as the OSSC The button mappings are very similar, and
can be seen below
Page 6

Getting started
Start by carefully removing any add on boards or MiSTer components from your DE10 Nano board,
if applicable A USB hub expansion such as the BlisSTer can be left in place but please disconnect
all cables Disconnect any Ethernet or USB cables and, if MiSTer software is installed, remove your
MiSTer system SD card and store it away safely
Insert the female end of the supplied jumper cable onto the connector labelled J2, as shown in the
picture below
Note the orientation of the jumper cable J2 has two rows of 4 pins, the jumper cable should be
placed at the back, that is, on the row of pins that is closest to the SCART connector This row of
pins is highlighted in yellow on the overview picture The red cable should be on the right (with the
SCART connector at the back of the board)

Dexx-vd_isl Quick Start Guide VideoGamePerfection com
Orient your DE10 Nano board so that the Ethernet connector is at the front, and the HDMI and
power connectors are at the back Leave the video and power connectors disconnected for now
Note the pin sockets highlighted in yellow, we will need those later
Carefully place the connector from the DExx on to the connector on the right of the DE10 Nano
board, as highlighted in red in the picture above, with the SCART socket on the DExx pointing to
the back Check the alignment of the pins before gently pushing the board down into place The
connector on the DExx matches the connector on the DE10 Nano exactly, one pin for every hole,
Page 8

meaning there should be no exposed pins at either end
Connect the male end of the jumper cable to the DE10 Nano as shown in the picture below
Check that the jumper cable is inserted into the correct place Refer to the previous picture where
the correct pin sockets are highlighted in yellow From the front of the board, there should be four
vacant holes in front of the jumper cable and ten behind
The hardware is now assembled, system software for the DExx should now be copied to a MicroSD
card

Dexx-vd_isl Quick Start Guide VideoGamePerfection com
Preparing the SD card
The DExx requires operating software/firmware to be installed on an SD card This SD card needs
to be prepared with a bootloader the first time you use it Start by downloading the latest version of
the bootloader and firmware from the link here:-
https://github com/marqs85/DExx-vd_isl/blob/master/board/de10-nano/software/bootloader/
sd_image/sdcard_cv img?raw=true
To prepare the SD card we recommend the program “Balena Etcher” which is available here:-
https://www balena io/etcher/
This program is available for Windows, Linux and MacOS The instructions that follow are for
Windows operating systems specifically, but the process should be very similar for Linux and
MacOS too
Download and install the Balena Etcher software and run it, you should see a window like the one
shown below
Click on “Flash from file” A standard file requester window should appear Navigate to your
download folder and choose the SD card image file It should be named “sdcard_cv img” or
“sdcard_cv”
Page 10

Insert your MicroSD card into your PCs card reader and make a note of the drive letter or
assignment Now, in the Etcher software, click on “Select Target” The window shown below will
appear

Dexx-vd_isl Quick Start Guide VideoGamePerfection com
Be sure to select the correct destination drive from the list All data on the destination will be
erased, so triple check that you have the right one before clicking on “Select (1)”
Now, click on “Flash!” Depending on your OS and how your computer is configured, you may
need to grant permission for the file to be written or enter your administrator password
The process should only take a moment When it is completed, the Etcher window will look like the
one shown below
Page 12

You can now remove the MicroSD card and insert it into the SD card socket on the DE10 Nano
board
These steps to prepare the SD card only need to be done once per SD card Future firmware updates
can be copied directly to the SD card using your operating system of choice See “Firmware
Updates” on page 21 for more information

Dexx-vd_isl Quick Start Guide VideoGamePerfection com
Po ering on and testing
With the software installed and the hardware assembled, we can now perform a functional test of
the DExx Start with all of your devices powered off Connect the SCART input cable between the
DExx and your retro console or computer and the HDMI cable between the DE10 Nano and your
display Now, power on your display and set to the correct input Next connect the power supply to
the DE10 Nano board If you programmed the MicroSD card correctly, you should see a grey test
pattern on your TV
Finally, power on your retro console and press the menu button on the OSSC remote Use the menu
navigation buttons and OK to choose “Input Select” and then select the relevant input for your
console For standard RGB SCART devices, choose “AV1_RGBS”
Page 14

You should now see a picture from your analogue video device Verify that audio is working
correctly by starting a game or test software We recommend Artemeo’s 240p test suite which is
available for several retro video games consoles and includes a useful audio test You can download
this software here:-
https://junkerhq net/xrgb/index php?title=240p_test_suite
Congratulations, you have now set up your DExx-vd_isl board and you can start experimenting
with its features

Dexx-vd_isl Quick Start Guide VideoGamePerfection com
Getting to kno your DExx
All settings for the DExx are configured using the on-screen menu To call up the menu at any time,
press the Menu On/Off button on the remote The root or top level menu is shown below
You can return to the top level menu at any time by pressing the “Back” button on the remote
(multiple presses may be required)
One scaler, three modes
The DExx-vd_isl shares much of the same code and design as the upcoming OSSC Pro The device
has three operating modes
•Pure line multiplier
•Adaptive line multiplier
•Scaler
Pure and adaptive line multiplication modes offer a lag free scaling solution for retro video
consoles, while the scaler mode offers more flexible output options, at the expense of some input
lag
We recommend users choose either adaptive line multiplication mode or scaler mode Adaptive line
multiplication offers many more options over the old, pure line multiplication that also featured on
the classic OSSC Theoretically, the pure line multiplication mode has slightly less input lag than
the adaptive mode, but in practise this difference is so small that it is imperceptible
Page 16

Changing modes
To change between line multiplier and scaler mode, navigate to the top level menu and then select
“Output opt ” and press “OK” you should now see the options shown below
Use the left and right navigation buttons on the remote to change between “Line multiplier” and
“Scaler”
To change between adaptive and pure line multiplier mode, first choose Line multiplier mode by
following the steps above, then use the back button on the remote, if necessary, to get back to the
top level menu
Now, navigate to “Line multiplier opt” and press “OK”
You can now use the remote to choose “Pure” or “Adaptive” mode Adaptive mode is recommended
for most users
Connecting a console, PCB or other hard are
Power your DExx off and connect a suitable source to the AV1 SCART connector For most
systems, using a properly wired RGB SCART cable connected to the AV1 input is the best and
easiest option To connect component video, a passive adapter cable is required Y connects to
green, Pb connects to blue and Pr to red The sync selector switch must also be set to SOG
You can connect either 15khz or 31khz sources to the DExx, if you need to connect an RGBHV
signal, a special adapter will need to be built More information on connecting different types of
hardware is covered on the wiki
Once you have connected your hardware, power on the DExx and select the appropriate input using
the remote Now, power on your console, PCB or vintage computer hardware You should now see
it displayed on your TV or monitor

Dexx-vd_isl Quick Start Guide VideoGamePerfection com
Scanlines
Vintage games consoles such as the Sega Megadrive and Nintendo SNES used a special screen
mode which resulted in alternating lines on a CRT display being left blank Typically when people
in the retro-gaming communities refer to scanlines, they mean the blank lines between parts of an
image on a CRT that were a result of this screen mode DExx allows you to simulate these
scanlines, making the image look more authentic You can enable or disable post-processing
scanlines on the DExx by pressing the Menu button on the remote and navigating to “Scanline opt ”
You can also configure scanline strength by using the Scanline Int button on the remote
In scaler mode, the DExx also supports custom scaling algorithms (see page 20 for more
information) Some of these may add scanlines to the image as the image is scaled In this case,
post-processing scanlines should be turned off
How pronounced the scanlines would look on a real CRT varies greatly between displays, so set the
scanline strength to your taste
Setting output resolutions
In line multiplication mode the DExx takes in one scanline and outputs two or more, resulting in a
lag free conversion of 240p to 480p, 720p or higher
To change the line multiplication output resolution, press the Menu on/off button so that the on
screen menu is displayed and use the back button if necessary to navigate to the top menu Select
“Line multiplier opt” and press “OK” The menu shown below will be displayed
Choose “Pure LM opt ” or “Adaptive LM opt ” depending on the mode you are in, for this example
we will assume adaptive mode The menu shown below will then appear
Page 18

You can now choose the output resolution based on the input resolution The most common input
resolutions are 240p for NTSC region retro consoles and 288p for PAL/European region consoles
There is no right or wrong setting for the output resolution, results will vary based on the scaler and
processing in your television or monitor Some users prefer a softer, more natural CRT type look
while others prefer a sharper image
You cannot damage your display by trying the different line multiplication modes If your display
refuses to show a picture, simply use the remote to change to a different mode again
If the DExx is set to scaler mode, the range of output resolutions is more flexible Again, some
experimentation may be required to find the best looking or most compatible modes for your
display
Changing resolution in scaler mode works in much the same way, but is done by accessing “Scaler
opt ” from the top level menu This menu is shown in the picture below
Again, use the left and right or “Value” buttons on the remote to change the resolution You can also
press “OK” to see a list of all supported resolutions

Dexx-vd_isl Quick Start Guide VideoGamePerfection com
Usually the best results in scaler mode are obtained by choosing the highest resolution supported by
your display If you do not get a picture, or the picture intermittently disappears or blanks, choose a
lower resolution
Framelock
Framelock is an important option to understand When Framelock is on, output refresh rate is
matched to the input This results in a smooth image with no judder While this is desirable, it may
be necessary to turn Framelock off for the purpose of compatibility or if your game title uses
multiple screen modes (such as a game which uses interlace in the menu screens but progressive
modes during gameplay) In these cases, choose “Off (50hz)” for PAL material or “Off (60hz)” for
NTSC
In line multipler modes, frame lock is always on and cannot be disabled
Scaling algorithm
You can use this option to change the appearance of the scaled image Generally, it is just a matter
of choosing which option you personally think looks the best For more information on these
options or to use the custom scaling algorithms, please visit the wiki
Interlace video and the DExx
Certain retro consoles and computers (e g Sony PS2, Nintendo Gamecube) output in interlace
modes These modes send alternating scanlines to the display in each frame and were how standard
definition analogue television was broadcast To display interlace video on modern displays, it must
be deinterlaced first
In line multipliaction mode, the DExx can deinterlace content like this with no input lag However,
the image that is produced tends to exhibit some flickering and combing artefacts
If the flicker is distracting, we recommend you use the scaler mode and the motion adaptive
deinterlacer To activate the motion adaptive deinterlacer, follow these steps
Page 20
Table of contents
Popular Video Card manuals by other brands

AMD
AMD FirePro S9000 user guide

Watercool
Watercool HEATKILLER GPU-X2 GTX285V2 Assembly instructions

NEC
NEC N8105-61 Startup guide

Artesyn
Artesyn SharpMedia PCIE-8120 Installation and use

Hercules Computer Technology
Hercules Computer Technology GB 100 owner's manual

FOR-A
FOR-A MFR-9SDI12G installation guide