Viavito Satori User manual

Owner’s Manual.
Exercise Bike.
SATORI
www.viavito.com
Manual version 2.1

02 www.viavito.com
Congratulations
on purchasing your
very own SATORI
Exercise Bike.
Manual Contents.
You have chosen a high-quality, safe and
innovative piece of exercise equipment as
your training partner and we are certain
it will keep you motivated on the way to
Please take the time to read this owner’s
manual as it will help you to get the most
out of your new piece of equipment.
For more information, or if you require
any assistance please email us at
support@viavito.com
Safety Information 03/04
Machine Assembly 05/14
Contents Checklist 05
Hardware Pack 06
Assembly Diagram 07
Assembly Instructions 08/14
Console Instructions 15/22
Button Functions 15
Display Functions 16
Personalising the Units 16
Operation 17/22
Conditioning Guidelines 23/26
Beginners Guide to Exercise 24
Stretching Guide 25/26
Customer Support 27/28
Contact Information 27
Manufacturer’s Warranty 28
Technical Information 29/33
Troubleshooting 29
Space Required 29
Exploded Diagram 30
Parts List 31/33

03www.viavito.com
Safety Information.
• Please read all the instructions carefully
before using this product.
• Retain this manual for future reference.
vary slightly from the illustrations and
are subject to change without notice.
IMPORTANT SAFETY NOTICE:
note the following precautions before
assembling or operating the machine.
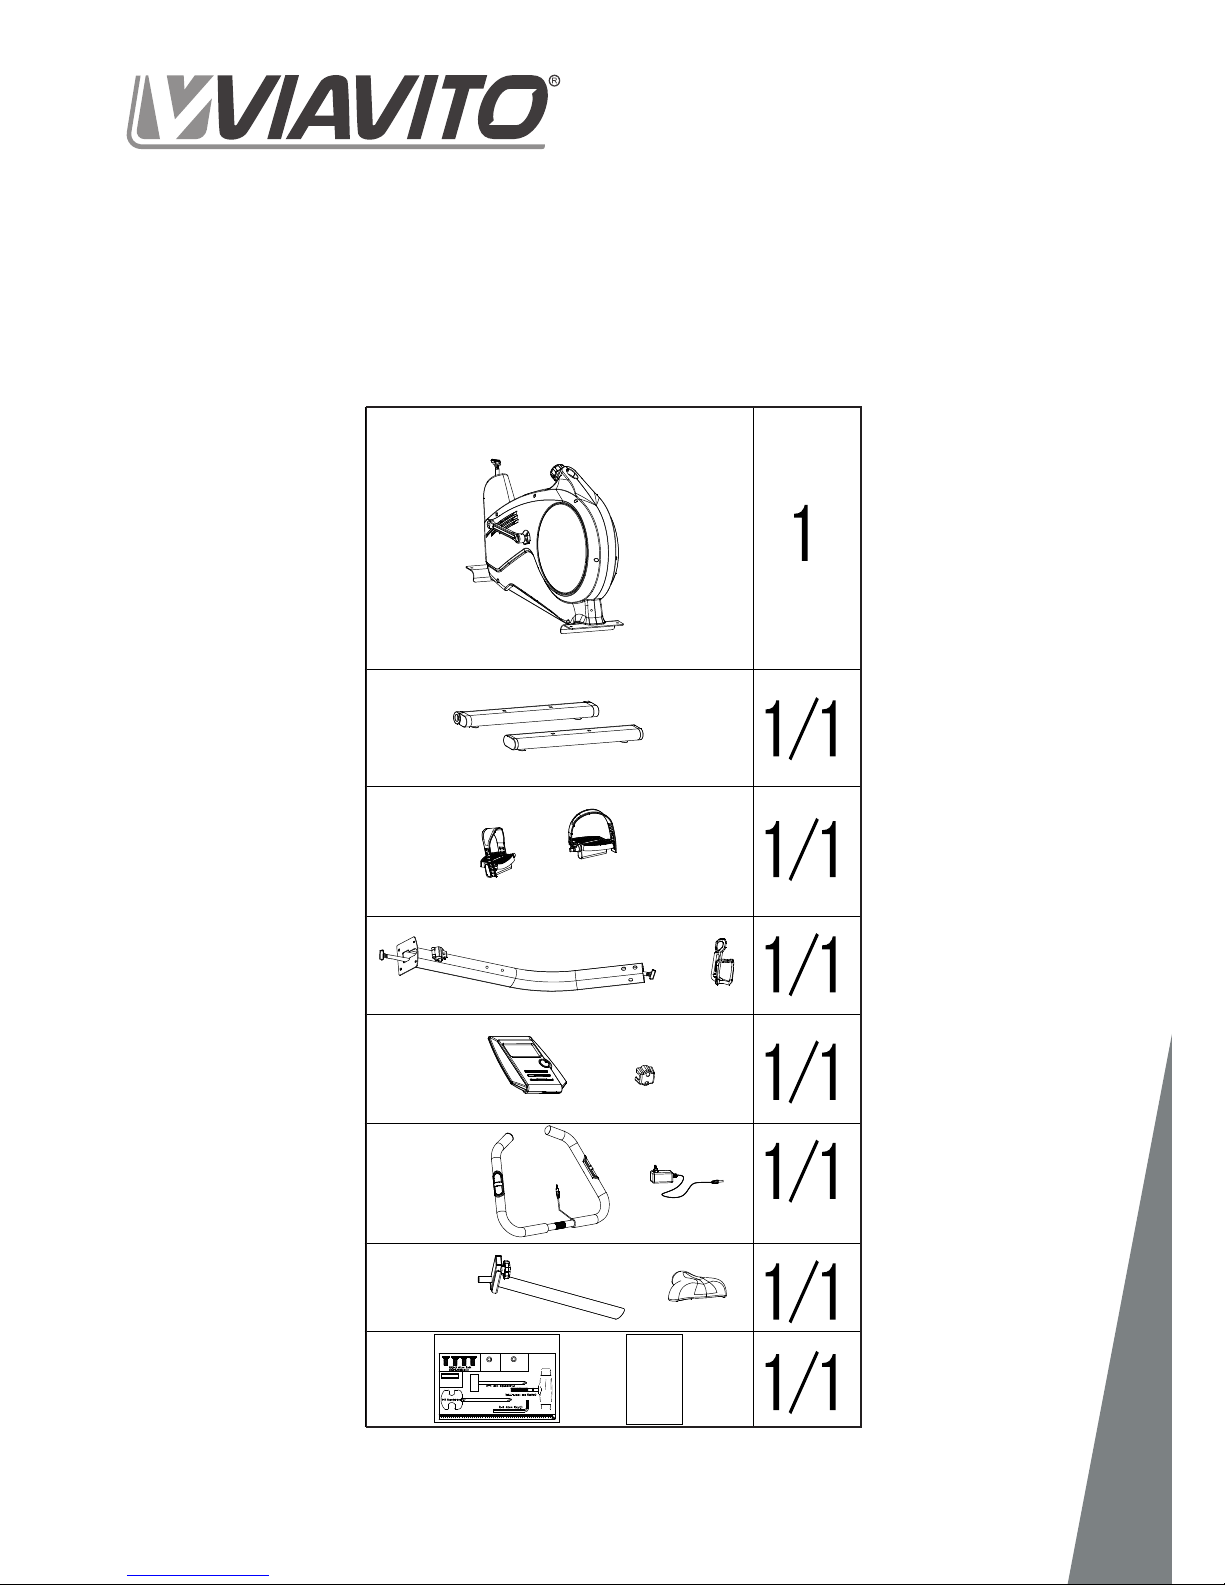
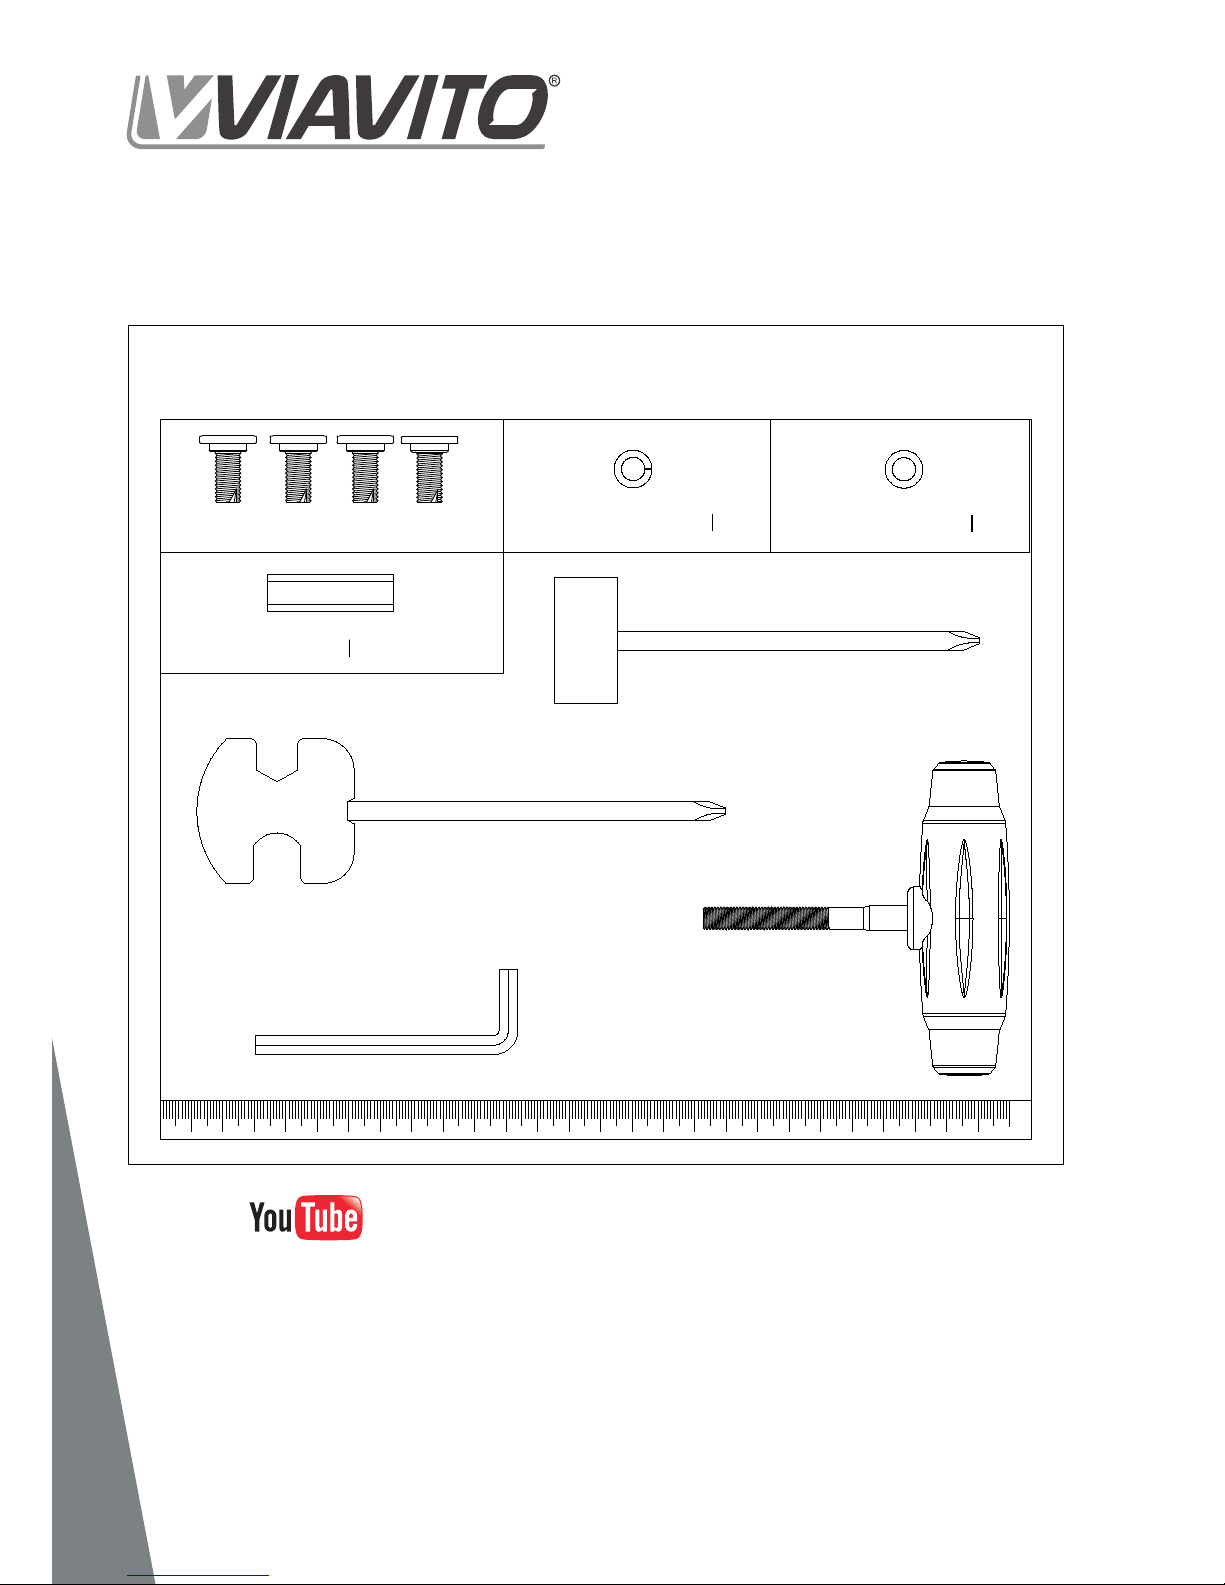
01 Assemble the machine exactly as per
the instructions in this manual, using
only the supplied tools to assemble it.
02 Check all the screws, nuts and other
connections before using the machine
has been built correctly and is safe
to be used.
03 This machine is for indoor, home use
only. Position the machine on a clear,
dry and level surface. DO NOT position
it near water or outdoors.
04 Place a suitable base (e.g. rubber mat,
wooden board etc.) beneath the
machine in the assembly area to
protect it from dirt.
05
space around the exerciser when
you set it up.
06 Before beginning training, remove
all objects within a 2-metre radius
of the machine.
07 Use the machine only for its intended
purpose as described in the manual.
This machine is not suitable for
therapeutic or medical purposes.
08 This machine may only be used by
one person at a time.
09 Always wear appropriate workout
clothing when exercising. Aerobic
shoes are required when using this
machine.
10 Before exercising on this machine,
always warm up and do the stretching
11 When altering any adjustable parts,
make sure they are adjusted properly
and note the marked maximum
position for each part, for example
on the saddle support.
12 DO NOT use aggressive cleaning
products, such as detergents,
to clean the machine. Remove
drops of sweat from the machine
13
incorrect or excessive training.
Consult a doctor before beginning
a training program.
14 WARNING! Heart rate monitoring
systems may be inaccurate. Over
exercising may result in serious injury
or death. If you experience dizziness,
nausea, chest pain, or any other
abnormal symptoms STOP
EXERCISING IMMEDIATELY
AND CONSULT A PHYSICIAN
WITHOUT DELAY.

04
15 Disabled persons should not use this
or physician in attendance.
16 Children should be kept away from the
machine at all times.
17 The maximum user weight is 140kg
(309lbs). The product weighs 31.0kg
(68lbs). Safety standards: EN957 1
& 5 – Class HA
18 WARNING: the safety level of the
machine can be maintained only if it is
examined regularly for damage and
wear, e.g. bearings, connection points.
19 Examine the machine carefully before
you use it, especially the components
most susceptible to wear, e.g.
handlebar, cranks, pedals and the
connection points.
20 Stop using the machine immediately
if there are any defective components
and keep it out of use until you replace
the components or it is repaired by a
21 Use only original spare parts for any
necessary repairs.
22 WARNING! Inappropriate use or of
this machine such as while under the
with instructions or excessive usage,
may result serious injury or death.
WARNING: Before beginning using this
machine or doing any exercise program,
consult your doctor. This is especially
important for people over the age of
35 or those with pre-existing health
problems. Read all instructions before
using this exercise bike.
Viavito assumes no responsibility
for personal injury or property,
and/or damage sustained by or
through the use of this product.
RECYCLING INFORMATION
Used electrical and electronic equipment (WEEE) should not be mixed with general
household waste. For proper treatment, recovery and recycling, please take this
product to designated collection points where it will be accepted free of charge.
Alternatively, in some countries you may be able to return your products to your
local retailer upon purchase of an equivalent new product. Disposing of this product
correctly will help save valuable resources and prevent any potential negative
inappropriate waste handling. Please contact your local authority for further details
of your nearest designated collection point. Penalties may be applicable for incorrect
disposal of this waste, in accordance with your national legislation
SAFETY STANDARDS
This equipment meets the requirements of European safety directives such as: the
Electromagnetic Compatibility (EMC) Directive and the Low Voltage Directive (LVD).
www.viavito.com

User's Manual
B700
NO.N-8RegularWasherφ7(1)
NO.N-9 Spring
Washerφ7(1)
NO.N-7 Bushing
φ12*40MM (1)
05
Machine Assembly.
Contents Checklist Make sure you have the following parts:
www.viavito.com

NO. N-8 Regular Washer O7 (1)
NO. N-9 Spring Washer O 7 (1)
N-4 Box Spanner (1)
N-5 Screwdriver/Wrench (1)
N-6 Allen Key (1)
NO. N-1 T-shape knob
M8x65L (1)
NO. N-7 Bushing O 12x40MM (1)
NO. N-3 Allen Bolt M8xP1 25x16L (4)
(MM)
06 www.viavito.com
Hardware Pack
Please also view our Youtube Assembly
Guide video, should you require extra
assistance in setting up this product:
https://youtu.be/yH8cPgfQuDM

A
M
N-2
N-8
N-1
G-6
K
G-10
I-4
N-3
G-4L
G-20
G-24
H-1
H-2
E-1
E-2
H-3
G-25
N-9
N-7
E-3
J-2 N-3
G-4R
A-1
07
www.viavito.com
Assembly Diagram

I-4
G-9
N-3
J-2
N-3
4
N3 M8x16L N-6 Allen Key
08 www.viavito.com
Step One.
01 Attach the front stabiliser (J-2) to the
main frame (G-9) using the two Allen
bolts (N-3).
02 Attach the rear stabiliser (I-4) to the
main frame (G-9) using the two
Allen bolts (N-3).
Assembly Instructions
Please also view our Youtube Assembly
Guide video, should you require extra
assistance in setting up this product:
https://youtu.be/yH8cPgfQuDM

N-5 Screwdriver/Wrench
G-4R
G-4L
G-12
G-2
09
www.viavito.com
Step Two.
01 Attach the right and left pedals (G-4 R+L) to the right and left cranks (G-2 + G-12)
using the wrench.
Note: Screw the left pedal in counter-clockwise and the right pedal clockwise.
Use the supplied wrench to screw in the two spindles completely.
Do not force the pedal. If it’s not turning freely then unscrew it and re-seat it. Forcing the
pedal on may damage the thread and prevent assembly.

N-4 Box Spanner
N-5 Screwdriver/Wrench
G-6
G-19
K
1
2
10 www.viavito.com
Step Three.
01 Insert the seat post (K) into the main
frame, then choose the desired height and
tighten the knob (G-19). Be sure the knob
is always tightened before exercising.
02 Attach the saddle (G-6) to the seat
slider (L-1). The saddle can be adjusted
angle has been set, tighten the two
nuts under the seat using the wrench.
Keep tightening the nuts until there is
no horizontal or vertical movement.
In addition, the slider can be adjusted on
the horizontal plane by loosening the knob
underneath the slider. Once the desired
position has been set, re-tighten the
knob to secure the slider.

24 2
E-1
Ø8x2T E-2M8x16L E-3Ø8x2T N-6 Allen Key
H-2
E-1
E-2
E-3
H-1
G-24
G-20
11
www.viavito.com
Step Four.
01
(G-24), then unscrew the
pre-assembly semi-circle washer
(E-1), the screw (E-2) and the
main frame.
02 Slide on the handlebar post cover
(G-24) and pass the handlebar post
through it.
03 Hold the handlebar post (H-2)
and carefully connect the lower
computer cable (G-20) to the upper
computer cable (H-1).
04 Slide the handlebar post (H-2)
onto the main frame then secure
it with the 4 sets of semi-circle
washer (E-1), the screw (E-2)
Note: Do not fully tighten the bolts
one at a time. Fix the 4 bolts in place
fully tighten them using the supplied
Allen key.

H-2
N-2
N-7
N-9
N-8
N-1
M
12 www.viavito.com
Step Five.
01 Attach the handlebar (M) to the handlebar
post (H-2) using the main clamp which is
near the top of the handlebar post, and
secure it using the T-knob, spacers and
washers as per the diagram below.
02 Pass the hand pulse wire (M-4) through
the hole on the handlebar post as per
the inset drawing, making sure that the
cables are secured inside the small rubber
grommet. Push the rubber grommet
in position then gently pull through the
wires until they’re neat and tidy.

A
A-1
H-1
M-4
H-3
G-25
H-2
G-10
13
www.viavito.com
Step Six.
01 Connect the upper cable wire (H-1)
to the back of the computer (A), and
the hand pulse wire jack (M-4) to the
female hand pulse socket. Then attach
the computer (A) to the computer
bracket with the enclosed screws (A-1).
02 Remove the screws (H-3) from the post
and attach the bottle holder (G-25) to
the post (H-2) using those screws.

14 www.viavito.com
Step Seven.
01 Connect the power supply (G-10) to the socket at the rear base of the bike and then
plug it into the mains power.
Please also view our Youtube Assembly
Guide video, should you require extra
assistance in setting up this product:
https://youtu.be/yH8cPgfQuDM

15
www.viavito.com
Console Instructions.
DIAL CLOCKWISE Select training mode and adjust function values up by
turning the dial clockwise
DIAL ANTICLOCKWISE Select training mode and adjust function values down by
turning the dial anticlockwise
ENTER
button works by pushing the dial inwards
RESET
Reset: In stop mode, press to go back to the main menu and
clear all set values. Total Reset: At any time, hold the RESET
key for 2 seconds. The screen will show the full display for 2s
and then go back to the home page
START/STOP Start or stop workout
RECOVERY Test heart rate recovery status. See Operation section point 4
on page 22 for more information
BODY FAT In stop mode, press for body fat measurement. See Opera-
tion section point 3.6 on page 21 for more information
KM/ML SWITCH Select KM (°C) or ML (°F) mode
Button Functions

16 www.viavito.com
TIME
Count up – with no pre-set target: Time will count up from 00:00
to a maximum of 99:59.
Count down - If training with a pre-set target time: Time will
count down from your pre-set level to 00:00. Target time can be
set in increments of 1 minute from 01:00 to 99:00
SPEED Displays current training speed with display range of
0.0~99.9km/H &ml/H
RPM Displays Rotations per Minute with display range of 0~999
DISTANCE
Shows total distance from 00:00 up to 99.99 KM or ML. The user
may pre-set a target distance using the dial and ENTER button.
Each increment is 0.1KM or ML
CALORIES
Shows calorie consumption during training from 0 to a maximum
exercise sessions and must not be used for medical purposes)
PULSE
User may set up a target pulse from 0-30 to 230. The computer
buzzer will beep when actual heart rate is over the target value
during the workout. Display range of 30~230
WATTS Displays current workout watts. Display range of 10~350. See
Operation section point 3.5 for more information
Display Functions
Personalising the Units
The display can show units in imperial or metric, with distance in kilometres and
temperature in Celsius or in miles and Fahrenheit. There is a button on the back of the
setting using the switch, and then turn the power back on.

Fig. 1 Fig. 2
Fig. 3
17
www.viavito.com
1. Power on
Connect the power supply and the console
will power on with a long beep sound. The
screen will show the full display for 2s
(figure 1) and then display as per figure
2 for 1s.
Then it will display the calendar setting
mode.
If there is no input for 30s then the
console will enter POWER SAVING mode.
2. Settings
2.1. Setting the Date
Set the year, month, date and clock by using
Operation

Fig. 4
Fig. 6
Fig. 8
Fig. 5
Fig. 7
Fig. 9
18 www.viavito.com
2.2. Setting up User Proles
for personalised data feedback during
workouts such as more accurate calories
their age, gender, height and weight one
after the other to create their own user
button to input all data. The computer will
setting it up, the monitor will go to the main
selected wishes to use the machine, they
should press the reset button, then when U1
is displayed on the screen use the dial to get
press the start/stop key to select it.
Note: If the bike is unplugged from the

Fig. 10
Fig. 12
Fig. 11
Fig.13
19
3. Selecting workout
To select a workout, turn the dial when
in the main menu and press the ENTER
3.1. Manual Mode.
When in the main menu, press the START/STOP
button to begin exercising in MANUAL mode.
When entering Manual mode, you may set
a Time, Distance, Calories or Pulse target,
and the LOAD level (resistance), pressing
the target, press the START/STOP button
to start the workout.
The LOAD level also can be adjusted from
level 1 to level 32 during exercise by
turning the dial.

Fig. 15
Fig. 14
20 www.viavito.com
3.2. Program Mode.
In PROGRAM mode, rotate the dial and press
the ENTER button to select
Program1~Program12. After the program has
Choose the LOAD level by rotating the dial.
Press the ENTER button to set the workout
target (TIME/DISTANCE/CALORIES/PULSE).
Then press START/STOP to begin the work-
out. All 12 pre-set programs are scalable,
so you can increase the LOAD (resistance)
3.3. User Program Mode.
If USER PROGRAM is selected, you can
turning the dial and pressing ENTER.
There are 20 segments to set. Hold the
parametres.
The machine will store the program for
quick access when you want to perform
it. The program is also scalable, so as your
-
sistance up to the maximum level to keep
yourself challenged whilst still doing your
favourite workout.
3.4. H.R.C Mode.
Heart Rate Control mode lets you train at
set user AGE using the dial (pre-set age is
25), then go to program selection.
There will be 4 programs to choose from:
These heart rate percentages are based
on the maximum level for the input age,
and TAG lets you set your own pulse target
from 30~230. Use the dial to select one of
the programs and press the ENTER button
to set your exercise target. Press the
START/STOP button to start the workout.
To perform this program you must wear
a compatible chest strap that pairs with
the console. Once you begin the program,
the machine will automatically adjust the
resistance to maintain your heart rate at
For more information about target heart
rate, see the section in the Conditioning
Guidelines on page 23.
Other manuals for Satori
2
Table of contents
Other Viavito Exercise Bike manuals