Videology 45S10SL User manual

Doc # INS-45S10SL
Issue Date: 01/12/2012
Revision: A
Page 1 of 15
Prior to Using This Document: Videology reserves the right to modify the information in this
document as necessary and without notice. It is the user’s responsibility to be certain they possess the
most recent version of this document by going to www.videologyinc.com, searching for the model
number, and comparing revision letters on the respective document, located in the document’s footer.
For technical assistance with this product, please contact the supplier from whom the product was
purchased.
Videology® Imaging Solutions, Inc.
Videology® Imaging Solutions, Europe B.V.
37M Lark Industrial Parkway
Greenville, Rhode Island 02828 USA
Tel: (401) 949 –5332 Fax: (401) 949 –5276
North/South American Sales: sales@videologyinc.com
www.videologyinc.com
Neutronenlaan 4
NL-5405NH Uden, The Netherlands
Tel: +31 (0) 413 256261 Fax: +31 (0) 413 251712
European Sales: info@videology.nl
www.videology.nl
Instruction Manual
45S10SL
IMAGING SOLUTIONS INC.
Original Equipment Manufacturer

Doc # INS-45S10SL
Issue Date: 01/12/2012
Revision: A
Page 2 of 15
Table of Contents
1. Document History....................................................................................................................3
2. Scope of Work.........................................................................................................................3
3. Specifications..........................................................................................................................3
4. Optical Specifications ...............................................................................................................3
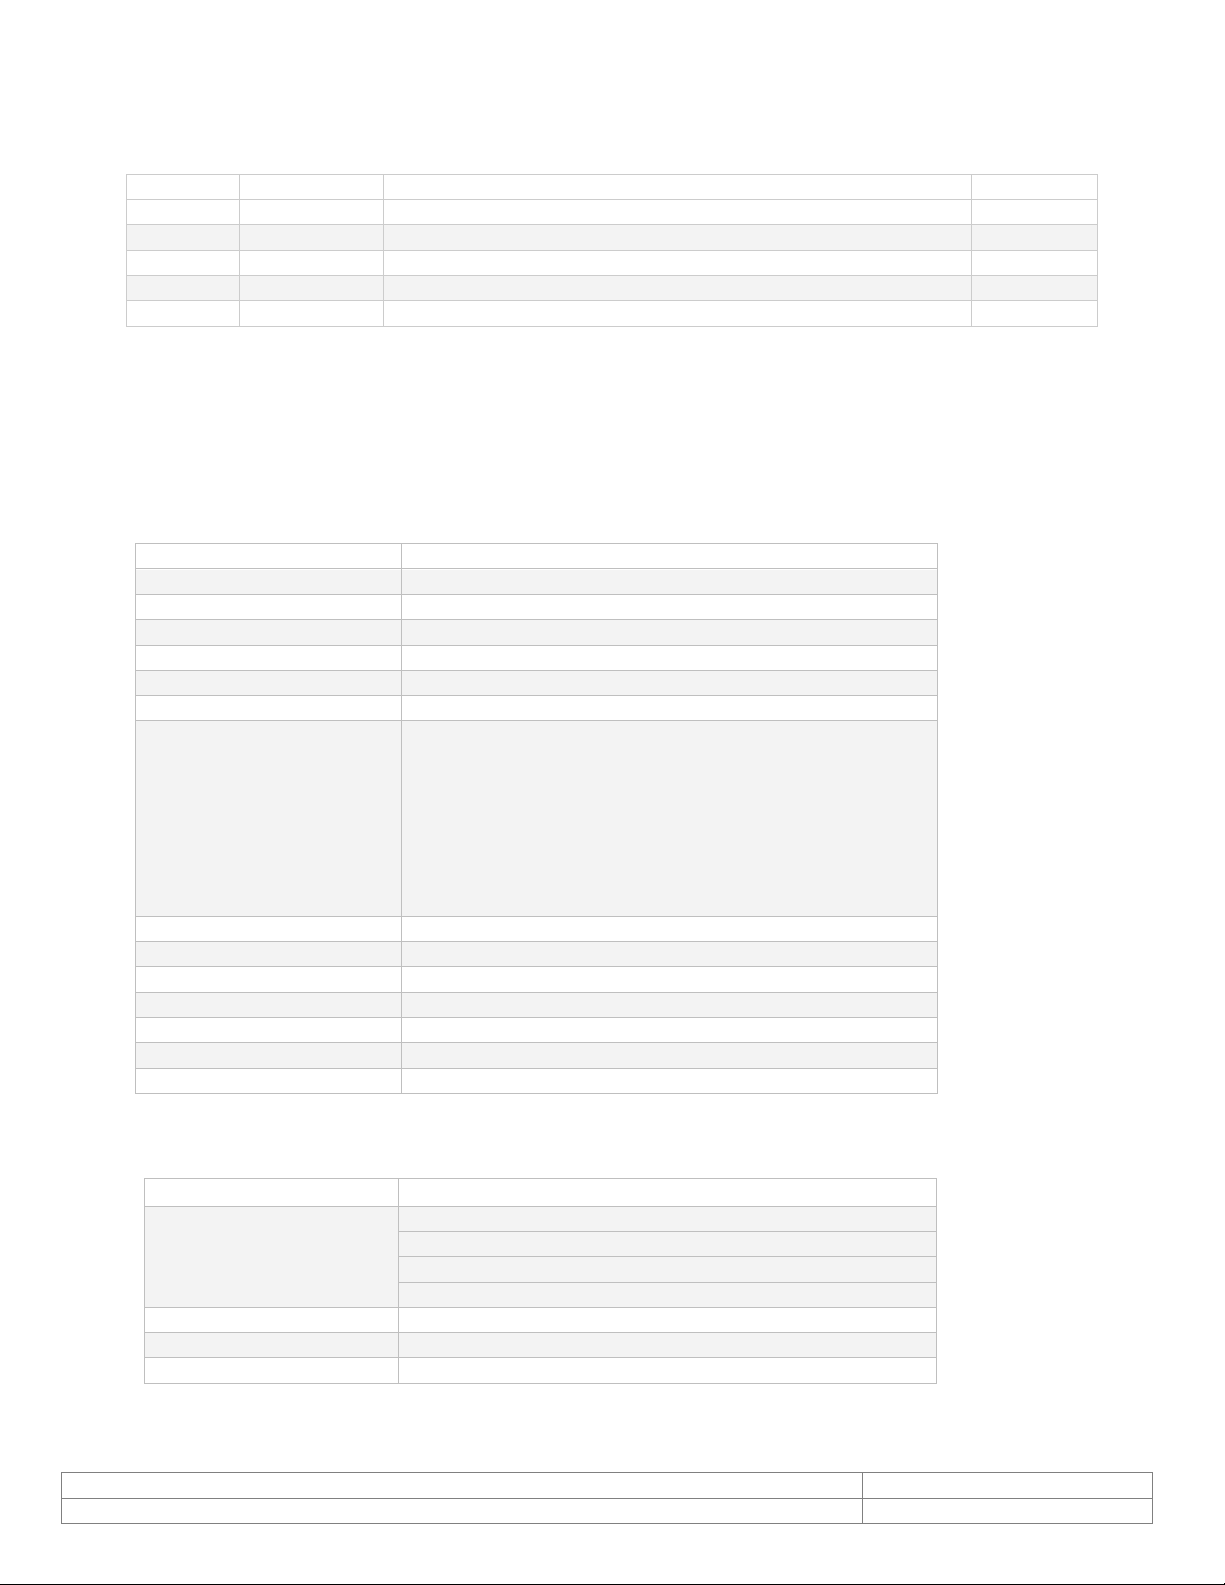
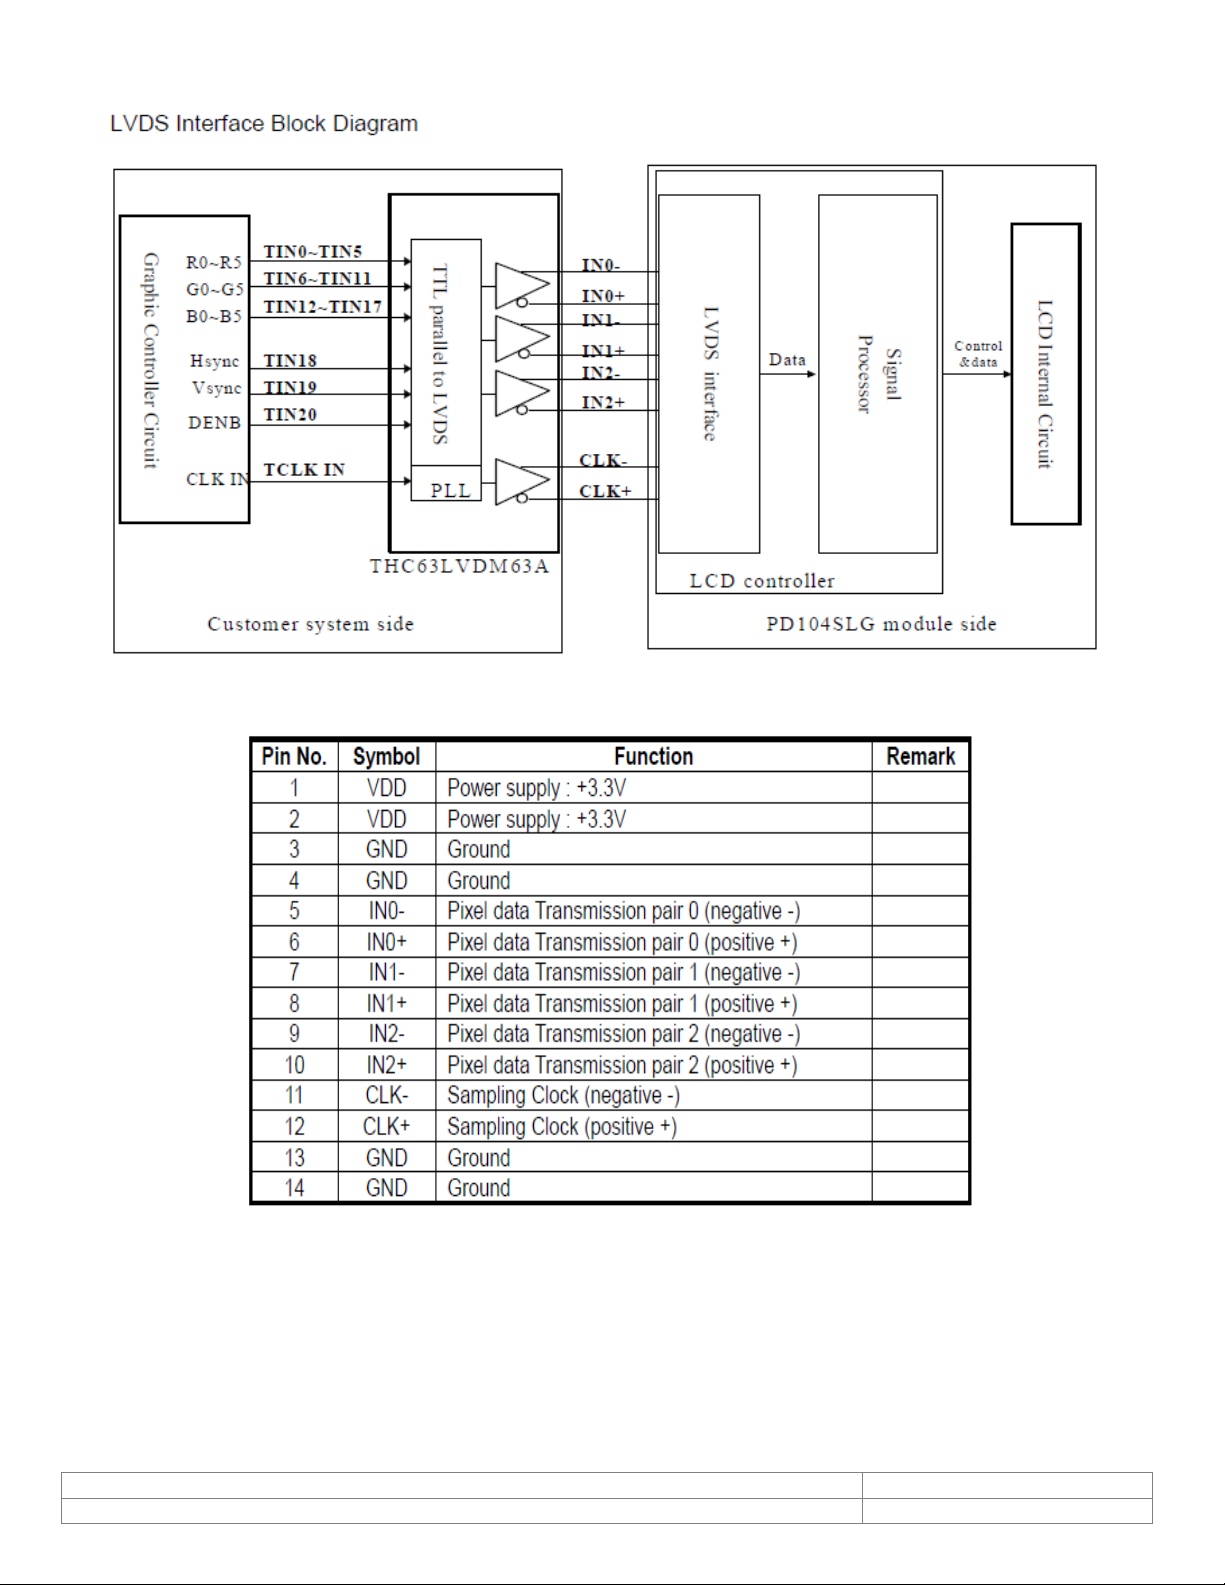
5. Block Diagram.........................................................................................................................4
6. Input Terminal Pin Assignment..................................................................................................4
7. Inspection Standard.................................................................................................................5
7.1. Inspection environment conditions ......................................................................................5
7.2. Classification of Defects .....................................................................................................5
8. Reference Drawings .................................................................................................................6
8.1. Drive Board w/Input Connectors .........................................................................................6
8.2. LED Backlight Board ..........................................................................................................7
8.3. Function Key /IR LED Board ...............................................................................................7
9. Remote control operation .........................................................................................................8
10. OSD Function ......................................................................................................................9
10.1. Source .........................................................................................................................9
10.2. Item (Hot key, simple operation).....................................................................................9
10.3. OSD Menu ....................................................................................................................9
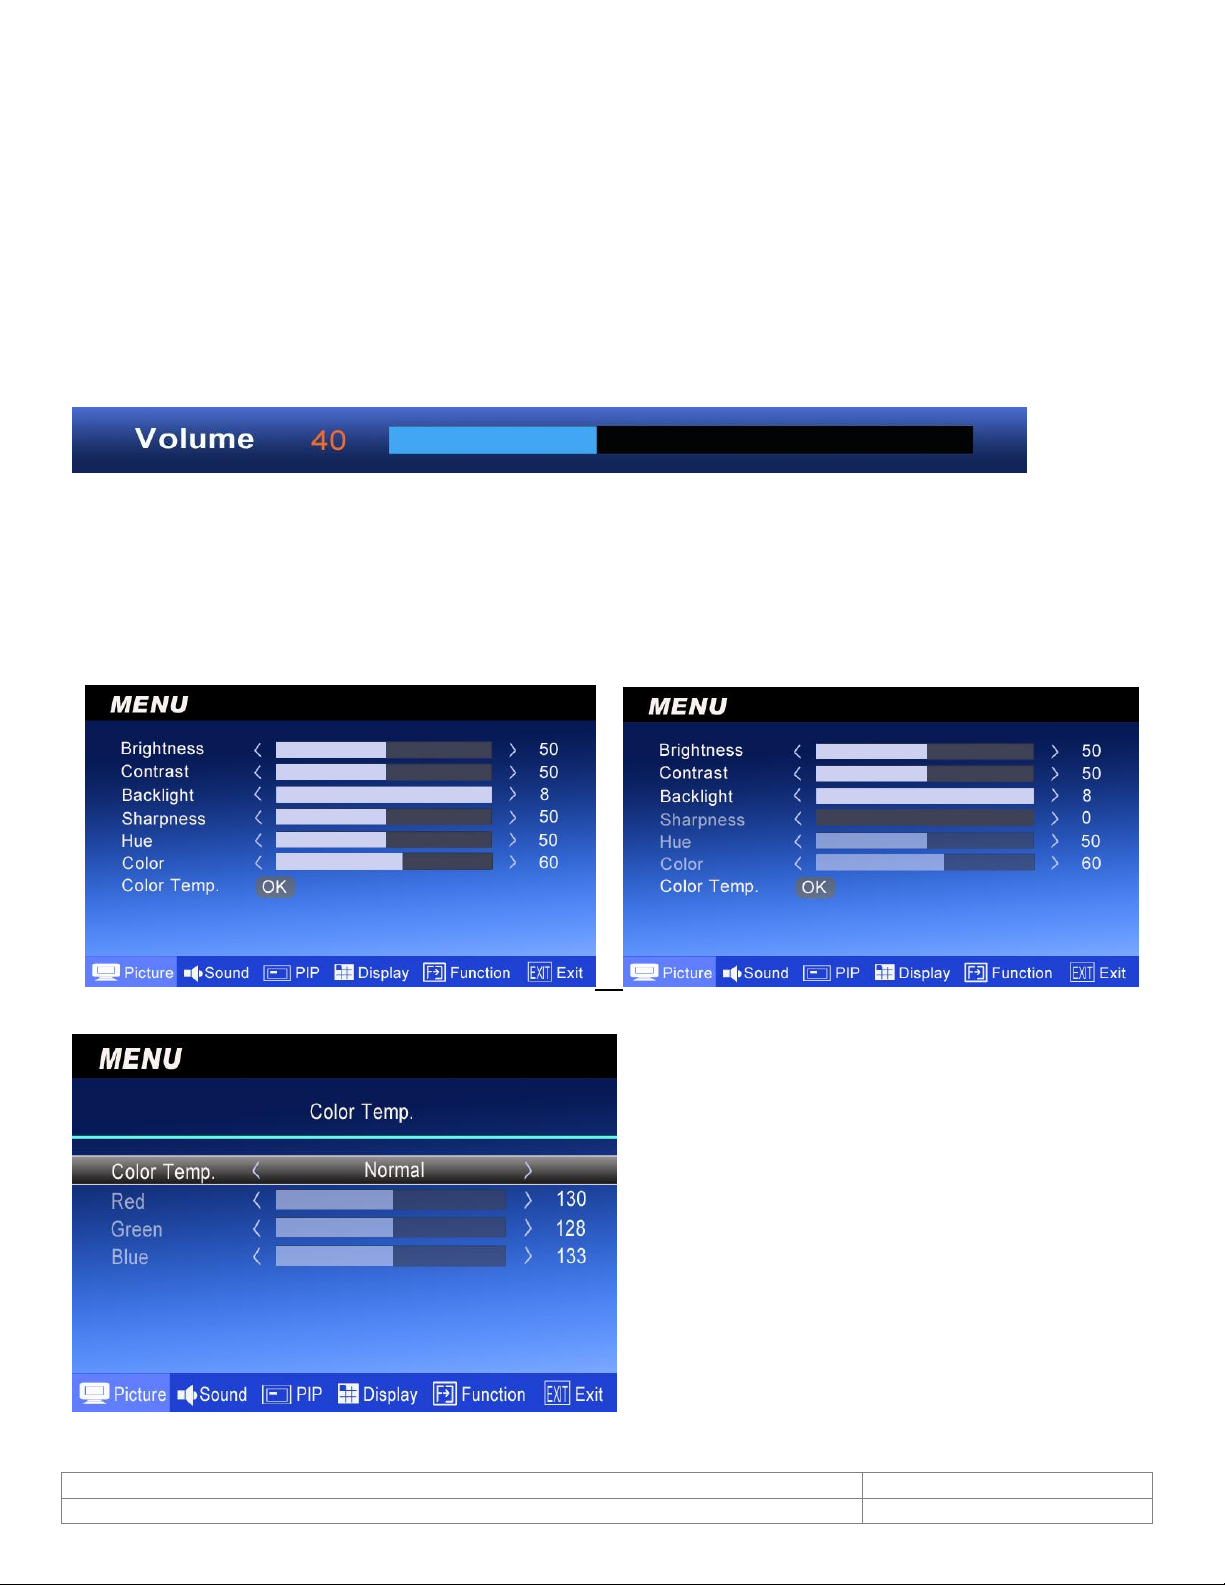
10.4. PICTURE.......................................................................................................................9
10.5. SOUND....................................................................................................................... 10
10.6. PIP ............................................................................................................................ 11
10.7. Display....................................................................................................................... 11
10.8. Image Optimize........................................................................................................... 12
10.9. Function ..................................................................................................................... 13
10.10. Exit............................................................................................................................ 13
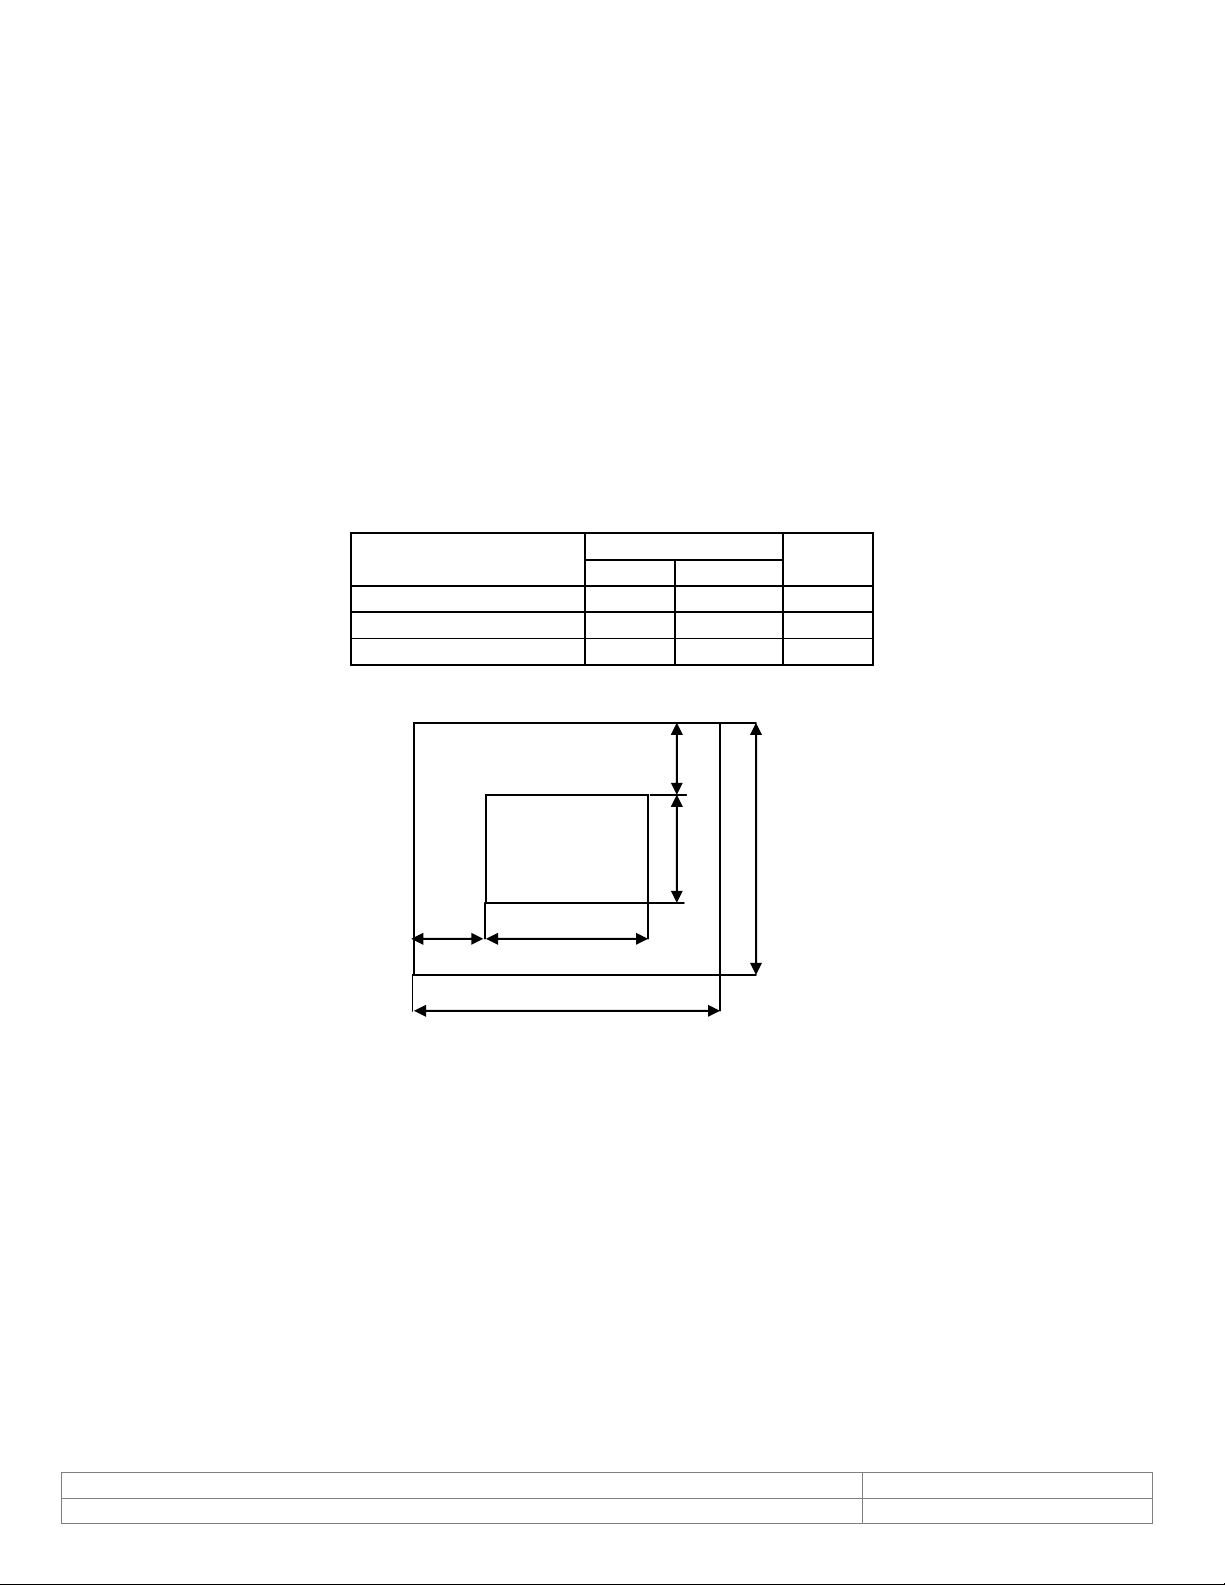
11. Outline Dimension of LCD Panel ........................................................................................... 14
12. Contact Information ...........................................................................................................15

Doc # INS-45S10SL
Issue Date: 01/12/2012
Revision: A
Page 3 of 15
1. Document History
2. Scope of Work
This specification shall be applied to model: 45S10SL, 10.4” TFT sunlight readable
LCD module with 3D comb filter, 3D De-interlace, and noise reduction.
3. Specifications
Display
10.4” color TFT LCD
Number of dots
800 x 600
Active Area
211.2(H) x 158.4(V)
Dot Pitch
0.264(H) x 0.264(V)
Color Configurations
RGB Stripe
Display Color
262K
Back Light
LED
Input/output
Signal/Connector
NTSC/PAL Auto Switchable.
1 CH Composite video Input/Output (BNC x 2)
Input Impedance Auto Termination.
1CH S-Video Input (4P Mini-Din X1)
1CH PC Analog RGB Input (D-sub 15P)
1CH Audio L/R Input (RCAX2)
1CH PC Audio Phone jack , 3.5ψ x1
Speaker 2WX2(option)
Power Input Voltage
DC12±10%
Power Consumption
19W max
External Control
OSD Function Control
Operating Temperature
0°C~50°C
Storage Temperature
-10°C~60°C
Overall Dimension
243.0(W) x 185..1(H) x 10.5D) (Panel only)
Weight
470g (Panel only)
4. Optical Specifications
Lamp Life-time
20,000hr min. (at Temp =25℃)
Viewing Angle (min.)
Right 75 degrees
Left 75 degrees
Up 60 degrees
Down 50 degrees
Brightness
1200 nit
Contrast Ratio
600:1 typical
Response Time
Tr: 15 ms Tƒ: 25ms (Typ)
Revision
Issue Date
Reason
CN#
Rev A
01-12-12
Initial release
11-0120

Doc # INS-45S10SL
Issue Date: 01/12/2012
Revision: A
Page 4 of 15
5. Block Diagram
6. Input Terminal Pin Assignment

Doc # INS-45S10SL
Issue Date: 01/12/2012
Revision: A
Page 5 of 15
7. Inspection Standard
7.1. Inspection environment conditions
Room temperature 20~25℃
Humidity 65±5% RH
The viewing line should be perpendicular to the surface screen.
7.2. Classification of Defects
Dot defect
A. Inspection condition
Inspection distance: 35±5cm
Inspection illumination: 100~150Lux
Panel temperature: 30±5℃
Inspection pattern: Full white, full black, red, green and blue screens.
B. Acceptable
Item
Area
Total
A
B
Blue Black
2
3
4
Red Green White
1
3
3
Total
2
5
7
C. The definitions of A and B zone
Scratch on the polarizer
Number = 3 max.
Width ≦0.1 mm, Length ≦6 mm
Dent on the polarizer
Number = 3 max., Average Diameter ≦0.3 mm
Foreign material on the polarizer
Number = 2 max, Average Diameter ≦0.5 mm
Afterimage
After displaying a pattern for 5 seconds then switch to a different pattern, the previous pattern should
disappear within 10 seconds.
B
A
H
H/4
H/2
V
V/2
V/4

Doc # INS-45S10SL
Issue Date: 01/12/2012
Revision: A
Page 6 of 15
8. Reference Drawings
8.1. Drive Board w/Input Connectors

Doc # INS-45S10SL
Issue Date: 01/12/2012
Revision: A
Page 7 of 15
8.2. LED Backlight Board
8.3. Function Key /IR LED Board
1. SOURCE
Select input signal from AV1, S-Video or
VGA.
Used as "Return/Exit" function in OSD menu
2. MENU
Push to call out OSD menu.
Used
as
Confirm / OK function in OSD menu.
3. ITEM
Hot key selection for < Brightness/ Contrast/
Backlight/ Sharpness/ Hue/ Color/ Volume >
function OSD menu
4. Adjust
Increase or decrease the value on OSD
menu.
Used as UP or Increase value
on the OSD Menu.
5. Adjust
Used as DOWN or Decrease value
on the OSD Menu.
6. Power
Push to turn on and turn off the unit.
Power indicator Green: Power on

Doc # INS-45S10SL
Issue Date: 01/12/2012
Revision: A
Page 8 of 15
9. Remote control operation
1. Power: Push to turn on and turn off the unit.
2. Mute: Disable the unit's sound output,
press the button again or the Volume +/- button to
restore the volume.
3. Zoom: Toggle between the image ratios.
(4:3/16:9/14:9/Movie/Panorama)
4. PC/HD, AV1/AV2, SV: Press to choose the desired
signal source directly.
5. Item: As hot key selection for Brightness/Contrast/
Backlight/Sharpness/Hue/Color /Volume > adjust
6. Source/ (Exit):Push to select input
signal. Used as "Return/Exit" function in OSD menu.
7. OK/Menu: Push to call out OSD menu.
Used
as
"Confirm / OK" function in OSD menu.
8. Select▲/▼: Change the function up or down.
9. Display: Press to display the information on the screen,
such as resolution, signal source etc.
10. Picture: Toggle between the different picture modes.
Standard /Soft/Personal /Bright.
11. Freeze: Press to freeze the picture(AV1,AV2,SVideo),
press again to restore.
12. PIP:Press to activate the PIP function and select the size of sub-picture Small/ Medium/ Large/
1+1/ Off. Off means PIP function is turned off.
13. Swap: In the PIP mode, press the button to switch the main picture and sub-picture. (This
function works only when sub-picture exists.)
14. Position: PIP mode Press to select the position of sub-picture. (4 corners and center)
15. Sleep: Select the Automatic turn off time.

Doc # INS-45S10SL
Issue Date: 01/12/2012
Revision: A
Page 9 of 15
10.OSD Function
10.1. Source
Push <Source>button to selection the channel.
AV/SVIDEO/PC
10.2. Item (Hot key, simple operation)
Use the < Item > button as a hot key to call out the Adjust bar. Then use the +/- button to increase/
decrease the menu bar.
(Brightness/Contrast/Backlight/Sharpness/Hue/Color/Volume)
10.3. OSD Menu
Push <Menu>button to display the Main menu.
Main menu includes (Picture)、(Sound)、(PIP)、(Display)、(Function) and (Exit)- 6 categories.
Use Select (▲▼) button to select the function category to be adjusted.
Push the Menu/OK button to enter the selected category.
10.4. PICTURE
(Mode: AV, S-VIDEO, HD)(Mode: PC D-Sub)
(Color Temp.)
Use Select (▲▼) button to select the item to be adjusted.
Push <Menu> to confirm the selected item; use Select
(▲▼) button to adjust and then push <Source> button to
return.

Doc # INS-45S10SL
Issue Date: 01/12/2012
Revision: A
Page 10 of 15
10.5. SOUND
Use Select (▲▼) button to select the item to be adjusted. Push Menu to confirm the selected item, use
Select (▲▼) button to adjust and then push <Source> button to return.
MENU
FUNCTION
MODE
Sound Mode
Use Select(▲)(▼)button to select
Theater//Music/News/Original/User- 5 kinds of modes.
all
Bass
Use Select(▲)(▼)button to adjust the Bass.
all
Treble
Use Select(▲)(▼)button to adjust the Treble.
all
Balance
Use Select(▲)(▼)button to adjust the left / right balance.
all
Speaker Enhance
Use Select(▲)(▼)button to select On/Off
all
MENU
FUNCTION
MODE
Brightness
Use Select (▲▼)button to increase/decrease the screen brightness.
all
Contrast
Use Select (▲▼)button to increase/decrease the screen contrast.
all
Back light
Use Select (▲▼)button to increase/decrease the screen backlight.
all
Sharpness
Use Select (▲▼)button to adjust the sharpness of the image.
AV/S-video
Hue
Use Select (▲▼)button to adjust the hue of the image.
AV/S-video
Color
Use Select (▲▼)button to increase/decrease the image color
saturation.
AV/S-video
Color Temp.
Use Select (▲▼)button to select the desired color temperature.
There are Normal / Warmer / Warm / Cool / Cooler / User- 6
modes. In User mode, push <MENU> button to enter and adjust the
Red/Green/Blue color separately.
all

Doc # INS-45S10SL
Issue Date: 01/12/2012
Revision: A
Page 11 of 15
10.6. PIP
Use Select (▲▼) button to select the item to be adjusted. Push Menu to confirm the selected item, use
Select (▲▼) button to adjust and then push <Source> button to return.
10.7. Display
Use Select (▲▼) button to select the item to be adjusted. Push Menu to confirm the selected item , use
Select (▲▼) button to adjust and then push <Source> button to return.
(Mode:AV、S-VIDEO,HD) (Mode:PC D-Sub)
MENU
FUNCTION
PIP Source
Use Select (▲▼) button to select the source of sub-picture.
PIP Size
Use Select (▲▼) button to select the size of sub-picture
Small/Medium/Large/1+1/Off. Off means PIP function is turned off.
PIP Swap
Push <MENU> button to switch the main picture and sub-picture.
(This function works only when sub-picture exists )
PIP Position
Use Select (▲▼) button to select the position of sub-picture(0~5)
4 corners and center.(This function works only when sub-picture exists)

Doc # INS-45S10SL
Issue Date: 01/12/2012
Revision: A
Page 12 of 15
10.8. Image Optimize
(Mode:AV、S-VIDEO,HD) (Mode:PC D-Sub)
MENU
FUNCTION
MODE
MADI
Use Select (▲▼) button to select Auto/Off/Standard
3 kinds of modes.
all
DCDI
Use Select (▲▼)button to select On/Off.
all
CCS
Use Select (▲▼)button to select Auto/Off/Standard
3 kinds of modes.
all
DNR
Use Select (▲▼) button to select Low/ Medium/ High/ Off
4 kinds of modes.
AV/S-video
Auto Color
Push <MENU> button to adjust the best image color.
PC
MENU
FUNCTION
MODE
H. Position
Use Select (▲▼) button to adjust the horizontal position of the
image.
all
V. Position
Use Select (▲▼) button to adjust the vertical position of the
image.
all
Image Ratio
Use Select (▲▼)button to select the image ratio.
PC mode : 4:3/16:9
AV/S-VIDEO mode : 4:3/16:9/14:9/Movie/Panorama
all
Image Optimize
Push <MENU> button to enter the sub-menu and use Select
(▲▼) button to adjust/select
all
Phase
Use Select (▲▼) button to increase/decrease the noise on the
screen.
PC
Clock
Use Select (▲▼) button to increase/decrease the snowflake
noise on the screen.
PC
Auto Adjust
Push <MENU> button to adjust the best image.
PC

Doc # INS-45S10SL
Issue Date: 01/12/2012
Revision: A
Page 13 of 15
10.9. Function
Use Select (▲▼) button to select the item to be adjusted. Push MENU to confirm the selected item,
Use Select (▲▼) button to adjust and then push <Source> button to return.
10.10.Exit
Push <MENU>to exit the OSD menu.
MENU
FUNCTION
MODE
OSD Language
Use Select (▲▼)button to select the desired language.
all
OSD Time
Use Select (▲▼)button to increase/decrease the OSD display time.
all
OSD Blend
Use Select (▲▼)button to increase/decrease the transparent degree
of the OSD display.
all
Sleep Time
Use Select (▲▼) button to select the automatic turn off time.
Off/10/20/30/60/90/120/150/180 Min.
all
Image Auto Move
Use Select (▲▼) button to select the image move time.
Off/30/60/90/120/180 Min.
all
Reset
Push <MENU> button to return to factory default setting.
all

Doc # INS-45S10SL
Issue Date: 01/12/2012
Revision: A
Page 14 of 15
11.Outline Dimension of LCD Panel

Doc # INS-45S10SL
Issue Date: 01/12/2012
Revision: A
Page 15 of 15
12.Contact Information
For technical assistance with this product, please contact the supplier from whom the product
was purchased.
For OEM inquiries, contact Videology Imaging Solutions:
North / South America:
Europe:
Videology Imaging Solutions Inc.
37M Lark Industrial Parkway
Greenville, RI 02828
USA
Tel: (401) 949-5332
Fax: (401) 949-5276
Videology Imaging Solutions Europe
Neutronenlaan 4
NL-5405 NH Uden,
Netherlands
Tel: +31 (0) 413 256 261
Fax: +31 (0) 413 251 712
Please visit our website at: http://www.videologyinc.com
VIDEOLOGY IMAGING SOLUTIONS is an ISO 9001 registered video camera developer and
manufacturer serving industrial, machine vision, biometric, security, and specialty OEM markets.
Videology designs, develops, manufactures, and distributes video, image acquisition, and display
technologies and products to OEMs worldwide.
Table of contents
Other Videology Control Unit manuals
Popular Control Unit manuals by other brands

Nice
Nice MOONCLEVER MC424 Instructions and warnings for installation and use

Reliance
Reliance Cash Acme EB45 installation instructions

Emerson
Emerson Alco Controls 110RB Operating instruction

Beckmann
Beckmann EMS-1040 operating manual

Pickering
Pickering 4 890 Series manual

CEAG
CEAG COOPER Crouse-Hinds GHG 664 5 Series operating instructions

LOVATO ELECTRIC
LOVATO ELECTRIC ATL DPS1 operating manual

Emerson
Emerson Fisher ET instruction manual

Duplomatic
Duplomatic UEIK-11RS Series manual

HAUTAU
HAUTAU RAZ K Installation and operating instructions

Honeywell
Honeywell ADEMCO 5800RL Installation and setup guide

Metso
Metso neles ND7000H operating instructions