Videotec OHEPS19B User manual

EN English - Instructions manual
IT Italiano - Manuale di istruzioni
FR Francais - Manuel d'instructions
DE Deutsch - Bedienungslanleitung
OHEPS19B
Kit for wide range camera power supply IN 100-240Vac - OUT 12Vdc


EN - English - Instructions manual
EN
ENGLISH
1
About this manual1
Before installing and using this unit,
please read this manual carefully. Be sure
to keep it handy for later reference.
Typographical conventions1.1
DANGER!
g High level hazard.
Risk of electric shock; disconnect the
power supply before proceeding with any
operation, unless indicated otherwise.
WARNING!
h Medium level hazard.
This operation is very important for
the system to function properly: please
read the procedure described very
carefully and carry it out as instructed.
INFO
j Description of system specifications.
We recommend reading this part
carefully in order to understand
the subsequent stages.
Notes on copyright and2
information on trademarks
The quoted names of products or companies
are trademarks or registered trademarks.
Safety rules3
The manufacturer declines all responsibility
h for any damage caused by an improper use
of the appliances mentioned in this manual.
Furthermore, the manufacturer reserves
the right to modify its contents without
any prior notice. The documentation
contained in this manual has been
collected with great care, the manufacturer,
however, cannot take any liability for
its use. The same thing can be said for
any person or company involved in the
creation and production of this manual.
The device must be installed only and•
exclusively by qualified technical personnel.
Before any technical work on the appliance,•
disconnect the power supply.
Do not use power supply cables•
that seem worn or old.
Never, under any circumstances, make any•
changes or connections that are not shown in
this handbook: improper use of the appliance
can cause serious hazards, risking the safety
of personnel and of the installation.
Use only original spare parts. Non-•
original spare parts could cause fire,
electrical discharge or other hazards.
Before proceeding with installation check•
the supplied material to make sure it
corresponds with the order specification:
examine the identification labels, as described
in the section on Product markings.
OHEPS19B
Kit for wide range camera power supply IN 100-240Vac - OUT 12Vdc, 1A

EN - English - Instructions manual
2
Installing and assembling6
Only specialised personnel should be
h allowed to install and assemble the device.
Installation6.1
Before carrying out any operation
g remember to disconnect the power
supply from the product.
The kit is designed to operate with an
h input power supply voltage of 100-240Vac
and with an output voltage of 12Vdc,
1A. Never power the kit with a voltage
different from the one indicated!
The wide range power supply
h is not applicable to cases with
installed cooling device.
Installation in HEG housing6.1.1
Open the housing unscrewing the
3 screws on the rear side.
Place the equipped power supply (01) in the site
view for this purpose of the rear side of the housing.
Fix the power supply on the bottom of
the housing using the special bracket
(02) and the supplied screws (03).
Insert the 6 poles connector of the power supply
cable (04) in the corresponding connector
(05) on the circuit shown as J5 (Fig. 02).
01
02
03
04
05
Fig. 01
Identification4
Product description4.1
and type designation
Kit for wide range camera power supply
IN 100-240Vac - OUT 12Vdc, 1A.
Product markings4.2
See the label attached to the outside of the package.
Preparing the5
product for use
Any change that is not expressly
h approved by the manufacturer
will invalidate the guarantee.
Contents and unpacking5.1
When the product is delivered, make sure that
the package is intact and that there are no
signs that it has been dropped or scratched.
If there are obvious signs of damage,
contact the supplier immediately.
Keep the packaging in case you need
to send the product for repairs.
Check the contents to make sure they correspond
with the list of materials as below:
1 wide range power supply•
IN 100-240Vac - OUT 12Vdc, 1A
1 power supply bracket•
Fixing screws•
1 instructions manual•
Safely disposing of5.2
packaging material
The packaging material can all be recycled.
The installer technician will be responsible for
separating the material for disposal, and in
any case for compliance with the legislation
in force where the device is to be used.
Bear in mind that if the material has to be returned
due to a fault, using the original packaging
for its transport is strongly recommended.

EN - English - Instructions manual
3
01
02
03
04
05
Mounting on VERSO housing.Fig. 03
01
02
03
04
05
Mounting on VERSO COMPACT housing.Fig. 04
IN 100-240Vac
OUT 12Vdc
J5 J3
J1
OUT
100-240Vac
Electronic board mounting on VERSO housing.Fig. 05
OUT 12Vdc IN 100-240Vac
J5 J3
J1
OUT
100-240Vac
Electronic board mounting onFig. 06
VERSO COMPACT housing.
Close the housing by proceeding in the
reverse order to that described above.
IN 100-240Vac
OUT 12Vdc OUT 100-240Vac
Fig. 02
Close the housing by proceeding in the
reverse order to that described above.
Installation in VERSO and6.1.2
VERSO COMPACT housings
Open the housing and place the power
supply (03) in the proper seat.
Fix the power supply to the body of the housing
using the corner support bracket (01) and
the screws (02) provided for this purpose.
Insert the 6 poles connector at the end of
the cable (04) in the corresponding socket
identified by J5, on the support circuit (05).
Connect the power supply to the terminal
identified by J3 on the support circuit (05).
Connect the 12Vdc power supply of the
camera to the terminal identified by J1
(12Vdc, GND) on the support circuit.

EN - English - Instructions manual
4
Disposal of waste7
materials
This symbol mark and recycle system
n are applied only to EU countries
and not applied to the countries
in the other area of the world.
Your product is designed and manufactured
with high quality materials and components
which can be recycled and reused.
This symbol means that electrical and electronic
equipment, at their end-of-life, should be disposed
of separately from your household waste.
Please dispose of this equipment at your local
Community waste collection or Recycling centre.
In the European Union there are separate collection
systems for used electrical and electronic products.

IT - Italiano - Manuale di istruzioni
IT
ITALIANO
1
Informazioni sul1
presente manuale
Prima di installare e utilizzare questa unità, leggere
attentamente questo manuale. Conservare questo
manuale a portata di mano come riferimento futuro.
Convenzioni tipografiche1.1
PERICOLO!
g Pericolosità elevata.
Rischio di scosse elettriche. Togliere
l'alimentazione prima di procedere con
le operazioni, salvo diversa indicazione.
ATTENZIONE!
h Pericolosità media.
L'operazione è molto importante per
il corretto funzionamento del sistema.
Si prega di leggere attentamente
la procedura indicata e di eseguirla
secondo le modalità previste.
INFO
j Descrizione delle caratteristiche del
sistema.
Si consiglia di leggere attentamente
per comprendere le fasi successive.
Note sul copyright2
e informazioni sui
marchi commerciali
I nomi di prodotto o di aziende citati sono
marchi commerciali o marchi commerciali
registrati appartenenti alle rispettive società.
Norme di sicurezza3
Il produttore declina ogni responsabilità
h per eventuali danni derivanti da un
uso improprio delle apparecchiature
menzionate in questo manuale. Si
riserva inoltre il diritto di modificarne il
contenuto senza preavviso. Ogni cura é
stata posta nella raccolta e nella verifica
della documentazione contenuta in
questo manuale, tuttavia il produttore
non può assumersi alcuna responsabilità
derivante dall'utilizzo della stessa.
Lo stesso dicasi per ogni persona o
società coinvolta nella creazione e
nella produzione di questo manuale.
L'installazione e la manutenzione del•
dispositivo deve essere eseguita solo
da personale tecnico qualificato.
Prima di effettuare interventi tecnici•
sull'apparecchio togliere l'alimentazione elettrica.
Non utilizzare cavi di alimentazione con•
segni di usura o invecchiamento.
Non effettuare per nessun motivo•
alterazioni o collegamenti non previsti in
questo manuale: l'uso di apparecchi non
idonei può portare a gravi pericoli per la
sicurezza del personale e dell'impianto.
Utilizzare solo parti di ricambio originali. Pezzi•
di ricambio non originali potrebbero causare
incendi, scariche elettriche o altri pericoli.
Prima di procedere con l'installazione controllare•
che il materiale fornito corrisponda alle
specifiche richieste, esaminando le etichette
di marcatura, secondo quanto descritto
nel capitolo Marcatura del prodotto.
OHEPS19B
Kit alimentatore wide range per telecamera IN 100-240Vac - OUT 12Vdc, 1A

IT - Italiano - Manuale di istruzioni
2
Installazione e6
assemblaggio
L'installazione e l'assemblaggio vanno
h eseguiti solo da personale specializzato.
Installazione6.1
Prima di eseguire qualsiasi operazione
g ricordarsi di togliere tensione al prodotto.
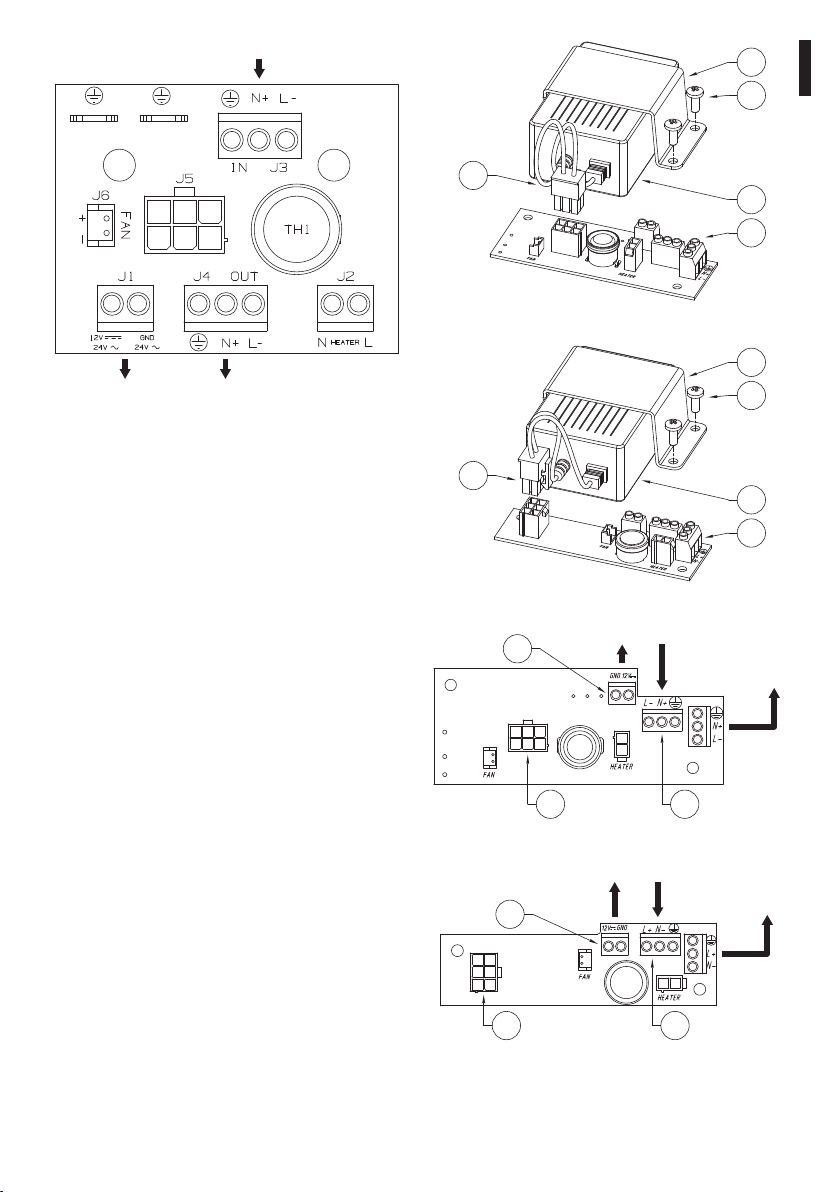
Il kit è previsto per il funzionamento
h con una tensione di ingresso pari a
100-240Vac e una tensione in uscita di
12Vdc, 1A. Non alimentare il kit con una
tensione diversa da quella indicata.
L’alimentatore wide range non è
h applicabile nelle custodie munite di
sistema per il raffreddamento installato.
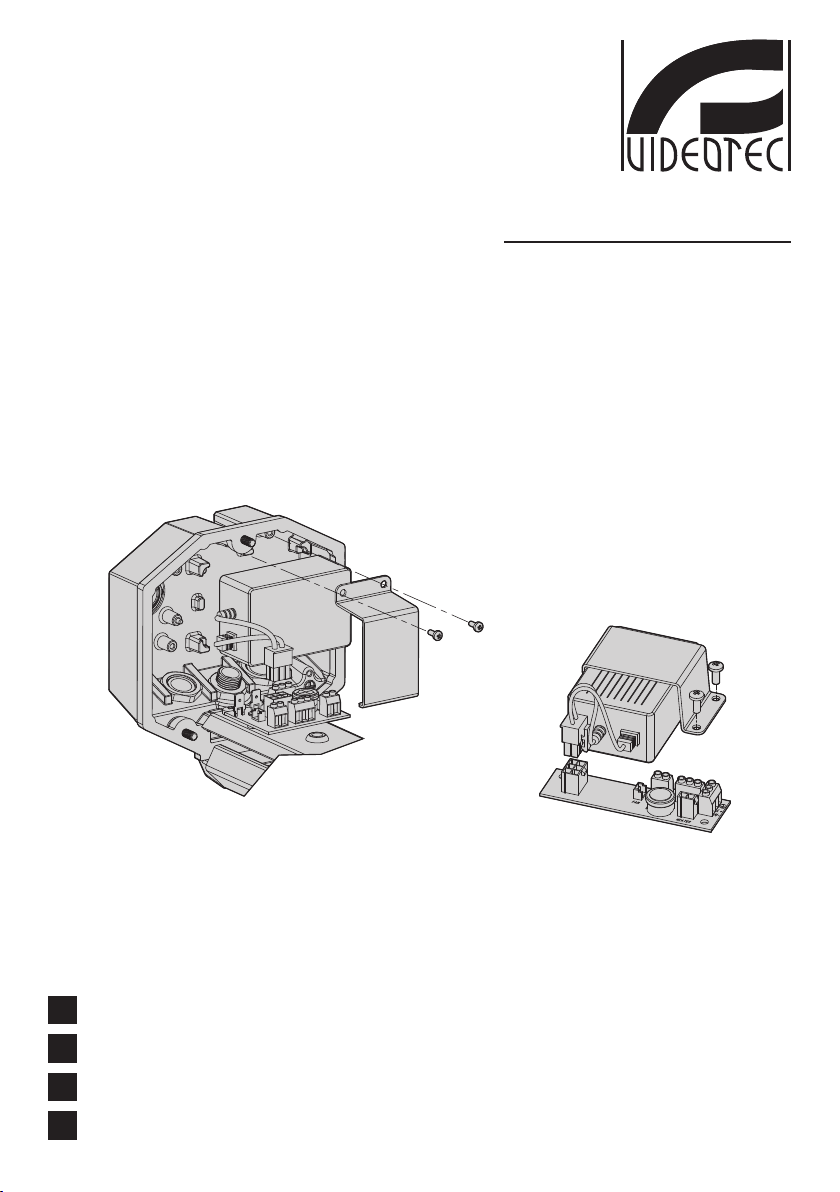
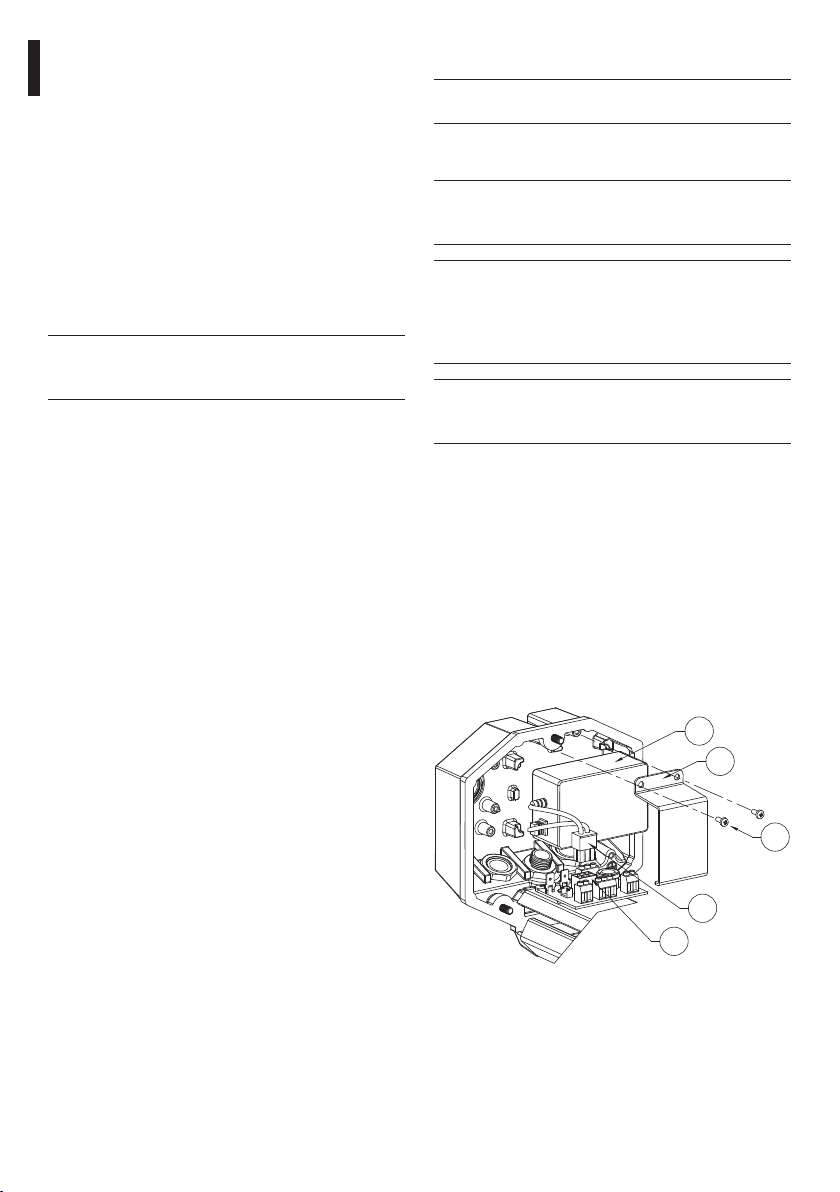
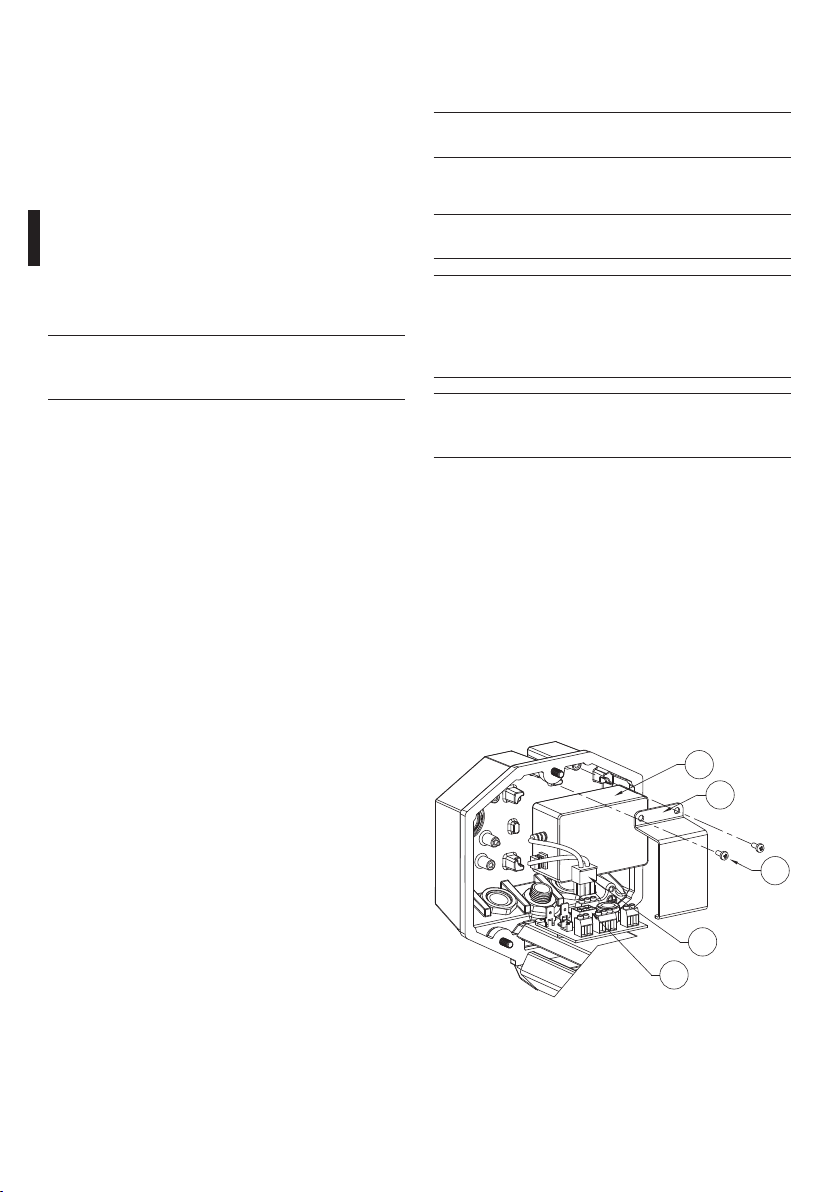
Installazione su custodia HEG6.1.1
Aprire la custodia svitando le 3
viti del fondo posteriore.
Posizionare l’alimentatore (01) fornito in
dotazione al kit nell’apposito alloggiamento
previsto sul fondo posteriore della custodia.
Fissare l’alimentatore al fondo della
custodia con l’apposito supporto (02) e
le viti (03) fornite in dotazione al kit.
Inserire il connettore a 6 poli del cavo
dell’alimentatore (04) nel corrispondente connettore
(05) sul circuito di appoggio indicato con J5 (Fig. 02).
01
02
03
04
05
Fig. 01
Identificazione4
Descrizione e4.1
designazione del prodotto
Kit alimentatore wide range per telecamera
IN 100-240Vac - OUT 12Vdc, 1A.
Marcatura del prodotto4.2
Vedere l’etichetta posta sull’esterno dell’imballo.
Preparazione del5
prodotto per l'utilizzo
Qualsiasi cambiamento non
h espressamente approvato dal
costruttore fa decadere la garanzia.
Contenuto e disimballaggio5.1
Alla consegna del prodotto verificare che
l'imballo sia integro e non abbia segni
evidenti di cadute o abrasioni.
In caso di evidenti segni di danno all'imballo
contattare immediatamente il fornitore.
Conservare l'imballo nel caso sia necessario
inviare il prodotto in riparazione.
Controllare che il contenuto sia rispondente
alla lista del materiale sotto indicata:
1 alimentatore Wide Range•
IN 100-240Vac - OUT 12Vdc, 1A
1 supporto alimentatore•
Viti di fissaggio•
1 manuale di istruzioni•
Smaltimento in sicurezza5.2
dei materiali di imballaggio
I materiali d'imballo sono costituiti interamente
da materiale riciclabile. Sarà cura del tecnico
installatore smaltirli secondo le modalità di
raccolta differenziata o comunque secondo
le norme vigenti nel Paese di utilizzo.
Si ricorda comunque che in caso di ritorno di
materiale con malfunzionamenti è consigliato
l'imballaggio originale per il trasporto.

IT - Italiano - Manuale di istruzioni
3
01
02
03
04
05
Montaggio su custodia VERSO.Fig. 03
01
02
03
04
05
Montaggio su custodia VERSO COMPACT.Fig. 04
IN 100-240Vac
OUT 12Vdc
J5 J3
J1
OUT
100-240Vac
Scheda elettronica su custodia VERSO.Fig. 05
OUT 12Vdc IN 100-240Vac
J5 J3
J1
OUT
100-240Vac
Scheda elettronica su custodia VERSO COMPACT.Fig. 06
Chiudere la custodia operando in maniera
inversa a quanto descritto precedentemente.
IN 100-240Vac
OUT 12Vdc OUT 100-240Vac
Fig. 02
Chiudere la custodia operando in maniera
inversa a quanto descritto precedentemente.
Installazione su custodia6.1.2
VERSO e VERSO COMPACT
Aprire la custodia e posizionare
l’alimentatore (03) nell’apposita sede.
Fissare l’alimentatore al corpo della custodia
utilizzando l’apposita staffetta ad angolo
(01) e le viti fornite in dotazione (02).
Inserire il connettore a 6 poli posto al’estremità
del cavo (04) nel suo corrispondente indicato
con J5 sul circuito d’appoggio (05).
Collegare la tensione di alimentazione nel morsetto
indicato con J3 sul circuito di appoggio (05).
Collegare l’alimentazione 12Vdc della
telecamera al morsetto indicato con J1
(12Vdc, GND) sul circuito di appoggio.

IT - Italiano - Manuale di istruzioni
4
Smaltimento dei rifiuti7
Questo simbolo e il sistema di
n riciclaggio sono validi solo nei paesi
dell'EU e non trovano applicazione
in altri paesi del mondo.
Il vostro prodotto è stato costruito da
materiali e componenti di alta qualità,
che sono riutilizzabili o riciclabili.
Prodotti elettrici ed elettronici che portano
questo simbolo alla fine dell'uso devono essere
smaltiti separatamente dai rifiuti casalinghi.
Vi preghiamo di smaltire questo apparecchio
in un Centro di raccolta o in un'Ecostazione.
Nell'Unione Europea esistono sistemi di raccolta
differenziata per prodotti elettrici ed elettronici.

FR - Francais - Manuel d'instructions
FR
FRANÇAIS
1
À propos de ce1
mode d’emploi
Avant d’installer et d’utiliser cet appareil,
veuillez lire attentivement ce mode d’emploi.
Conservez-le à portée de main pour pouvoir
vous y reporter en cas de besoin.
Conventions typographiques1.1
DANGER!
g Risque élevé.
Risque de choc électrique; sauf indication
contraire, sectionner l’alimentation
avant de procéder à toute opération.
ATTENTION!
h Risque moyen.
Opération extrêmement importante
en vue d’un fonctionnement correct du
système; lire avec attention les opérations
indiquées et s’y conformer rigoureusement.
REMARQUE
j Description des caractéristiques du
système.
Il est conseillé de procéder à une
lecture attentive pour une meilleure
compréhension des phases suivantes.
Notes sur le copyright2
et informations sur les
marques de commerce
Les noms de produit ou de société cités
sont des marques de commerce ou des
marques de commerce enregistrées.
Normes de securité3
Le producteur décline toute responsabilité
h pour les dommages éventuels dus à une
utilisation non appropriée des appareils
mentionnés dans ce manuel. On réserve
en outre le droit d’en modifier le contenu
sans préavis. La documentation contenue
dans ce manuel a été rassemblée et vérifiée
avec le plus grand soin, cependant,le
producteur ne peut pas s’assumer aucune
responsabilité dérivante de l’emploi de
cellelà. La même chose vaut pour chaque
personne ou société impliquées dans la
création et la production de ce manuel.
L’installation et l’entretien du dispositif•
doivent être exclusivement être effectués
par un personnel technique qualifié.
Sectionner l’alimentation électrique avant•
toute intervention technique sur l’appareil.
Ne pas utiliser de câbles d’alimentation•
usés ou endommagés.
Ne procéder sous aucun prétexte à des•
modifications ou des connexions non prévues
dans ce manuel : l’utilisation d’appareils non
adéquats peut comporter des dangers graves
pour la sécurité du personnel et de l’installation.
Utiliser uniquement des pièces de rechange•
d’origine. Les pièces non d’origine peuvent être
source d’incendies, de choc électrique ou autres.
Avant de procéder à l’installation, contrôler que•
le matériel fourni correspond à la commande et
examiner les étiquettes de marquage comme
indiqué au chapitre Marquage du produit.
OHEPS19B
Kit alimentation wide range pour caméra IN 100-240Vac - OUT 12Vdc, 1A

FR - Francais - Manuel d'instructions
2
Installation et6
assemblage
L’installation et l’assemblage
h doivent exclusivement être effectués
par un personnel spécialisé.
Installation6.1
Ne pas oublier de placer le
g produit hors tension avant de
procéder à toute opération.
Le kit est prévu pour fonctionner avec
h une tension d’entrée de 100-240Vac
et une tension de sortie de 12Vdc,
1A. Ne pas alimenter le kit avec une
tension autre que celle indiquée.
L’alimentation gamme étendue n’est pas
h applicable pour les caissons équipés de
système pour le refroidissement installé.
Installation dans le caisson HEG6.1.1
Ouvrir le caisson en desserrant les
3 vis du fond postérieur.
Positionner l'alimentation (01) fournie avec le kit dans
le logement prévu sur le fond postérieur du caisson.
Fixer l'alimentation au fond du caisson au moyen du
support prévu (02) et des vis (03) fournies avec le kit.
Insérer le connecteur à 6 pôles du câble
de l'alimentation (04) dans le connecteur
correspondant (05) sur le circuit de
support signalé comme J5 (Fig. 02).
01
02
03
04
05
Fig. 01
Identification4
Description et4.1
désignation du produit
Kit alimentation wide range pour caméra
IN 100-240Vac - OUT 12Vdc, 1A.
Marquage du produit4.2
Voir l’étiquette sur l’extérieur de l’emballage.
Préparation du produit5
en vue de l’utilisation
Toute modification non approuvée
h expressément par le fabricant entraînera
l’annulation de la garantie.
Contenu et déballage5.1
Lors de la livraison du produit, vérifier que
l’emballage est en bon état et l’absence de
tout signe évident de chute ou d’abrasion.
En cas de dommages évidents, contacter
immédiatement le fournisseur.
Conserver l’emballage en cas de nécessité
d’expédition du produit pour réparation.
Contrôler que le contenu correspond à la
liste matériel indiquée ci-dessous:
1 alimentation gamme étendue•
IN 100-240Vac - OUT 12Vdc, 1A
1 support alimentation•
Vis de fixation•
1 manuel d'instructions•
Élimination sans danger5.2
des matériaux d’emballage
Le matériel d’emballage est entièrement composé
de matériaux recyclables. Le technicien chargé de
l’installation est tenu de l’éliminer conformément aux
dispositions en matière de collecte sélective et selon
les normes en vigueur dans le pays d’utilisation.
En cas de dysfonctionnement et de retour
de matériel , il est conseillé d’utiliser
l’emballage original pour le transport.

FR - Francais - Manuel d'instructions
3
01
02
03
04
05
Montage dans le caisson VERSO.Fig. 03
01
02
03
04
05
Montage dans le caisson VERSO COMPACT.Fig. 04
IN 100-240Vac
OUT 12Vdc
J5 J3
J1
OUT
100-240Vac
Montage dans le caisson VERSO.Fig. 05
OUT 12Vdc IN 100-240Vac
J5 J3
J1
OUT
100-240Vac
Montage dans le caisson VERSO COMPACT.Fig. 06
Fermer le caisson en effectuant les opérations
indiquées ci-dessus mais en sens contraire.
IN 100-240Vac
OUT 12Vdc OUT 100-240Vac
Fig. 02
Fermer le caisson en effectuant les opérations
indiquées ci-dessus mais en sens contraire.
Installation dans les caissons6.1.2
VERSO et VERSO COMPACT
Ouvrir le caisson et placer l’alimentateur
(03) dans le logement aproprié.
Fixer l’alimentateur au corps du caisson
au moyen de l'étrier angulaire de
support (01) et les vis fournies (02).
Introduire le connecteur à 6 pôles à
l'extrémité du câble (04) dans l'élément
correspondant J5 sur le circuit fourni (05).
Brancher la tension d'alimentation dans
la borne J3 sur le circuit d'appui (05).
Brancher l’alimentation 12Vdc de la caméra dans
la borne J1 (12Vdc, GND) sur le circuit d'appui.

FR - Francais - Manuel d'instructions
4
Élimination des déchets7
Ce symbole et le système de recyclage
n ne sont appliqués que dans les pays UE
et non dans les autres pays du monde.
Votre produit est conçu et fabriqué avec des
matèriels et des composants de qualité supérieure
qui peuvent être recyclés et réutilisés.
Ce symbole signifie que les équipements électriques
et électroniques en fin de vie doivent être
éliminés séparément des ordures ménagères.
Nous vous prions donc de confier cet équipement
à votre Centre local de collecte ou Recyclage.
Dans l’Union Européenne, il existe des
systèmes sélectifs de collecte pour les produits
électriques et électroniques usagés.

DE - Deutsch - Bedienungslanleitung
DE
DEUTSCH
1
Allgemeines1
Lesen Sie bitte vor dem Installieren und
dem Verwenden dieses Gerätes die
Bedienungsanleitung sorgfältig durch. Bewahren
Sie sie zum späteren Nachschlagen auf.
Schreibweisen1.1
GEFAHR!
g Erhöhte Gefährdung.
Stromschlaggefahr; falls nichts anderes
angegeben, unterbrechen Sie die
Stromversorgung, bevor die beschriebenen
Arbeiten durchgeführt werden.
ACHTUNG!
h Mittlere Gefährdung.
Der genannte Vorgang hat große
Bedeutung für den einwandfreien
Betrieb des Systems: es wird
gebeten, sich die Verfahrensweise
anzulesen und zu befolgen.
ANMERKUNG
j Beschreibung der Systemmerkmale.
Eine sorgfältige Lektüre wird
empfohlen, um das Verständnis der
folgenden Phasen zu gewährleisten.
Anmerkungen2
zum Copyright und
Informationen zu den
Handelsmarken
Die angeführten Produkt- oder Firmennamen sind
Handelsmarken oder eingetragene Handelsmarken.
Sichereitsnormen3
Der Hersteller lehnt jede Haftung für
h eventuelle Schäden ab, die aufgrund
unsachgemäßer Anwendung der in diesem
Handbuch erwähnten Geräte entstanden
ist. Ferner behält er sich das Recht vor, den
Inhalt ohne Vorkündigung abzuändern.
Die Dokumentation in diesem Handbuch
wurde sorgfältig ausgeführt und überprüft,
dennoch kann der Hersteller keine Haftung
für die Verwendung übernehmen. Dasselbe
gilt für jede Person oder Gesellschaft, die
bei der Schaffung oder Produktion von
diesem Handbuch miteinbezogen ist.
Die Installation und Wartung der Vorrichtung•
ist technischen Fachleuten vorbehalten.
Vor technischen Eingriffen am Gerät muss die•
Stromversorgung unterbrochen werden.
Es dürfen keine Versorgungskabel mit Verschleiß-•
oder Alterungsspuren verwendet werden.
Unter keinen Umständen dürfen Veränderungen•
oder Anschlüsse vorgenommen werden, die
in diesem Handbuch nicht genannt sind: Der
Gebrauch ungeeigneten Geräts kann die Sicherheit
des Personals und der Anlage schwer gefährden.
Es dürfen nur Original-Ersatzteile verwendet•
werden. Nicht originale Ersatzteile können
zu Bränden, elektrischen Entladungen
oder anderen Gefahren führen.
Vor der Installation ist anhand des•
Kennzeichnungsschildes nachzuprüfen, ob
das gelieferte Material die gewünschten
Eigenschaften aufweist. Siehe hierzu das
Kapitel “Kennzeichnung des Produktes”.
OHEPS19B
Kit für Wide Range Kameranetzteil IN 100-240Vac - OUT 12Vdc, 1A

DE - Deutsch - Bedienungslanleitung
2
Installation und6
Zusammenbau
Installation und Zusammenbau
h sind Fachleuten vorbehalten.
Installation6.1
Vor Beginn jedweder Tätigkeit
g ist die Stromversorgung des
Produktes zu unterbrechen.
Das Kit ist für den Betrieb mit einer
h Eingangsspannung von 100-240Vac und
einer Ausgangsspannung von 12Vdc,
1A vorgesehen. Das Kit darf nicht mit
einer Spannung versorgt werden, die
vom angegebenen Wert abweicht.
Das Wide Range- Netzteil ist in
h den Gehäusen mit installiertem
Kühlsystem nicht anwendbar.
Installation im HEG- Gehäuses6.1.1
Das Gehäuse wird geöffnet, indem man die 3
Schrauben der hinteren Abdeckplatte entfernt.
Das Netzteil (01) aus dem Lieferumfang des Kits
in der vorgesehenen Aufnahmestelle auf der
hinteren Abdeckplatte des Gehäuses positioniere.
Das Netzteil mit der zugehörigen Halterung
(02) und den beiliegenden Schrauben (03) an
der Abdeckplatte des Gehäuses fixieren.
Den 6-poligen Kabelstecker des Netzteiles (04) in
die zugehörige, mit J5 bezeichnete Steckbuchse
(05) auf der Trägerschaltung einfügen (Fig. 02).
01
02
03
04
05
Fig. 01
Identifizierung4
Beschreibung und4.1
Bezeichnung des Produktes
Kit Netzteil Wide Range Spannung IN
100-240Vac - OUT 12Vdc, 1A.
Kennzeichnung des Produkts4.2
Siehe das Schild außen auf der Verpackung.
Vorbereitung5
des Produktes auf
den Gebrauch
Jede vom Hersteller nicht ausdrücklich
h genehmigte Veränderung führt zum
Verfall der Gewährleistungsrechte.
Inhalt und Entfernen5.1
der Verpackung
Bei der Lieferung des Produktes ist zu prüfen, ob
die Verpackung intakt ist oder offensichtliche
Anzeichen von Stürzen oder Abrieb aufweist.
Bei offensichtlichen Schadensspuren
an der Verpackung muss umgehend
der Lieferant verständigt werden.
Bewahren Sie die Verpackung auf für den Fall, dass
das Produkt zur Reparatur eingesendet werden muss.
Prüfen Sie, ob der Inhalt mit der nachstehenden
Materialliste übereinstimmt:
1 Netzteil Wide Range 100-240Vac/12Vdc, 1A•
1 Halterung für Netzteil•
Befestigungsschrauben•
1 Bedienungslanleitungen•
Sichere Entsorgung der5.2
Verpackungsmaterialien
Die Verpackungsmaterialien sind vollständig
wiederverwertbar. Es ist Sache des
Installationstechnikers, sie getrennt, auf jeden
Fall aber nach den geltenden Vorschriften
des Anwendungslandes zu entsorgen.
Es wird nochmals empfohlen, mit
Fehlfunktionen behaftetes Material in der
Originalverpackung zurückzusenden.

DE - Deutsch - Bedienungslanleitung
3
01
02
03
04
05
VERSO Gehäuseinstallation.Fig. 03
01
02
03
04
05
VERSO COMPACT Gehäuseinstallation.Fig. 04
IN 100-240Vac
OUT 12Vdc
J5 J3
J1
OUT
100-240Vac
Elektronische Karte VERSO Gehäuseinstallation.Fig. 05
OUT 12Vdc IN 100-240Vac
J5 J3
J1
OUT
100-240Vac
Elektronische Karte VERSO COMPACTFig. 06
Gehäuseinstallation.
Nun das Gehäuse in umgekehrter Reihenfolge
schließen, wie oben beschrieben.
IN 100-240Vac
OUT 12Vdc OUT 100-240Vac
Fig. 02
Nun das Gehäuse in umgekehrter Reihenfolge
schließen, wie oben beschrieben.
Installation in den VERSO6.1.2
und VERSO COMPACT Gehäusen
Das Gehäuse öffnen und die Speiseleitung
(03) in die geeignete Stellung legen.
Die Speiseleitung an dem Gehäuse-Korpus fixieren.
Benutzt werden der winkelförmige Haltebugel
(01) und die mitgelieferten Schrauben (02).
Den 6-poligen Stecker am Kabelende
(04) in die entsprechende, mit J5
gekennzeichnete Aufnahmestelle am
mitgelieferten Schaltkreis einfügen (05).
Die Versorgungsspannung in der mit J3 bezeichneten
Klemme am Auflageschaltkreis anschließen (05).
Die 12Vdc Speiseleitung der kamera in der
J1 (12Vdc, GND) bereichnetenklemme am
Auflageschaltkreis anschließen (05).

DE - Deutsch - Bedienungslanleitung
4
Müllentsorgungsstellen7
Dieses Symbol und das entsprechende
n Recycling-System gelten nur für
EULänder und finden in den anderen
Ländern der Welt keine Anwendung.
Ihr Produkt wurde entworfen und hergestellt
mit qualitativ hochwertigen Materialien
und Komponenten, die recycelt und
wiederverwendet werden können.
Dieses Symbol bedeutet, daß elektrische und
elektronische Geräte am Ende ihrer Nutzungsdauer
von Hausmüll getrennt entsorgt werden sollen.
Bitte entsorgen Sie dieses Gerät bei Ihrer örtlichen
Sammelstelle oder im Recycling Centre.
In der Europäischen Union gibt es unterschiedliche
Sammelsysteme für Elektrik- und Elektronikgeräte.


VIDEOTEC S.p.A.
www.videotec.com
Printed in Italy
MNVKPS19B_0830
HEADQUARTERS ITALY
VIDEOTEC S.p.A.
Tel. +39 0445 697411
Fax +39 0445 697414
FRANCE
VIDEOTEC FRANCE S.A.R.L.
Tel. +33 2 32094900
Fax +33 2 32094901
UK / IRELAND
VIDEOTEC UK SALES
Tel. +44 0113 815 0047
Fax +44 0113 815 0047
U.S.A. / CANADA
VIDEOTEC SECURITY, Inc.
Tel. +1 973 5950788
Fax +1 425 6484289
ASIA PACIFIC
VIDEOTEC (HK) Ltd
Tel. +852 2333 0601
Fax +852 2311 0026
Table of contents
Languages:
Other Videotec Power Supply manuals