Ihr neues Balkon- & Terrassen-Hochbeet von VIDEX ist schnell und einfach zu montieren.
Nach der Montage ist es nur noch mit Erde zu befüllen. Nach dem Bepfl anzen mit Saatgut oder Jung-
Pfl anzen, regelmässig bewässern. Freuen Sie sich auf Ihre Kräuter, Blumen oder Ihr selbst gezogenes Gemüse.
MONTAGEANLEITUNG, Art. 31478
Balkon- & Terrassen-
Hochbeet
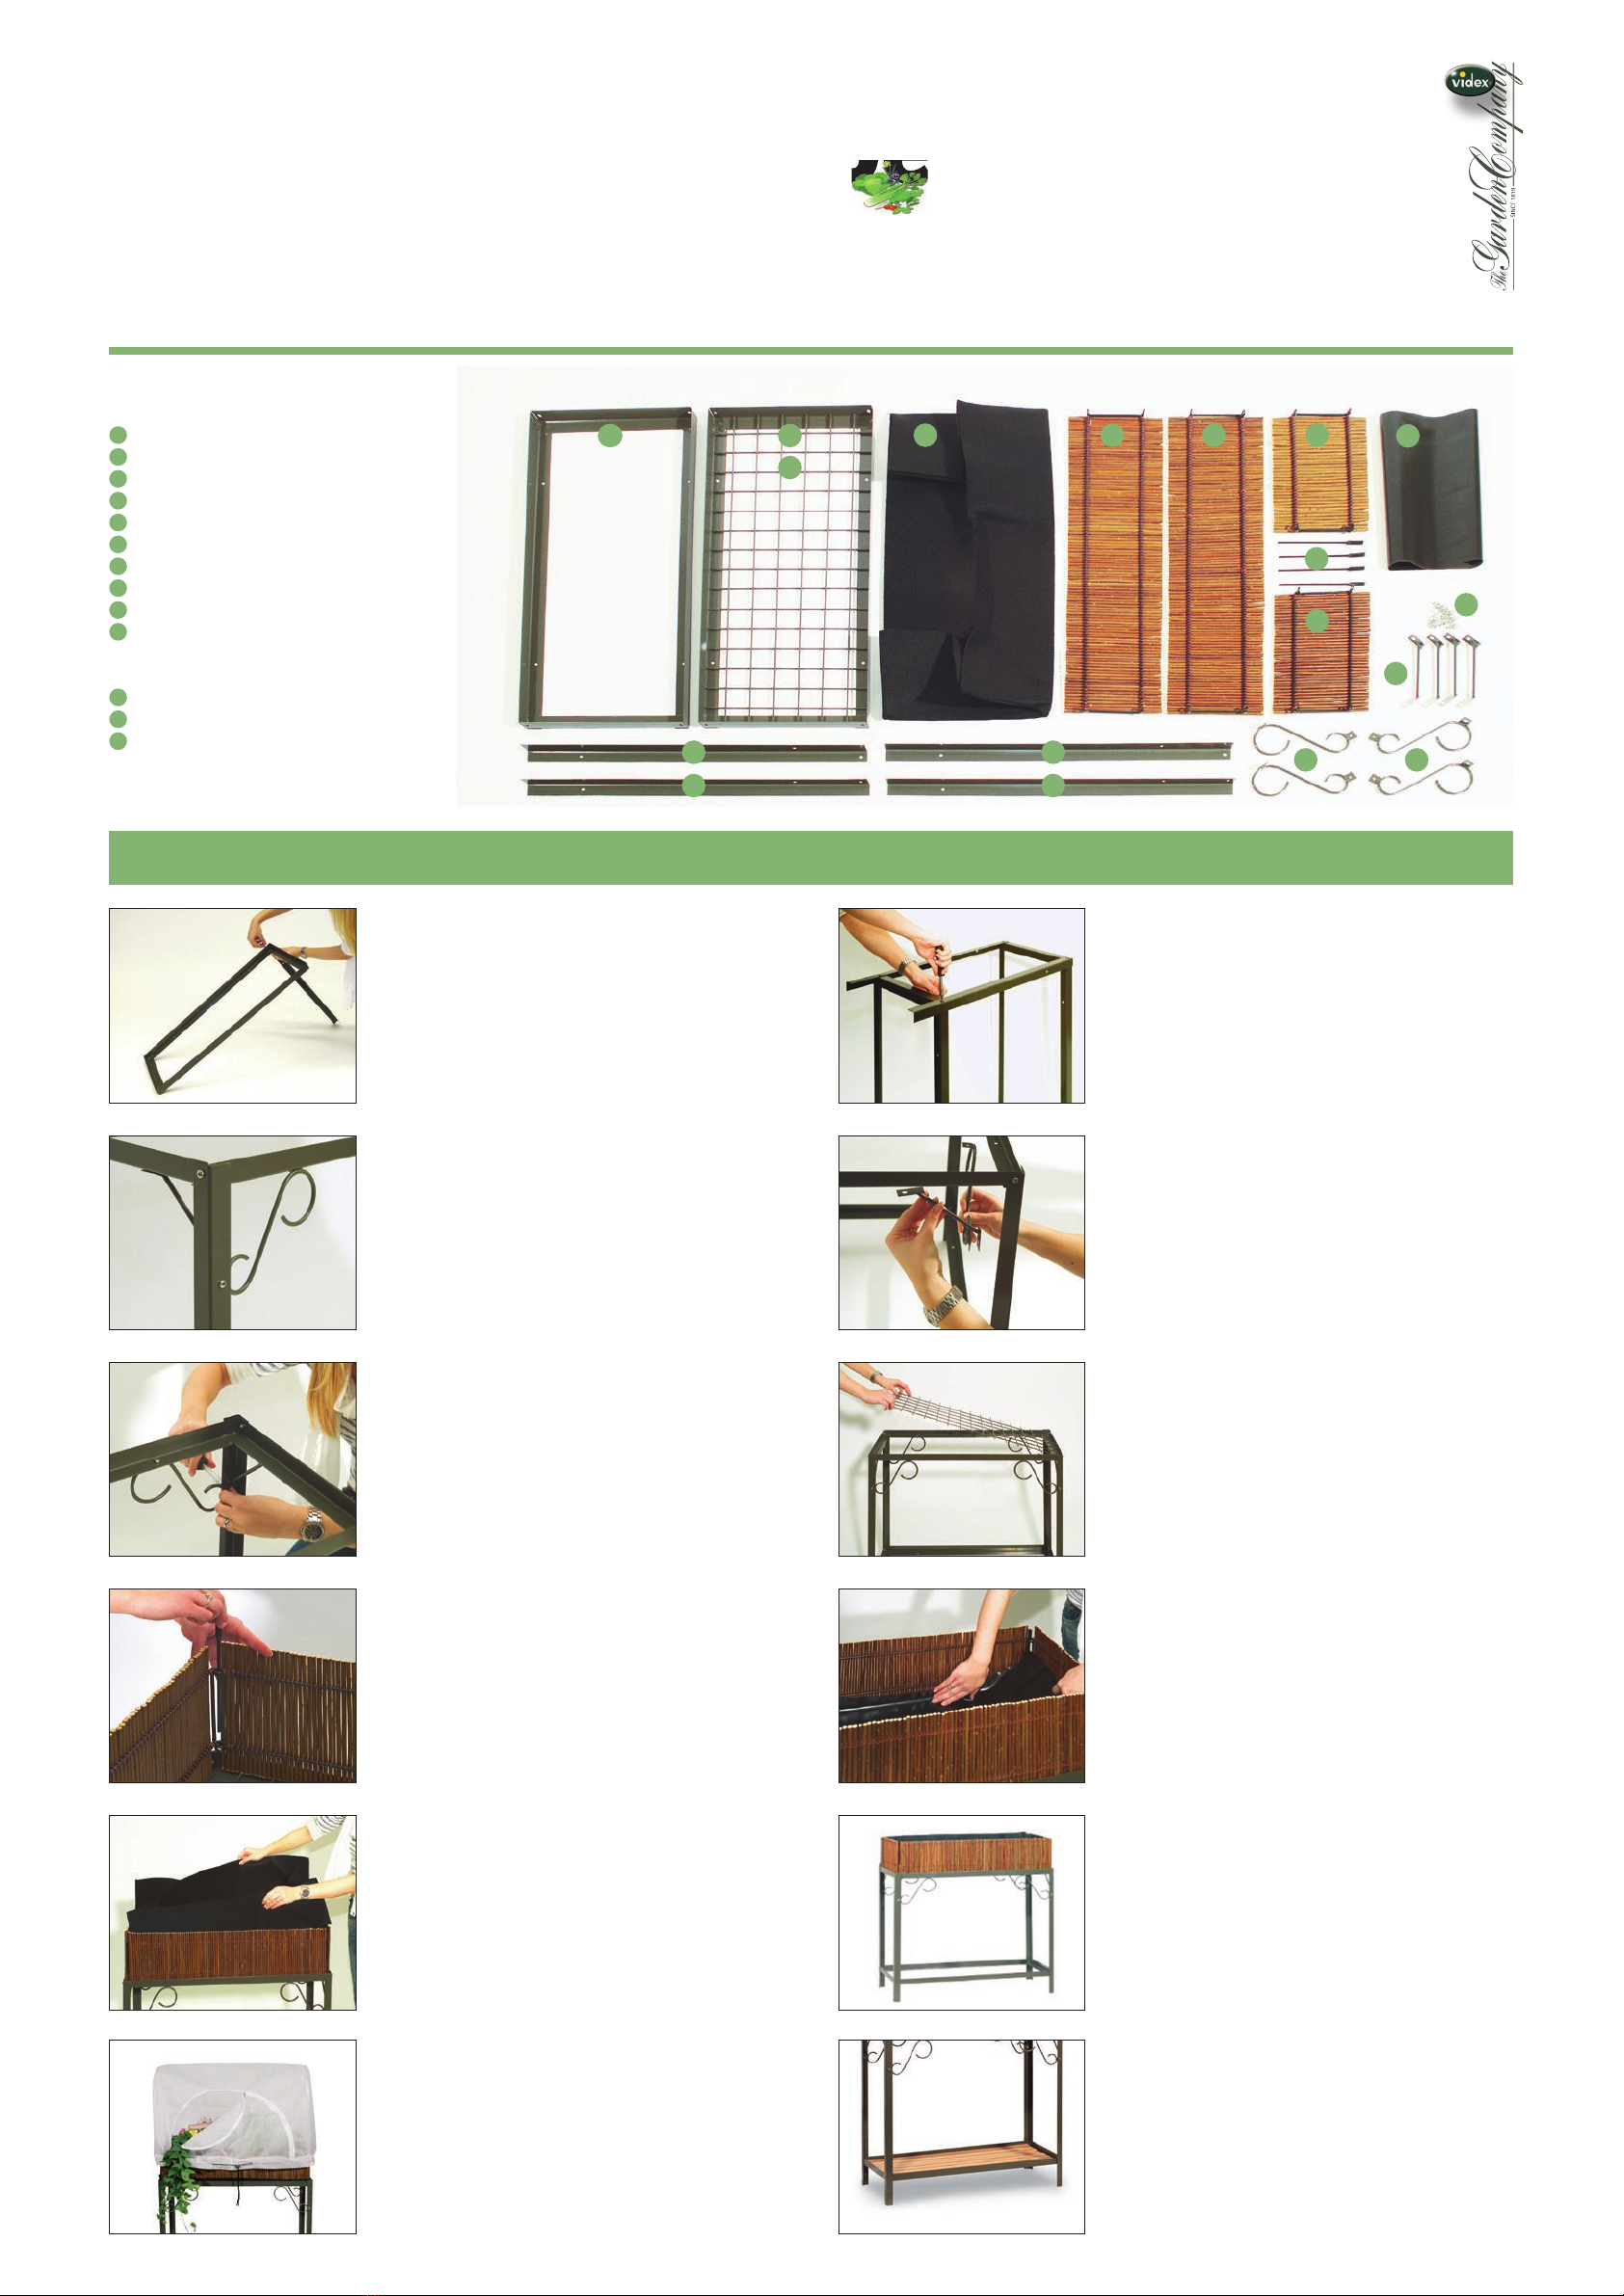
INHALTSÜBERSICHT
2 x Grundrahmen
1 x Gitterboden
2 x Fuß Version A
2 x Fuß Version B
1 x Planter-Bag
2 x mit Weide bespannter Seitenrahmen lang
2 x mit Weide bespannter Seitenrahmen kurz
4 x Stift zur Verbindung der Seitenrahmen
1 x Bodenfolie
1 x Schraubenset, bestehend aus
20 x Schraube
20 x Sechskantmutter
4 x Querverstrebung gerade
2 x Querverstrebung Ornament Version A
2 x Querverstrebung Ornament Version B
9
10
11
8
12
13
7
6
5
4
3
2
1
8
7
6
5
4
3
2
1
1
6
4
3
7
9
10
11
12 13
BENÖTIGT WERDEN DIE BAUTEILE 1, 3, 4 & 10
Verschrauben Sie die 4 Füße mit dem oberen Grundrahmen.
An den 4 Ecken des Grundrahmens befestigen Sie jeweils
einen Fuß mit je einer Schraube, sodass der Fuß mit dem
Grundrahmen oben bündig abschließt.
Der Grundrahmen muss dabei nach oben hin offen sein.
Sie sollten aus optischen Gründen darauf achten, dass der
fl ache Kopf der Schraube außen ist und die Sechskantmutter
nach innen zeigt.
BENÖTIGT WERDEN DIE BAUTEILE 1 & 10
Legen Sie das Gestell auf die Seite und verschrauben
den unteren Grundrahmen mit den 4 Füßen.
Auch hier muss der Grundrahmen nach oben offen sein.
Zunächst ziehen Sie die 4 Schrauben nur leicht fest.
Abschließend stellen Sie das Hochbeet gerade auf die Füße
und ziehen alle Muttern nochmal mit dem
Schraubenschlüssel fest.
BENÖTIGT WERDEN DIE BAUTEILE 10, 11, 12 & 13
Zur Stabilisierung des Hochbeets schrauben Sie an allen 4
Ecken jeweils 2 Querverstrebungen zwischen den Füßen und
dem oberen Grundrahmen an.
Die gerade Querverstrebung verläuft an der kurzen Seite des
Hochbeets, die Querverstrebung Ornament verläuft an der
langen Seite.
An den Füßen steht nur ein Loch für beide Querverstrebungen
zur Verfügung. Wichtig ist, dass die gerade Querverstrebung
hinter der gebogenen verläuft.
Zunächst ziehen Sie alle 12 Schrauben nur leicht fest.
Abschließend überprüfen Sie, ob das Hochbeet gerade ist
und ziehen alle Muttern nochmal mit dem
Schraubenschlüssel fest.
BENÖTIGT WIRD DAS BAUTEIL 2
Legen Sie den Gitterboden auf den oberen Grundrahmen.
BENÖTIGT WERDEN DIE BAUTEILE 6, 7 & 8
Stellen Sie die 4 Seitenrahmen auf dem oberen Grundrahmen
auf und verbinden diese an den Ecken mit den Verbindungs-
stiften.
BENÖTIGT WIRD DAS BAUTEIL 9
Legen Sie die Bodenfolie in den Beetkasten ein und drücken
diese an den Rändern leicht an.
BENÖTIGT WIRD DAS BAUTEIL 5
Setzen Sie den schwarzen Planter-Bag in den Beetkasten ein.
Der Polyester Planter-Bag ist luft- und wasserdurchlässig
und dient zum Halt der Pfl anzenerde.
Herzlichen Glückwunsch zu Ihrem neuen
Balkon- und Terrassen-Hochbeet!
Nun können Sie mit dem Befüllen beginnen.
VLIESHAUBE (ZUBEHÖR), ART. 31479
Zu dem Balkon- und Terrassen-Hochbeet bietet VIDEX eine
passende Vlieshaube mit praktischem Reißverschluss und
Kordel. Mit der Vlieshaube sind Ihre Kräuter, Ihr Obst und
Gemüse gut geschützt vor Wind und Wetter, Insekten und
Vögeln.
EINLEGEBODEN (ZUBEHÖR), ART. 24019
Der schicke Einlegebogen aus Bambusholz passt genau in den
unteren Grundrahmen und bietet hier zusätzlich Platz für Gieß-
kanne, Schaufel und Co.
999-103-512
12
3a
4
56
7
3b
3c


