Viera 941P User manual

1
1-1
Getting Started
USIM Card............................................................. 1-2
About USIM Card .......................................................................1-2
USIM Card Installation................................................................1-3
USIM PINs..................................................................................1-3
Parts & Functions.................................................. 1-4
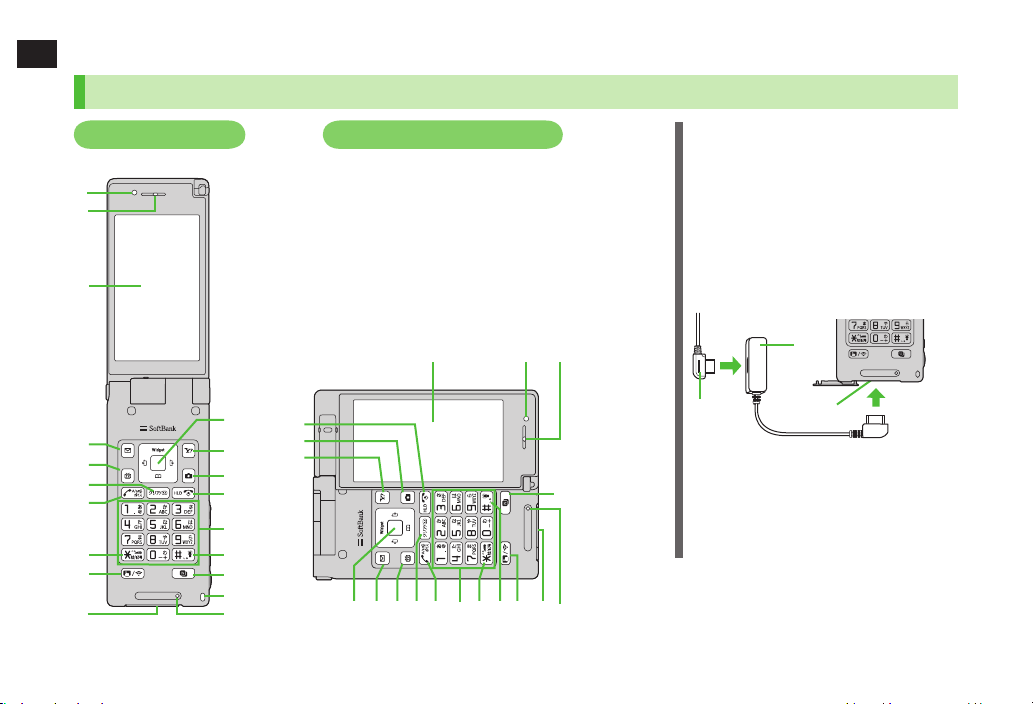
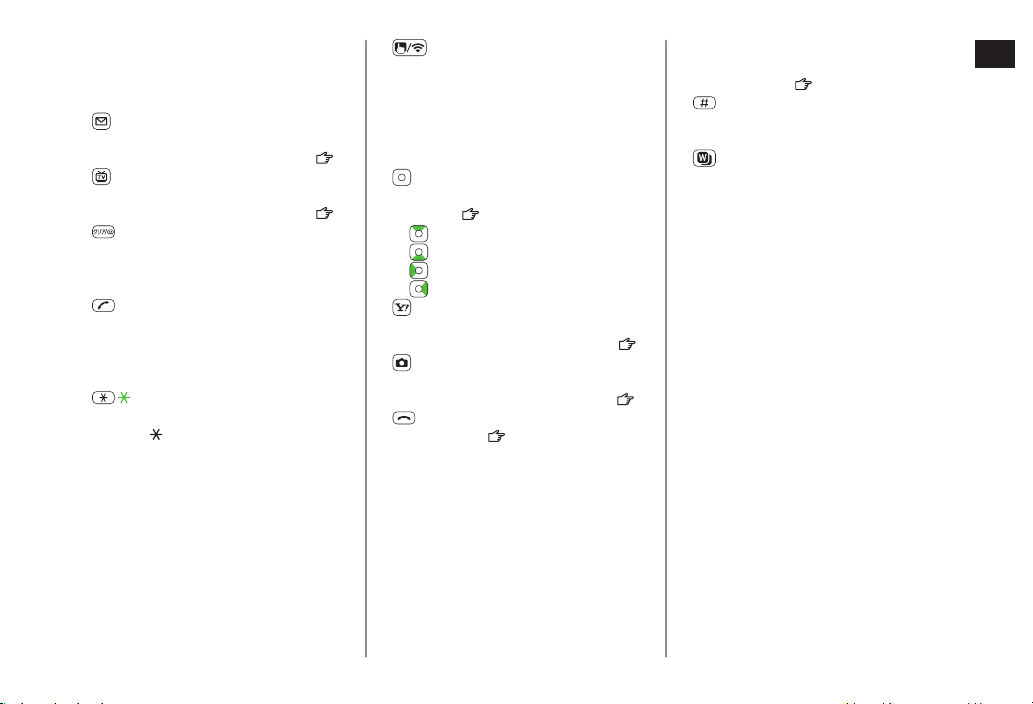
Handset .....................................................................................1-4
Display Positions.........................................................................1-7
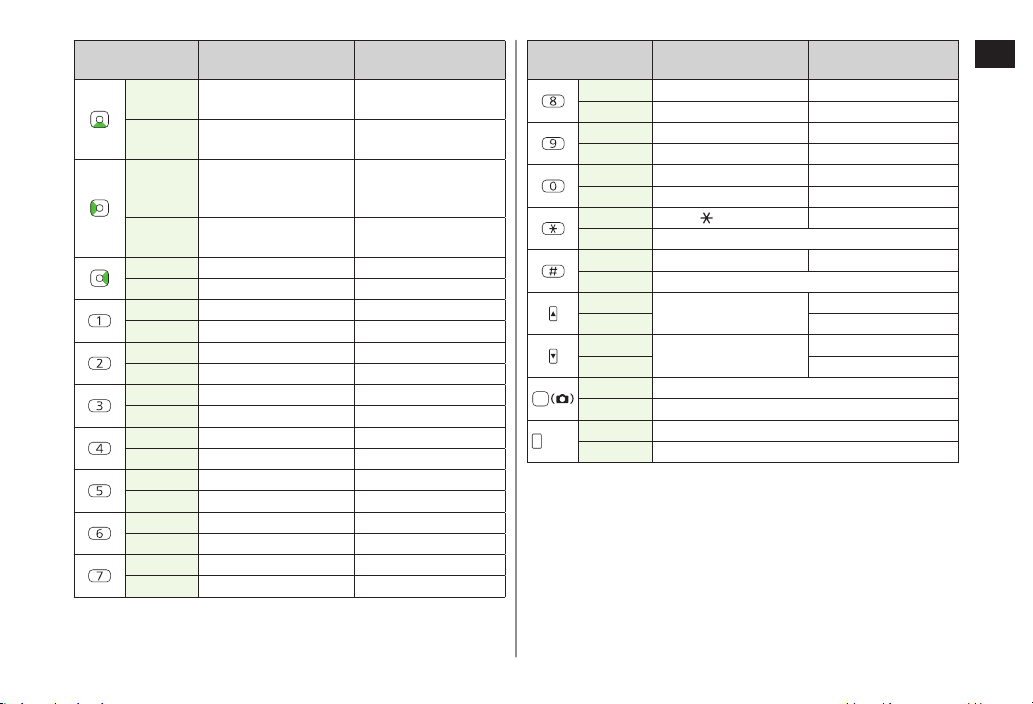
Key Operations in Standby ..........................................................1-8
Display.....................................................................................1-10
About Battery..................................................... 1-13
Before Charging .......................................................................1-13
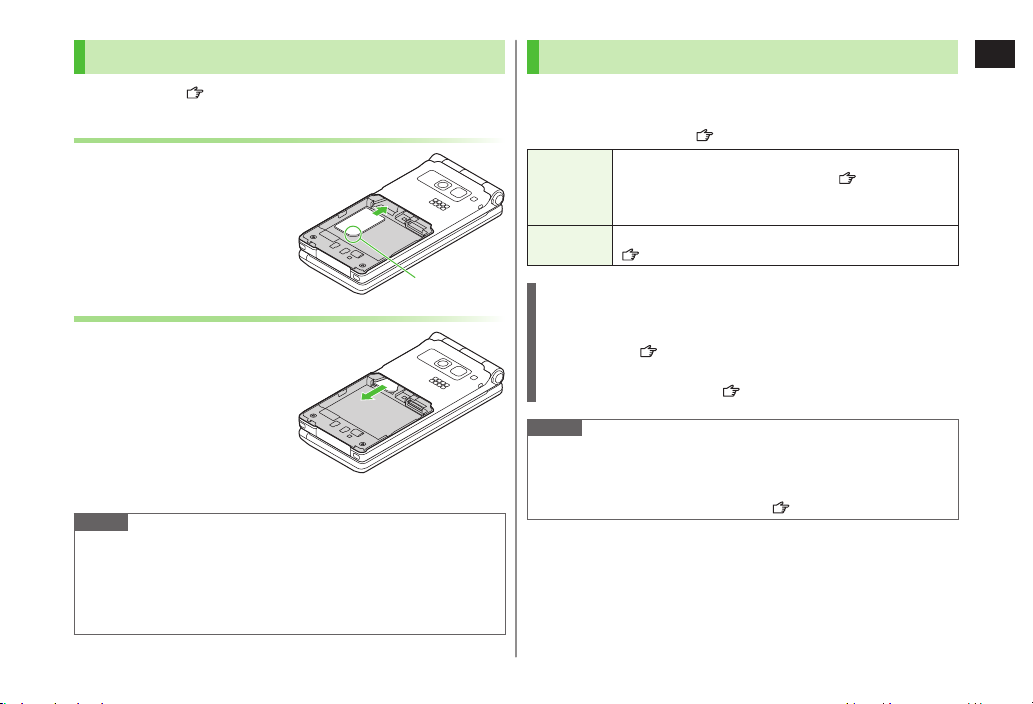
Battery Installation ...................................................................1-15
Charging Battery ......................................................................1-16
Handset Power On/Off........................................ 1-17
Manner Mode ..................................................... 1-18
Minding Mobile Manners..........................................................1-18
Manner-related Features...........................................................1-18
Activating Manner Mode ..........................................................1-18
Activating Offline Mode............................................................1-19
Activating Driving Mode ...........................................................1-19
Handset Menus................................................... 1-19
Main Menu ..............................................................................1-19
Menu Numbers ........................................................................1-21
Accessing Functions/Info from Standby .....................................1-22
Touchpad ................................................................................. 1-23
Standby Options & Event Indicators .................. 1-24
Event Indicators........................................................................1-24
Mobile Widget (Japanese).........................................................1-25
S! Quick News (Japanese).........................................................1-25
Shortcuts..................................................................................1-25
Customizing User Interface ................................ 1-26
Customized Screen ...................................................................1-26
Changing Display Font..............................................................1-27
Private Menu ...................................................... 1-28
Opening Private Menu..............................................................1-28
Customizing Private Menu .......................................................1-28
Adding Shortcuts......................................................................1-28
Simple Menu....................................................... 1-29
Activating Simple Menu............................................................1-29
Simple Menu............................................................................1-30
Using Videos/Music............................................. 1-31
Passwords........................................................... 1-32
Phone Password .......................................................................1-32
Center Access Code..................................................................1-32
Security Code ...........................................................................1-32
Multi Task ........................................................... 1-33
Activating Another Function......................................................1-33
Ending Current Functions..........................................................1-33
View Blind .......................................................... 1-34
My Number......................................................... 1-34
BEGIN_E_OI.indb 1 2010/03/09 18:25:20

1
Getting Started
1-2
USIM Card
About USIM Card
Universal Subscriber Identity Module (USIM) Card is an IC
card containing customer and authentication information,
including handset number, and limited Phone Book entry
and SMS message storage. USIM must be inserted to use
handset or Network services (calling, messaging, Internet,
etc.). Turn handset off before inserting/removing USIM Card.
Insert USIM Card into other compatible SoftBank handset to use
information saved on USIM Card.
Use SoftBank specified USIM Card only; non-specified USIM Cards may
not function properly.
Do not insert USIM Card into other IC card devices. SoftBank is not liable
for any resulting damages.
Keep IC portion clean.
Do not damage, carelessly touch or short-circuit IC chip; doing so may
result in loss of data or malfunction.
Remove dust/debris with a soft, dry cloth.
Do not place labels, etc. on USIM Card; may cause failure.
If handset is dropped/subjected to shock, handset may return to Standby.
This is not a malfunction.
If
USIM not inserted After power-off
Insert USIM
appears,
re-insert USIM Card properly then restart handset.
USIM Card
IC
Important
USIM Card is the property of SoftBank.
Return USIM Card to SoftBank upon service cancellation.
USIM Card will be reissued for a fee if lost or damaged.
If USIM Card/handset with USIM Card inserted is lost or stolen,
contact SoftBank Mobile Customer Center or Global Call Center
(P.19-34).
Back up USIM Card files. SoftBank is not liable for lost files.
USIM Card specifications/performance may change without prior
notice.
Pre-installed S! Appli may be unusable while a different or replacement
USIM Card is inserted into handset.
Returned USIM Cards are recycled.
Note
Some downloaded files may be inaccessible after upgrades/repairs,
USIM Card/handset replacement.
BEGIN_E_OI.indb 2 2010/03/09 18:25:23

1
Getting Started
1-3
USIM Card Installation
Remove battery (
P.1-15) then follow steps below.
Inserting
1With IC chip down, insert USIM Card
Removing
1Slide out USIM Card gently
Note
Do not force USIM Card into or out of handset; may damage handset/
USIM Card.
Be careful not to lose the removed USIM Card.
Avoid touching USIM Card terminals or IC chip; doing so may hinder
performance/USIM Card recognition.
Notch
USIM PINs
There are two USIM Card security codes: PIN & PIN2
PIN and PIN2 are set to
9999 by default.
PIN/PIN2 can be changed ( P.12-3).
PIN
4 to 8-digit code used to prevent unauthorized handset use.
When
PIN Authentication
is
ON
( P.12-2), PIN entry
is required each time handset is turned on (with USIM
Card inserted).
PIN2 Required to clear call times/costs or set maximum cost
(P.18-9).
PIN Lock & Cancellation (PUK/PUK2)
PIN Lock or PIN2 Lock is activated if PIN or PIN2 is incorrectly entered
three times. Cancel PIN Lock or PIN2 Lock by entering the PIN Unblocking
Key (PUK/PUK2) ( P.12-3).
For information on PUK/PUK2, contact SoftBank Mobile Customer
Center, General Information ( P.19-34).
Note
If PUK/PUK2 is incorrectly entered ten times, USIM Card is locked and
handset is disabled. Write down PUK/PUK2.
For procedures required to unlock USIM Card, contact SoftBank Mobile
Customer Center, General Information ( P.19-34).
BEGIN_E_OI.indb 3 2010/03/09 18:25:28

1
Getting Started
1-4
Parts & Functions
Handset
❷
❸
❹
❺
❻
❼
❽
❾
❶
⓰⓫❹❺❻❼⓯❽ ❿⓳
⓱
❾
❶ ❷❸
⓮
⓭
⓬
⓫
⓬
⓭
⓮
⓯
⓱
⓳
❿
⓰
⓲
ノーマルスタイル
Normal Position
Horizontal Open Position
Using Earphone Microphone or Video
Output Cable
Connect following accessories (A) and (B) to
External Port.
(A) Earphone Microphone or Video Output Cable
(B) Stereo Earphone Conversion Cable
<Operation>
①Connect flat plug (A) to flat terminal (B)
②Connect plug (B) to External Port
Do not press answer button on Earphone
Microphone when connecting. Doing so may
cause Earphone Microphone to malfunction.
In that case, pull out Earphone Microphone,
and connect again.
External Port
②
①
(B)
(A)

1
Getting Started
1-5
❶Light Sensor
Detects ambient light
・
❷Earpiece
❸Internal Display
❹Mail Key
Open Messaging menu
・
Execute Upper Left Softkey function (
・ P.ix)
❺TV Key
Activate TV
・
Execute Lower Left Softkey function (
・ P.ix)
❻Clear/Memo Key
Delete characters
・
Cancel menus
・
Use Answer Phone
・
❼Send Key
Initiate or answer calls
・
Toggle upper/lower case in text entry
・
windows
Use Voice Dial
・
❽/Pictograph/Symbol/Driving Mode
Key
Enter "
・ "
Access pictographs in text entry windows
・
Access symbol list from pictograph list
・
Toggle Driving Mode
・
❾Touchpad/Wi-Fi Switch Key
Toggle Touchpad on/off
・
Toggle Wi-Fi function on/off
・
❿External Port
Connect AC Charger (sold separately),
・
Stereo Earphone Conversion Cable or other
accessories here
⓫Multi Selector
Scroll up/down/left/right to navigate menus
・
and text ( P.ix)
・ Select widgets/S! Quick News
・ Open Phone Book
・ Open Incoming Call Logs
・ Open Redial logs
⓬Yahoo! Keitai Key
Open Yahoo! Keitai Main Menu
・
Execute Upper Right Softkey function (
・ P. i x )
⓭Camera Key
Activate Camera/Video Camera
・
Execute Lower Right Softkey function (
・ P. i x )
⓮End/Escape & Power Key
Power on/off (
・ P.1-17)
End calls
・
Return to Standby
・
⓯Keypad/Touchpad
Enter phone number/text
・
Use Touchpad (
・ P.1-23)
⓰#/Symbol/Manner Key
Enter "#"
・
Toggle Manner Mode
・
⓱Widget Key
View list of available widgets
・
Activate Music Player
・
⓲Horizontal Open Position Hook
⓳Microphone
BEGIN_E_OI.indb 5 2010/03/09 18:25:52

1
Getting Started
1-6
⓴
⓴Antenna
External Display ( P.1-12)
Notification Light/Charging Indicator
Flashes for incoming transmissions
・
Lights in red for charging
・
Hinge/Antenna
Infrared Port
Transfer data via Infrared
・
Camera
Logo
Place Logo over a reader/writer when using
・
Osaifu-Keitai®( P.13-11)
Battery Cover
Charging Terminals
Strap Eyelet
Flash/Photo light
Lights/flashes during Camera use
・
Use when shooting in dark places
・
Speaker
One-push Open Button ( P.1-7)
TV Antenna
Upper Side Key
Increase earpiece/TV volume
・
[Handset Closed]
View Incoming Call Logs on External Display
・
Toggle External Display
・
Turn on illumination
・
Lower Side Key
Decrease earpiece/TV volume
・
[Handset Closed]
Set/cancel Manner Mode
・
Check missed calls/new messages
・
(MULTI) MULTI Key
Open TASK MENU/Pictures Folder
・
Shutter Key
Activate Camera/capture images
・

1
Getting Started
1-7
Display Positions
Normal Position
Press One-push Open Button to open handset.
Close handset manually. If handset does not close, open completely
before closing handset again.
Customize handset to answer/end calls, etc. when opening/closing
handset ( P.18-8, P.18-10).
Handset may spring open. Be careful not to drop handset.
One-push Open Button
Portrait View
Horizontal Open Position
1Press
Ⓐlightly
2Flip open (as indicated by arrow)
Watch TV programs or use Messaging, S! Appli, Camera, etc. in
Horizontal Open Position (Landscape View).
Hook
Ⓑshould be intact. If hook is detached, close handset and try
again.
Do not lift hinge portion Ⓐwhen opening handset.
Note
If One-push Open Button is pressed in Horizontal Open Position,
handset opens in Normal Position after it is closed.
Before switching positions, be sure to completely close handset. Do not
switch positions when handset is not fully closed; otherwise malfunction
or damage may result.
Ⓑ
Ⓐ
12
Landscape View

1
Getting Started
1-8
Key Operations
■
Key operations in Horizontal Open
Position may differ from Normal
Position.
Multi Selector (
)
operations are described as pictured.
Settings Linked with Display Position
■
Open handset in Horizontal Open Position to show Horizontal Open
Menu while handset is in Standby ( P.1-20). Also, activate Digital TV or
Camera automatically ( P.18-14).
Note
Switching Normal Position to Horizontal Open Position may end active
screen.
Key Operations in Standby
Press or press and hold (more than one second) a key in
Standby to execute the following.
Key Operations Normal Position
(Portrait View)
Horizontal Open Position
(Landscape View)
Short Press Initiate a call —
Long Press Voice dial —
Short Press Show/hide widgets
Long Press
(2 + sec) Turn off power
Key Operations Normal Position
(Portrait View)
Horizontal Open Position
(Landscape View)
Short Press Open Main Menu Open Horizontal Open
Menu
Long Press Activate/cancel Keyguard
Short Press Play Answer Phone —
Long Press Activate/cancel Answer
Phone —
Short Press Activate Camera
Long Press Activate Video Camera
Short Press Activate Digital TV
Long Press Activate/cancel IC Card Lock
Short Press Open Messaging Menu
Long Press Open S! Mail Composition window
Short Press Access Yahoo! Keitai
Long Press Open Yahoo! Keitai Menu
Short Press Open Widget List
Long Press Activate Music Player
Short Press —
Long Press Toggle Wi-Fi on/off
Short Press
Select widgets, Event
Indicators, shortcuts,
status indicators or
S! Quick News ticker.
—
Long Press Activate slideshow —
BEGIN_E_OI.indb 8 2010/03/09 18:26:03

1
Getting Started
1-9
Key Operations Normal Position
(Portrait View)
Horizontal Open Position
(Landscape View)
Short Press Open Phone Book search
window —
Long Press Open Phone Book entry
window —
Short Press Open Incoming Call Logs
Select widgets, Event
Indicators or S! Quick
News ticker.
Long Press Open Received address
logs Activate Slideshow
Short Press Open Redial logs —
Long Press Open Sent address logs —
Short Press Enter "1" —
Long Press
Open Phone Book page "
あ
"
—
Short Press Enter "2" —
Long Press
Open Phone Book page "
か
"
—
Short Press Enter "3" —
Long Press
Open Phone Book page "
さ
"
—
Short Press Enter "4" —
Long Press
Open Phone Book page "
た
"
—
Short Press Enter "5" —
Long Press
Open Phone Book page "
な
"
Turn on/off Back Light
Short Press Enter "6" —
Long Press
Open Phone Book page "
は
"
—
Short Press Enter "7" —
Long Press
Open Phone Book page "
ま
"
—
Key Operations Normal Position
(Portrait View)
Horizontal Open Position
(Landscape View)
Short Press Enter "8" —
Long Press
Open Phone Book page "
や
"
Activate/cancel View Blind
Short Press Enter "9" —
Long Press
Open Phone Book page "
ら
"
—
Short Press Enter "0" —
Long Press
Open Phone Book page "
わ
"
—
Short Press Enter " "—
Long Press Activate/Cancel Driving Mode
Short Press Enter "#" —
Long Press Activate/Cancel Manner Mode
Short Press Increase earpiece volume —
Long Press —
Short Press Decrease earpiece volume —
Long Press —
Short Press —
Long Press Activate Camera
(MULTI)
Short Press Activate TASK MENU
Long Press Open Pictures folder
BEGIN_E_OI.indb 9 2010/03/09 18:26:09

1
Getting Started
1-10
Display
⓯
- are Status Indicators. Access functions
from respective indicators ( P.1-22).
Display Indicators
❶
❷
❸
❹
❺
❻
❼
❽
❾
❿
⓫
⓬
⓭
⓮
⓯
⓰
⓱
⓲
⓳
⓴
❶Signal Strength
Strong Moderate Weak Low
Emission OFF Mode Active
Out-of-Range
❷Packet Transmission in Progress (PC)
Dial-up Connection Established on PC
3G/GSM Packet Transmitting
Operator (set for Select Operator)
Out-of-Range
/
3G/GSM Packet Transmission Available*
/
3G/GSM Packet Transmission Unavailable
*
* Appears only while abroad
Wi-Fi On (Out-of-Range)
Wi-Fi On (In-Range)
Wi-Fi Connection
❸Secure Content
S! Addressbook Back-up Synchronizing
Auto Sync Settings Active
❹PC Site Browser Active
Infrared Transmission
IC Transmission
USB Cable Connected
Keyguard Active
❺Software Update (Notification/Updating/
Result)
Voice Mail
(Blue) Bluetooth®Device Connected
(Black) Bluetooth®Power Save Mode
❻microSD Card
Inserted
Reading/Writing Data
Write-protected
Unsupported
Unusable
USB Cable (Not Included) Connected
microSD Mode
MTP Mode
During Call
During Video Call
During Voice Call
BEGIN_E_OI.indb 10 2010/03/09 18:26:18

1
Getting Started
1-11
❼Positioning
New S! Quick News Information
New S! Information Channel info
❽Unsent Message
Unread Message
Incoming Mail Memory Full (Handset)
❾Security
Privacy Key Lock Active
Personal Data Lock Active
Key Pad Dial Lock Active
IC Card Lock Active
Secret Mode and Secret Data Only Active
Key Pad Dial Lock, Secret Mode and
Secret Data Only Active
Key Pad Dial Lock and Personal Data Lock
Active
Secret Mode, Secret Data Only and
IC Card Lock Active
Privacy Key Lock and IC Card Lock Active
Personal Data Lock and IC Card Lock Active
Key Pad Dial Lock and IC Card Lock Active
Key Pad Dial Lock, Secret Mode, Secret
Data Only and IC Card Lock Active
Key Pad Dial Lock, Personal Data Lock
and IC Card Lock Active
❿Manner Mode Active
Manner Mode (set in User Mode)
⓫S! Appli
/Active/Paused
Auto Start Request Received
/ Start Request Received while Active/
Paused
⓬One Function Active
Multiple Functions Active
Digital TV Active
Recording TV Program
During Timer Recording
TV Recording Paused
Music Playback
Music Paused
⓭Time
⓮Battery Level
(Red)
⓯(Red) Alarm Set (Today)
(Blue) Alarm Set (After Today)
⓰Vibration Active (Incoming Call)
Vibration Active (Incoming Message)
Vibration Active (Incoming Call/Message)
⓱Incoming Call Ringtone Disabled
Incoming Message Ringtone Disabled
Incoming Call/Message Ringtone Disabled
⓲Driving Mode
⓳
microSD Mode set for USB Mode
MTP Mode set for USB Mode
⓴
Side Key Disabled when Handset Closed
Timer Lock at Close Active
Call Charge Reached Upper Limit
Back Light OFF
View Blind ON
Back Light OFF; View Blind ON
〜
Answer Phone Active (Number of
Answer Phone Messages (Voice
Calls))
〜
Answer Phone Active (Number of
Answer Phone Messages (Video
Calls))
Weather Indicator ( P.8-3)
Note
To show indicator description:
Main Menu
XSettings XDisplay Settings
XDescribe Icons Xto highlight an
indicator
BEGIN_E_OI.indb 11 2010/03/09 18:26:32

1
Getting Started
1-12
External Display Indicators
Upon closing handset, External Display
illuminates for 15 seconds.
Each
press toggles Incoming Call Logs with
missed calls.
(Right side)
Time
❼❶ ❷ ❸ ❹ ❻❺ ❾❽
DateTime
❶Signal Strength
Strong Moderate Weak Low
Offline Mode
Out-of-Range
❷Voice Mail
Software Update (Notification/Updating/
Result)
Bluetooth®Device Connected
Bluetooth®Power Save Mode
❸
S! Addressbook Back-up Synchronizing
❹Keyguard Setting Active
❺Unsent Message
Unread Message
Incoming Mail Memory Full
❻Privacy Key Lock Active
Personal Data Lock Active
Key Pad Dial Lock Active
IC Card Lock Active
Secret Mode and Secret Data Only Active
Key Pad Dial Lock, Secret Mode and
Secret Data Only Active
Key Pad Dial Lock and Personal Data
Lock Active
Secret Mode, Secret Data Only and
IC Card Lock Active
Privacy Key Lock and IC Card Lock Active
Personal Data Lock and IC Card Lock Active
Key Pad Dial Lock and IC Card Lock Active
Key Pad Dial Lock, Secret Mode, Secret
Data Only and IC Card Lock Active
Key Pad Dial Lock, Personal Data Lock
and IC Card Lock Active
❼Manner Mode Active
Manner Mode (set in User Mode) Active
❽microSD Card
Inserted
Reading/Writing Data
Write-protected
Unsupported
USB Cable (Not Included) Connected
microSD Mode
MTP Mode
❾Battery Level

1
Getting Started
1-13
About Battery
Before Charging
Charge battery before use or after a period of disuse
(AC Charger sold separately).
Charging Time & Operating Time Estimates
3G GSM
Charging Time 130 minutes*
Standby Time 650 hours* 370 hours*
Talk Time Voice Call 220 minutes* 230 minutes*
Video Call 140 minutes* –
* Approximate value
3G Mode/GSM Mode:
P.2-10
Charging time is an average measured within temperatures of 5°C to
35°C.
Talk Time is an average measured with a new, fully charged battery, with
stable signals.
Standby Time is an average measured with a new, fully charged battery,
with handset closed without calls or operations, in Standby with stable
signals.
Talk Time and Standby Time may vary by environment (battery status,
temperature, etc.).
About Battery
Clean handset, battery & charger with dry cotton swab.
Replace battery if operating time shortens noticeably.
Charge battery at least once every six months.
Use a case when carrying battery separately.
Charging
Battery must be installed to charge it.
It may take longer for charging when handset is on.
Move charger away from TV/radio if interference occurs.
BEGIN_E_OI.indb 13 2010/03/09 18:26:44

1
Getting Started
1-14
Battery Time
Using handset in the following conditions may shorten battery time.
Extreme temperatures
・
Handset/battery/AC Charger terminals are dirty.
・
Weak signal/out-of-range
・
Handset is left mid-operation (not in Standby)
・
Playing Music Player, Wi-Fi is on, TV or S! Appli is active, etc.
・
Extending battery time
Example:
Turn Back Light Time
・
OFF
or set a shorter time for Power Saver mode
(P.18-5)
Select
・
OFF
for Key Tone ( P.18-3)
When Battery Runs Out
Unless a Call is in Progress
A message appears and warning tone sounds for 10 seconds.
Handset power turns off automatically after one minute; press any key
except or to cancel warning tone manually. Charge or
replace battery.
If Manner Mode is active, nothing sounds.
・
To stop warning tone, press
・ (MULTI) while handset is closed.
During a Call
A message appears and warning tone sounds via Earpiece or Speaker.
After 20 seconds, call ends and handset shuts down in one minute.
Charge or replace battery.
Battery Strength Indicator
Battery Strength indicator changes as remaining usage time decreases.
Charge or replace battery when battery level is low ( P.1-10) or a
message appears on Display.
Note
Alternatively, check battery level from
Main Menu XSettings
XPhone Settings XBattery XBattery Level
Low battery warning message
appears. Charge or replace
battery immediately.
Operating
Voltage
Battery Voltage
Remaining Strength (at 25°C) Operating Time
Approx. 70%
Approx.20%
Approx.10%
Level 3 Level 2 Level 1 Level 0
Red
BEGIN_E_OI.indb 14 2010/03/09 18:26:45

1
Getting Started
1-15
Battery Installation
Always turn off handset power before removing battery.
1Press and slide to
remove cover
2Insert Battery
Align battery contacts with
handset pins.
Remove Battery
Lift battery out as shown.
3Replace battery cover
Cover should click into place.
Note
Lithium-ion batteries are valuable and recyclable
resources.
Recycle used lithium-ion battery at a shop displaying
・
the symbol shown to the right.
To avoid fire or electric shock, do not:
・
- Short-circuit battery
- Disassemble battery
BEGIN_E_OI.indb 15 2010/03/09 18:26:49

1
Getting Started
1-16
Charging Battery
Use only specified AC Charger (sold separately).
Charging Time: Approximately 130 minutes
Port Cover
AC Outlet
Charger
Blades
2
3
Arrows up
1
Charging Indicator
Release Tabs
AC Charger
Charger Connector
External Port
1Connect AC Charger to handset
Insert Charger Connector (arrows up) into External Port.
2Plug AC Charger into AC Outlet
Extend Charger Blades.
Charging Indicator illuminates and charging starts.
When charging is complete, Charging Indicator goes out.
When Charging Indicator flashes, remove AC Charger and battery
from handset then attach them again.
Charge Sound is heard when charging starts/ends.
When handset is turned off or in Manner Mode, nothing sounds.
3When charging is complete, unplug AC Charger,
then disconnect handset
Squeeze Release Tabs to remove Charger Connector, and replace Port
Cover.
Note
For details, read AC Charger instructions.
Alternatively, charge battery by using Desktop Holder (not included).
Tip
●Charging Start/End Tone Off ( P.18-3)
BEGIN_E_OI.indb 16 2010/03/09 18:26:52

1
Getting Started
1-17
Handset Power On/Off
1Press and hold
Start-up window appears and handset
enters Standby.
Enter PIN if PIN Authentication is ON
( P.12-2).
2Press for 2+ seconds
Handset shuts down.
Do not turn on handset immediately
after turning off. Wait a few seconds.
Initial Setup
■
The first time handset powers up and Initial setting window appears, select
YES
and set the following: (Each item can be set separately.)
Date & Time* ( P.18-9) Set date and time
Phone Password
(P.12-2)
Enter 9999, and enter new Phone
Password (4-8 digits)
Key Tone (P.18-3) Select
ON
or
OFF
Font Size ( P.18-6)
Set Display font size all at once
* May be automatically set
Standby
View Information Messages
■
At time of purchase, information message is provided for your convenience.
to highlight an Event Indicator ( P.1-24), then press
Incoming Mail
Received
Select a message
Widget appears in Standby after information message is viewed.
Note
If
USIM not inserted After power-off
Insert USIM
appears, clean
and properly re-insert USIM Card then restart handset.
When handset is open, Display turns off after a period of inactivity.
Retrieving Network Information
When , or is pressed for the first time in Standby,
handset initiates Network Information retrieval; to
retrieve it.
Update Network Information to use messaging, Internet, etc.
Update Network Information manually:
Main Menu XSettings
XConnectivity XRetrieve NW Info XYES
Set Tip
Settings
●Change Wallpaper ●Add Calendar to Wallpaper
●Change Wallpaper Randomly ( P.18-3)
●Change Start-up Window ( P.18-4)
BEGIN_E_OI.indb 17 2010/03/09 18:26:56

1
Getting Started
1-18
Manner Mode
Minding Mobile Manners
Please use your handset responsibly. Use these basic tips as
a guide. Inappropriate handset use can be both dangerous
and bothersome. Please take care not to disturb others
when using your handset. Adjust handset use according to
your surroundings.
Turn it off in theaters, museums and other places where silence is the
norm.
Refrain from use in restaurants, lobbies, elevators, etc.
Observe signs and instructions regarding handset use aboard trains, etc.
Refrain from use that interrupts the flow of pedestrian or vehicle traffic.
Manner-related Features
Manner Mode
(Right)
Press Manner key to mute handset tones and
activate vibration for incoming transmissions.
Vibration Mode
(P.18-2)
Activate in public places, meetings, etc. for silent
call/message alerts.
Ringer Volume
(P.18-2) Mute call/message tones.
Offline Mode
( P.1-19) Suspend all handset transmissions.
Answer Phone
(P.2-15)
Use to handle incoming calls when inappropriate/
unsafe to answer.
Driving Mode
(P.1-19)
While driving, send a voice message informing
the caller that you cannot answer the call
(Handset does not ring.).
Activating Manner Mode
Press one key to mute handset tones and activate vibration
for incoming transmissions.
Manner Mode settings can be changed (
P.18-7).
When Manner Mode is active,
appears.
1In Standby, press and hold
To cancel: Press and hold
again
To activate/cancel while handset is closed:
Press and hold
Note
Shutter click and incoming tone via Earphone (
Level 1
) sound even in
Manner Mode.
When activating Music Player or Digital TV in Manner Mode,
confirmation appears asking whether to cancel Manner Mode.
When
Prefer manner mode
is
OFF
( P.13-7), Alarm sounds even if
Manner Mode is active.
Tip
Settings
●Set Manner Mode Type ( P.18-7)
BEGIN_E_OI.indb 18 2010/03/09 18:26:57

1
Getting Started
1-19
Activating Offline Mode
Temporarily suspend all handset transmissions; when active,
all calls/messages and incoming information are blocked.
When Offline Mode is active,
appears.
Main Menu XSettings XCall Settings XOffline Mode
1
YES
To cancel: Follow the same steps.
Note
Offline Mode disables Bluetooth
®/Wi-Fi/Infrared/IC transmissions.
Bluetooth®handsfree devices cannot be used either.
Activating Driving Mode
Handset does not ring for incoming calls. Voice guidance
informs the caller you are unavailable and handset records
voice/video messages.
When Driving Mode is active,
appears.
1In Standby, press and hold
Press and hold
again to cancel.
Note
When Answer Phone memory is full, incoming calls are rejected.
Ringtone sounds through Earphone Microphone when connected.
Handset Menus
Main Menu
1In Standby,
Main Menu appears.
To change Main Menu theme:
[Set Menu] Select a theme
2to highlight an icon
Selected function menu appears.
To return to Standby:
Note
Standby window returns after 15 seconds of inactivity in Main Menu.
Main MenuStandby
BEGIN_E_OI.indb 19 2010/03/09 18:26:59

1
Getting Started
1-20
Main Menu Icons
Messaging
Create new/view
received messages
Yahoo!
(Yahoo! Keitai)
Enjoy Mobile Net &
PC Site browsing…
S! Appli
Download, set and
use S! Appli
News/
Entertainment
Use S! Quick News or
E-books
Camera
Capture images or
record videos
Videos/Music
Play music, videos,
etc.
Tools
Set Alarm or save
Calendar entries…
Data Folder
Open files saved on
handset/microSD Card
Widget
(Mobile Widget)
Use Mobile Widget
TV
View TV or record/
timer-record programs
Phone
Access Phone Book,
save contact
information...
Settings
Adjust/customize
handset settings
Tip
Settings
●Change Display Color Scheme ●Change Main Menu Icons
●Change Main Menu Background ( P.18-4)
Horizontal Open Menu
In Horizontal Open
Position, press in
Standby to access
Horizontal Open Menu.
From Horizontal Open
Menu, access functions
available in Horizontal
Open Position.
Default Horizontal Open Menu varies by handset color (
P.18-28).
Press
to go from Horizontal Open Menu to Standby.
Set handset to open to Horizontal Open Menu, Digital TV or Camera for
Horizontal Open Position (Horizontal View: P.18-14).
Some operations and menu items in Horizontal Open Menu differ from
those that appear in this guide.
BEGIN_E_OI.indb 20 2010/03/09 18:27:02
Table of contents