Viessmann TectoPromo SV2 Deli User manual

TECTOPROMO
SV2 Deli
MD3 Deli
01/2018 Please keep these instructions for future reference!
User Guide
EN - DE - FR - PL - RU - NL - FI - SV - NO - DA - EE - LV

DELI / NORCON
TectoPromo
SV2 Deli / MD3 Deli
DELI / NORCON
DELI / NORCON
DELI / NORCON
43
1 2

PI ENGLISH
Original instructions
1
ENGLISH
1. Before you start...............................................................................................................................2
1.1.Warranty................................................................................................................................2
2. TectoPromo SV2 / MD3...................................................................................................................2
2.1.Warnings...............................................................................................................................2
2.2.Restrictions ..........................................................................................................................3
2.3.Package ................................................................................................................................4
2.4.Transport damage................................................................................................................4
2.5.Installing ...............................................................................................................................4
2.6.Cleaning before use.............................................................................................................5
3. Electrical connections ....................................................................................................................5
4. Operation .........................................................................................................................................6
4.1.Starting up............................................................................................................................6
4.2.Loading cabinet ................................................................................................................... 6
4.3.Setting operating thermostat..............................................................................................6
4.4.Control device......................................................................................................................7
4.4.1. Display messages......................................................................................................7
4.4.2. Checking temperature settings..................................................................................8
4.5.Automatic defrosting...........................................................................................................8
5. Cleaning...........................................................................................................................................8
5.1.Cleaning condenser.............................................................................................................9
6. Interruptions in electricity distribution .........................................................................................9
7. Troubleshooting ..............................................................................................................................9
8. Servicing and spare parts ............................................................................................................10
9. Disposal of equipment..................................................................................................................10

PI ENGLISH
Original instructions
2
1. Before you start
Read these instructions carefully. They explain how to install, place, use and service the
cabinet correctly and safely.
Keep these instructions in a safe place and available for other users.
The cabinet must be installed and started up in compliance with the manufacturer’s instructions
and in conformance with local instructions and regulations.
If a defect occurs in the cabinet or cabinet equipment, or the cabinet does not operate normally,
check that this does not create a hazard to people or property. If necessary, disconnect the
cabinet and contact the nearest service organisation. All users of the cabinet must be aware of
how to use the cabinet correctly and safely.
1.1. Warranty
Each cabinet has a one (1) year durability and material warranty for normal ambient conditions
(class 3).
Normal ambient conditions must not exceed:
• Relative humidity 60 % RH
• Ambient temperature +25 °C
• Frontal airow < 0.2 m/s
NOTE The warranty does not extend to any breakage of glass, accidental or otherwise.
2. TectoPromo SV2 / MD3
TectoPromo SV2 / MD3 are cooled display cabinets for drinks, sandwiches and dairy products,
aimed at impulse buyers. The cabinets maintain the storage temperature required by the
products.
TectoPromo SV2 Deli model includes a night blind that can be pulled in front of the shelves.
See gure 4 on the inside cover. Pull the night blind up as shown in the picture and lock the
hook in the counterpart, which is found behind the light.
NOTE The climate class for these cabinets is 3, normal operating conditions.
2.1. Warnings
WARNING If the machinery contains propane R290, there is a re hazard. The propane
content is declared on the rating plate and the machinery.

PI ENGLISH
Original instructions
3
WARNING Do not obstruct airow within the machinery and the cabinet.
WARNING Do not hasten defrosting by mechanical means.
WARNING Do not damage the refrigeration circuit.
WARNING Due to re hazard, only a qualied technician is allowed to install the system.
WARNING No electrical equipment should be placed inside the cabinet unless specically
approved by the manufacturer.
WARNING Do not use the product without protective lighting covers / reectors under the
handrails. If the lighting covers are damaged or missing, they must be replaced
and installed without delay to rule out any risk of electric shock from the lighting
components. Using the product with lighting covers in place is perfectly safe.
2.2. Restrictions
Using the cabinet in any way other than specied in these instructions is prohibited. Only
products that are specied in these instructions or in the brochure for the cabinet may be
stored in the cabinet.
The manufacturer accepts no liability for incidents that are caused by using the cabinet in
contravention of these instructions, or with disregard for the warnings in these instructions or
without following these instructions.
NOTE Climbing inside or on the top of the cabinet is prohibited. Standing on any part of
the cabinet is prohibited.
NOTE Handle cabinets with glass lids and doors with care to avoid nger or other
injuries.
NOTE Always wear protective gloves when handling H version, surfaces inside the
cabinet are hot.
NOTE Cabinet is for indoor use only.

PI ENGLISH
Original instructions
4
NOTE Ventilate the premises if refrigerant leakage is suspected.
NOTE Disconnected the cabinet from the power supply before replacing the source of
light. Only a qualied technician is allowed to replace a uorescent tube.
NOTE Storing ammable or hazardous liquids in the cabinet is strictly prohibited.
2.3. Package
Transport or move the cabinet to its destination site in the original factory packing, whenever
possible. The packaging materials are recyclable.
NOTE (This applies to cabinets using R290 as refrigerant): do not turn on the power
to the cabinet if you suspect that a refrigerant leakage has occurred during
transportation.
2.4. Transport damage
Unpack the cabinet and check for any sign of damage during transport. Report any damage
immediately to your insurance company, or to the supplier or manufacturer of the cabinet.
2.5. Installing
1. Release the tape from the air gap stopper and let it fall into a horizontal position.
2. Set the cabinet in its place.
Leave an unobstructed air gap of at least 8 cm behind the
cabinet, also when cabinets are back to back, and of at least
25 cm above the cabinet.

PI ENGLISH
Original instructions
5
3. Adjust the cabinet to stand perpendicularly using the adjustable legs.
4. Ensure that the airow to the condenser unit is not obstructed.
When installing the cabinet, make sure of the following:
• The area where the cabinet is placed is at and level.
• No objects are placed on top of the cabinet.
• The cabinet is not placed in the immediate vicinity of a heat source
such as a radiator, warm air blowing heater or spotlight.
• The cabinet is not exposed to direct sunlight. If necessary, use blinds in
any nearby window.
• The air conditioning for the premises does not blow onto the cabinet.
The correct positioning of the cabinet optimises temperature conditions and
performance.
Cabinets with castors / wheels may be anchored to the wall behind them as
a safety precaution.
2.6. Cleaning before use
1. Clean the cabinet surfaces and the storage compartment for foodstuffs with a mild liquid
detergent (pH 6-8) before using the cabinet.
Follow the instructions provided with the detergent.
NOTE Make sure that all cleaning uids are classed as non-toxic.
2. Dry the surfaces carefully.
3. Electrical connections
NOTE The symbol marked on the cabinet (a lightning bolt inside a triangle) indicates
that there are components and wires under the cover containing live voltage.
Only personnel qualied to install and service electrical equipment are permitted
access to areas that contain live voltage.
Check the voltage and size of the fuse required on the rating plate attached to the cabinet. The
supply socket must be earthed and protected by a 10 A slow fuse. No other appliances may be
connected to the same fuse.
NOTE All electrical connections must be carried out by approved and qualied
personnel and comply with all IEE and local regulations, failure to do this could
result in personal or fatal injury.

PI ENGLISH
Original instructions
6
4. Operation
The cooling is achieved by a fan evaporator system. The evaporator is located at the bottom
of the cabinet’s tray. The cold air is blown to the shelves through the perforated back wall and
through the cooling cell in the top corner.
The cabinet is equipped with a Dixell XR40CX controller.
In case the pressure rises to high, for example because of dirt in the condenser, the Dixell
XR40CX controller stops the machine from running and shows an error message (HA2).
For more information on the different control systems, please see the corresponding chapters.
4.1. Starting up
1. Connect the plug to the supply socket.
The compressor and fans start operating.
2. Wait for 90 minutes or until the desired temperature is reached.
The cabinet is now ready to be lled.
4.2. Loading cabinet
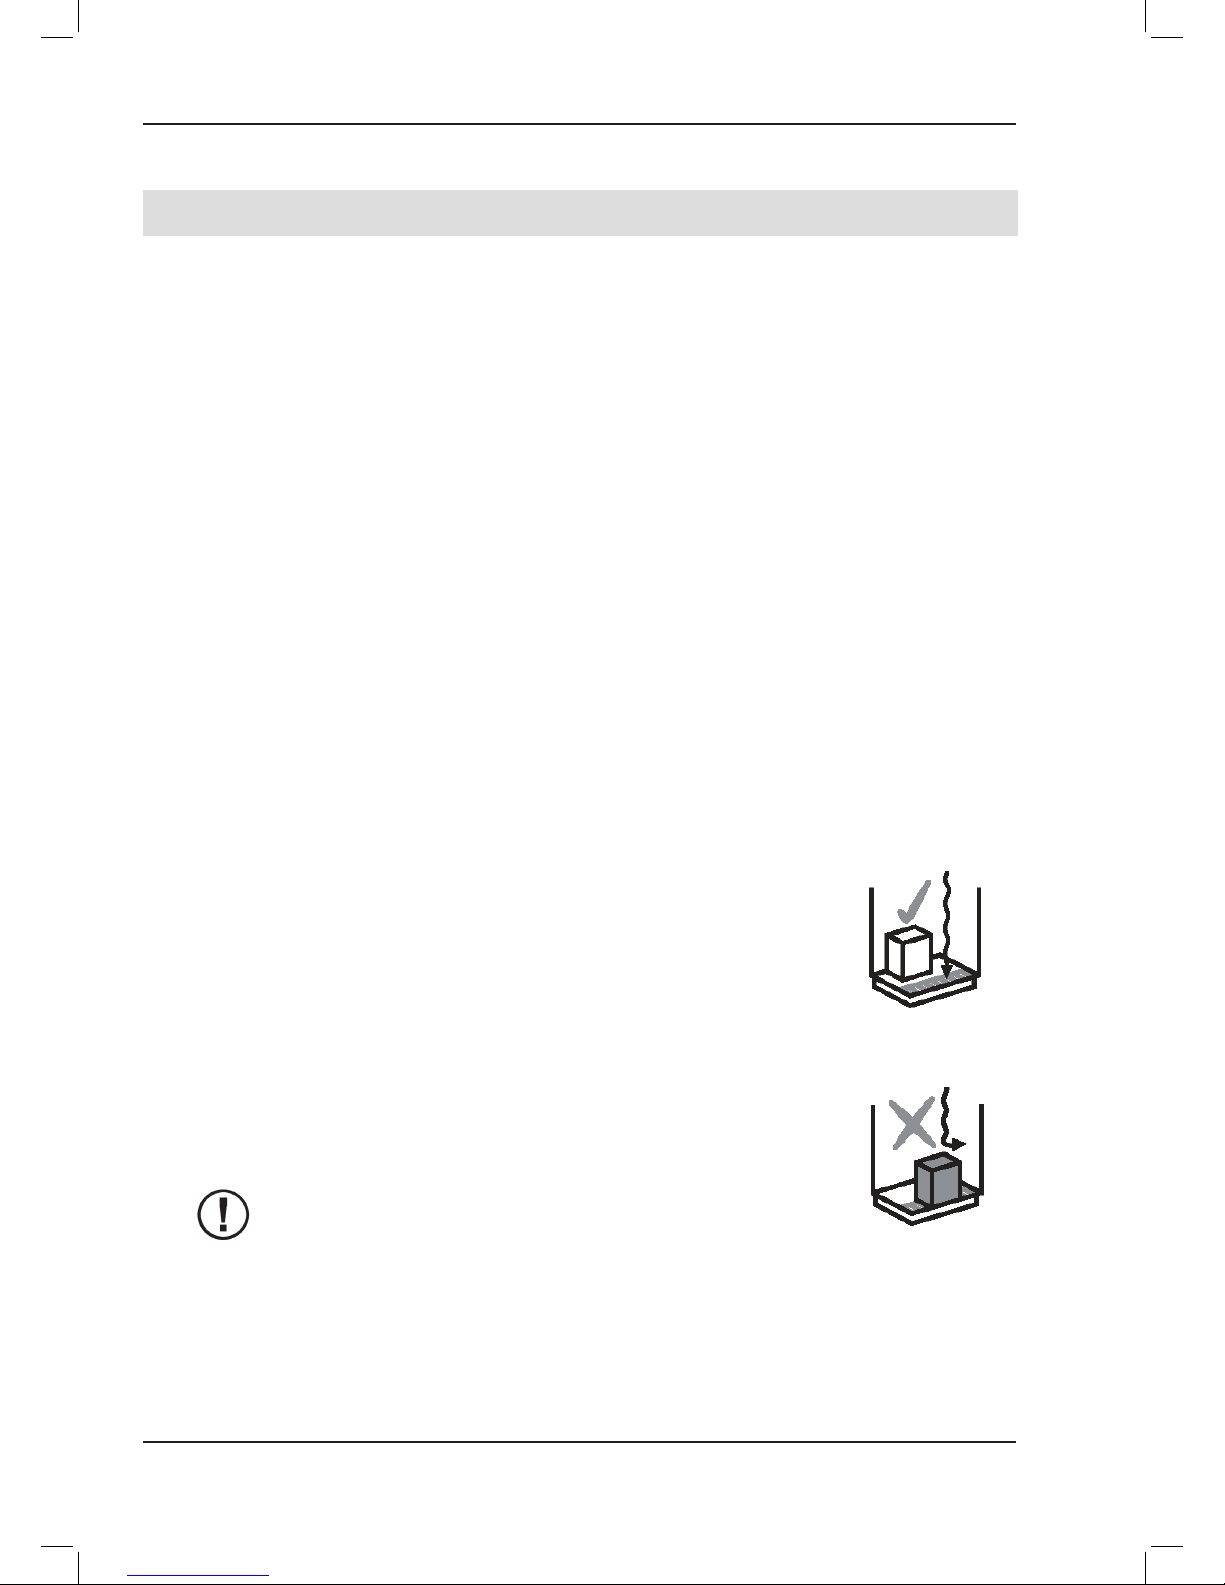
• Position the products carefully.
• Do not exceed the load limit. The maximum load on the shelves is
100 kg per metre.
• Do not place products so that they protrude over the front edge of
the shelf or obstruct the inlet grid.
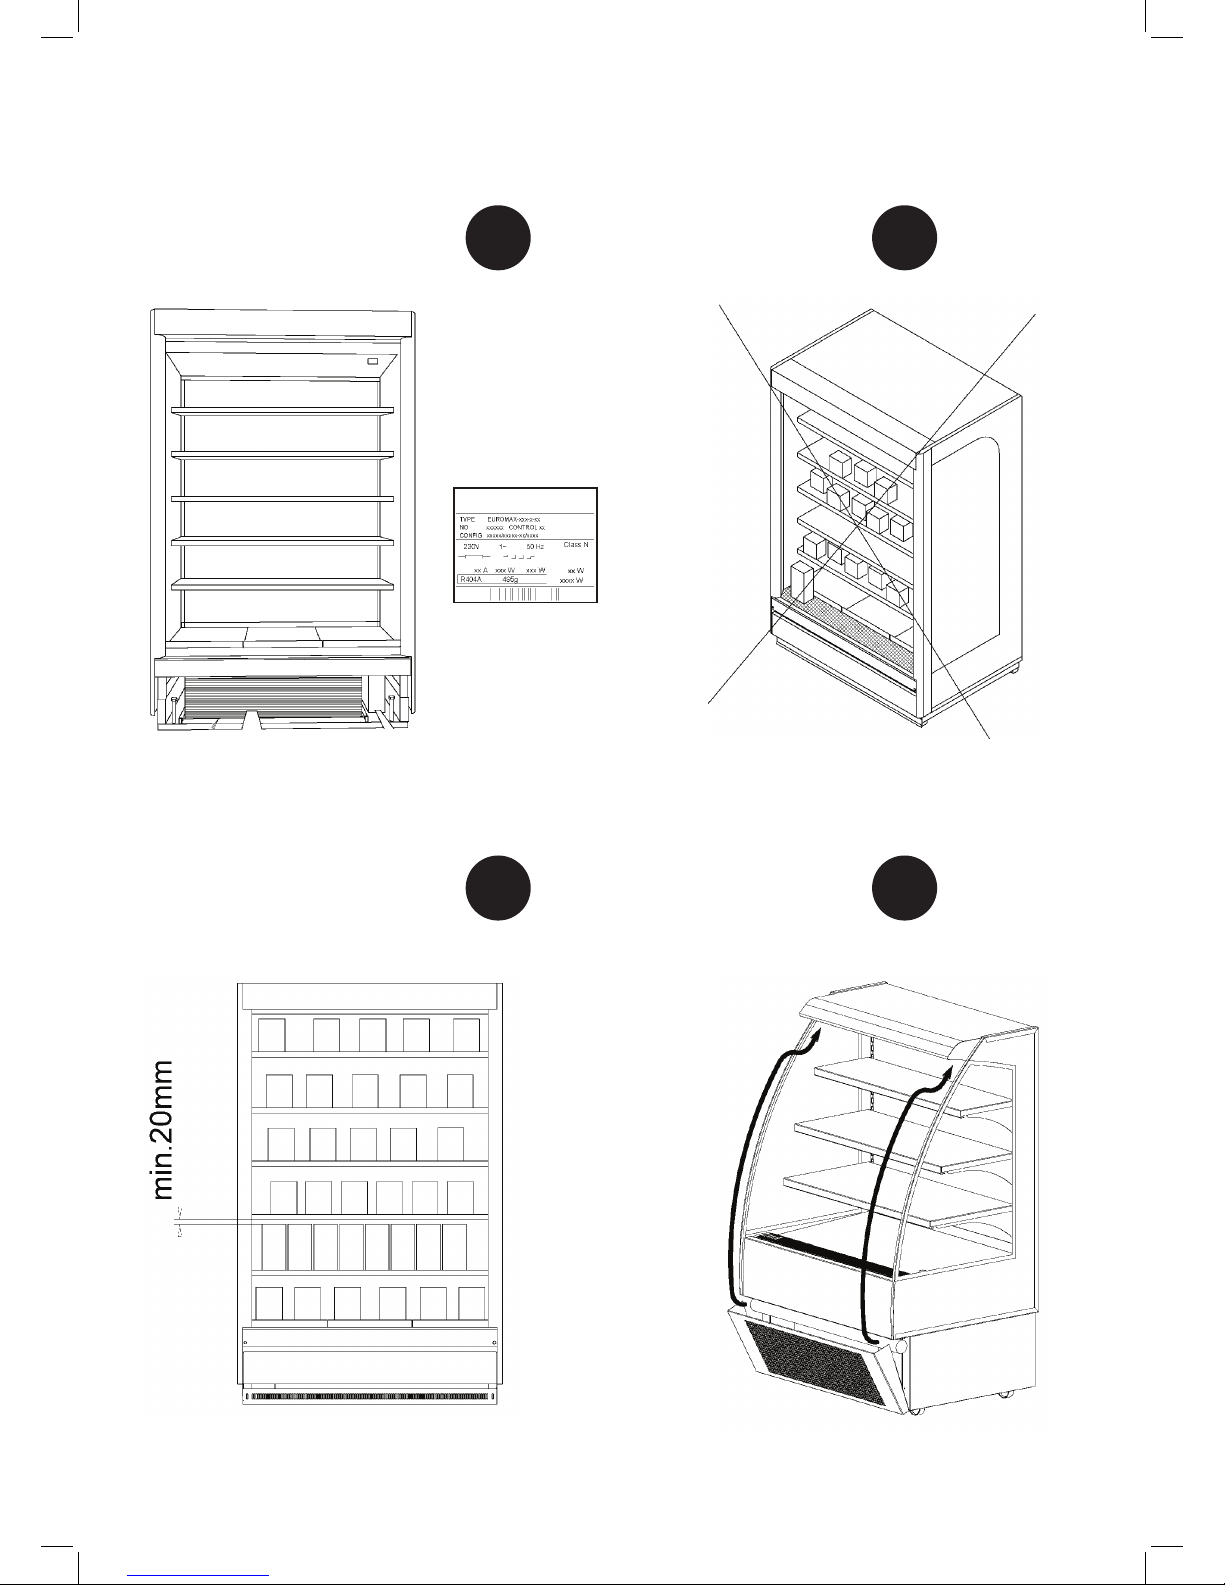
An unobstructed space of at least 20 mm must be left between
the shelves and the top plate of the cabinet. Products must not be
placed in front of the inlet and outlet grids and must not protrude
over the front edges of the shelves. Improper loading of the cabinet
will disrupt the air ow and raise the temperature of products in the
cabinet.
See gures 2 and 3 on the inside cover.
• Do not place goods on top of the cabinet.
NOTE The cabinet is not designed to cool down products but to
maintain them at the temperature at which they are placed
in the cabinet. Food products warmer than the specied
temperature should not be placed in the cabinet.
4.3. Setting operating thermostat
The operating thermostat for the cabinet is located in the terminal box inside the machinery
compartments. The lid to the machinery compartment is xed with a spring. The thermostat is
preset to the correct temperature at the factory.

PI ENGLISH
Original instructions
7
4.4. Control device
The type of the control device depends on the cabinet. All features are not available on every
cabinet.
4.4.1. Display messages
In normal status, the display shows cabinet temperature.
Defrosting signals
Defrosting under way.
Probe failure alarm signals
Control probe failure.
Contact service.
Evaporator probe failure.
Contact service.
Cabinet probe failure.
Contact service.
Condenser temperature
probe failure. Contact service.
Cabinet failure alarm signals (condenser overheat)
The compressors are switched off due to overheating. Check
the condenser rst and clean it by opening the hatch from
the base and vacuuming the condenser, if needed. If the fault
persists, contact service.

PI ENGLISH
Original instructions
8
4.4.2. Checking temperature settings
1. Press the SET key briey.
Setpoint value appears in the display.
The normal temperature view also reappears if you do not touch any button for ve (5)
seconds.
4.5. Automatic defrosting
The cabinet is equipped with an automatic defrosting equipment. The control device of the
cabinet controls the operation periods and the defrosting process. Defrosting is performed six
(6) times a day (electric defrosting). Drain water from defrosting is automatically led to a hot
gas evaporation tray or to an electrically heated evaporation sump depending on the cabinet
model. The temperature inside the cabinet rises by a few degrees during defrosting.
5. Cleaning
The following cleaning procedure must be carried out at least twice a year.
NOTE The cabinet must not be cleaned while the fans are running. To disable the
fans, disconnect the cabinet from the electricity supply.
WARNING Evaporators, condensers and parts made of stainless steel may have sharp
edges. Wear protective gloves and work cautiously to avoid cut injuries.
1. Disconnect the cabinet from the mains supply or turn the separate switch to the cleaning
position.
2. Empty the cabinet.
3. Allow the cabinet to reach the ambient temperature.
4. Remove any debris.
Do not use picks or sharp tools to remove ice from the evaporator. Damage to the coil may
lead to refrigerant leakage.
5. Inspect for drain water and remove it, if there is any.
6. Clean the interior surfaces of the cabinet with a mild liquid detergent (non-toxic, pH 6-8)
and dry the surfaces carefully using a clean towel.
7. When cleaning is completed, start up the cabinet.
See section Starting up.
Check at regular intervals also that
• the operating noise of the cabinet is normal,
• the evaporator is clean and
• the inlet and outlet grids are not obstructed or dirty.

PI ENGLISH
Original instructions
9
NOTE Clean the drain sump located in the machinery compartment. Inadequate or
infrequent cleaning may shorten the service life of the electric heater / hot gas
piping for the drain sump. Detergent residues must be cleaned without delay
from the tray.
NOTE In the event of a refrigerant leakage all products displayed in the cabinet must
be disposed of and then the cabinet must be cleaned.
5.1. Cleaning condenser
Check once a month, or more often if necessary, that the condenser is clean.
Carry out the following procedures when necessary.
1. Vacuum the condenser ns and check that the spaces between the
ns are unobstructed.
2. Pull the top edge of the plate outwards and turn the plate downwards,
as indicated in the enclosed drawing.
If the controller unit indicates high pressure in the condenser, check
the condenser and clean it, if necessary. If the cabinet still doesn’t
function normally after this procedure, contact service.
NOTE When the cabinet is disconnected from the mains supply,
the sump heater or pump will not operate and drain water or
cleaning liquid may ll the evaporation sump.
NOTE The condensing unit is located at the bottom of the cabinet.
6. Interruptions in electricity distribution
The cabinet will start up automatically after a power cut or an interruption in the electricity
supply. The evaporation drain sump may overow during a power cut. After a power cut, check
that the cabinet operates normally. If necessary, contact your nearest service organisation.
7. Troubleshooting
If a defect occurs in the cabinet or cabinet equipment, or the cabinet does not operate normally,
check that this does not create a hazard to people or property. If necessary, disconnect the
cabinet and contact your nearest service organisation.
Before contacting a service representative, check that
• the plug has not come out of the supply socket and that the mains supply is working.
• the fuse for the cabinet is intact.
• the cabinet is correctly positioned.

PI ENGLISH
Original instructions
10
• the condenser is not blocked or dirty.
• the products are placed in the cabinet correctly.
• the airow in the cabinet is not disrupted.
• defrosting is not in progress, see the thermometer.
If the reason for the malfunction cannot be identied, disconnect the electrical supply to the
cabinet and contact the service organisation.
Check at regular intervals that the operating noise of the cabinet is normal, the condenser and
evaporator are clean, and the air ow through the inlet and outlet grids is not obstructed by
debris, packaging waste or other such material. See section 4.4.1. Display messages.
8. Servicing and spare parts
The specications of the cabinet are marked on the rating plate, see the inside cover. Please
inform your authorised service organisation of the cabinet type, name, serial number and
the Control markings marked on the rating plate. A wiring diagram and a list of technical
specications (FAKTA) that includes a component list are enclosed in a plastic wallet inside
the machinery compartment of the cabinet. The service periods of the cabinet are dened in a
service contract.
NOTE Only authorised tters may carry out servicing and repair of the machinery
and electrical equipment in the cabinet. The evaporator should be cleaned by
authorised service personnel.
It is recommended to use Viessmann spare parts.
9. Disposal of equipment
After reaching the end of its service life, the cabinet must be disposed of in compliance with
local regulations and instructions. Seek expert advice when disposing of substances that are
harmful to the environment and when utilising recyclable material.
WARNING R290 is highly ammable, this applies to cabinets using R290 propane as
refrigerant.

PI DEUTSCH
Übersetzung der Originalanleitung
1
DEUTSCH
1. Vor der Inbetriebnahme ..................................................................................................................2
1.1.Garantie ................................................................................................................................2
2. TectoPromo SV2 / MD3 ...................................................................................................................2
2.1.Warnhinweise.......................................................................................................................3
2.2.Einschränkungen.................................................................................................................3
2.3.Verpackung...........................................................................................................................4
2.4.Transportschäden................................................................................................................4
2.5.Installation............................................................................................................................4
2.6.Reinigung vor der Inbetriebnahme ....................................................................................5
3. Elektrische Anschlüsse..................................................................................................................6
4. Betrieb..............................................................................................................................................6
4.1.Inbetriebnahme ....................................................................................................................6
4.2.Bestückung des Kühlmöbels..............................................................................................6
4.3.Einstellung des Betriebsthermostats ................................................................................7
4.4.Steuereinheit Dixell XR40CX...............................................................................................7
4.4.1. Displaymitteilungen....................................................................................................8
4.4.2. Kontrolle der Temperatureinstellungen......................................................................8
4.5.Automatisches Abtauen......................................................................................................9
5. Reinigung.........................................................................................................................................9
5.1.Reinigung des Kondensators...........................................................................................10
6. Unterbrechungen der Stromversorgung ....................................................................................10
7. Fehlersuche...................................................................................................................................10
8. Wartung und Ersatzteile ............................................................................................................... 11
9. Entsorgung der Geräte ................................................................................................................. 11

PI DEUTSCH
Übersetzung der Originalanleitung
2
1. Vor der Inbetriebnahme
Bitte lesen Sie diese Bedienungsanleitung sorgfältig durch. Hier nden Sie wichtige
Informationen über Montage, Aufstellungsort, Gebrauch und Wartung Ihres neuen Kühlmöbels.
Bewahren Sie diese Anleitung an einem sicheren, auch für andere Benutzer zugänglichen Ort
auf.
Das Kühlmöbel muss gemäß den Herstelleranweisungen und den örtlichen Vorschriften und
Bestimmungen entsprechend aufgestellt und in Betrieb genommen werden.
Überprüfen Sie bei Auftreten eines Defekts am Kühlmöbel oder einem Zubehörteil bzw. bei
Betriebsstörungen sofort, ob sich daraus eine Gefährdung für Personen oder Sachwerte
ergibt. Trennen Sie ggf. das Kühlmöbel vom Netz und setzen Sie sich mit der nächsten
Kundendienststelle in Verbindung. Alle Benutzer des Kühlmöbels müssen sich mit dessen
korrektem und sicherem Gebrauch vertraut machen.
1.1. Garantie
Auf jedes Kühlmöbel wird ein (1) Jahr Materialgarantie gewährt, sofern das Gerät unter
normalen Umgebungsbedingungen (Klasse 3) betrieben wird.
Die folgenden Werte dürfen im Normalbetrieb nicht überschritten werden:
• Relative Luftfeuchtigkeit 60 % RH
• Umgebungstemperatur +25 °C
• Luftstrom vor dem Gerät < 0,2 m/s
Anmerkung Glasbruchschäden sind ungeachtet ihrer Ursache von der Garantie
ausgeschlossen.
2. TectoPromo SV2 / MD3
TectoPromo SV2 / MD3 sind Kühltheken für den Impulsverkauf von Getränken, belegten
Broten und Molkereiprodukten. Das eingebaute Kühlaggregat hält die richtige Lagertemperatur
dieser Produkte aufrecht.
Das Modell TectoPromo SV2 Deli verfügt über eine Nachtblende, die über die
Gerätevorderseite gezogen werden kann. Siehe Abb. 4 auf der Innenseite des Umschlags.
Ziehen Sie die Nachtblende nach oben, wie in der Abbildung dargestellt, und hängen Sie den
Haken am Gegenhaken hinter der Beleuchtung ein.
Anmerkung Bei den Geräten handelt es sich um Kühlmöbel der Klimaklasse 3, geeignet für
für normale Betriebsbedingungen.

PI DEUTSCH
Übersetzung der Originalanleitung
3
2.1. Warnhinweise
ACHTUNG Falls das Kühlaggregat Propan R290 enthält, besteht Feuergefahr.
Der Propangehalt ist auf dem Typenschild und auf dem Aggregat vermerkt.
ACHTUNG Der Luftstrom innerhalb von Aggregat und Kühlmöbel darf nicht behindert
werden.
ACHTUNG Versuchen Sie nicht, den Abtauvorgang mit mechanischen Mitteln zu
beschleunigen.
ACHTUNG Schützen Sie den Kältekreislauf vor Beschädigungen.
ACHTUNG Aufgrund der Feuergefahr darf das System nur von qualizierten Technikern
installiert werden.
ACHTUNG Ohne die ausdrückliche Genehmigung des Herstellers dürfen keine
elektrischen Geräte in das Kühlmöbel gelegt werden.
ACHTUNG Verwenden Sie das Produkt nicht ohne die Lampenblenden/Reektoren
unter den Handläufen. Sie dienen als Schutz vor Stromschlägen durch die
Beleuchtungselektrik und müssen bei Beschädigung oder Abhandenkommen
unverzüglich ersetzt werden. Solange die Schutzblenden installiert sind, kann
das Produkt gefahrlos verwendet werden.
2.2. Einschränkungen
Jede andere Nutzung des Kühlmöbels als zu den in dieser Anleitung beschriebenen Zwecken
ist untersagt. In dem Gerät dürfen nur die in diesem Dokument oder dem Prospekt genannten
Produkte aufbewahrt werden.
Der Hersteller lehnt jegliche Haftung für Unfälle ab, die auf anleitungswidrige Verwendung des
Geräts oder eine Missachtung der in dieser Anweisung gegebenen Hinweise bzw. auf einen
Verstoß gegen diese zurückzuführen sind.
Anmerkung Der Aufenthalt von Personen in dem Kühlmöbel ist verboten, ebenso das
Sitzen oder Stehen auf dem Gerät oder auf Teilen davon.
Anmerkung Beim Önen und Schließen von Glastüren bzw. -deckeln ist Vorsicht geboten,
um Finger- und anderweitige Verletzungen zu vermeiden.

PI DEUTSCH
Übersetzung der Originalanleitung
4
Anmerkung Die Innenächen der H-Version werden sehr heiß. Schutzhandschuhe
verwenden!
Anmerkung Das Kühlmöbel ist nur für den Innengebrauch vorgesehen.
Anmerkung Bei Verdacht auf Kältemittelleckagen den Raum gründlich lüften.
Anmerkung Trennen Sie das Kühlmöbel von der Stromversorgung, bevor Sie die
Lichtquelle austauschen. Die Neonröhre darf nur von qualizierten Technikern
ausgewechselt werden.
Anmerkung Die Aufbewahrung entammbarer oder anderweitig gefährlicher Flüssigkeiten
in dem Gerät ist strengstens verboten.
2.3. Verpackung
Transportieren Sie das Kühlmöbel möglichst in seiner Originalverpackung zum endgültigen
Aufstellungsort. Die Verpackungsmaterialien sind recyclingfähig.
Anmerkung (Für Versionen, die R290 als Kältemittel verwenden:) Falls Anlass zu der
Vermutung besteht, dass beim Transport Kühlmittelleckagen aufgetreten sein
können, darf das Gerät nicht eingeschaltet werden.
2.4. Transportschäden
Packen Sie das Kühlmöbel aus und überprüfen Sie es auf eventuelle Transportschäden.
Melden Sie ggf. festgestellte Schäden unverzüglich Ihrer Versicherungsgesellschaft, dem
Lieferanten oder dem Hersteller des Möbels.
2.5. Installation
1. Lösen Sie das Band vom Luftspaltstopper und lassen Sie diesen in eine horizontale
Position fallen.

PI DEUTSCH
Übersetzung der Originalanleitung
5
2. Stellen Sie das Kühlmöbel auf.
Lassen Sie einen Luftspalt von 8 cm hinter dem Kühlmöbel
frei, auch wenn die Geräte Rücken an Rücken aufgestellt
werden, und mindestens 25 cm oberhalb des Kühlmöbels.
3. Stellen Sie die Füße so ein, dass das Kühlmöbel genau senkrecht steht.
4. Stellen Sie sicher, dass der Luftstrom zum Kondensator nicht blockiert wird.
Beim Aufstellen des Kühlmöbels muss auf Folgendes geachtet werden:
• Der Aufstellbereich ist waagerecht und eben.
• Auf dem Kühlmöbel werden keine Objekte abgestellt.
• Das Kühlmöbel bendet sich nicht in unmittelbarer Nähe einer
Heizquelle, wie Heizkörper, Heißluftgebläse oder Scheinwerfer.
• Das Kühlmöbel darf keiner direkten Sonneneinstrahlung ausgesetzt
sein. Wenn nötig, verwenden Sie Blenden in den nahe gelegenen
Fenstern.
• Die Klimaanlage der Räumlichkeiten darf nicht auf das Kühlmöbel
blasen.
Sachgemäße Aufstellung optimiert die Temperaturbedingungen und die
Leistung des Geräts.
Mit Rollen ausgestattete Kühlmöbel können durch eine Wandverankerung
gesichert werden.
2.6. Reinigung vor der Inbetriebnahme
1. Säubern Sie die Regalächen und Innenwände vor der Inbetriebnahme mit einer milden,
ungiftigen Reinigungslösung (pH 6-8).
Beachten Sie die Gebrauchshinweise des Reinigungsmittels.
Anmerkung Achten Sie darauf, dass alle verwendeten Reinigungsmittel als ungiftig
eingestuft sind.
2. Trocknen Sie die Flächen sorgfältig ab.

PI DEUTSCH
Übersetzung der Originalanleitung
6
3. Elektrische Anschlüsse
Anmerkung Das Stromwarnsymbol (Blitz im Dreieck) weist darauf hin, dass sich unter der
Abdeckung spannungsführende Bauteile und Kabel benden. Der Zugang
zu spannungsführenden Bereichen ist nur Fachkräften zum Installieren und
Instandsetzen elektrischer Anlagen gestattet.
Die erforderliche Spannungsversorgung und Sicherungsgröße ist auf dem Typenschild
des Geräts vermerkt. Die Steckdose muss geerdet und durch eine Sicherung (10 A, träge)
abgesichert sein. Über die Sicherung dürfen keine weiteren Elektrogeräte abgesichert werden.
Anmerkung Alle elektrischen Anschlüsse dürfen nur von dafür zugelassenen Fachkräften
unter Beachtung geltender Vorschriften des Elektrotechnikerverbands sowie
anwendbarer lokaler Bestimmungen ausgeführt werden. Anderenfalls besteht
die Gefahr von Unfällen mit schweren oder tödlichen Verletzungen.
4. Betrieb
Die Kühlung wird mittels eines Umluftverdampfers erzielt. Der Verdampfer bendet sich unter
dem Innenboden des Kühlmöbels. Die gekühlte Luft wird durch die Lochblende und durch die
in der oberen Ecke bendlichen Kühlzelle ins Innere des Kühlmöbels geblasen.
Das Kühlmöbel ist mit einer Steuereinheit vom Typ Dixell XR40CX ausgerüstet.
Die Steuereinheit Dixell XR40CX schaltet bei einem Druckanstieg (verursacht z. B. durch
Verschmutzung des Kondensators) das Gerät aus und meldet den Fehlercode (HA2).
Nähere Informationen zu den unterschiedlichen Steuersystemen nden Sie in den
entsprechenden Kapiteln.
4.1. Inbetriebnahme
1. Stecken Sie den Stecker in die Steckdose.
Kompressor und Gebläse nehmen ihren Betrieb auf.
2. Warten Sie 90 Minuten oder bis zum Erreichen der gewünschten Temperatur.
Das Kühlmöbel kann nun bestückt werden.
4.2. Bestückung des Kühlmöbels
• Ordnen Sie die Produkte sorgfältig ein.

PI DEUTSCH
Übersetzung der Originalanleitung
7
• Überschreiten Sie nicht das zulässige Gewicht. Die maximale
Tragkraft der Regalböden beträgt 100 kg/m.
• Ordnen Sie die Produkte nicht so ein, dass sie über die
Vorderkante der Etagen hinausreichen oder das Ansauggitter
behindern.
Unter der Regaldecke muss ein Freiraum von mindestens 20 mm
bleiben. Die Produkte dürfen nicht unmittelbar vor die Ausblas-
und Ansauggitter gestellt werden oder über die Vorderkanten der
Regalböden hinausragen. Ein falsches Bestücken des Kühlmöbels
führt zu einer Unterbrechung der Luftzirkulation und einem
Temperaturanstieg der Produkte.
Siehe Abb. 2 und 3 auf der Innenseite des Umschlags.
• Stellen Sie keine Gegenstände auf der Oberseite des Kühlmöbels
ab.
Anmerkung Das Kühlmöbel ist nicht zum Abkühlen von Produkten
ausgelegt, sondern zur Aufrechterhaltung ihrer
ursprünglichen Temperatur. Lebensmittel, deren
Temperatur über dem angegebenen Maximalwert liegt,
dürfen nicht in das Gerät gelegt werden.
4.3. Einstellung des Betriebsthermostats
Das Betriebsthermostat des Kühlmöbels bendet sich im Anschlusskasten des
Maschinenfachs. Die Klappe zum Maschinenfach ist mit einer Feder gesichert. Das Thermostat
ist ab Werk auf die richtige Temperatur eingestellt.
4.4. Steuereinheit Dixell XR40CX
Die integrierte Steuereinheit ist vom Gerätemodell abhängig. Es sind nicht alle Funktionen in
jedem Kühlmöbel verfügbar.

PI DEUTSCH
Übersetzung der Originalanleitung
8
4.4.1. Displaymitteilungen
Im Normalstatus wird auf dem Display die Kühltemperatur angezeigt.
Abtausignale
Gerät wird abgetaut.
Alarmsignale bei Sensorfehlern
Fehler im Kontrollsensor. Bitte
Wartungsdienst kontaktieren.
Fehler im Verdampfersensor.
Bitte Wartungsdienst
kontaktieren.
Fehler im Fühler für
Innenraumtemperatur. Bitte
Wartungsdienst kontaktieren.
Fehler im Kondensatortemperatursensor.
Bitte Wartungsdienst kontaktieren.
Alarmsignale bei Funktionsstörung (Kondensatorüberhitzung)
Die Kompressoren schalten sich wegen Überhitzung ab.
Kondensator überprüfen und ggf. säubern (im Sockel
bendliche Klappe önen und Kondensator mit dem
Staubsauger reinigen). Falls der Fehler weiterhin besteht,
wenden Sie sich bitte an Ihren Wartungsdienst.
4.4.2. Kontrolle der Temperatureinstellungen
1. Drücken Sie kurz die SET-Taste.
Im Display erscheint der Einstellungswert.
Die normale Temperaturanzeige erscheint auch dann, wenn fünf (5) Sekunden lang keine
Taste gedrückt wird.
This manual suits for next models
1
Table of contents
Languages:
Other Viessmann Display Case manuals
Popular Display Case manuals by other brands

Kysor/Warren
Kysor/Warren HQD6, HQD6L Installation & operation manual

FPG
FPG Fusion product manual

Delfield
Delfield Dual View 536-SR68 Specification sheet

Delfield
Delfield F15PR48D Specification sheet

STODDART
STODDART Woodson W.HFH23 Specification, installation and operation manual

Hatco
Hatco Glo-Ray GRHD-2P Specifications