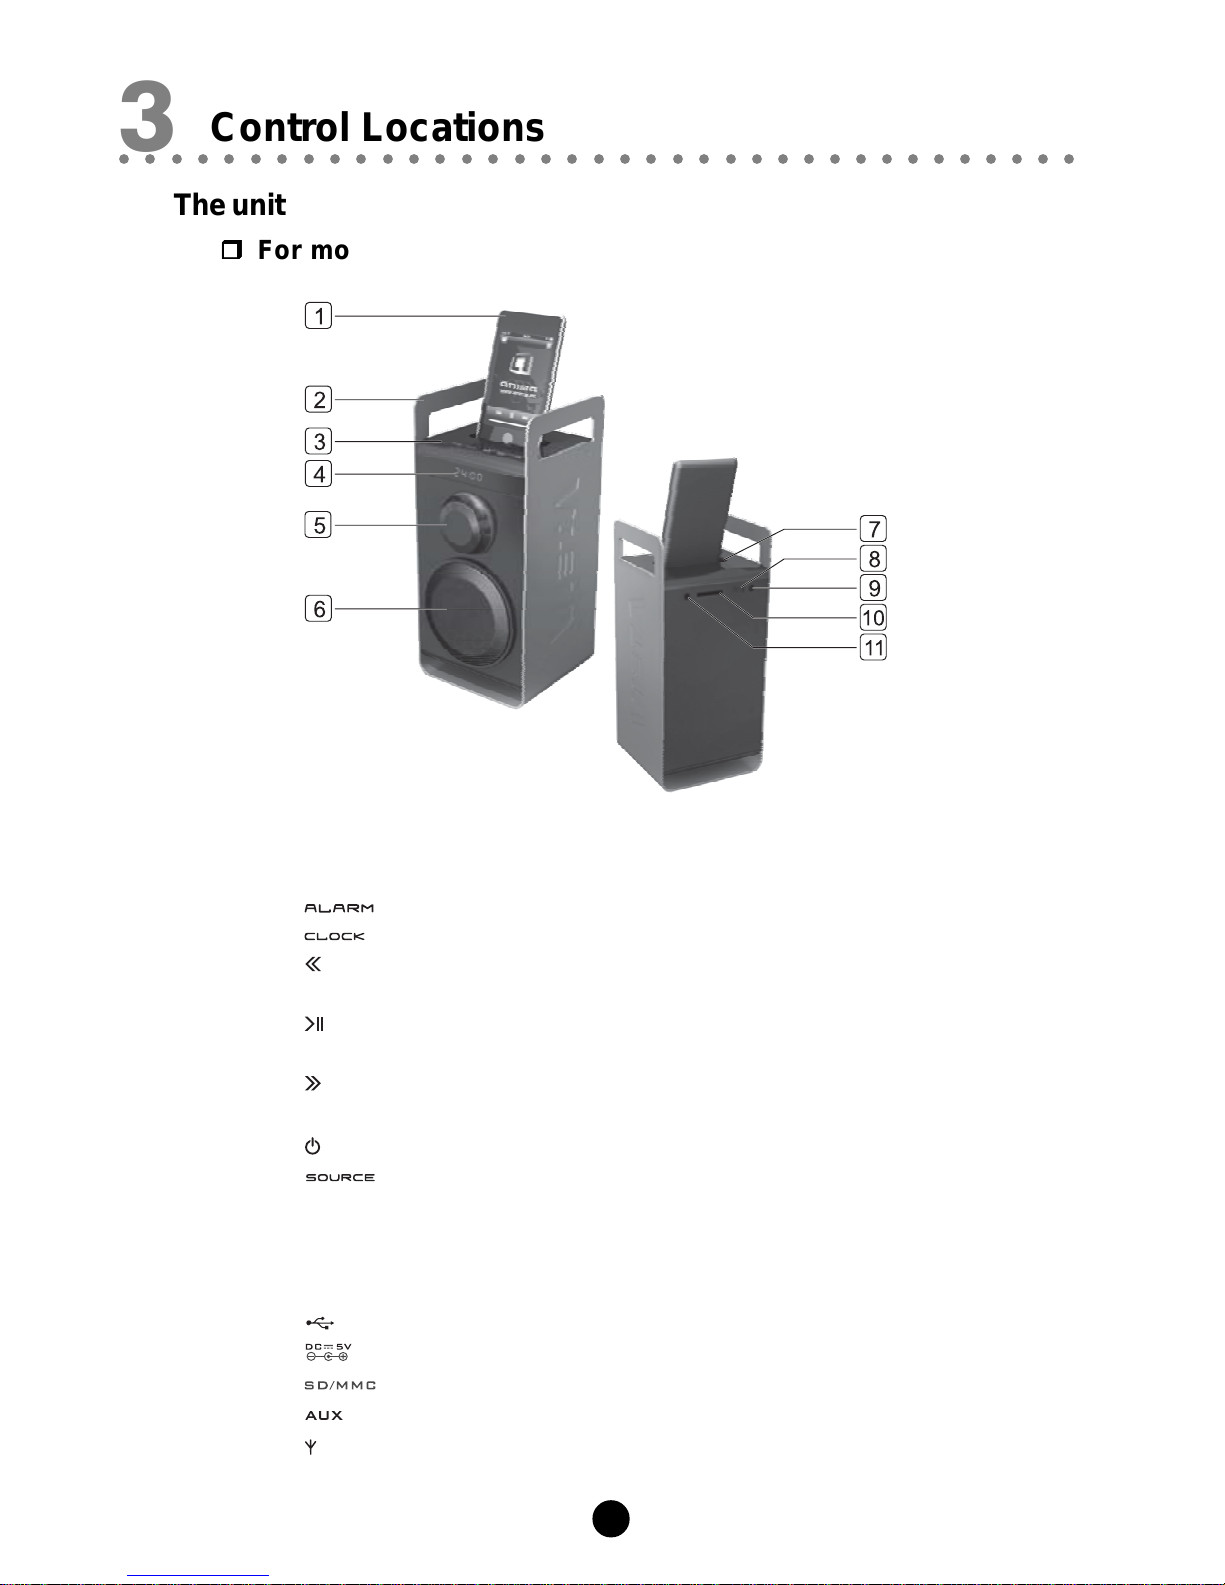
VIETA IP20 User manual


1
Thank you for purchase this unit. Please read this owner’s manual carefully before use
and keep it at a safe place for your future reference.
Table of Contents
1. Table of Contents ............................................................................................... 1
2. Precautions ........................................................................................................ 2
3. Control Locations ............................................................................................. 3
Theunit ................................................................................................................................3
Remotecontrol ..................................................................................................................... 5
4. Installation Batteries ......................................................................................... 6
5. Turning the Power On and Off ......................................................................... 7
6. Using the Unit .................................................................................................... 8
Listening to music from ani-Pod (i-Pod player is not supplied): .............................................. 8
Listening to music from an USB or Memory card (SD or MMC): ........................................... 8
Listeningto RadioBroadcasts: ............................................................................................. 9
Listeningto musicfroman auxiliarydevice: .......................................................................... 10
7. Setting the Clock Manually..............................................................................11
8. Setting the Alarm ..............................................................................................12
9. Trouble shooting ..............................................................................................13
10. Technical Specifications ................................................................................14
11. Accessories ......................................................................................................15
12. Notes for battery disposal .............................................................................16
○○○○○○○○○○○○○○○○○○○○○○○○○○○○○○○○○○○○○
1Table of Contents

2
○○○○○○○○○○○○○○○○○○○○○○○○○○○○○○○○○○○○○
2Precautions
Before operating this unit, check the voltage of this unit to see if it is identical with the
voltage of your local power supply.
Unplug the unit from the wall outlet if it is not used for a long time. To disconnect the
cord, pull it out by grasping the plug.
To avoid electric shock, do not open the cabinet by unqualified personnel.
There is no user serviceable parts inside. In case of unit failure, unplug the power cord
and consult your dealer
The ventilation should not be impeded by covering the ventilation openings with items
such as newspaper, table-cloths, curtains etc.
The apparatus shall not be exposed to dripping or splashing and that no objects filled
with liquids, such as vases, shall be placed on the apparatus.
To prevent fire or shock hazard, do not expose this equipment to hot places, rain,
moisture or dust.
Don’t get close to the water source when using this unit, such as near bathtub, bath
slot, ish-washing slot, washing machine to use it; also, don’t use this unit on damp
plinth or nearby swimming pool or similar close to the water source.
Do not place this unit close to strong magnetic field.
Don’t place this unit close to the damper, or the moisture will affect the life of the laser
head.
If the unit is brought directly from a cold to a warm location, or is placed in a very
damp room, moisture may condense on the lens inside the unit. Should this occur,
the unit will not operate properly. Remove the disc and leave the unit turned on for
about an hour until the moisture evaporates.
Should any solid object or liquid fall into the unit, unplug the unit and have it checked
by qualified personnel before operating it any further.
Before cleaning this unit, unplug the unit from the wall outlet first. Don’t use the cleaner
which is with liquid or aerosol (e.g. pesticide). You can use a clean cloth to clean this
unit.
Please use the connection cable to connect to unit. Don’t use accessorial equipment
recommended by non manufacturer. It may course an electric shock by using this
equipment.
Batteries shall not be exposed to excessive heat such as sunshine, fire or the like.
Where the Mains plug is used as the disconnect device, the disconnect device shall
remain readily operable.

3
○○○○○○○○○○○○○○○○○○○○○○○○○○○○○○○○○○○○○
3Control Locations
The unit
For model no.: IP10
1 i-Pod Player (Not supplied)
2. Handle
3. -- Set the alarm
--- Set clock
--------- Previous
Tuning backward / Channel select backward
--------- Play / Pause / Stop
Memory Stations
--------- Next
Tuning forward / Channel select forward
--------- Standby
-- Function mode select
4. LED Display lens
5. Volume control knob
6. Speaker
7. i-Pod dock
8. ..................... USB port
9. .................. DC jack
10. .............. Memory card port (SD or MMC)
11. (Line in) ..... Auxiliary input terminal
........................ FM Antenna Socket

4
For model no.: IP20
1 i-Pod Player (Not supplied)
2. Handle
3. -- Set the alarm
--- Set clock
--------- Previous
Tuning backward / Channel select backward
--------- Play / Pause / Stop
Memory Stations
--------- Next
Tuning forward / Channel select forward
--------- Standby
-- Function mode select
4. LED Display lens
5. Speakers
6. Volume control knob
7. i-Pod dock
8. ..................... USB port
9. .................. DC jack
10. .............. Memory card port (SD or MMC)
11. (Line in) ..... Auxiliary input terminal
........................ FM Antenna Socket

5
Remote control
1--------- Standby
2. SOURCE Function mode select
3. H------ Previous
Tuning backward / Channel select backward
4. ----------- Volume down
5. CLOCK -- Set clock
6. -------- Mute
7. BF ----- Play / Pause / Stop
Memory Stations
8. G------ Next
Tuning forward / Channel select forward
9. +---------- Volume up
10. ALARM -- Set the alarm

6
○○○○○○○○○○○○○○○○○○○○○○○○○○○○○○○○○○○○○
4Installation Batteries
Caution: Be careful when you press the slot of the battery compartment with your
fingernails only as this might break them.
1. Press the lock on the battery compartment.
2. Press the slot on the battery compartment.
3. Pull out the battery compartment.
4. Replace a new battery (size 2025) correctly and fully
insert the battery compartment back to the original
position.
* Batteries contain chemical substances, so they should
be disposed of properly.
Handling the Remote Control
Improper use could cause corrosion or battery leakage and may result in physical
injury and/or property damage including fire.
Remove the battery from remote control handset when it is not to be used for a
long period. Otherwise it can be damaged due to leakage of battery.
To avoid possible failure, read the following instructions and handle the remote
control property.
Do not drop or cause impact to the remote control.
Do not spill water or any liquid on the remote control.
Do not place the remote control on a wet object.
Do not place the remote control under the direct sunlight or near sources of
excessive heat.
Do not use caustic cleaners (porcelain, stainless steel, toilet, or oven cleaner
etc.) on the remote, as it may suffer damage.

7
Insert the AC/DC adapter’s DC plug into the unit, then insert one side of AC power cord
into a wall outlet, and your unit is at your command!
* This unit has a built-in Recharge Li-lon battery, you can also insert the AC/DC
adapter’s DC plug into the unit for charging, the indicator will light up. The indicator will
turn off when the built-in Recharge Li-lon battery is full power .
Turning the Unit On
Press the button for 2 seconds or more to turn the unit on from standby mode.
Caution: When turning the unit on, the unit will continue in the mode it was in when
it was turned off last time.
Turning the Unit Off
Press the button for 2 seconds or more to turn the unit off and go to standby
mode.
Caution: Be sure to unplug the power cord from the outlet when the unit is not in
use for an extended period of time.
Note:
For saving power, If you don’t use any function of the unit for about 30 seconds in
playing mode, the LED will turn drak. And if you don’t use any function of the unit for
about 1 minute in playing mode when using the built-in Recharge Li-lon battery, the
LED will turn off. Press any one button to returns to the original display.
○○○○○○○○○○○○○○○○○○○○○○○○○○○○○○○○○○○○○
5Turning the Power On and Off

8
○○○○○○○○○○○○○○○○○○○○○○○○○○○○○○○○○○○○○
6Using the Unit
Listening to music from an i-Pod (i-Pod player is not supplied):
1. Place the appropriate corresponding universal i-Pod adaptor, included with i-Pod, into
this unit i-Pod docking location, then connect your i-Pod.
2. Press the button for 2 seconds or more. A LED will indicate that the unit is on.
3. Press the button repeatedly to select “ ” source.
4. The i-Pod player stored music will be played automatically, press the (BF) button
to temporarily stop the playing, press the button again, it will continue to play.
5. Adjust volume using the volume control knob on the front of the unit or +/-buttons on
the remote.
6. Press the (H) button once or more to skip previous one or more tracks of the disc.
Press and hold the (H) button to search for the position that you intend to start
playing.
Press the (G) button once or more to skip forward one or more tracks of the disc.
Press and hold the (G) button to search for the position that you intend to start
playing.
7. Press the button on the remote in playing mode, all sound will be muted. Press the
button again or +/-buttons on the remote or rotate the volume control knob on the front
of unit to resume sound.
Note:
* In DC power on mode, directly dock your i-Pod player in the docking for charging.
* Select and play music through your i-Pod controls.
*For the purpose of saving power, recharging of your i-Pod is NOT SUPPORTED when
the main set is in the STANDBY MODE.
Listening to music from an USB or Memory card (SD or MMC):
By connecting a USB mass storage device (including USB flash memory, USB flash
players or memory cards) to the unit, you can enjoy the device's stored music through the
speakers of the unit.
1. Press the button for 2 seconds or more. A LED will indicate that the unit is on.
2. Insert the USB device's USB plug into the port on the rear of the unit or insert the
memory card into the port on the rear of the unit.
3. Press the button repeatedly to select “ ” or “ ” source.
4. The i-Pod player stored music will be played automatically, press the (BF) button
to temporarily stop the playing, press the button again, it will continue to play.
Press and hold the (BF) button for 2 seconds or more to stop the playing.
5. Adjust volume using the volume control knob on the front of the unit or +/-buttons on
the remote.
6. Press the (H) button once or more to skip previous one or more tracks of the disc.
Press and hold the (H) button to search for the position that you intend to start
playing.

9
Press the (G) button once or more to skip forward one or more tracks of the disc.
Press and hold the (G) button to search for the position that you intend to start
playing.
7. Press the button on the remote in playing mode, all sound will be muted. Press the
button again or +/-buttons on the remote or rotate the volume control knob on the front
of unit to resume sound.
Listening to Radio Broadcasts:
This unit has built-in FM antenna.
If reception is poor, please connect the supplied FM antenna to the FM antenna socket on
the rear of the unit, then adjust the position of the FM antenna for the best reception.
Caution: Disconnect the audio cable when using the FM antenna.
Tuning in a Station
1. Press the button for 2 seconds or more. A LED will indicate that the unit is on.
2. Press the button repeatedly to select “ ” source.
3. Select a station using one of the following methods.
Manual Tuning
Repeatedly press the ,(H,G) buttons to move from frequency to fre-
quency until you find the station you want.
Auto Tuning
Press and hold the ,(H,G) buttons for 2 second or more, the frequency
changes down, or up, automatically until a station is found.
4. Adjust volume using the volume control knob on the front of the unit or +/-buttons
on the remote.
5. Press the button on the remote in playing mode, all sound will be muted. Press
the button again or +/-buttons on the remote or rotate the volume control knob on
the front of unit to resume sound.
Presetting Stations
1. Tune in the desired station.
2. Press and hold the (BF) button for 2 seconds or more, the preset number will
blink on the display and the frequency will be displayed.
3. Press the ,(H,G) buttons once by once to select the preset number, you
can preset up to 10 stations.
(H) Decreases the preset number by 1
(G) Increases the preset number by 1
4. Press the (BF) button to store the station.
5. Repeat above steps 1 to 4 for each station you want to store in memory with a
preset number.

10
Note: The operating time of every step shouldn’t be longer than 5 seconds or it will
return to the original display.
If the unit is unplugged or if a power failure occurs, the preset stations will
not be erased.
Preset Tuning (Possible only after presetting stations)
Repeatedly press the (BF) buttons to select the desired preset number. Its
frequency will displayed.
Listening to music from an auxiliary device:
The unit includes a 3.5mm audio cable for connection to any analog music unit with a 3.
5mm output.
Caution: Disconnect the supplied FM antenna when using an audio cable.
1. Connect the auxiliary device to the unit using the supplied 3.5mm audio cable.
2. Press the button for 2 seconds or more. A LED will indicate that the unit is on.
3. Press the button repeatedly to select “ ” source.
4. Control music playback through the auxiliary device.
5. Adjust volume using the volume control knob on the front of the unit or +/-buttons
on the remote.
6. Press the button on the remote in playing mode, all sound will be muted. Press
the button again or +/-buttons on the remote or rotate the volume control knob on
the front of unit to resume sound.

11
The built-in clock shows the time on the display.
1. In standby mode, press the button for 2 seconds or more, the hour indicator
will blink on the LED.
2. Set the hour with rotate the volume control knob on the front of the unit or +/-buttons
on the remote.
3. Press the button, minute indicator will blink on the LED.
4. Set the minute with rotate the volume control knob on the front of the unit or +/-buttons
on the remote.
5. Press the button, the built-in clock starts operating.
Caution:
* The operating time of every step shouldn’t be longer than 10 seconds or it will return
to the time display.
* If there is a power failure or the units power is turned off, the clock will lose its setting.
To confirm the clock time
When you press the button, the clock time is displayed. Wait for a few
seconds until the display returns to the original display.
○○○○○○○○○○○○○○○○○○○○○○○○○○○○○○○○○○○○○
7Setting the Clock Manually

12
○○○○○○○○○○○○○○○○○○○○○○○○○○○○○○○○○○○○○
8Setting the Alarm
The alarm time indicator “ ” is displayed of the LED display when you turn the alarm
on, however the clock must be set correctly for the timer function to work.
1. In standby mode, press and hold the button for 2 seconds or more to enter
alarm set mode.
2. Rotate the volume control knob on the front of the unit or +/-buttons on the remote to
adjust the hour setting.
3. Press the button to save this setting and enter the alarm minute set mode.
4. Rotate the volume control knob on the front of the unit or +/-buttons on the remote to
adjust the minute setting.
5. Press the button to save this setting and enter the alarm source mode.
6. Rotate the volume control knob on the front of the unit or +/-buttons on the remote to
select the alarm source: , , , or .
7. Press the button to save this setting and enter the alarm daily frequency
mode (except for mode).
NOTE:
* If you wish to wake up to a specific song on your i-Pod, dock your i-Pod on the unit,
select the song on your i-Pod, and then select “ ” as your alarm source.
* If you have selected “ ” as your alarm source, the alarm will play the last
radio station selected.
8. Press the button to save this setting and enter the alarm volume mode
9. Rotate the volume control knob on the front of the unit or +/-buttons on the remote to
set the alarm volume.
Exit the Alarm Set mode
Press the button to exit the Alarm Set mode. The unit will also automatically
exit the Alarm Set mode after 10 seconds of inactivity.
To confirm the Alarm Set
When the alarm time will be set, press the button to switch “ ” or
“” in standby mode.
Note
1. When exiting the Alarm Set mode, the alarm is automatically turned off. To turn
on the alarm, press the button.
2. This Altec Lansing Moondance Home system features a built-in backup battery
unit to provide continuous clock settings in the event of a power failure. If a power
failure occurs or the AC cord is accidentally disconnected, the display will not
remain lit and the alarm will not function, but the current time will be maintained.
3. If “i-Pod” (or USB, CARD) is selected as the alarm source but no i-Pod (or USB,
CARD) is inserted when the alarm goes on, the unit will turn on automatically
without sound.
4. When you use the button on the unit to set the alarm, the unit will enter
the clock setting mode first.

13
Reasons
AC/DC adapter isn’t plugged into
a wall outlet or the connector isn’t
plugged into the power supply jack
on the back of the unit.
Wall outlet is not functioning
Built-in Recharge Li-lon battery’s
power is enhausted.
Volume is at minimum.
Incorrect source selection
The antenna is disconnected
The FM wire antenna is not prop-
erly extended and positioned
Battery is weak
The remote control is not pointed
toward the unit.
Using the wrong adapter for i-Pod
or no adapter
i-Pod didn’t install properly
i-Pod is not installed properly
i-Pod is locked up
AC/DC adapter isn’t plugged into
a wall outlet or the connector isn’t
plugged into the power supply jack
on the back of the unit.
Troubles
The unit can’t be
turned on. (AC Operation)
The unit can’t be
turned on. (Battery Operation)
No sound.
Poor radio reception
Remote control can’t work
i-Pod doesn’t dock properly
i-Pod didn’t charge
Solutions
Plug the AC/DC adapter into
a wall outlet and plug the
connector into the power sup-
plyjackonthebackoftheunit.
Plug another device into the
same outlet to confirm the
outlet is working.
Connect the AC/DC adapter
to the unit for charging.
Adjust the volume.
Ensurethat the correct source
is selected.
Reconnect the antenna se-
curely
ExtendFMwireantenna tothe
best reception position
Replace current battery with a
newbattery.
Point the remote control to-
ward the unit and make sure
there is a clear pathway be-
tween the remote control lens
and the unit.
Make sure the dock adapter is
the proper fit for your i-Pod.
Remove your i-Pod from the
dockandcheckforobstruction
on the connectors in the dock
and on your i-Pod. Then reset
it in the dock.
Remove your i-Pod from the
dockandcheckforobstruction
on the connectors in the dock
and on your i-Pod. Then reset
it in the dock.
Please make sure your i-Pod
is working properly before
docking into the unit. Please
refer to your i-Pod manual for
details.
Plug the AC/DC adapter into
a wall outlet and plug the
connector into the power sup-
plyjackonthebackoftheunit.
○○○○○○○○○○○○○○○○○○○○○○○○○○○○○○○○○○○○○
9Trouble shooting

14
○○○○○○○○○○○○○○○○○○○○○○○○○○○○○○○○○○○○○
10 Technical Specifications
AC Power supply ............................ 100-240V~ 50/60 Hz 0.25A Max.
AC/DC Adapter ............................... 5V
Power consumption ......................... 5W
FM frequency range ....................... 87.5 - 108 MHz
Speaker Impedance ........................ 4Ω
Display............................................ LED display
Battery type.................................... Bulit-in Recharge Li-lon Battery (unit)
Lithium CR2025 (remote)
Dimension ....................................... IP10: 111(W) × 242(H) × 118(D) mm
IP20: 264(W) × 185(H) × 118(D) mm
Power Adapter
Model No. ........................................ XKD-C1000IC5.0-5W
Manufacturer ................................... SHENZHEN MOSO POWER SUPPLY
TECHNOLOGY CO. LTD
Input ................................................ 100-240V~ 50/60 Hz 0.25A Max.
Output ............................................. 5.0V 1A


This manual suits for next models
1
Table of contents
Other VIETA Docking Station manuals