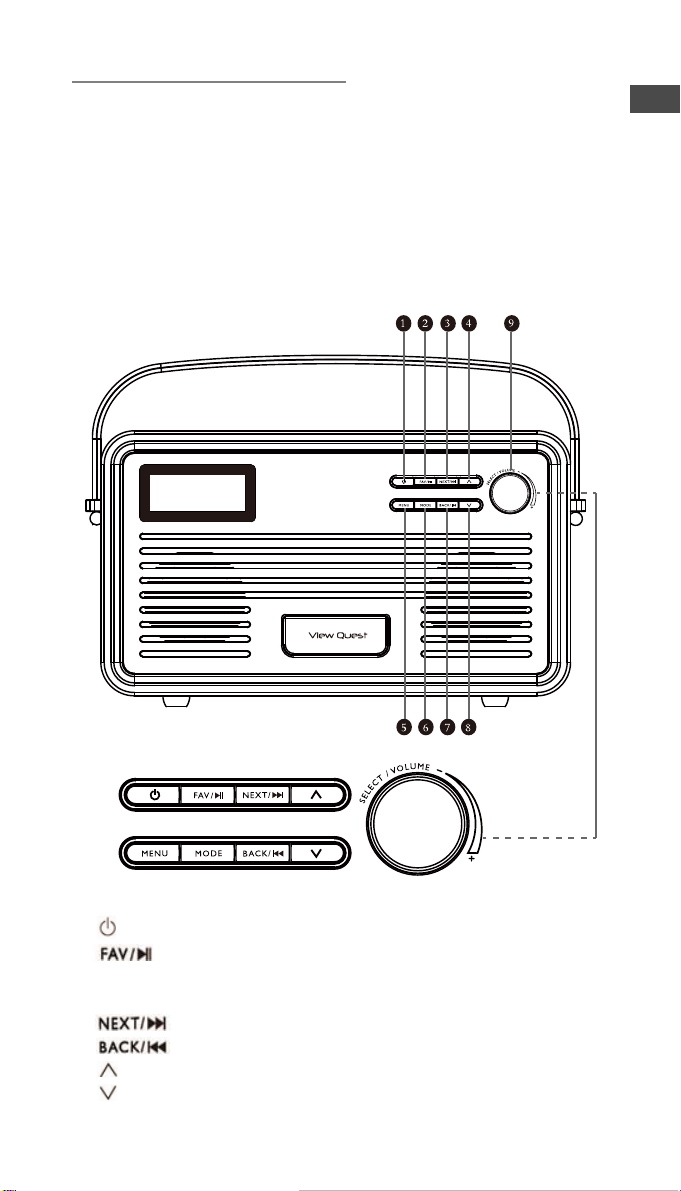
Retro Wi-Fi DAB+ Radio
2
Operation
1. Switch on
Insert the power supply into the ‘DC in’ jack on the back of the radio. Alternatively,
put 4 C sized batteries into the battery compartment (also on the back of the radio).
Turn the power switch on the back to ‘ON’. The ‘View Quest’ logo will appear on
the screen. The radio will automatically start searching for Wifi networks; please
wait whilst this is processing. When the search is complete, there will be a number
of valid network options shown to you on the LCD screen. (If the network search
has already been performed, it will skip the network list interface and automatically
select and enter the network used last time), press or or rotate the
SELECTION DIAL to scroll to network, press the SELECTION DIAL to enter into
this network.
How to input network password?
To input password, press or button or rotate the SELECTION DIAL to
choose characters, press button to move on to the next character,
press button to move back and therefore delete character. Press the
SELECTION DIAL to complete password entry.
2. FM
With the unit powered on, press the MENU button to enter the main menu. Rotate
the SELECTION DIAL or buttons to choose FM, then press the
SELECTION DIAL to enter into FM mode. You can also press the MODE button to
reach the FM function.
Manual scan:in FM mode, press the button to search up or to search
down. One press will adjust thefrequency by50KHZ.
Auto scan: in FM mode, press and hold the button for roughly 2
seconds, to autoscan forward. To autoscan backwards, press and hold the
. When the radio detects a clear signal for a station, it will stop
searching automatically and play.
Preset stations: to preset your favourite radio stations press and hold the FAV
button until the preset icon and preset numbers appear on the screen, press the
/ buttons or rotate the SELECTION DIAL to navigate to the number you
would like to preset, then press the SELECTION DIAL to confirm the preset. There
are 20 preset stations possible.
To get to a preset station: in FM mode, press the FAV button, the preset number
will be shown on the screen, press the / button or rotate the
SELECTION DIAL to get to the preset number you are after, then press the
SELECTION DIALto confirm.Now enjoy your favouriteradio station!
3. DAB/DAB+
With the unit powered on, press the MENU button to get to the main menu. Using
the / or by rotating the SELECTION DIAL, scroll to DAB/DAB+ and
GB