Vigilate VIGKP User manual

User Manual
VIGKP Wireless RFID Keypad
Please read this manual carefully before use.
Please keep this manual for future reference.

9
Technical Specifications
Specifications
Working Humidity ≤90%
Working Temperature
Input DC 5V 1A
Battery Lithium-ion Battery, 800mAH
Wireless Frequency 433.92MHz
Transmission Distance Up to 1000m without obstacle
Standby Time 6 months for daily use (8 times per day, 30 seconds each time)
Weight 180g with backup battery
Size 144.5x91.8x20.8mm (LxWxH)(±0.1mm)
Status Bar 1 bar, 3 colours (RED/GREEN/BLUE).
Power Switch x1, beneath battery cover.
Reset Button x1, pin hole, beneath battery cover.
Buttons 13 Touch buttons
RFID Area All front area around the buttons.
Materials FRONT : PC, BACK : Non glassy surface to avoid scratches, WALL BRACKET :
Non-glassy surface to avoid scratches
Wall Mounting Using Mounting Bracket
Features
Power Saving Supported, not supportedwhile charging, the real-time status would
be updated only when the keypad is activated.
Pairing Supports scanning QR Code for pairing.
Low Battery Warning Supported. Colour indicated on keypad and warning in App.
Tamper Alarm Supported
RFID Disarm Supported, up to 99 RFID tags.
Reset Supported
-10℃~50℃

FAQ
Problem Cause Solution
No response
from keypad
Low Battery
Please connect the power adapterto charge
the battery. If the problem is not solved, please
contact the dealer for more help.
Wearing Gloves Take o the glove and try pressing the keypad
again.
Keypad can’t
be paired with
the system
No response from the alarm
system.
Make sure the alarm system power is ON and the
App has already connected to the system.
Always make sure the location of the keypad
installed can be covered by the RF signal sent
from the alarm system. You can use a paired
remote controller to test.
Can’t disarm by
the RFID tag.
The RFID tag hasn’t paired
with the alarm system.
Usethe Appto pairthe RFID tag with the
system.
Keypad is in power saving
mode. Touch any button of the keypad to activate it.
[Arm]
[Disarm]
[Home Arm]
failure
Wrong operation password
Please input the right code. Users can modify the
operation codein the App, under advanced
setting--More--Reset PIN
8 1
Table of Contents
Introduction
Foreword
Parts List
Appearance
Preparation before Use
FAQ
FAQ
Technical Specifications
02
02
02
03
04
08
08
09
09
FCC Statement
Pair the Keypad with the Main Panel
Pair the RFID Tag with the Main Panel
Usage
Activate Panel
Arm/Disarm/Home Arm
Care & Maintenance
Usage Notices
Maintenance
05
05
06
06
06
07
07
07
07

Introduction
Foreword
Thank you for purchasing this wireless keypad. It is recommended to installindoors and close to
the entry point, so users can conveniently operate arm, disarm, home arm after inputting the
passcode on the keypad or arm/disarm by using the RFID tags.
To avoid triggering the alarm before disarming from the keypad after entering the house, this
keypad is ideal for use with the VIGILATE smart alarm system's Entry Delay feature.
The operations are quite easy, just input the passcode then press [Arm]/[Disarm]/[Home Arm] key, or
put RFID tag on the keypad to arm/disarm the system.
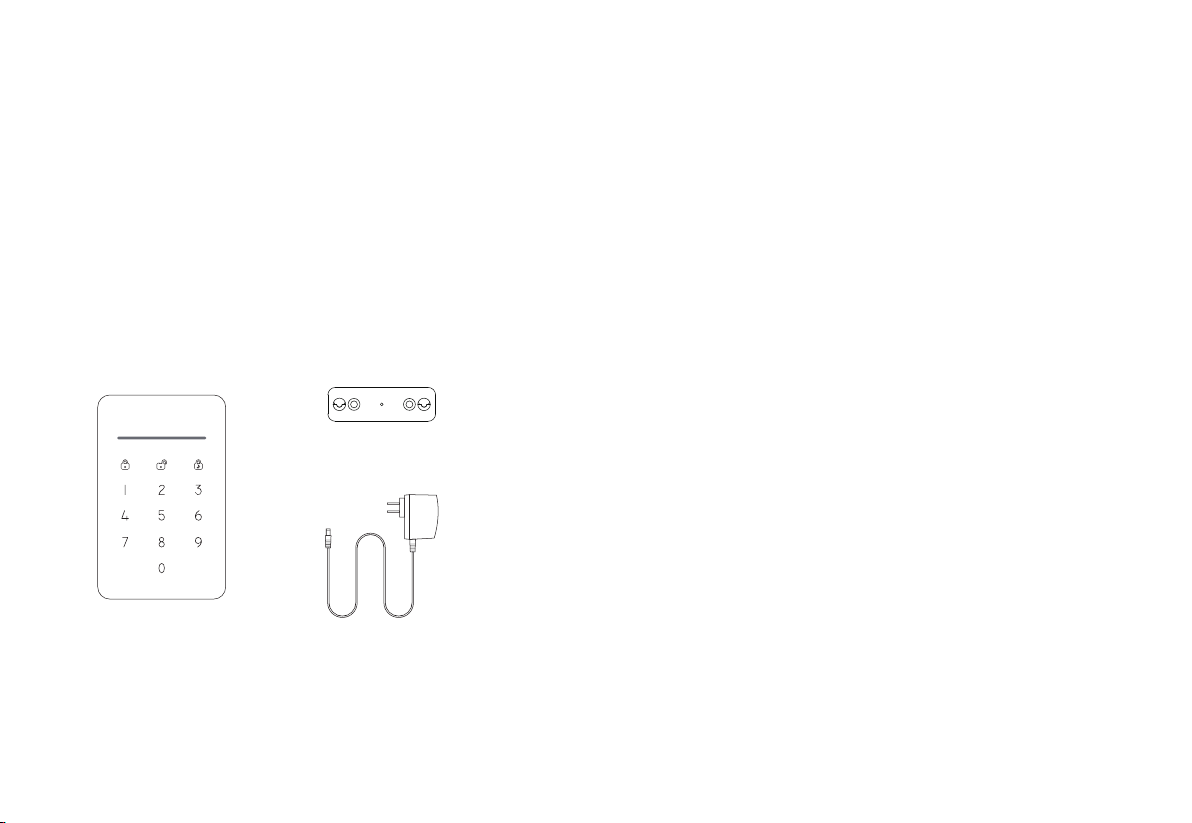
Parts List
Keypad x 1
Wall Mount Bracket x1
AC/DC Power Adapter x1
2
Care & Maintenance
Usage Notices
•The keypad should be paired to the main panel before use.
•The power supply for the keypad could impactthe transmitting distance of the wireless signal.
•Please make sure the battery has been installed in the keypad before use.
•The keypad is neither waterproof nor moisture-proof, please install it in a shady, cool and dry place.
•Install the keypad away from equipment that produces heat or electric-magnetic, such as heater,
air conditioner, microwave oven etc.
•Take the keypad for disposal of recycling according to the local regulation.
•Do not take apart the product if you are not a professional technician.
7
Maintenance
•You can remove most dust or fingerprint marks using a dry, soft cloth or tissue.
•If there is dirt on the keypad, please wipe the surface using a soft clothwitha little dilutedalkaline
detergent and then wipe again with a dry cloth.
FCC Statement
This equipment has been tested and found to comply with the limits for a Class B digital device, pursuant to Part 15 of the FCC
Rules. These limits are designed to provide reasonable protection against harmful interference in a residential installation.
This equipment generates uses and can radiate radio frequency energy and, if not installed and used in accordance with the
instructions, may cause harmful interference to radio communications. However, there is no guarantee that interference will
not occur in a particular installation. If this equipment does cause harmful interference to radio or television reception, which
can be determined by turning the equipment o and on, theuser is encouraged to try to correct theinterference by o ne
or more of the following measures:
-- Reorient or relocate the receiving antenna.
-- Increase the separation between the equipment and receiver.
-- Connect the equipment into an outlet on a circuit dierent from that to which the receiver is connected.
-- Consult the dealer or an experienced radio/TV technician for help.
This device complies with part 15 of the FCC Rules. Operation is subject to the following two conditions:
①This device may not cause harmful interference.
②This device must accept any interference received, including interference that may cause undesired operation.
Changes or modifications not expressly approved by the party responsible for compliance could void the user’s authority
to operate the equipment.

RFID AREA
LED indicator
Appearance
Battery Cover
Power Switch
Tamper Detector
Battery
Reset Hole
DC-IN
3
ARM
DISARM
HOME ARM
Usage
Activate Panel
1. When the keypad is in sleep mode, touching any button will activate the keypad.
2. After being activated,the keypad will synchronise the real-time status with the alarm system
immediately, the result will be represented by the status bar.
3. When there is no operation on the keypad for 10 seconds,it will enter sleep mode .
4. When the keypad is sleeping, it will not react to any signal sent from the system until the next
activation.
Why sleep mode?
When the keypad is in battery mode, sleep mode is the best option for long-term use.
When the power adapter is connected, it starts providing power and charging the battery. With the
help of an over-chargingprotective circuit, we recommendusers to keep the adapter connected
while using. If you are not using the power adapter, the keypad has a Low battery indicator
that will light up once every 15 seconds and apush notification will be sent to the APP. Please
charge in time.
Arm/Disarm/Home Arm
Inputthe operationcode, and press[Arm][Disarm]or [Home Arm]
key.
The status bar will flash once and then change colour, as follows,
after the command is executed correctly.
[Arm] : Red
[Disarm] : Green
[Home Arm] : Blue
Note: The operation code can be set in the App.
Read the RFID tag on the keypad panel, the system will Disarm
immediately if the tag has been paired.
Once the system is in SOS status and the keypad is activated, the
status bar will flash red and generate beep alarm sounds for 1
minute.
SOS
6

1. Make sure the battery has been
installed correctly.
2. If you are using it for the first
time, please connect thekeypad
to the power adapter. The LED
indicatorwill flash while charging.
and turn solid once the keypad
is fully charged.
3. Remove the battery cover and
turn on the power switch.
ON
Preparation before Use
4
Pair the Keypad with the Main Panel
Scan QR Code
2. Launch the App.In the accessory management section, tap [Add Accessory].
3. Scan the QR Code on the keypad.
4. Follow the guidelinesin the App and save the settings.
Pair the RFID Tag with the Main Panel
Scan QR Code
1. Make sure the keypad has been paired with the system.
2. Launch the App.In the accessory management section, tap [Add Accessory].
3. Scan the QR Code on the RFID Tag.
4. Follow the guidelinesin the App and save the settings.
been correctly paired.
5
1. Reset the keypad until the status bar is flashing 3 colours.
Table of contents