Villaware 200 Manual

Food Strainer
For Fruits and Vegetables
Directions & Recipes
No. 200
200_booklet.qxd 5/11/04 5:33 PM Page 2

FULL ONE-YEAR WARRANTY
This VillaWare product is protected against defects in materials
and workmanship for one year from the date of original purchase.
If the product proves to be defective in materials or workmanship
during this period, it will be repaired free of charge.
This warranty does not apply to damage resulting from misuse,
accidents or alterations to the product, or to damages incurred in
transit. This warranty does not apply to power cords or plugs.
All returns must be carefully packed and made transportation
prepaid with a description of the claimed defect.
Wafflers
Pizzelle Bakers
Electric Skillets
Crepe Makers
PowerGrinder™Electric Food Grinders
Disney Licensed Series by VillaWare
Imperia®& Al Dente™Pasta Machines
Cookie Presses
Smoothee-Bar™Blenders & Servers
Bravo™Pizza Stones
Espresso Coffee Pots
Victorio™& VillaClassic™Cookware
Italian Style Gadgets & Utensils
...and hundreds more Classic Italian
Kitchenware products from VillaWare
For additional information on the VillaWare product line, see your dealer or visit
our website at www.villaware.com.
Also look for the award-winning UNO™line of kitchen electrics including wafflers,
panini grills, warming trays, toasters and more.
THE LINE OF FINE VILLAWARE PRODUCTS INCLUDES:
Copyright © 2004 Tilia, Inc. All rights reserved. This material may not be reproduced or redistributed in any fashion
without the express written consent of Tilia, Inc.
VillaWare, UNO, PowerGrinder, Al Dente, Smoothee-Bar, Bravo,Victorio and VillaClassic are trademarks of Tilia Int'l., Inc.
All other trademarks are properties of their respective owners. VillaWare is distributed by Tilia, Inc., a Jarden company.
Printed in China. (5/04)
18901 Euclid Avenue No. 1
Cleveland, Ohio 44117
200_booklet.qxd 5/11/04 5:33 PM Page 1

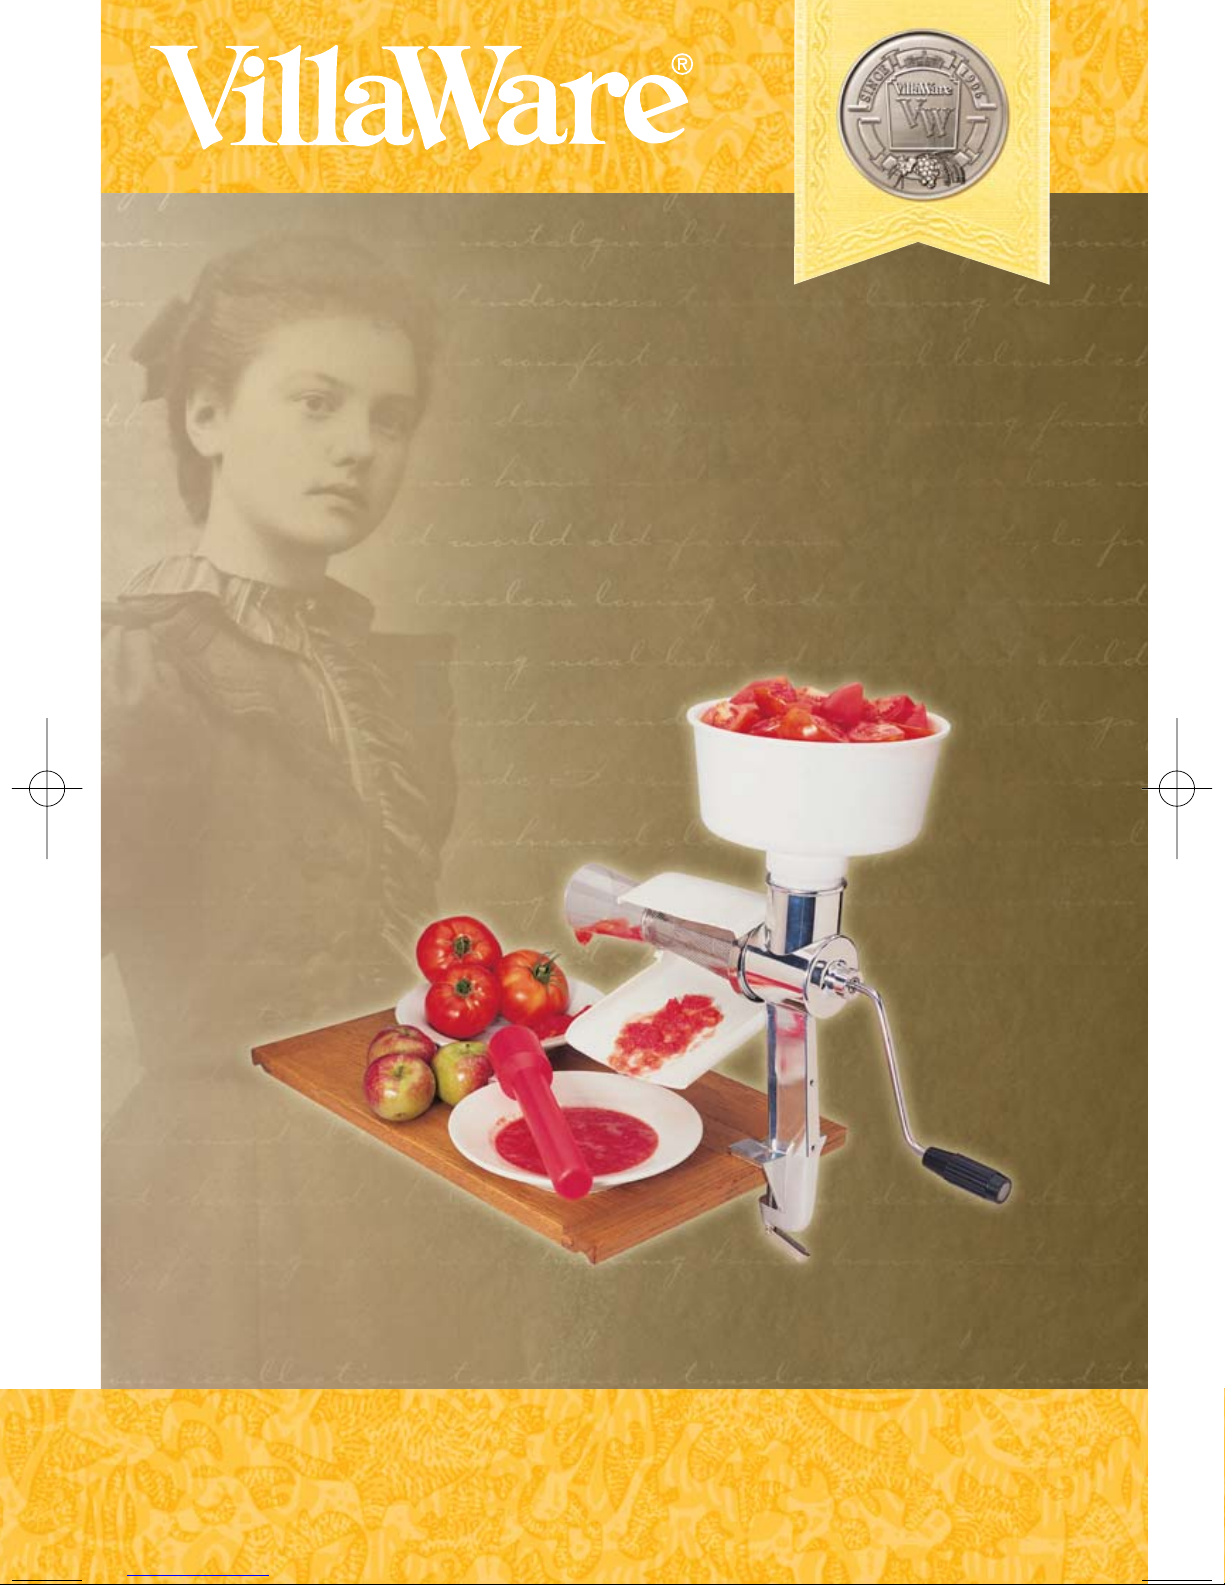
Your VillaWare Food Strainer can be used to process foods such as tomatoes, apples,
apricots, avocados, carrots, cherries, cooked dried beans, cranberries, peaches and
potatoes. With additional attachments, that can be purchased separately in the back
of this book, many other foods can also be processed.
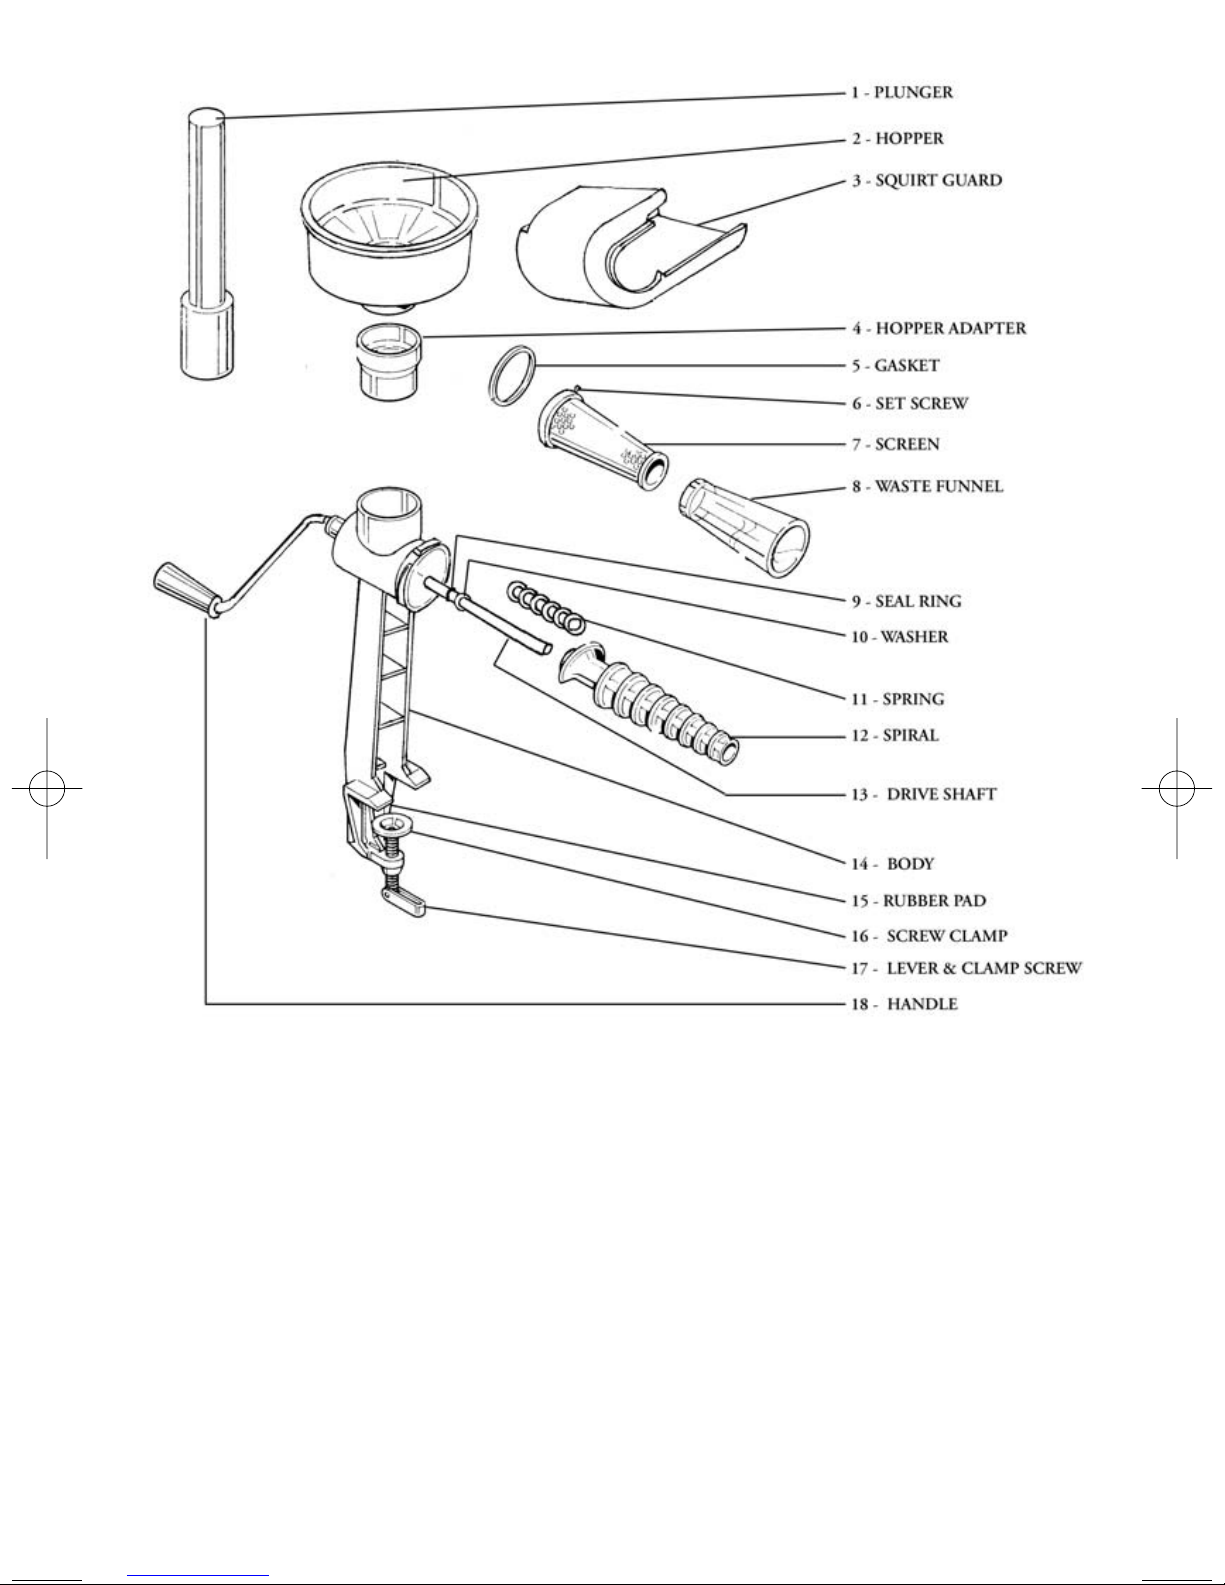
Before using the strainer for the first time, become familiar with the various parts of
the unit by using the diagram to the right. Your strainer will come partly assembled.
Disassemble completely and wash all parts in hot soapy water before use. Rinse and
dry thoroughly.
To remove the assembled screen unit from the strainer body (#14), loosen the set
screw (#6) by turning counterclockwise until it stops. Then twist the screen (#7) in
the direction of the OFF arrow imprinted on the top of the screen rim. Remove the
gasket (#5) from inside the screen. Finally, inside the cylindrical opening on the
strainer body where the screen attaches is the drive shaft (#13); to remove, simply
grasp it and pull.
Note: When storing between uses, lubricate the clear rubber seal ring (#9) on the
drive shaft (#13) with a few drops of vegetable oil. This will prevent the seal ring
from getting dry and brittle.
HOW TO ASSEMBLE
1. Clamp food strainer body (#14) to a tabletop or countertop. Select a table or
counter with a durable top and a minimum 1 1/2 inch overhang. Turn lever
and clamp screw (#17) to secure, but do not over tighten.
2. With strainer body clamped to your work surface, stand behind strainer
during assembly. Insert drive shaft (#13) into white plastic hole on inside of
cylindrical opening, near top of strainer body. When inserted, the end of the
drive shaft with the hole in it should be facing out the back of the food
strainer body. This is where the handle will attach. Be sure the metal lock
washer (#10) is on the drive shaft.
3. Slide metal spring (#11) onto drive shaft.
4. Insert metal end of red spiral (#12) onto end of drive shaft, rotating spiral
until metal hole in spiral just slips over drive shaft.
5. Place white rubber gasket (#5) inside rim of screen. (The gasket must be
used in order for screen to attach properly to strainer body.) Slide screen over
spiral, rotating screen until middle arrow on screen rim is lined up with
triangle imprint on body. Firmly pull screen toward body, then turn in the ON
direction (clockwise) until screen locks. Tighten set screw (#6) to secure screen.
6. Attach narrow end of clear waste funnel (#8) to small end of screen, making
sure it snaps into place on funnel to secure.
7. Hold rounded end of plastic squirt guard (#3) with your right hand so that
the longer side is on the bottom. Slip squirt guard around screen until inside
edge of squirt guard snaps onto strainer body just beyond rim of screen.
Rotate angle of squirt guard until small notch locks together with small
metal bump on strainer body.
ACACACACACACACACACA 3CACACACACACACACACACA
200_booklet.qxd 5/11/04 5:33 PM Page 3

8. Place hopper adapter (#4) into hole at top of body. Place plastic hopper (#2)
on top of hopper adapter.
9. Insert handle (#18) into hole in drive shaft, being sure to line up the two
ridges in the handle with the two slots in the hole. Important: Do not turn
handle when strainer is dry as it may damage the strainer. Only turn handle
when food is being processed so juices can lubricate the screen and prevent
heat build-up. Handle will turn easily when food is in spiral. Your VillaWare
Food Strainer is now ready to use!
ACACACACACACACACACA 4CACACACACACACACACACA
For information on ordering replacement parts for your VillaWare®Food Strainer,
please see the chart on page 9 of this booklet.
200_booklet.qxd 5/11/04 5:33 PM Page 4

HOW TO USE
1. To prepare food for processing, thoroughly wash fruits and vegetables. Peel
avocados before straining.
2. Cut foods into pieces just small enough to fit into the opening at the base of
the hopper. Remove any large seeds and pits.
3. Pre-cook firm fruits and vegetables, such as apples, potatoes and pears, to
soften before straining. These foods can be softened by parboiling, steaming
or microwaving. Drain thoroughly before straining.
4 Place one bowl under end of squirt guard to catch sauce, pulp or juice.
Place a second bowl under the waste funnel to catch unwanted skin, seeds
and cores.
5. Place food into hopper, filling no more than halfway. Turn handle clockwise,
while using red plunger (#1) to guide food into spiral.
6. When straining is complete, remove squirt guard. Using a rubber spatula,
scrape remaining food pulp from screen.
7. Strained food should be used immediately or preserved through canning,
freezing or dehydrating. Always follow directions and recipes from reliable
sources to assure proper food safety practices and high-quality results.
8. Discard all waste products.
CARE AND CLEANING
1. Disassemble food strainer. To remove screen, first loosen set-screw on rim.
Remove screen by turning in OFF direction until it pops off. If jammed,
push back and forth a few times to free.
2. Wash all parts in hot soapy water. You may want to use a stiff bottle brush to
remove food residue from screen. Be sure to clean end and seam of screen
where seeds and skin may become lodged.
3. Dry thoroughly. Re-lubricate rubber seal ring on drive shaft with vegetable oil.
4. The food strainer may be stored in its original box.
Note: Any light-colored plastic parts may become stained after straining foods
such as tomatoes, berries, etc.
ACACACACACACACACACA 5CACACACACACACACACACA
200_booklet.qxd 5/11/04 5:33 PM Page 5

HELPFUL HINTS
When straining large quantities of high-moisture foods, such as tomatoes, it is
normal for liquid to appear in the hopper. Continue to turn handle until liquid
drains from the hopper before adding more food.
During processing, it may be necessary to occasionally scrape excess pulp from
the screen.
When processing foods with tougher peels or foods without peel or cores, it may be
necessary to re-strain to extract additional pulp. Also, if seeds and pulp do not seem
as dry as they could be, it can be run through strainer a second time, but this is not
expected to be standard procedure.
Accessory screens, spirals and a motor attachment are available to expand the use of
your strainer and to process a wider variety of foods.
Recipe Tips
Tomato Sauce/Puree
Start with whole, preferably vine-ripened, tomatoes. Remove stems, wash tomatoes
and cut into quarters. If tomatoes are pulpy, a little unripe, or otherwise hard to
strain, parboil to soften. Cool slightly, then strain. Use immediately or preserve for
later use. Add your favorite seasonings and simmer until it reaches desired thickness.
Simmer longer for thicker sauce or tomato paste. Canned tomato paste may also be
added to help thicken the sauce.
Applesauce
Remove stems, wash apples and cut into quarters. Do not peel or core. Microwave or
parboil apple sections until tender. Drain, if necessary. Cool slightly, then strain.
Sweeten and season to taste. You can also combine different apple varieties to suit
your particular tastes.
Berries/Fruit Jams
Strained berries can be used to make jam, jellies, pie fillings, desserts, ice cream
toppings or fruit leather. Use the Berry Screen (available separately) to process berries
that have very small seeds. Remove stems and leaves. Rinse berries, drain well, then
strain. Sweeten to taste.
ACACACACACACACACACA 6CACACACACACACACACACA
200_booklet.qxd 5/11/04 5:33 PM Page 6

Fruit Purees
Fruits, such as apricots, peaches, pears, prunes and plums, make excellent purees.
Wash fruit and remove pits, if necessary. Simmer firm fruits until soft; drain. Cool,
then strain. Sweeten and season to taste.
Vegetable Purees
Make vegetable purees, free of seeds, skin and tough fibers—just right for creamy
soups or baby food. Wash vegetables and cut into quarters or cubes. Simmer until
soft; drain. Cool slightly, then strain.
Dried Beans and Peas
Pureed cooked beans and peas can be used to make burritos, enchiladas, soups, side
dishes or bean dips. Cook dried beans and peas according to package directions until
soft. Drain, then strain. Season to taste with onion, garlic, salt and spices.
Potatoes and Corn
Make mashed potatoes quickly for large groups or families. No need to peel—just
cube and boil in salted water until tender. Drain, then strain. Stir in hot milk, butter
and seasonings to taste.
Pumpkin and Squash
Pumpkin and squash puree is just right for pies, breads and side dishes. Use the
Pumpkin Screen (available separately) to process pumpkin and squash. Wash
pumpkin or squash, remove seeds and cut into sections. Bake, steam or microwave
until soft. Cool slightly, then strain. Season to taste.
ACACACACACACACACACA 7CACACACACACACACACACA
200_booklet.qxd 5/11/04 5:33 PM Page 7

Salsa
Have wonderful chunky texture in your fresh tomato salsa by using the Salsa Screen
(available separately) to strain your tomatoes. Combine the strained tomatoes with
chopped onion, jalapeño and fresh cilantro. Season to taste with fresh lime juice,
minced garlic and salt.
Grape Juice
Use the shorter Grape Spiral (available separately) to process grapes. Wash grapes,
remove stems, and strain with the standard screen provided. You may want to run the
pulp through the strainer a second time to extract the most juice from the grapes.
Grandma Vitantonio’s Tomato Sauce
This fresh, Italian salsa di pomodoro is made without meat. When the summer garden is
filled with ripe, tasty tomatoes, prepare this sauce in quantity, then can or freeze it for use
during the rest of the year. Buon appetito!
2 pounds fresh tomatoes 1/2 cup chopped onion
1/4 cup olive oil 1 clove garlic, minced
1/2 cup chopped carrot Salt to taste
1/2 cup chopped celery 1/2 teaspoon sugar (optional)
Strain tomatoes. Place tomato puree in pot; cook, covered, over medium heat, for 10
minutes, stirring occasionally. In large saucepan, cook carrot, celery, onion and garlic over
medium-low heat until lightly browned, stirring occasionally. Stir in tomatoes and sugar.
Season to taste with salt. Bring to a boil. Reduce heat and simmer gently about 30 minutes
or until thick. Fresh or dried herbs such as bay leaf, basil or oregano may also be added.
Makes about 2 cups
ACACACACACACACACACA 8CACACACACACACACACACA
200_booklet.qxd 5/11/04 5:33 PM Page 8

ORDERING PARTS AND ATTACHMENTS
See your local dealer, visit www.villaware.com, or write to the address on the back
of this booklet. Please see the chart below and on the next page for information on
replacement parts and optional attachments for your strainer.
When ordering parts or accessories, please specify the part number and name. Add
$6.95 shipping and handling. If your total is over $50.00, please add $9.95. Send
check or money order only. (Canadian orders add $8.95 US. If your total is over
$50.00, please add $12.95 US. Please remit in U.S. funds.)
REPLACEMENT PARTS
Diagram No. Part No. Name Price
1 200-02 Plunger $5.25
2 200-07 Hopper 7.50
3 200-15 Squirt Guard 8.00
4 200-07A Hopper Adapter 1.75
5 200-12 Screen Gasket (sold set of 3) 3.95
7 200-13 Standard Screen 14.95
8 200-14 Waste Funnel 4.95
9 200-09 Seal Ring (sold set of 3) 2.95
10 200-09A Metal Lock Washer 1.25
11 200-10 Spring 2.25
12 200-11 Standard Spiral 9.50
13 200-08 Drive Shaft 5.00
14 200-06 Body 17.50
15 200-06A Rubber Pad (sold set of 2) 2.95
16 200-05 Screw Clamp 1.25
17 200-04 Lever & Clamp Screw 3.75
18 200-03 Handle 5.75
ACACACACACACACACACA 9CACACACACACACACACACA
200_booklet.qxd 5/11/04 5:33 PM Page 9

OPTIONAL ATTACHMENTS
Part No. Name/Description Price
200-20 Berry Screen $14.95
The fine mesh (3/64”) of this screen is ideal for removing small seeds. It is recommended
for straining blackberries, raspberries and strawberries, as well as foods such as cottage
cheese, tomatoes and cooked cranberries. Use the berry screen for making jams, jellies, pie
fillings and dessert toppings.
200-21 Grape Spiral 11.00
This shorter spiral (5 1/2”) minimizes jamming caused by seeds or skin. Use the grape
spiral for making delicious grape jelly or juice!
200-22 Pumpkin Screen 14.95
This screen has coarse holes (1/8”), and is great for processing pumpkin, squash and
potatoes. Use it to make pies, breads and side dishes.
200-25 Salsa Screen 14.95
This screen has even coarser holes (1/4”) than the Pumpkin Screen, and is recommended
when a coarser strained texture is preferred. This screen makes wonderful chunky salsas!
200-29 Strainer Attachment Kit 49.95
This 4-piece kit includes the berry, pumpkin and salsa screens, plus grape spiral.
200-01 Electric Motor Kit with Mount Bracket Assembly 98.00
This kit includes a powerful 2-speed motor and steel mounting bracket assembly. The
bracket is simple to mount and attaches to the strainer body with only 2 screws. The
strainer already comes with the necessary mounting holes, so the motor is ready to attach.
Your food strainer body also comes with 2 screws in it. These have been provided for the
motor bracket assembly. Note that these attachments and parts are not interchangeable with
old food strainer models, Pronto™and Victorio™(where screens mount with 2 wing screws),
or any other strainers manufactured before 1999.
200-011 Motor Bracket Assembly only 16.50
Thank you for purchasing
your VillaWare®Food Strainer
ACACACACACACACACACA 10 CACACACACACACACACACA
200_booklet.qxd 5/11/04 5:33 PM Page 10
Table of contents
Other Villaware Kitchen Appliance manuals