Vinpower Daisy Chain User manual

User Manual
For Daisy Chain Duplicator
V 3.5.5

WARNING!
VINPOWER DIGITAL’S CD/DVD/BLU-RAY/LIGHTSCRIBE DUPLICATOR IS
MEANT FOR BACK UPAND DISTRIBUTION OF ORIGINAL DATAAUTHORED OR
OWNED BYTHE USER. ANY DUPLICATED DISCS MADE FROM A VINPOWER
DIGITAL’S CD/DVD/BLU-RAY/LIGHTSCRIBE DUPLICATOR IS THE COPYRIGHT
OWNERSHIP OF THE AUTHOR OR COMPANY WHICH OWNS THE SOURCE DISC.
ANY UNAUTHORIZED COPYING, EDITING, OR ANY PART THEREOF OF A
COPYRIGHT DISC IS STRICTLY PROHIBITED. WE DISCOURAGE THE USE OF
ANY SUCH ACTION THAT GIVES RISE TO CRIMINAL INTENT AND PROSECUTION.
VINPOWER DIGITAL IS NOT RESOPONSIBLE FOR ANY POTENTIAL ILLEGAL
ACTIONS OF THE USER DUE TO ACTIVITIES BEYOND THE SCOPE OF THE
PRODUCTS INTENDED USE.
Copyrights and Trademarks
ALL RIGHTS RESERVED. NO PART OF THIS PUBLICATION MAY BE
REPRODUCED IN ANY MEDIUM PRINTED OR ELECTRONIC WITHOUT THE PRIOR
WRITTEN PERMISSION FROM VINPOWER, INC. COPYRIGHT©2000-2008 BY
VINPOWER, INC. ALL RIGHTS RESERVED.

Table of Contents
Title
Page
Chapter 1: Introduction & Manual Overview……………………………….………
1
Before you start………………………………………………………….…….
1
Package Content………………………………………………………………
3
Chapter Overview……………………………………………………….…….
3
Chapter 2: Getting to know your system……………………………………………
4
System Overview………………………………………………….…………..
4
LCD Front Panel……………………………………………………………….
5
Input Characters/Numbers………………………………………………….
6
Understanding the Boot up Screen Display……………………………….
7
Chapter 3: Setup your Daisy Chain Systems………………………………………
8
Chapter 4: Basic Operations………………………………………………………..
10
Make Disc-to-Disc Copies…………………………………………………….
10
oSection 1: Selecting the Source Drive …………………………….……
10
oSection 2: Making Copies from the Source Drive..................………
11
Make Hard Drive-to-Disc Copies…………………………………………..
14
oSection 1: Loading Master Disc content into the Hard Drive as a
partition/image…………....................................….…………………….
14
oSection 2: Selecting the Source Drive for the Hard Drive……………..
17
oSection 3: Making Copies from an existing partition/image of the
Hard Drive……………………..………….………………………………..
17
Select the Duplication Speed.…..……………………………………………
21
Change the Setup settings………..………………………………………….
23
Chapter 5: Menu Overview………………….………………………………………..
24
Appendix A: Installing additional tower(s) to existing Daisy Chain
configuration…………………………………………………………………………..
30
Appendix B: Troubleshooting……………………………………………...…………
32
Frequently Asked Questions…..…………………………………..…………
32
Error Code………………………….…..…………….………………………..
35
Appendix C: Safety & Regulatory information……………………………………...
40

- - 1 - -
Chapter 1: Introduction & Manual Overview
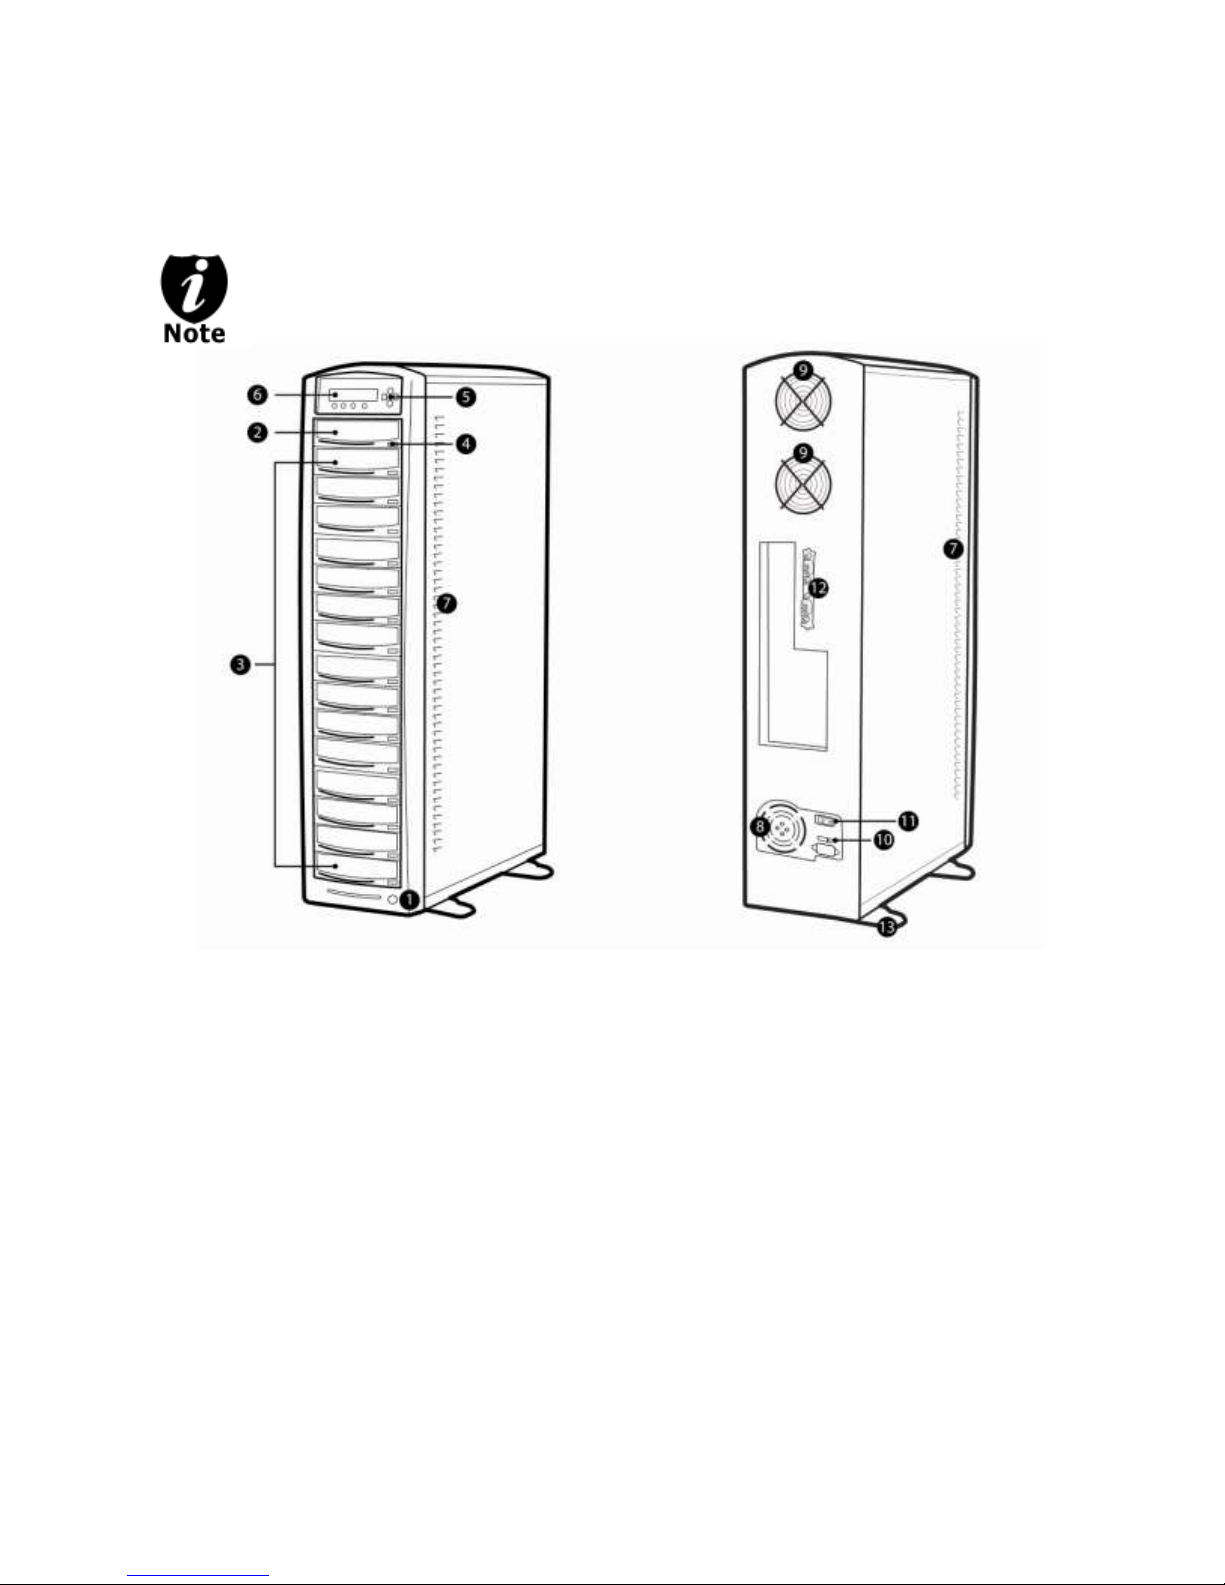
Your Daisy Chain Duplication System is a reliable, scaleable, ultra-high performance standalone
multi-tower system. It consists of 2 or more Daisy Chain capable duplication towers
Before you start:
Before you start using this system, please read the following to ensure proper operation:
1. Important Notice:
The type of system you purchase will determine the type of discs you are able to copy. For
example, if you purchased a CD only system, then you will only be able to copy onto
recordable CD formats. If you purchased a DVD system, then you can copy on to
recordable DVD and CD formats. If you purchased a Blu-ray system, then you can copy
onto recordable Blu-ray, DVD, and CD formats.
If you have a Blu-ray capable system, the terms CD or DVD can be substituted for Blu-ray
within the text of this user manual.
2. System Limitations:
The system will not copy any CD, DVD, or Blu-ray discs that have Copy Protection encoded
inside. Typically, the movies you purchase or rent from the store will contain copy protection.
In addition to the copy protection limitation, the system cannot copy across formats. This
means that you cannot copy a DVD master onto a recordable CD or vice versa. In addition,
you cannot copy the same formats if the discs have different maximum capacity
limitations. This means that you cannot copy a single layer DVD or Blu-ray Disc onto a
double/dual layer DVD or Blu-ray Disc or vice versa. The recordable blanks must be the
same format and maximum capacity as the master disc you intend to duplicate.
3. Temperature Warning:
If the system was stored in a location where the temperature dropped below 32oF (0oC)
within the past 24 hours, please leave the system in a warm room with temperatures at least
65oF (19oC) for 4 hours prior to powering it on for the first time. Failure to do so may cause
irreparable harm and prevent the system from functioning.
4. Maintenance:
It is very important to operate and keep the system in a dust free, clean environment since
dust is the number 1 killer for optical recording devices. Failure to do so may severely
damage your system. We strongly suggest you place an Air Cleaner next to the system and
constantly use the Air Duster (Can Air) to clear off any dust on the surface of the system.
Do not try to use the Air Duster to clean the system while the reader/writer
trays are open. In doing so, you may inadvertently blow dust into the recording
device and damage the recording device.

- - 2 - -
5. Proper Shutdown:
To avoid possible system failures, you need to shutdown the system properly. To shutdown
the system, you need to press the Up or Down Arrow button to “16. Shutdown”, then press
“ENT”/Enter and follow instructions on the screen to shutdown the system properly. Turning
off your system without performing this function will increase the risk of damaging your
system.

- - 3 - -
Package Contents:
Quick Start Guide
Daisy Chain Connection
Power Cord Cable
OR
Standard Operation User Manual Booklet or CD
Chapter Overview:
Chapter 2: Getting to know your system
This chapter describes the physical features and instructions on how to operate your
system
Chapter 3: Setup your Daisy Chain Systems.
This chapter describes how to setup and connect 2 or more DaisyChain Towers together.
Chapter 4: Basic Operations Guide
This chapter describes how to perform basic operations like Making Copies, Changing
Speed, etc.
Chapter 5: Menu Overview
This chapter describes what every function/setting does.
Appendix A: Installing additional tower(s) to existing Daisy Chain configurations (Optional)
This section describes how to add an additional DaisyChain tower into an existing chain.
Appendix B: Troubleshooting
This section provides many solutions on frequently asked questions and provides
insights on system error codes.
Appendix C: Safety & Regulatory information
This section provides environment, health, safety and other regulatory information.

- - 4 - -
Chapter 2: Getting to know your system
System Overview
The below image is one representation of the duplicator casing. Your case’s
outlook may vary but will have similar principles.
Figure 1-1 CD/DVD System Controls and Display
The components shown in Figure 1-1 are:
1. System Power On/Off Button
2. Optical Disc Reader
(Referred to as “Reader” throughout this manual)
3. Optical Disc Writers
(Referred to as “Writer” throughout this manual)
4. Eject Button
5. Keypad
6. LCD Screen
7. System Ventilation Vents
8. Power Supply Fan
9. Ventilation Fans
10. Power Voltage Switch (110v/220v) (not available on all models)
11. Power Supply On/Off Switch (not available on all models)
12. DaisyChain Connection Ports
13. Stability Feet (not available on all models)

- - 5 - -
LCD Front Panel
*The below image is for reference only. Your key assignment and appearance may differ.
: Up (Menu/Option Scroll Up)
: Down (Menu/Option Scroll Down)
: Forward; Enter; OK; Execute the function
: Backward; Escape; go back to the previous function
: Shortcut to make a copy
: Shortcut to make simulation of copying process
: Shortcut to change the duplication speed
: Shortcut to change your master reading source

- - 6 - -
Input Characters/Numbers
When you operate this system, there are cases when a number or a name is required to be
entered by you. Such cases could be entering the Counter quantity or a Hard Drive
Partition/Image name.
To enter an alpha numeric character, you need to use the up or down button to scroll through
varies numbers or letters then use the “ENT”/Enter or “ESC”/Escape button to move the cursor
position right or left. Once you’ve finished, move the cursor to OK and press the “ENT”/Escape
button.
The below example is meant to illustrate how to enter a partition/image name. For
detail procedures on how to create a new partition/image or rename an existing
partition/image, please refer to; Section 1: Loading Master Disc content into the
Hard Drive as a partition/image on page 14.
For example, if you want to enter a partition name of “FUN1”, do the following:
a) Press the down button repeatedly until “F” is displayed.
b) Press the “ENT”/Enter button once to move the cursor to the next position.
c) Press the down button repeatedly until “U” is displayed.
d) Press the “ENT”/Enter button once to move the cursor to the next position.
e) Press the down button repeatedly until “N” is displayed.
f) Press the “ENT”/Enter button once to move the cursor to the next position.
g) Press the down button repeatedly until “1” is displayed.
h) Press the “ENT”/Enter button repeatedly to move the cursor to OK. Then, press the
“ENT”/Enter button once to submit your selection and proceed to next step.
When you enter a number, normally it asks for a 4 digit number. If your number is
less than 4 digits, you need to fill the leading spaces with 0s (any leading zeros will
be skipped). An example of that would be 0234 (Two hundred and thirty four) or
0010(ten).
Edit Partition Name:
[ ],OK?

- - 7 - -
Understanding the Boot up Screen Display:
Upon successful boot up of your Daisy Chain system(s), you shall see following screen:
Master Tower:
Slave Tower(s):
Through out this User Manual, all screen shots examples are for Master Tower ONLY.
DUPLICATOR ( 3)
1.Copy
The “( 3) ” indicates there are a total of 3 Towers in this chain.
The “1.Copy” indicates the current menu.
DC Link Mode #002
14 Drive Ready
“DC Link Mode” indicates this particular tower has been
linked by a mater tower in this chain.
“#002” indicates this is the 2nd tower in this chain. (The #001
Tower is the Master Tower).
“14 Drive” indicates there are 14 writers detected in this
particular tower.
“Ready” indicates current tower’s status.

- - 8 - -
Chapter 3: Setup your Daisy Chain Systems.
1. Unpack all the towers and place them on a secure elevated surface.
2. Arrange all of the towers in order based on the preset Daisy Chain configuration located
on the back of every tower:
a. Locate the configuration label on each box that identifies that tower as the FIRST,
MIDDLE (Optional), or END unit. When setting up, the duplication towers should
be arranged according to its label.
Note: If your system has ONLY 2 towers, the MIDDLE tower will not exist and all
mention of it can be ignored throughout this guide.
b. The system labeled as FIRST should be the first and primary tower in the Daisy
Chain configuration. The system labeled END should be the last tower positioned
in the Daisy Chain configuration.
c. If any system(s) are labeled MIDDLE, they should be arranged between the
FIRST and END towers (there is no particular order for the MIDDLE towers as
long as they are placed between the FIRST and END towers).

- - 9 - -
3. Connect all towers together using the included Daisy Chain Cables per the instruction
label on the back of each tower. The instructions are listed below as well:
a. All Daisy Chain Ports & Daisy Chain Cable Connecters are color-coded as Blue
or Black. The Blue cable connector should be plugged into the Blue port on the
back of the tower while the Black cable connector should be plugged into the
Black port on the back of the tower.
b. For the First Tower, connect the Blue Cable Connector to the Blue Port on the
back of the tower, leaving the Black Port empty. Connect the Black Cable
Connector from the same cable to the Black Port on the next tower (MIDDLE or
END) in the Daisy Chain.
c. If there are more than 2 Daisy Chain towers which need to be connected, then
continue the same connection method throughout all towers except for the END
tower. On the END tower, connect the Black Cable Connector from the previous
tower to the Black Port on the back of the tower leaving the Blue Port empty.
4. Attach the Power Cord provided to the back of each tower.

- - 10 - -
Chapter 4: Basic Operations
Make Disc-to-Disc Copies
This process will copy your master disc onto one or multiple blank discs simultaneously.
However, due to its simultaneous nature, a good conditioned master disc and a lower recording
speed is recommended for higher success rates and better quality duplications.
For a disc-to-disc copy, the copy source can be any drive connected to the master tower. By
default, the source is preset to the 1st drive from the top of the master tower. If the 1st drive is
not functioning properly or cannot read the master disc, you can choose a different drive as the
master reader "source".
During the copying process, it will simultaneously load the master disc image into the hard drive
while copying from the source drive to the writer drives during the first round of the copy process;
then starting from the 2nd round, all copies will be made from the hard drive for enhanced
performance and reliability.
Section 1: Selecting the Source Drive.
When you turn on your system, after it has booted up, you should see the following
signifying your system is ready.
Use the up or down arrow button to navigate to the Select Source menu.
Step 1: Press “ENT”/Enter button to enter the Select Source menu and you shall see a
screen similar to below:
Step 2: Press the UP or DOWN button to select your desired source drive base on “Drive #”
and press “ENT”/Enter button to make your selection.
DUPLICATOR ( 3)
1.Copy
DUPLICATOR ( 3)
7.Select Source
Drive 0 Port x.x
Pioneer DVDRW DVR-
Drive 0 Port x.x
Pioneer DVDRW DVR-
The “( 3)” indicates there are a total of 3 Towers in this chain.
Typically, drive 0 is an indicator representing the 1st drive on the master tower.
The listing of "Pioneer" above is used solely as an example only. The actual writer drives
installed in this system could vary.

- - 11 - -
Once the source has been selected, you will be guided to the main menu. You
should see the following screen:
Section 2: Making Copies from the Source Drive
Step 1: Use the up or down arrow button to navigate to the Copy menu:
Step 2: Press the “ENT”/Enter button to enter the Copy menu. You should then see the
Counter feature screen.
The Counter feature will let you choose how many copies you want to make for your project.
It allows the system to count the number of copies you’ve made for this job and prompt you
when the desired number has been achieved.
The Counter feature is for your convenience only, and will allow you to make more
copies than the amount desired, if so required.
You can choose not to input your desired number of copies if you prefer to copy
continuously with no interruption. (It will still count the number of copies you’ve made for this
job, but it will not notify you when to stop.) To do so, simply press “ENT”/Enter button when
you see the “No Counter” on the 2nd line of the screen below:
Or, you can choose to enter the desired number of copies for this job by following the simple
procedure below:
a) Simply press the up or down button to the following screen:
b) Then press the “ENT”/Enter button to submit. You should see the following Specify
Counter screen:
c) Please refer to the “Input Name and Number” section of “Chapter 2: Getting to know
your System” on how to enter the desired amount. Then press “ENT”/Enter to
continue to the next step.
DUPLICATOR ( 3)
1.Copy
Counter:
No Counter
Counter:
No Counter
Counter:
Specify Counter
Specify Counter:
[ ] OK?
DUPLICATOR ( 3)
7.Select Source

- - 12 - -
4012M indicates the total capacity of your
master disc.
0/21 indicates you have a project size of
twenty-one copies and you have made zero
copies thus far.
10% indicates the current percentage of the
copying progress.
401M indicates the current amount of data
that has been copied from the master disc.
4012M indicates the total capacity of your
master disc.
0 indicates you have made zero copies thus far.
10% indicates the current percentage of the
copying progress.
401M indicates the current amount of data
that has been copied from the master disc.
Step 3: Once the Counter selection is submitted, you shall see the following “Waiting for
Master” screen and EVERY tray that does not contain any disc(s) in them will automatically
be ejected:
Step 4: After you’ve placed your master disc in the Source Drive, you will see following
screen:
Step 5: After you’ve placed all the blank discs throughout the chain, please press the
ENT/Enter button to start the job. All trays will be closed at the same time and you will see
the following screen:
All rewritable media is requires to be erased prior copying. All non-erased
rewritable media will be failed. (Only exceptions are formatted DVD+RW media)
Step 6: After 10 or 15 seconds of processing time, one of the following Copy progress
screens will appear. The left-hand screen is shown when “Specify Counter” is selected and
the right-hand screen is shown when “No Counter” is selected.
When “Specify Counter” is selected: When “No Counter” is selected:
It is normal to see the progress indicator stay at 0% up to 1 minute. That is
caused by the initializing and finalizing stages.
Preparing
Waiting for Master
Please insert disc
Press ENT to Start
Copying... 4012M
0/21 10% 401M
Copying ... 4012M
0 10% 401M
Preparing
Please Wait

- - 13 - -
Step 7: Once the duplication run is completed, the successful copies will be ejected and you
shall see the following screen.
Step 8: Remove the successful copies and press the ENT/Enter button to continue the next
run to make more copies (see Step 4 for details). You can also press the “ESC”/Escape
button to terminate your project and go back to the main menu.
If you’ve specified a counter value for your project and your project is completed, you shall
see the following screen:
You can then press “ENT”/Enter to go back to main menu.
If you happen to have any failed discs (bad copy), the failed disc(s) will not be
ejected automatically. You need to manually eject them and throw them away if
they are write once recordable disc(s).
“OK: 7” indicates that you’ve just made 7 successful copies.
“NG: 0” indicates that you have no failure in this run.
OK: 7 NG: 0
Press ENT to Cont.
OK: 7 NG: 0
Job Completed! Press ENT to Finish

- - 14 - -
Make Hard Drive-to-Disc Copies
Copying from the hard drive is the best way to make copies. Overall, there are four benefits of
copying from the hard drive.
Performance. Copying from the hard drive will enable the writer dives to boost the copying
performance to its limit.
Stability. Copying from hard drive will stabilize the duplication process compared to disc-to-
disc duplication.
Durability –The hard drive is a more durable storage device than recordable discs. The
recording surface of a recordable disc is exposed and can easily be scratched on its surface,
while hard drives are covered with metal and mounted inside the system protecting it from
incidental damage.
Convenience –With your master disc(s) stored inside the hard drive, you can have access
to each one easily. There is no need to carry your master discs every time you want to make
a copy; they are all stored inside the system.
Throughout this manual, the term partition(s) is also used to refer to image files in
the hard drive.
A partition will be created whenever you begin to load the master disc content into the hard drive.
The size of the created partition will be the same as the size of your master disc rounded up to
the next Gigabyte. The number of partitions the hard drive can hold is determined by the
capacity of your hard drive and the size of every partition you created.
There are many factors that could contribute to the capacity difference between the advertised
capacity and the actual capacity:
1. Hard Drive Manufactures use a conversion rate of 1GB = 1 Billion Bytes or 1000^3
Bytes. However, most Operating Systems, including our Duplication System use a
standard conversion rate of 1GB = 1.074 Billion Bytes or 1024^3 Bytes. Therefore, for an
advertised 160GB Hard Drive (160 Billion Bytes), the true capacity base on our system’s
standard is actually 149GB.
2. In addition, we round off all fractions of a GB to the lower whole number. That means for
a hard drive that has a 149.5GB system capacity, we only recognize and utilize 149GB.
The following steps will show you how to load your master disc into the installed hard drive as
an image and copy the stored image onto blank discs.
Section 1: Loading Master Disc content into the Hard Drive as a partition/image.
When you turn on your system, after it has booted up, you should see the following
signifying your system is ready.
Step 1: Use the up or down arrow button to navigate to the Hard Drive Setup menu.
DUPLICATOR ( 3)
1.Copy
DUPLICATOR ( 3)
9.Hard Drive Setup

- - 15 - -
Step 2: Press “ENT”/Enter button to enter the Hard Drive Setup menu.
If the current source is not Hard Drive, you will see the screen below. Please press
the “ENT”/Enter button once to proceed.
Once you’ve entered the Hard Drive Setup menu, you will see following screen:
Step 3: Use the up or down button to locate the Load Partition menu; as shown in the
reference screen shot below.
Step 4: Press the “ENT”/Enter key to enter the Load Partition menu and you should see the
following screen.
You have a choice when loading your master disc content into the hard drive by pressing the
up or down button to find your desired partition naming method:
Option 1:
Manually create a new partition/image
Option 2:
Overwrite one of the existing partitions/images (if any exists, including the reserved
partition/image)
Option 3:
Choose Auto Generate to have the system automatically generate a partition/image name
for you.
Hard Drive Setup
1.Select Partition
Hard Drive Setup
2.Load Partition
Select HDD as source
OK?
Load Partition[004/149]
Load►New Partition
The “004” indicates the number of GB you’ve already used on
the Hard Drive.
The “149” indicates the total available capacity of the system’s
hard drive in GB. This number will vary based on the size of the
hard drive installed in your duplicator.
Load Partition[004/149]
Load►New Partition
Load Partition[004/149]
Overwrite[Reserved]
Load Partition[004/149]
Load►Auto Generate

- - 16 - -
From 1 of the 3 choices above, press the “ENT”/Enter button to submit your selection.
If you have chosen to create a new partition/image, you should see the following screen
after you submit your selection.
Please refer to the “Input Name and Number” section of “Chapter 2: Getting to know
your System” to enter the desired title. Then press the “ENT”/Enter to continue to the
next step.
If you have chosen to overwrite one of the existing partitions/images, you should see the
following screen after you submit your selection.
Then press “ENT”/Enter to continue to the next step.
If you have chosen Auto Generate, Then precede to the next step.
Step 5: Please place your master disc into the Reader or the 1st Writer if there’s no Reader
installed in your system. Once the system recognizes your master disc, the loading
progress screen will be displayed, as show below:
Step 6: Once the loading process is completed, you should see the following screen:
You can then press the “ENT”/Enter button to go back to the Hard Drive Setup
menu. And then press the “ESC”/Escape button to return to the Main menu. You
should see the following screen:
4012M indicates the total capacity of your
master disc.
FUN1 indicates the name of the partition/image
where the data is being loaded into.
10% indicates the current percentage of the
master disc that has been loaded into the hard
drive.
401M indicates the current amount data from
the master disc that has been loaded into the
hard drive.
Edit Partition Name
[ ]OK?
This Will Overwrite
[FUN1]OK?
Loading... 4012M
FUN1 10% 401M
Load Partition OK!
Press ENT to Continue
DUPLICATOR ( 3)
9.Hard Drive Setup

- - 17 - -
Section 2: Selecting the Source Drive for the Hard Drive.
Ignore this section and proceed to Section 3 if you have just completed Section 1:
Loading Master Disc content into the Hard Drive as an image as this process will
automatically switch the source to the hard drive.
Step 1: Use the up or down arrow button to navigate to the Select Source menu.
Step 2: Press “ENT”/Enter button to enter the Select Source menu and you shall see a
screen similar to below:
Step 3: Use the up or down button to locate the Hard Drive and press the “ENT”/Enter
button to select it.
Once the source has been selected, you will be guided to the Main menu. You
should see the following screen:
Section 3: Making Copies from an existing partition/image of the Hard Drive.
Step 1: Use the up or down arrow button to navigate to the Copy menu:
Step 2: Press the “ENT”/Enter button to enter the Copy menu. You should then see the
Choose Partition menu.
DUPLICATOR ( 3)
7.Select Source
HARD DRVIE Port x.x
HITACHI HDS721616PL
DUPLICATOR ( 3)
7.Select Source
DUPLICATOR ( 3)
1. COPY
Choose Partition:
[FUN1] DVD 4012MB
Drive 0 Port x.x
Pioneer DVDRW DVR-
Typically, drive 0 is an indicator representing the 1st drive on the master tower.
The listing of "Pioneer" above is used solely as an example only. The actual writer drives
installed in this system could vary.
This manual suits for next models
1
Table of contents
Other Vinpower Disc Duplicator manuals

Vinpower
Vinpower THE CUBE SERIES User manual

Vinpower
Vinpower VENSOLPTR User manual

Vinpower
Vinpower TITAN lite User manual

Vinpower
Vinpower ROBOTIC AUTOLOADER V3.6.0 User manual

Vinpower
Vinpower ROBOTIC AUTOLOADER V3.5 User manual

Vinpower
Vinpower The Cube V3.6.0 User manual

Vinpower
Vinpower The Cube V3.6.0 User manual

Vinpower
Vinpower Flash Memory V 2.1 User manual

Vinpower
Vinpower SharkCopier User manual

Vinpower
Vinpower HDDMINI User manual