Vinpower Hard Drive V 1.0 User manual

User Manual
For Hard Drive Duplicator
V 1.0

WARNING!
THIS FLASH MEMORY DUPLICATOR IS MEANT FOR BACK UP AND
DISTRIBUTION OF ORIGINAL DATA AUTHORED OR OWNED BY THE USER. ANY
COPIES MADE FROM THIS FLASH MEMORY DUPLICATOR ARE THE COPYRIGHT,
OWNERSHIP OF THE AUTHOR OR COMPANY WHO OWNS THE SOURCE DATA.
ANY UNAUTHORIZED COPYING, EDITING, OR ANY PART THEREOF OF
COPYWRITTEN MATERIAL IS STRICTLY PROHIBITED. WE DISCOURAGE THE USE
OF ANY SUCH ACTION THAT GIVES RISE TO CRIMINAL INTENT AND
PROSECUTION.
THE SELLER OF THIS PRODUCT IS NOT RESPONSIBLE FOR ANY POTENTIAL
ILLEGAL ACTIONS OF THE USER DUE TO ACTIVITIES BEYOND THE SCOPE OF
THE PRODUCTS INTENDED USE.
Copyrights and Trademarks
ALL RIGHTS RESERVED. NO PART OF THIS PUBLICATION MAY BE
REPRODUCED IN ANY MEDIUM, PRINTED OR ELECTRONIC, WITHOUT THE
PRIOR WRITTEN PERMISSION FROM VINPOWER INC. COPYRIGHT©2000-2012.
ALL RIGHTS RESERVED.

Table of Contents
Chapter 1: Introduction & Manual Overview...............................................................1
Before getting started: .................................................................................................1
Package List: ...............................................................................................................2
Chapter Overview: .......................................................................................................2
Chapter 2: Getting to know the system.......................................................................3
System Overview.........................................................................................................3
LCD Display & Operation Panel ..................................................................................4
HDD Bay Status LED Reference .................................................................................4
Menu Navigation..........................................................................................................5
Chapter 3: Basic Operation Tutorials ..........................................................................6
Making Copies of a Hard Drive....................................................................................6
Chapter 4: Device Menu Overview.............................................................................12
Appendix A: Troubleshooting ....................................................................................17
Common Concerns....................................................................................................17
Error Codes ...............................................................................................................18
Appendix B: Safety & Regulatory information .........................................................20

1
Chapter 1: Introduction & Manual Overview
This system is a reliable, high performance, high speed, standalone manual duplication system.
With its professional industrial design and simple user interface, it will make the duplicating
experience easier than ever.
Before getting started:
Before starting to use this system, please read the following to ensure proper operation:
1. Temperature Warning:
If the system was stored in a location where the temperature dropped below 32⁰F (0⁰C)
within the past 24 hours, please leave the system in a warm room with a temperature of at
least 65⁰F (19⁰C), for 4 hours prior to powering on the unit for the first time. Failure to do so
may cause irreparable harm and prevent the system from functioning properly.
2. Maintenance:
It is very important to operate and keep the system in a dust free, clean environment since
dust is the number one killer of electronic devices. Failure to do so may severely damage
the system. It is strongly suggest that an Air Cleaner be placed next to the system and that
an air duster (canned air) be used consistently to clear off any dust, which may accumulate
on the surface of the system.
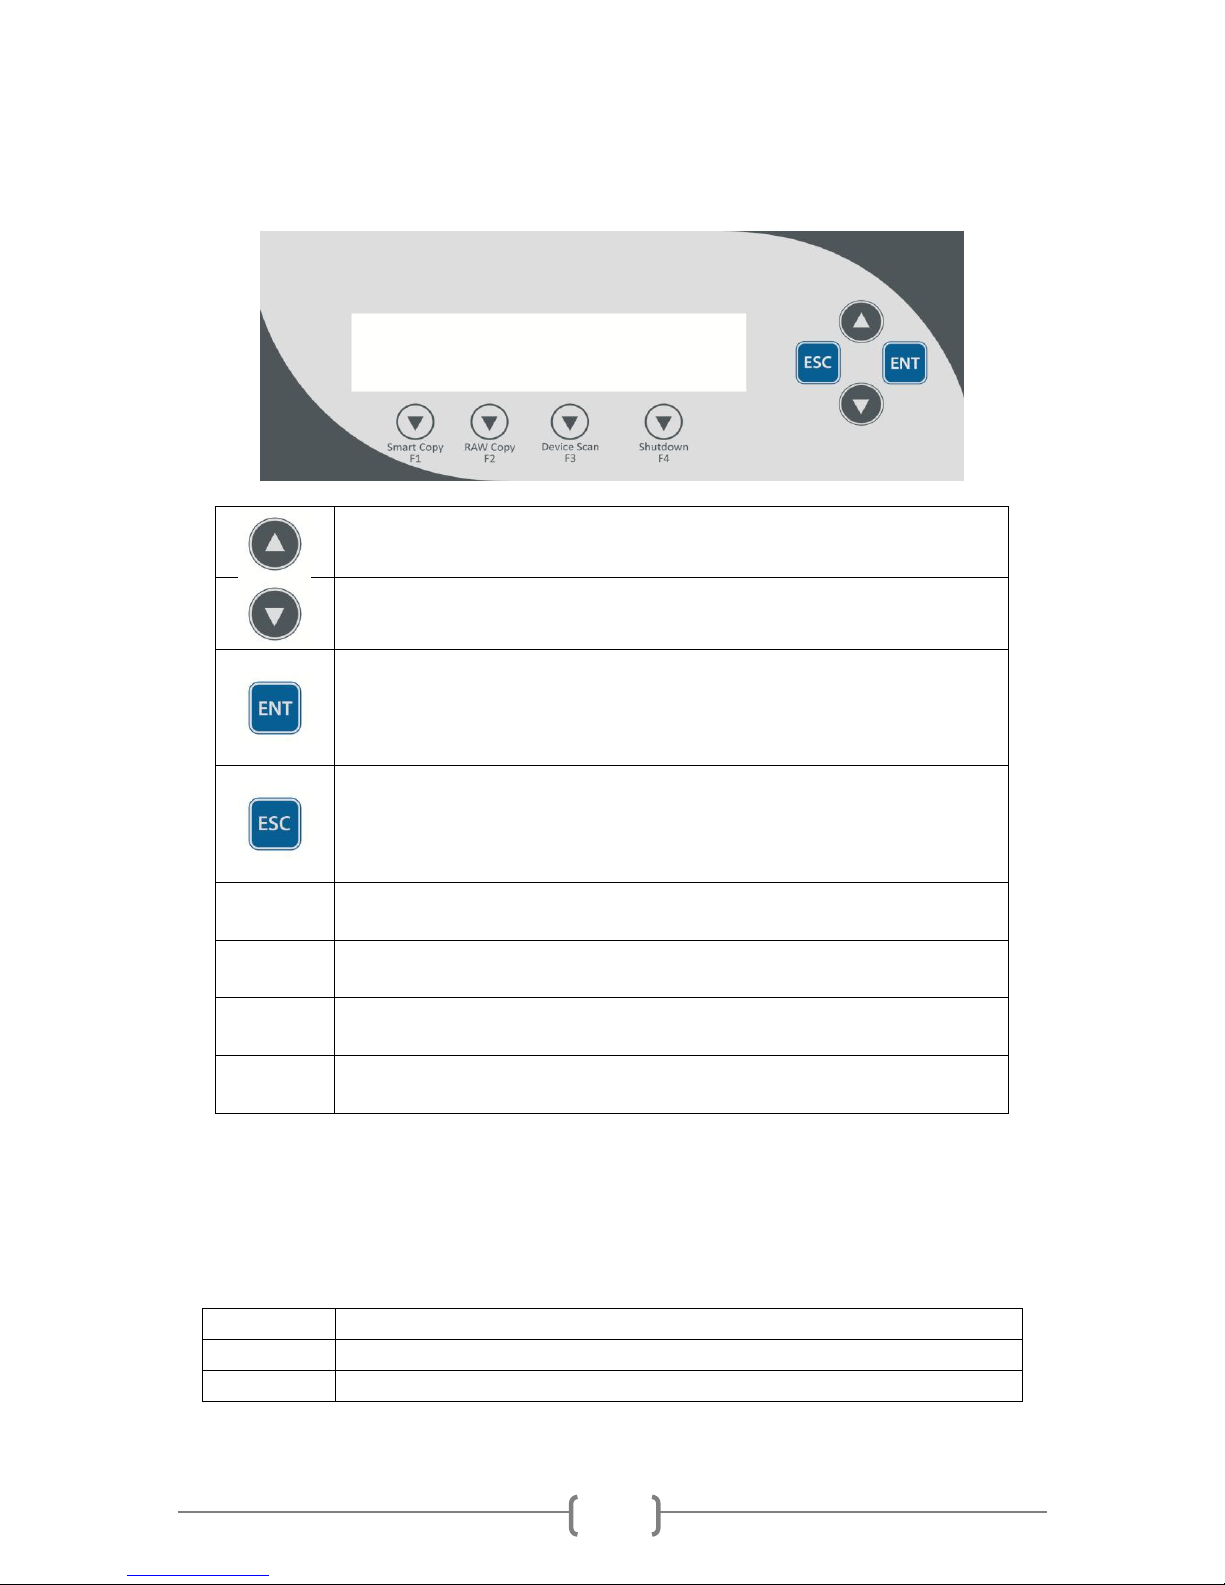
3. Proper Shutdown:
To avoid possible system failures, the system needs to be shutdown properly. To shutdown
the system, press the Up or Down Arrow button until the “Shutdown” menu is appears and
then press the “ENT” button. Follow the instructions on the screen to shutdown the system
properly. Turning off the system without performing this function will increase the risk of
damage to the system.

2
Package List:
Hard Drive Duplicator, 1pc
System Power Cord, 1pc
Hard Drive Trays for 2.5” HDD/SSD
System Operation Manual, 1pc
Chapter Overview:
Chapter 2: Getting to know the system
This chapter describes the physical features and instructions of how to operate the
system.
Chapter 3: Basic Operations Tutorials
This chapter describes how to perform basic operations like Making Copies, etc.
Chapter 4: Menu Overview
This chapter describes what each function/setting does.
Appendix A: Troubleshooting
This section provides many solutions to frequently asked questions and provides
insights on system error codes.
Appendix B: Safety & Regulatory information
This section provides environment, health, safety and other regulatory information.

3
Chapter 2: Getting to know the system
System Overview
The image below is a representation of the flash duplicator casing. The design of
the casing may vary but the unit continues to operate using similar principles.
Figure 1-1 System Controls and Display
The components shown in Figure 1-1 are:
1. System Power On/Off Button
2. Control Panel
3. Source HDD Bay
4. Target HDD Bay
5. HDD Bay Activity LED/Power Button
6. HDD Bay Fan Status LED
7. System Ventilation Vents
8. Power Supply Fan
9. Power Cord Input

4
LCD Display & Operation Panel
*The below image is for reference only. (Actual screen may vary. )
Up Arrow Button
Menu/Option Scroll Up
Down Arrow Button
Menu/Option Scroll Down
Enter/OK Button
Enter into the Menu
Execute the Function
Submit the Setting change
Escape Button
Go back to the previous Menu
Abort the current Function.
Cancel the Setting change
F1
Smart Copy Button
Shortcut to make a copy under Smart mode
F2
RAW Copy Button
Shortcut to make a copy under RAW mode
F3
Device Scan Button
Shortcut to detect available devices
F4
Shutdown Button
Shortcut to perform Shutdown function of the system
HDD Bay Status LED Reference
Every HDD bay has a corresponding Status LED next to it with Bay # labeled on top. Below is
the reference to the colors
LED Color
DESCRIPTION
Green
Such HDD Bay has power.
Orange
HDD in such bay has Read/Write activity.

5
Menu Navigation
The system is essentially composed of various functions and settings that organized into a
menu tree structure ease of operation. User normally uses four primary navigation buttons on
the Control Panel to navigate through the menu chart and select the desired function or setting:
Menu/Option Scroll Up
Menu/Option Scroll Down
Enter into the Menu
Execute the Function
Submit the Setting change
Go back to the previous Menu
Abort the current Function
Cancel the Setting change
Example: Adjust the “Buzzer” setting in the “Setup” menu:
Step 1.Turn on the system by pressing the Power button.
After it has booted up, the main menu screen will
appear (root menu) that signifies the system is ready.
Step 2.Consecutively press the UP or DOWN arrow button
until “Setup” appears.
Step 3.Press the “ENT” button once to enter into the
“Setup” menu.
Step 4.Consecutively press the UP or DOWN arrow button
until “Buzzer” appears.
Step 5.Press the “ENT” button once to enter into the
“Buzzer” menu.
Step 6.Press the UP or DOWN arrow button to change the
option from “On” to “Off”
Step 7.Press the “ENT” button once to submit the setting
change. The menu will change back to the previous
menu, “Setup”.
Step 8.Press the “ESC” button once to go back to the
previous menu, the root menu.
DUPLICATOR H.01
1.Copy (Smart)
DUPLICATOR H.01
5.Setup
Setup
1.Language
Setup
2.Buzzer
Buzzer:
On
Buzzer:
Off
Setup
2.Buzzer
DUPLICATOR H.01
5.Setup

6
Chapter 3: Basic Operation Tutorials
Making Copies of a Hard Drive
The tutorial guide below demonstrates how to quickly duplicate a Hard Drive.
Step 1. Remove Hard Drive Tray
from the system by:
1) Press the Tray Button
to release the tray
latch.
2) Pull the tray out using
the just released latch.
*If you cannot release the
latch by press the Tray
Button, if is likely due to the
tray is being locked, you may
need to flip the lock knob to
unlock position prior
removing the tray.
Step 2.
Insert your hard drives (both
source and target) into the
Hard Drive Tray.
* Make sure Hard Drive’s
bottom screw mount is
inserted into the tray’s
mounting point.

7
Step 3. Insert the hard drive tray with
your source hard drives into
the Source Bay (top bay),
and the hard drive tray with
your target hard drive into all
remaining bays.
Step 4. Insert the tray (with hard
drive) back to the system by:
1) Insert the tray into the
bay firmly and
completely.
2) Close the latch to
secure it.
* If you like further secure it
from the hard drive tray being
accidentally being removed;
you can lock the hard drive
tray by turn the lock knob to
the locking position.

8
Turn on HDD Bay
Press ENT to Cont.
Step 5.
Power on the system by
pressing the Power button
Step 6.
After it has booted up, the
screen on the left should
appear signifying the system
is ready.
Press the “F1 Smart Copy”
button to initiate the copying
process.
Step 7.
When prompted, power on all
hard drive included Bays by
pressing the corresponding
activity LED. Those activity
LEDs shall then turn to
green.
Then press ENT button once
to proceed.
DUPLICATOR H.01
1.Copy (Smart)

9
Turn off HDD Bay
Press ENT to Cont.
Step 8. The system will start
detecting/analyzing source
and target hard drives. Once
preparing process is
complete, the duplication job
will get started.
* The analyzing process may
take up to several minutes.
Please wait with patience.
Below explains the various items on the copy progress screen:
88.8G, this indicates the amount of data to be copied.
3m44s, this indicates the time left for the copy operation.
30%, this indicates the progress of the copy operation
130MB/s, this indicates the progress of the copy operation.
Step 9.
When prompted, power off all
hard drive included Bays by
pressing the corresponding
activity LED. Those activity
LEDs shall not be
illuminated. Press ENT
button once to proceed.
Copying... 88.8G
8m 9s 130MB/s 30%

10
Step 10.
Upon complete, the system
will show the job report.
Below explains the various items in the job report:
[OK:01] – indicates the number of copies passed in this process.
(1 in this example)
[NG:00] – indicates the number of copies failed in this process.
(0 in this example)
[12m20s] – indicates amount of time took for this process.
(12 minute and 20 seconds in this example)
[S 1 2 3 … E] – indicates the port number.
“S”: Source Port; “1 ~ 9”: Port 1 ~ 9; “A ~ E”: Port 10 ~ 14;
(Source Port and Port 1, 2 are shown in this example)
[o, x, -] – indicates the result for every individual port above.
“o” indicates OK; “x” indicates NG; “-” indicates port empty
(Port 1 is passed, and Port 2 are not used in this example)
OK:1 NG:0 [12m20s]
Press ENT to Cont,
S 1 2
o o -

11
Step 11.
Remove all duplicated hard
drives
Afterwards, you can either:
- Duplicate more hard drives
by repeat step 1~4 and 7~11
(skip step 5 and 6); Or
- End the job and go back to
the main menu by pressing
the “ESC” button.

12
Chapter 4: Device Menu Overview
This system comes with many features that can be accessed/adjusted by various functions and
settings within the operation menu. Please see the detailed descriptions below:
1. Copy
This process will copy the source hard drive, which is inserted into the Source Port, onto
one or multiple target hard drives simultaneously.
2. Copy+Compare
This function performs the Copy process, after which, it will perform a Compare process
automatically to ensure data accuracy.
3. Erase
This function erases the hard drives(s) connected to any port other than the Source Port.
There are three options for this function:
Quick Erase: It will erase only the beginning section of the hard drive, which is
just enough to make it look empty.
Full Erase: It will erase the entire hard drive by writing 0’s throughout. The erase
timeframe varies depending on the data capacity of the hard drive.
DOD Erase: It will erase the hard drive thoroughly to avoid any possible chances
of recovery. User will be prompted for # of passes to perform, the more pass
rounds selected, the lower the risk of data contents being recovered, but also the
longer the time the process will take.
Erase
Quick Erase
Erase
Full Erase
Erase
DOD Erase

13
4. Copy Mode
This setting will allow for the selection of a Copy Mode. There are 3 options:
Smart: This mode is the recommended and fastest approach to making copies
since it will analyze the source hard drive on supported file systems (FAT16/32,
NTFS, exFAT, ext2/3/4) and copy only the area that contains data. If the file
system on the source hard drive is NOT being supported, the system will
automatically shifts to RAW mode.
RAW: This mode is the safest and slowest approach to making copies since it will
copy the entire source hard drive bit by bit.
Partition: This mode is like RAW mode, but it will copy only the valid partitions of
the source hard drive (along with MBR/GPT table) bit by bit instead.
5. Setup
1) Language
This setting will allow you to choose the display language of the system.
2) Buzzer
This setting will allow the choice to hear a beep sound when a button is pressed
or when a task has been completed.
3) Screen Saver
This setting will allow the choice to enable the Screen Saver feature or not. By
enabling this feature, a screen saver will be displayed when the system has been
idle for an extended period.
Copy Mode
SMART
Copy Mode
RAW
Copy Mode
Partition

14
4) Read Error Skip*
This setting will allow for the change to the number of times the system will skip
ahead when it encounters a reading error, while reading the source hard drive.
By default, the system does not skip any reading error, which would result in an
immediate job failure if any read error occurred during the duplication process.
*Enable this setting will not fix any discovered error(s); it will merely skip it and
read the remaining data of the source hard drive.
5) Write Error Skip*
This setting will allow for the change to the number of times the system will skip
ahead when it encounters a writing error, while writing to the target hard drive.
By default, the system does not skip any writing error, which would result in an
immediate failure for such target hard drive if any write error occurred during the
duplication process.
*Enable this setting will not fix any discovered error(s); it will merely skip it and
continue write to the next data block of the target hard drive.
6) Partition Layout
This setting will allow user to adjust various partition layout options for the target
hard drive during the duplication process under “SMART”/”Partition” mode.
There are two options for this setting:
Auto Ratio: The system will automatically adjust the partition layout under the
same ratio as the source hard drive.
As It: The system will set the partition layout exactly same as the source hard
drive regardless the capacity differences.
Partition Layout
Auto Ratio
Partition Layout
As It

15
7) Size Tolerance
Normally, the capacity of the target hard drive is required to be greater than the
source hard drive so that all of the data can be copied without loss.
However, not all hard drives have identical storage capacity, even when they are
all labeled identically in terms of GB size. Thus, by enabling the size tolerance,
the system will allow the target hard drive’s capacity to be less than the original
hard drive by the percentage specified at the risk of less data loss/corruption.
6. Utilities
1) Compare
This function will perform the data comparison process between the source and
target hard drive to ensure data accuracy.
2) Verify Disk
This function will scan all target hard drives for readability.
3) Measure Speed
This function will perform read and write testes to report the read speed for the
source hard drive and write speed of all target hard drives.
4) Device Info
This function will show information regarding the hard drive connected to the
system.
5) System Info
This function will show the system’s hardware & software information.
6) Load Default
This function will reset all of the options back to the manufacture’s default
settings. Perform this function if the system is acting abnormal. Perform the
“Shutdown” operation and restart the system in order for these changes to take
effect.
7) Update Firmware
This function will update the software for the system. The update file needs to be
transferred to a Hard Drive pre-formatted as “FAT32” file system on a PC.
There are two options for this function:
Format Update HDD: This function will prepare a hard drive to be eligible for
firmware-update by format such hard drive in the source port as FAT16/32
File System.
Setup
7.Size Tolerance

16
Update: This function will perform firmware-update with the firmware-update
hard drive that contains the firmware update file.
General Firmware Update Procedure:
a. Pre-format a SATA Hard Drive using “Format Update HDD” function.
b. Copy the manufacture certified update file onto such pre-formatted hard
drive via a PC/Mac.
c. Insert such hard drive into the Source Port of the system.
d. Execute the “Update” function.
e. Restart the system when asked to do so.
It is strongly suggested that an upgrade to the system’s firmware not be
performed, unless the system is getting unstable and instructed to do so by a
technician.
8) Save
This function will save all the settings modified since the last time the system was
booted-up.
7. Manage Accounts
This menu will allow the Administrator to perform the following user administrative tasks.
This feature is disabled by default. Prior to activating this feature, the duplicator
recognizes all users as the only activated user defined as the administrator. The pre-
defined password for this menu is “0000”.
1) View User
This menu allows for the viewing of the existing user accounts.
2) Create User
This menu allows for the creation of additional user accounts. Each user has
individual settings. During this process, there are prompts to enter a new user
name (up to 8 alphanumeric letters or numbers) and user password (consisting
of a 4-digit number) for a new account.
3) Delete User
This menu allows for the deletion of an existing user account. During this
process, there is a prompt to select the existing account to be removed.
*User “Admin” is the administrative account; this account CANNOT be deleted.
4) Password on Bootup
This menu allows for the enabling/disabling pf the user administrative feature
prompt; user login upon boot up.
8. Shutdown
This function saves any system settings that have be modified since powering on the
system, to makes sure it is safe to turn off the system without any loss of settings. Once
the Ready to Power OFF message appears, then the system can be safely turned off via
the machine Power Switch. Turning off the system without performing this function will
increase the risk of damaging the system.

17
Appendix A: Troubleshooting
Common Concerns
1. No display on the LCD or the unit does not operate when the power is on.
Check the power cable connection and that the environment for the power outlet is normal.
Make sure the power voltage on the duplicator matches the voltage of the power outlet.
If the system was stored in a location where the temperature dropped below 32⁰F (0⁰C)
within the past 24 hours, leave the system in a warm room with temperatures at least 65⁰F
(19⁰C) for 4 hours prior to powering it on.
2. The system cannot recognize the hard drive
Check to make sure the hard drive tray (with the hard drive installed) is firmly attached to
the system
Check to make sure the hard drive is powered by verify the “green” LED on the hard drive
status indicator
3. Buttons do not function.
The system could still be busy on a task. Give it sometime and press it again. If it still does
not work, turn off the machine, and then restart the machine after a minute.
4. Copy process completed but the copied hard drives are not readable / executable?
Change the “Copy Mode” to “RAW”; this will likely solve any data related issue.
Use the “Compare” function to check that the target hard drive(s) are identical to the source
hard drive.
The Read Error Skip or Write Error Skip settings under the “Setup” menu, may have turned
on inadvertently. It is possible the skipped data (due to read/write error) may be causing
this issue.
5. The failure rate is high.
Make sure hard drive is properly seated prior power on individual HDD Bay.
Quality of the hard drive may be poor. Please try some other name branded flash devices.
6. Do I need to upgrade the system’s firmware?
Unless the system is getting unstable, it is strongly suggested not to upgrade the firmware
on the system. Please contact Tech Support if the system is getting unstable.
7. Cannot boot-up or fails to upgrade firmware.
Contact Tech Support for assistance.
This manual suits for next models
1
Table of contents
Other Vinpower Disc Duplicator manuals

Vinpower
Vinpower SharkCopier SATA User manual

Vinpower
Vinpower HDDMINI User manual

Vinpower
Vinpower VENSOLPTR User manual

Vinpower
Vinpower ROBOTIC AUTOLOADER V3.6.0 User manual

Vinpower
Vinpower ROBOTIC AUTOLOADER V3.5 User manual

Vinpower
Vinpower Flash Memory V 2.1 User manual

Vinpower
Vinpower SharkCopier User manual

Vinpower
Vinpower The Cube V3.6.0 User manual

Vinpower
Vinpower THE CUBE SERIES User manual

Vinpower
Vinpower TITAN lite User manual