Vinyl Systems Specialist User manual


The Best Brands For Your
Vinyl Systems Cutter
Awww.vinylsystems.com
Available at: 800-664-8090
WWW.VINYLSYSTEMS.COM
WEEKDAYS 7:00AM-5:00PM PST
Siser EasyWeed Heat Transfer Vinyl is an
easy to use material that is ready to cut
and allows you to weed out your letters
and numbers with ease.
Specialty Materials heat transfer lm
produces durable polyurethane based
materials for all your needs.
Paropy Heat Transfer Paper is widely
known as the premier brand in quality
heat transfer paper. Designed to transfer
with no visible background
Neenah Paper has been an industry
leader in the creation, development, and
improvement of heat transfer products
since their rst patent was granted in 1980.

Contents
B
Call Us: (800)664-8090
Getting Started
What Comes In The Box
Meet Your New Cutter
Basic Knowledge
Let's Build The Stand
Blade Set Up
LCD Control Interface
Troubleshooting
Maintenance
Sales & Service
1
2
3
5
7
8
11
12
13
14

Getting Started
1www.vinylsystems.com
1. Remove the vinyl cutter and all of it’s accessories out
of the box. Inspect all parts and make sure you have
received all of them.
2. Install the stand and ensure it is mounted securely.
3. Plug in your vinyl cutter to your computer with the
included A-B USB 2.0 cable.
4. Plug in your AC Power cord directly into the wall, surge
protector, extension cord, or power strip.
5. Install the blade into the blade holder and make sure
the latch on your carriage is closed and locked over
the proper place.
6. Proceed reading the Sign Master Walkthrough Guide
to set up your cutting software.
7. Familiarize yourself with the control interface to make
sure you understand what each function does.
Thank You for purchasing a Vinyl Systems Specialist! Before
you get started, it is important you understand following.

What Comes In The Box
2
Call Us: (800)664-8090
A. Cutter/Plotter
B. Power Cord (x1)
C. Blade 45° (x1)
D. Blade holder (x1)
E. Pen holder (x1)
F. Pen (x1)
G. Serial cable (x1)
H. USB cable (x1)
I. Allen wrench (x1)
J. Installation CD
(x1)
K. Digital Manual
(x1)
L. Support screw (x1)
(optional)
M. Dust cover (x1)
(optional)
Call (800)664-8090 if any parts are missing
Before proceeding, make sure you have the following
C.
D.
I.
J.
G.
H.
B.
A.

Meet Your New Cutter
3www.vinylsystems.com
Front View
Rear View
USB I/O Serial I/O Pinch Rollers Power Plug
Blade Carriage
Metal Roller Ruler
Power
Switch
Cutting Pad

Meet Your New Cutter
4
Call Us: (800)664-8090
SIDE View
Computer Gauge
LCD Display Input Controls Navigation Control

Basic Knowledge
5www.vinylsystems.com
Installing Vinyl Material
All Vinyl Systems cutters will have a 1” white tabs that are labeled on the cutter. These
tabs are the areas your pinch rollers will need to be placed in. If you look underneath
these white tabs, you will see that the metal roller will have traction which allows the
vinyl to be fed with proper grip. If your pinch rollers are set up outside of these white
tabs and clamped onto your vinyl, it is subject to shift when it is cutting since it will not
have any grip. Try your best to make sure the pinch rollers are placed at the edge
of your vinyl material. Sometimes if you have the pinch rollers too closely into the
material, your vinyl will get bunched and possibly jammed.
Straighten Your Vinyl
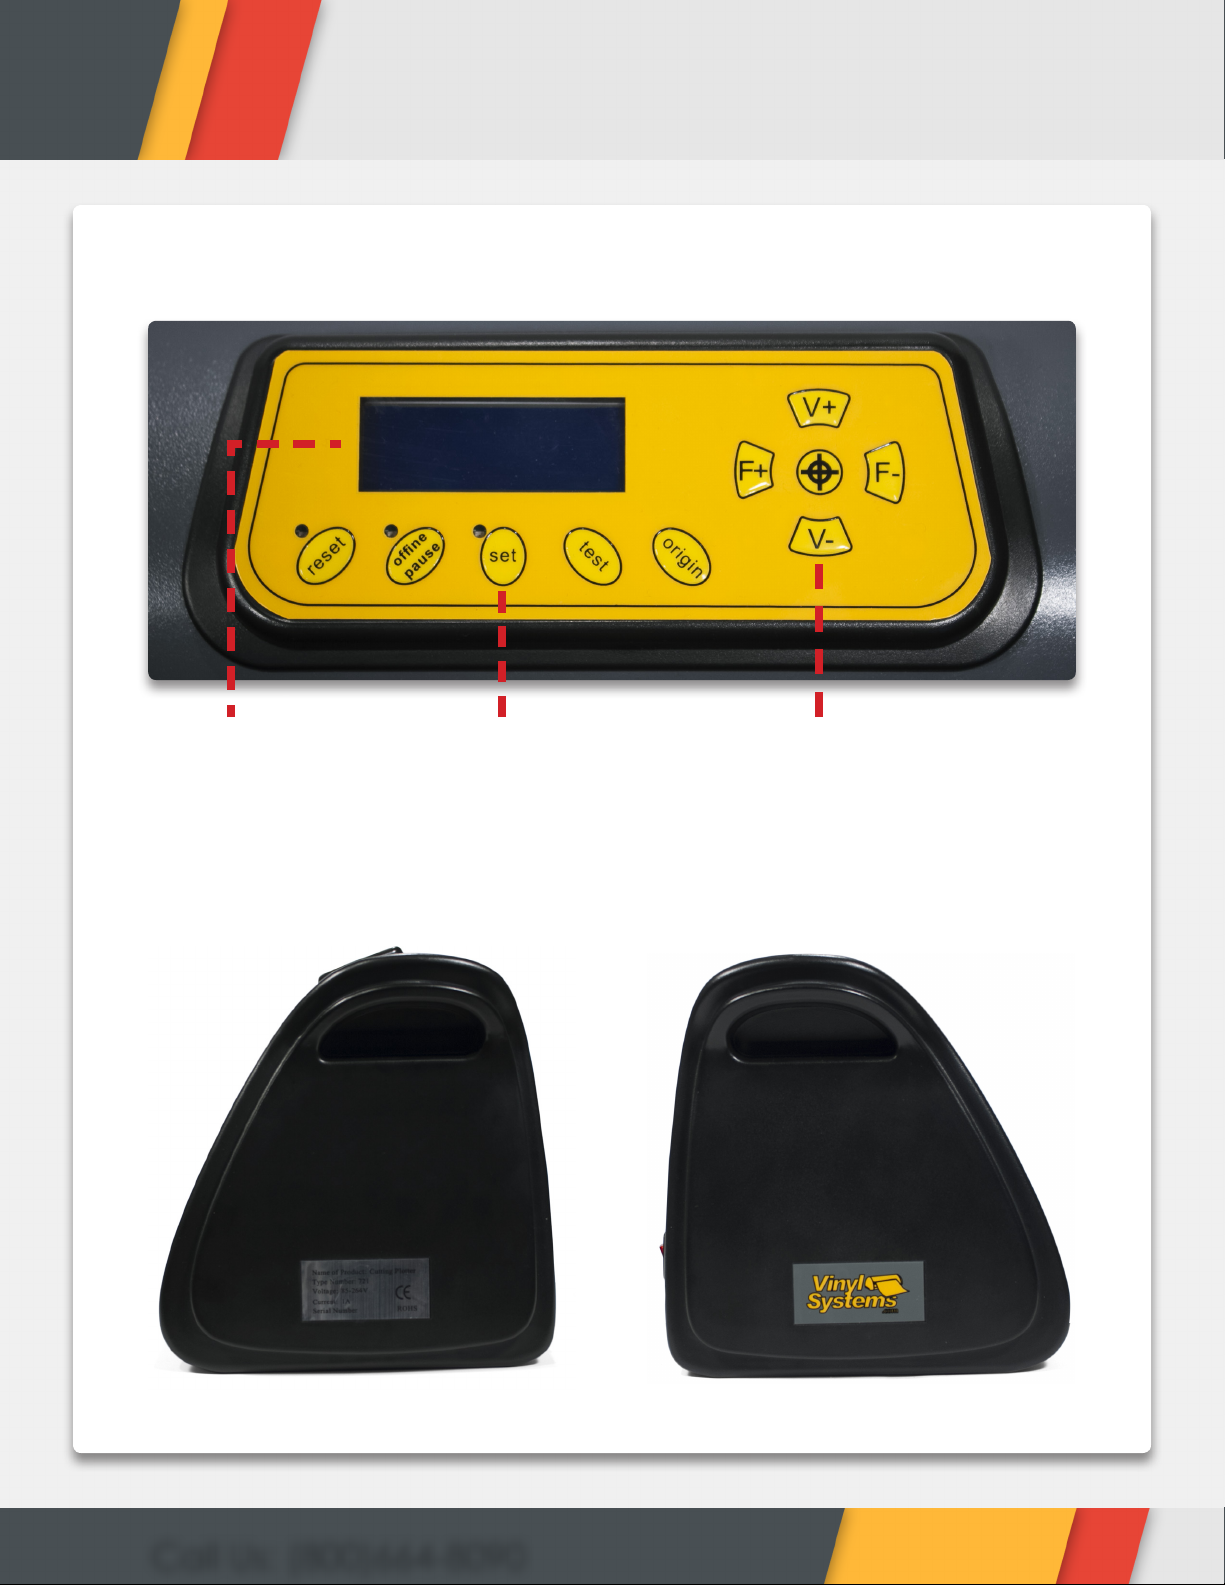
Vinyl can be installed straight using the ruler that is labeled on the front of your machine.
It is recommended to manually track out your vinyl forward using the control buttons
before sending the job to ensure that it will be completely straight while it is cutting
the entire size of your design. The last thing you’ll want is your entire cut image to be
ruined towards the end of the job just because you didn’t measure it correctly!
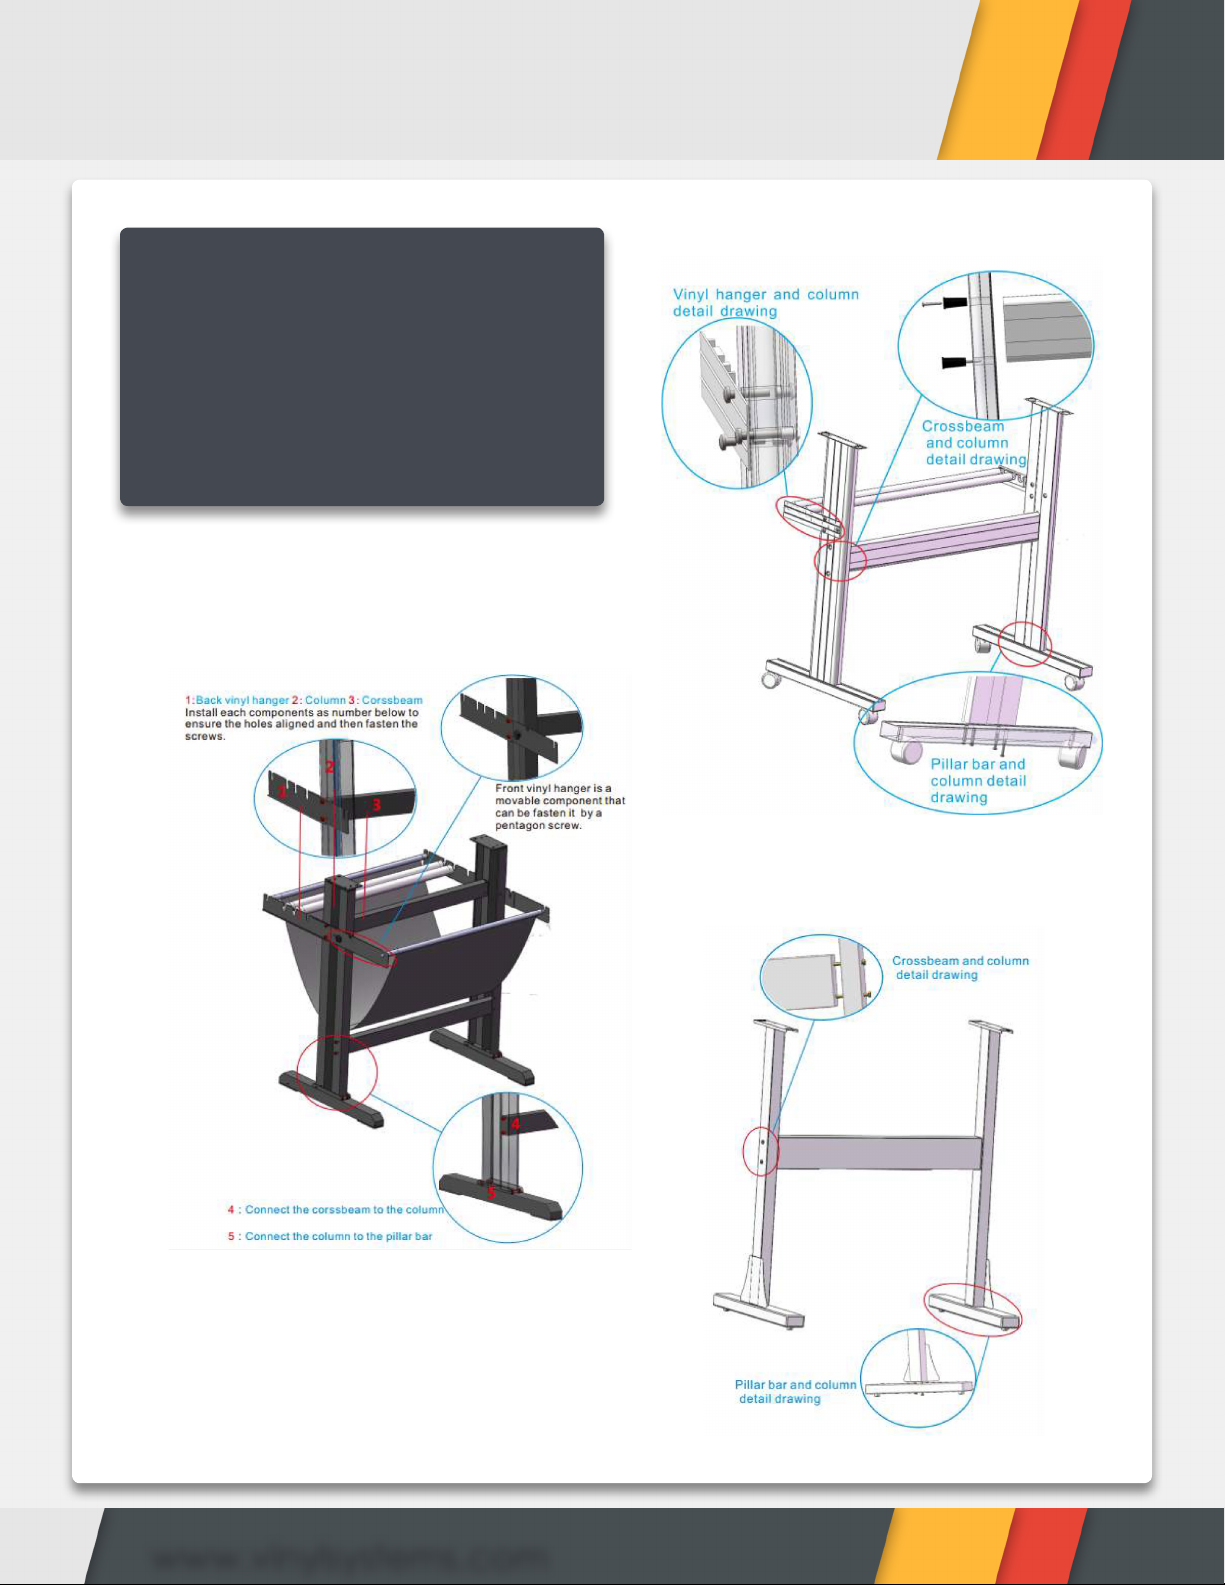
Placing Your Cutter
If you are not using the included stand, make sure you place it on a sturdy tabletop
or surface that will be able to support the weight and dimensions of your cutter. You
will also need to make sure your vinyl roll will be able to feed correctly as improper
feeding to the cutter will cause cut and tracking issues.
Power On Your Cutter
These vinyl cutters require a standard US electrical outlet. They can draw up to 5 amps
so make sure it is plugged into an outlet with enough power available. Connect the
power plug to the wall socket when the machine is switched “OFF.” Do not overload
the circuit with any other electrical appliances. Most homes can hold anywhere from
15 to 20 amperages per breaker.

Basic Knowledge
6
Call Us: (800)664-8090
Taking Precautions
Make sure there are no objects that can obstruct the movement of the blade carriage
when it is cutting. Sudden stoppage or obstruction can severely damage the motor.
Remove All Liquids
Do not operate the vinyl cutter with any liquids or chemicals that could potentially spill
onto the machine. This is a high risk of electric shock if the liquid is poured into the vinyl
cutters power supply located on the side of the machine. Also make sure your hands
aren’t wet when using the vinyl cutter to avoid electrical shock.
Blade Holder vs. Pen Holder
Due to the nature of a pen point, your pressure must be signicantly lower when using
the pen holder to plot instead of cutting. If your pressure is too high, you will ruin the
pen instantaneously.

Let's Build The Stand
7www.vinylsystems.com
Here Is what you need
to build the stand:
• Phillips head screw driver
• Crescent wrench
Build your stand using the following
diagrams:
Aluminum Stand Sketch Map
XL Stand Sketch Map
Iron Stand Sketch Map

Blade Set Up
8
Call Us: (800)664-8090
Installing the blade
The blade should be installed into the blade holder with the rounded/dull side into
the holder with the sharp side sticking out. Push the blade eject button while you
are inserting the blade so that it grabs the dull side in. You may push the blade eject
button again if you are trying to replace your blade.
Adjusting the blade depth
Adjust your blade depth to the thickness of your vinyl material. If you are cutting
standard heat transfer vinyl or window/decal vinyl, it should only be about the thickness
of a piece of paper. If you are cutting thicker materials such as Glitter or Flock heat
transfer vinyl, then you will need to increase the blade depth with the adjustment
screw to about a credit card thickness.
Types of Blades
For cutting standard, thick uorescent and reective
vinyl. This is your all around blade that allows you
to cut in detail and for most thick items. This blade
comes with all cutter models.
45 Degree
For cutting small text and ne detail. These more acute
angle blades typically cut higher levels of intricacy in
material that you would otherwise use a 45 degree
blade for.
30 Degree
For cutting reective vinyl, glitter vinyl, cardboard,
sandblast, ock, and stencil sharp edge. Typically
better for thicker material. This blade will prevent
fewer lifted vinyl edges.
60 Degree

Blade Set Up
9www.vinylsystems.com
Blade Holder Diagram
Pressure Sensitive Backing
Blade Release Button
Blade Holding Body Blade Adjusting Screw
Blade Holder Case Cutting Blade
Vinyl
PerfectToo FarToo Short
Do not insert the blade’s sharp side into
the holder. This will cause permanent
damage to both components.

Blade Set Up
10
Call Us: (800)664-8090
Installing the blade holder into
the carriage
The blade holder will need to be installed into the carriage
in this position with the eject button facing up and the blade
facing down.

LCD Control Interface
11 www.vinylsystems.com
1. Welcome: This message will appear a few seconds after you turn on your vinyl cutter
2. Speed: This allows you to change the speed of how slow or fast your cutter will cut. Slower is recommended
for more intricate, smaller, and detailed designs. Faster will be typically used for more largely scaled
graphics that aren’t as intricate. This allows you to speed up your production as needed.
3. Force: This allows you to change the pressure on how deep the vinyl cutter should cut your material.
Please note, the blade should only be strong enough to cut the vinyl material alone without cutting the
backing protective sheet.
4. Baud Rate: Is the rate at which information is transferred in a communication channel. Typically this isn’t
important unless you’re setting up your cutter with the RS-232 Serial Cable. Since you are using it with
USB. It will only transfer as fast as USB 2.0 will support which is instantaneously.
5. Redraw: This is also known as Recut. Which means it will cut the last job that was sent.
Interface Map
Plotter start screen. It will
take 3 seconds for the
machine to initialize.
Plotter will record the last out-
put data. Under this interface
the machine is ready to cut
This screen shows the
baud rate and the speed
grade. You can set up the
baud rate in this interface.
After initializing, the machine
automatically resets. Under this
interface you can adjust the cut-
ting speed and force, test the
machine, do on-line processing
Off-line interface: In
this status, you can
move the carriage
of metal roller by
pressing the button to
check the quality of
the pattern or to set
the origin location
Welcome
Speed
Force
800mm/s
140g
Move X 0
Y 0
e Speed
Baud
+0Vale
9600
Redraw
Pause
Press
Pause
Press Set
Press
Set
Press
Origin
Press

Troubleshooting
12
Call Us: (800)664-8090
• Blade tip is too long, cutting force is too high, or cutting pad has worn
and it has ridges from overuse.
• Software setting is incorrect. For example: tool compensation is open
and the value is set too high.
• Metal roller screw or motor gear is loose (extreme case).
The completed cut is deformed or in-
complete. Possibly missing a few parts
of the design.
• This can happen if you did not appropriately enter the correct width
dimensions of your material in the software.
• Make sure your designs always t within the size of your vinyl material by
checking both length and width prior to cutting.
Vinyl cutter is cutting out of position.
• Your blade offset needs to be increased. This is applicable when
switching your blade to different angled tips.
Corner of design is rounded instead of
a sharp clean edge.
• The blades are always pivoting at every point with the bearings built
inside the blade holder. If your blade offset settings are misadjusted by
the blade type you’re using, your cuts won’t connect.
• Your blade might be sticking out too far, therefore it is not able to pivot
correctly in the holder.
The designs aren’t connecting at the
end points. For example: When cutting
a circle, the lines don’t meet at the very
end and sometimes possibly overlap.
• Blade is sticking out too far. The blade carriage will lift the holder when it
is trying to cut in different area. If the blade is too far out, what happen is
it drags the blade across the vinyl when it is lifted.
Multiple improper slashes on your vinyl
or diagonal cuts across your design.
• This can happen when your pinch rollers are not set at the appropriate
position. The pinch rollers should be set underneath the white tabs where
the metal roller has grip. This grip allows the vinyl to be fed correctly
when it is tracking back and forth. Also, you must have them positioned
at the edge of your vinyl or else the blade will jam the vinyl into the pinch
roller when cutting a design that is wider than where the pinch roller is
positioned.
• If problem persists, your pinch roller could possibly be damaged. Check
to see if there are any cracks or damages. This would negate the tension
it is supposed to provide.
Vinyl bunches up and gets jammed
during the cutting process. Sometimes
the vinyl shifts when it is cutting.
• The mainboard has failed and will need to be replaced.
3 lights on gauge stay lit up.

Maintenance
13 www.vinylsystems.com
Blade
The blade is your bread and butter with any vinyl cutter. All Vinyl Systems cutters
come equipped with a 45 degree angle blade. We would recommend replacing the
blade every 6-12 months of continuous use. This can vary depending on the type and
thickness of your material.
Cutting Pad
The cutting pad is essentially the white strip your blade makes indirect contact with
when it is cutting through your material. This cutting pad can typically last about 6-12
months of continuous use before it will need to be replaced. One way you will notice
an issue is when your designs start to have missing parts or it starts to cut away from
the vector path.
Blade Holder
The blade holder uses bearings inside that allows the blade to pivot when it is cutting
corners, edges, and circles. These bearings can wear down over time which means
you will have to replace the entire blade holder. A blade holder should usually last
you over 1-2 years of continuous use. Only replace this if you have replaced the
blade, corrected the offset settings, replaced the cutting pad, and are still having
issues with nished cuts.
You may purchase all of these accessories and supplies at www.vinylsystems.com

Sales & Service
14
Call Us: (800)664-8090
Vinyl Systems provides lifetime free technical
support for all vinyl cutters purchased through us.
Our technicians use TeamViewer’s remote control
support for the easiest way to support you all the
way through!
If you feel unsure using or you have any questions
about your cutter and software, please download
www.vinylsystems.com/teamviewer and give us a
call at (800)664-8090.
Notes:

All rights reserved. No part of this publication may be reproduced, distributed,
or transmitted in any form or by any means, including photocopying, recording,
or other electronic or mechanical methods, without the prior written permission
of the publisher, except in the case of brief quotations embodied in critical
reviews and certain other noncommercial uses permitted by copyright law. For
permission requests, write to Vinyl Systems, 2300 E Walnut Ave. Fullerton, CA 92831
Copyright © 2017 Vinyl Systems
Table of contents