Virtue SPIRE III User manual

SPIRE III MANUAL
BUILT TO WIN PAINTBALL LOADER
™

SPIRE III SETUP
™
Thank you for purchasing the Virtue Spire III™ paintball loader. This manual covers all aspects of your Spire
III loader. It is recommended you read the whole manual as it contains important product and safety informa-
tion.
QUICK SETUP //
To start using the Spire III ™ immediately install 3 AA batteries. The LED
indicator shows the following information during normal operation.
•BLUE, loaded and ready.
•RED, not loaded, add paintballs.
•YELLOW during startup, low battery.
•GREEN blinking once every 2.5 seconds is in power save mode.
When your Spire III starts with low batteries, it will automatically enter the power
save mode until fresh batteries are installed. Power save mode prolongs battery
life by shutting down Reload Indicator and LEDs. The LED will occasionally
flash green to let you know it's on.
LENGTH: 9.5”
WIDTH: 4”
HEIGHT: 3.9”
WEIGHT: 16oz
CAPACITY: 230 balls
BATTERIES: 3 x AA
It is recommended to download the Spire III App from the
Google Play Store or Apple App Store and download the latest
firmware settings to your Spire III. Many exciting features will
be added to the App in the future.
SPEC //
WARNINGS \\\\\\\\\\\\\\\\\\\\\\\\\\\\\\\\\\\\\\\\\\\\\\\\\\\\\\\\\\\\\\\\\\\\\\\\\
* Always wear eye protection specifically designed for paintball.
* Persons under 18 years of age should have adult supervision
when using this product.
* Only use projectiles designed for the sport of paintball such as
paintballs or Reballs™.
* Misuse of paintball equipment can cause serious injury or death.
MANUAL // PAGE 1
SEE PROGRAMMING SECTION FOR ADDITIONAL SETTINGS

BATTERIES +OPERATION
™
LENGTH: 9.5”
WIDTH: 4”
HEIGHT: 3.9”
WEIGHT: 16oz
CAPACITY: 230 balls
BATTERIES: 3 x AA
The Spire III™ uses 3 AA batteries. To install them follow these steps:
1Open top shell by pressing unlock button on the back
2Remove Spire tray from shell by pinching the tray release tab between your thumb and forefinger
and pulling the tray up.
3Open Velcro strip covering the battery slots and insert 3 AA sized batteries. Follow the markings
on the bottom of the battery holder for correct polarity alignment. Tighten Velcro over the batteries
to ensure they don’t come loose during playing. Use high quality alkaline or lithium ion
batteries. Using rechargeable batteries is not recommended and will cause performance issues.
4Insert Spire tray back into the loader and push down until black lock clicks into locked position.
5Close top shell by pushing it down until it locks in place.
BATTERY INSTALLATION //
SOUND //
By default, the Spire III is muted. To turn on the speaker, with the Spire on, simply hold in the Force Feed
button for 2 seconds. The Spire will beep the number of times the Reload Indicator Alarm is set to confirm you
have turned on the Speaker. To mute the speaker, follow the same procedure and hold in the Force Feed
button. The Spire III will remember your setting next time you turn on the Spire.
MANUAL // PAGE 2

OPERATION
™
BASICS //
The Spire III uses an enhanced G-force sensor that detects the small recoil that occurs when shooting a paint-
ball marker. The Spire III G-force sensor is isolated and mounted in a silicone anti-vibration housing to allow
the sensor to perform better than on previous Spire loaders. During normal operation the Spire III spins Spire
Drive forward until the stack is full. When the stack is full, software detects the increase in Drive Pressure
through the motor and then stops. When a shot is fired the G-force sensor detects the shot and the Spire Drive
is rotated forward until the stack is full again. The faster the gun is fired the faster the Spire Drive is rotated.
When the Spire III is out of paint it will keep a slow rotation that saves battery life, minimizes balls bouncing
inside the loader, and most importantly ensures balls loaded in will be fed all the way to the marker.
BATTERIES +LOW BATTERY INDICATOR //
The Spire III functions on 3 AA type batteries. For maximum feed and to prevent feeding or performance prob-
lems, please use fresh high quality batteries. It is recommended to use either alkaline or lithium ion type
batteries. Do not use rechargeable batteries or cheap batteries like what may come with a TV remote control.
These types of batteries are not suited for driving a motor. Do not use 9V batteries and do not exceed 5.5V
input voltage. Always recycle used batteries according to the manufacturer’s instructions.
There is a built in Low Battery Indicator (LBI) on the Spire III. When turning on the Spire III with good batteries
the LEDs will turn to either red or blue depending if you have paint inside the loader or not. If the batteries are
low you will hear 3 short beeps and LED will stay solid yellow for 3 seconds. When the loader is in LBI mode,
the LEDs automatically shut off tp conserve power and maximize performance. They will occasionally blink
yellow to warn you need to replace the battery. At this point you should change your batteries. Because not
all batteries put out a consistent voltage, sometimes your batteries may need to be replaced without the Low
Battery Indicator going off.
MANUAL // PAGE 3

™
BATTERY LIFE //
The life of batteries varies very much depending on the type of batteries used, temperature, environmental
conditions, firing rate of the marker and the time used to fire the shots. As a general rule of thumb 1 set of
batteries should last about 20,000 shots or 1 year.
ELECTRONIC FORCE FEED /PROGRAMMING / MUTE BUTTON //
The button on bottom of Spire III serves several functions. When the Spire III is on, it serves as an electronic
force feed button. Pressing the button causes the loader to feed forward.
When you hold the Force Feed button in for 2 seconds, it unmutes or mutes the speaker. The Spire III is
muted by default and remembers your previously saved setting.
The Force Feed button also allows you to enter the Spire III Programming Menu by holding this button in when
you turn the Spire on, then releasing it after the Spire starts up.
REBALLS //
The Spire III was designed to be very reliable and easy on paintballs. This allows it to function with Reballs
or similar projectiles. Making sure the Reballs used are clean before loading them into the Spire III will
improve reliability.
If you are using Reballs, you should turn of the Auto Mode in the Yellow Drive Pressure setting. Set the
Yellow setting to a value of 3 or higher. Due to the very high friction of Reballs the feed rate will be lower,
wear on internal parts will increase, and battery consumption will be higher.
MANUAL // PAGE 4

DISASSEMBLY
™
OPENING SHELL //
To open the Spire III shell simply press the lock button on the back of
the Spire III. The top shell is spring loaded and will automatically lift
up to the open position. To close just press down until there is a click
sound.
REMOVE +INSTALL SPIRE TRAY //
Open the top shell first. Then locate the Tray Release Tab on the back
the Spire tray. Push forward as indicated by the arrow on the lock and
then pull the body tray up and out of the shell. To reinstall first align
the front of the body tray under the front support inside the front of the
loader. Then push down on the tray until it securely locks in place.
REMOVING LID + INSTALLING SPEED FEED //
The lid of the Spire III is installed using a quick mount system. To
remove the lid open it to its open position. Using your finger press in
the lock tab on the inside of the lid while pulling the lid out with your
other hand. The lid will slide out. To install another lid, speed feed or
another accessory simply push it in to the slot until it’s locked in place.
REMOVE +INSTALL SPIRE DRIVE //
To remove the Spire Drive from the loader first open the Shell and
remove the Spire tray. After that pull the Spire Drive straight up. It will
come loose and you will be able to pull it away from the body. To
re-install the Spire Drive, align one of the arms into the ball tray and
rotate the Spire Drive a little. A magnetic lock will pull the Spire Drive
in place and lock it automatically. MANUAL // PAGE 5

RACEWAY DISASSEMBLY //
The Spire III Raceway can be detached by unplugging the wiring
harness from the motor and pressing the Raceway Removal Tab on
the bottom of the tray then slide the Raceway and motor assembly
down and out. To reinstall the Raceway, slide the back of the Race-
way into the two slots first and then snap the Raceway Release tab
back into place. Take care to Make sure the wiring harness is not
pinched.
PCB ELECTRONICS PACKAGE REMOVAL //
The PCB electronics package can be removed after unplugging the
motor and removing the Raceway. At the front of the tray gently bend
each corner of the front tray PCB tabs away from the PCB and
remove the PCB package. To reinstall the PCB slide the back of the
PCB into the tray and then flex the front tray tabs around each side of
the front of the PCB.
There is no particular maintenance needed for the Spire III. Keeping it clean and using fresh batteries is all that is required.
If you leave the Spire III unused for more than 6 months it is suggested to remove the batteries to avoid damage due to a
possible leaking battery.
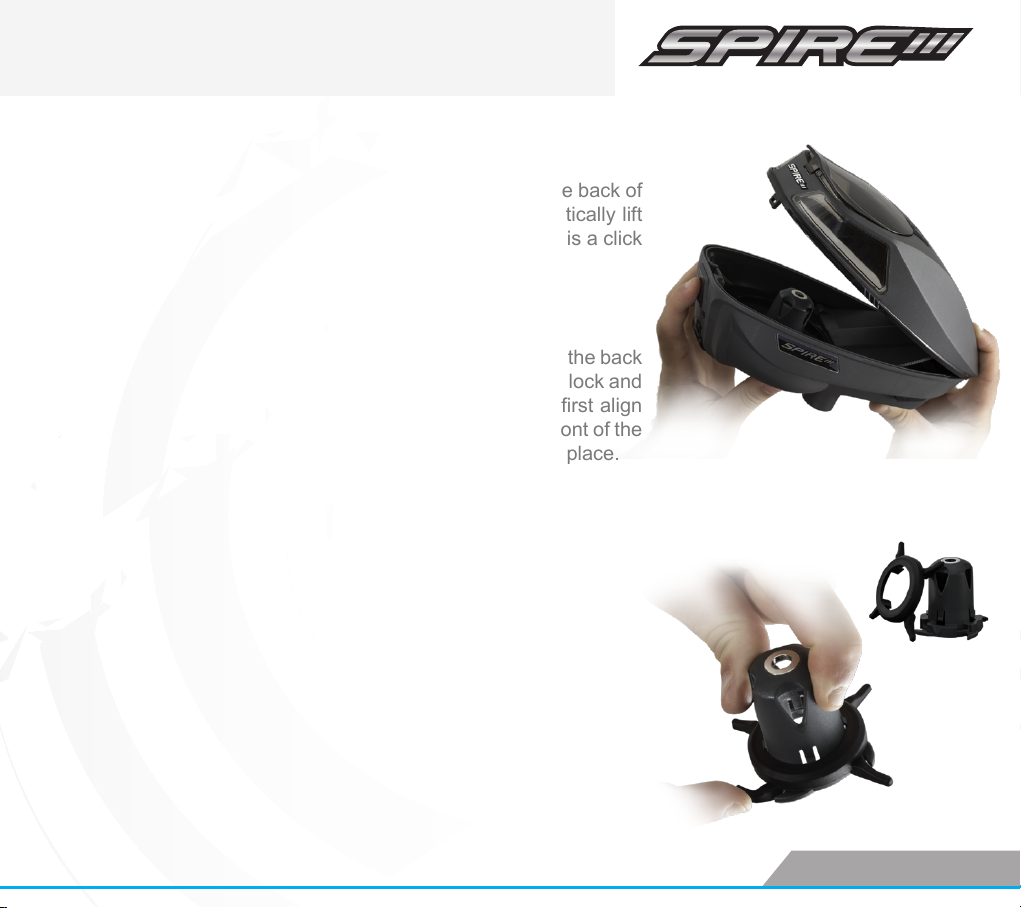
For normal cleaning of the Spire III, remove the Spire tray and set it aside. The shell can be washed under the sink using
warm water and mild detergent. Do not use a dishwasher, boiling water or other strong chemicals as this can weaken the
plastic. Remove the Spire III Drive from the tray and wash it like the shell.
Remove and clean the Raceway by hand. Generally, it's ok if the Raceway and motor assembly gets wet, but do not
submerge it in water to prolong the life components.
The PCB Electronics Package can also be removed and cleaned by hand. Do not submerge the PCB in water. Clean the
paint off the PCB using a cotton swab or paper towel. All of the electronics are conformal coated for weather and paint
resistance, however prolonged exposure to paint will eventually corrode away the coating and damage the electrical
components.
MANUAL // PAGE 6
CLEANING
+ MAINTENANCE

PROGRAMMING SETTINGS
™
RELOAD INDICATOR ALARM //
This setting allows you to adjust the speaker alarm for the Reload Indicator. Regardless of what this is setting
is set to, the Reload Alarm is muted by default. To turn on or to mute the speaker, while the Spire is on, simply
hold in the Force Feed button for 2 seconds. The Spire will beep the number of times the Reload Indicator
Alarm is set to confirm you have turned on the Speaker. The Spire III will remember your setting next time you
turn on the Spire.
Setting 1 is OFF. The Spire III will not beep when the Reload Indicator activates.
Setting 2 is ON and will beep quickly beep 2 times when the Reload Indicator activates.
Setting 3 is ON and will beep quickly beep 3 times when the Reload Indicator activates.
Setting 4 is ON and will beep quickly beep 4 times when the Reload Indicator activates.
The programming menu can be accessed by turning the Spire III ON while holding in the Force
Feed/Programming button on the bottom of Spire III and then releasing the Programming button. The LED will
cycle through a rainbow of colors. The LED will stop on purple indicating you are now in the first programming
setting.
Tapping the Programming button will toggle through the different programming settings. When the LED is lit
for the setting you wish to adjust press and hold the Programming button until the LED begins to flash, and
then let go. The LED will flash the number of times you want the new value to be set to. After you have set the
new value, the LED will flash the number of times you have entered and then flash the rainbow of colors,
returning to the color you have adjusted indicating that the new value has been saved. To exit the program-
ming mode turn the Spire III off by pressing the on/off button.
MANUAL // PAGE 7
PURPLE VALUES 1-4 /Default 2

™
RELOAD INDICATOR LED ACTIVATION //
When the Spire III Smart Ramp goes up, the Spire III Heads-Up Reload Indicator LEDs on both sides of the
Spire will change their color to Indicate when it's time to reload. Use this setting in conjunction with the Reload
Indicator Alarm to fine tune how you want the Spire III to warn you to reload based on your style of play.
The LEDs are positioned so they are not distracting while shooting, but just out of line of sight so you can see
it with a quick movement of your head. When Reload Indicator is activated the LED colors are:
RED – if the Reload Indicator is activated: time to reload.
BLUE – if the Reload Indicator is not activated: your hopper is full.
Setting 1: Reload Indicator LEDs activate immediately after the Smart Spring Ramp goes up.
Setting 2: Reload Indicator LEDs activate after the Smart Ramp goes up and the motor spins 5 times
Setting 3: Reload Indicator LEDs activate after the Smart Spring Ramp goes up and motor spins 10
times.
G-FORCE SENSITIVITY //
This setting allows you to adjust the sensitivity of the G-force sensor. Setting 1 is the least sensitive and
setting 7 is the most sensitive.
Do not adjust this setting unless there is problem with your Spire III, and you have already removed and
cleaned the Spire Drive and are sure you have good batteries. Generally, you do not need to adjust this
setting at all unless there is a problem.
If the Spire III is spinning too much causing pop-corning, you can lower the sensitivity. Please note, too high
of a sensitivity can cause unwanted pop-corning, and too low of a sensitivity can cause the loader not to
detect shots. It is only recommended to adjust this setting if absolutely needed.
MANUAL // PAGE 8
RED VALUES 1-7 /Default 4
TEAL VALUES 1-3 /Default 1
HEADS-UP

™
DRIVE PRESSURE //
The Spire III features a new Automatic Drive Pressure monitoring logic that enables the loader to sense when
to start and stop on its own.
Setting 1: (Default) Auto mode. In this mode, the loader will choose the best setting for current conditions.
Settings 2 – 7: Manual modes. The higher the value the more pressure the Spire Drive needs to feel before it
will stop spinning. Lower numbers will make the Spire Drive stop easier when it feels pressure on the stack.
Do not adjust this setting unless there is problem with your Spire III, and you have already removed and
cleaned the Spire Drive and are sure you have good batteries. If the Spire III stops spinning before the balls
stack is full, you can raise this setting. Too high of a setting can cause unwanted pop corning, and too low of
a setting can cause the Spire III to stop spinning too soon.
A Note on Reballs:
Because Reballs have a high amount of friction, you should not use the default Auto Mote, but turn
the Drive Pressure setting to 4 or higher to ensure the Spire does not stop feeding the Reballs
prematurely.
LED POWER SAVER //
This setting allows you to turn the LEDs off. This can be useful for example when playing night games or if
you want to conserve power.
Setting 1: Heads-Up LEDs are on. The LEDs automatically dim occasionally to 40% power when the
loader is idle to conserve battery life.
LED POWER SAVER CONTINUED ON NEXT PAGE MANUAL // PAGE 9
YELLOW VALUES 1-8 /Default 1
GREEN VALUES 1-3 /Default 1

™
LED POWER SAVER //
Setting 2: Shuts off the LEDs entirely save to battery power.
Setting 3: Shuts off the LEDs save to battery power, but occasionally blinks green to let you know the
Spire III is on.
FIRMWARE UPGRADE MODE //
Enter this setting to perform a firmware upgrade on the loader using your mobile phone (iOS or Android). Hold
in the Programming Button when the LED is Flickering Blue to put the loader into Wireless Receiving mode
and the LED will turn White. The loader is now Discoverable on the mobile application. If left in Discover mode
too long the Spire III will automatically reboot and exit the programming menu.
Start the application and press Upgrade Firmware. The app will show a your loader's serial number in the list.
Tap on the serial loader number and wait until the application indicates that the upgrade has been completed.
The loader will boot and resume normal operation. If the upgrade fails, the loader will revert back to the exist-
ing firmware.
FACTORY RESET //
To return all setting to the factory defaults, while in programming mode, hold the bottom button down for 10
seconds until the LED turns white. Once the LED turns white, the led will then flash through the rainbow of
colors indicating that all settings have been returned to the factory default.
MANUAL // PAGE 10
CONTINUE FOR TROUBLESHOOTING TIPS
GREEN VALUES 1-3 /Default 1
FLICKERING BLUE Then WHITE when entered.

This manual covers only the basic troubleshooting information. For up to date support and contact information
please visit: www.virtuepb.com/Spire III
SPIRE III NOT TURNING ON //
TROUBLESHOOTING
™
MANUAL // PAGE 11
1Make sure the tray is seated properly in the shell assembly. Does the tray turn on when it is
outside the Spire III?
2Make sure batteries are installed and the polarity is correct. The negative ( - ) of the battery should
be touching the spring of the battery holder.
3Make sure batteries have power in them. Sometimes even brand new batteries are dead, test with
another set to make sure.
4Check that the cable between main PCB and motor is connected on both ends.
SPIRE III LED OR SPEAKER NOT WORKING //
1Make sure the LED and Speaker are turned on in the program menu, or perform a factory reset.
SPIRE III FEEDING SLOWLY OR ERATICALLY //
1Ensure that your batteries are fresh and a good quality. Off brand batteries frequently cause poor
performance.
2 Ensure that you have the latest firmware update by using the Spire App to download and flash
your Spire III.
3 Check the condition of the Spire drive fingers. If they are excessively soft or worn, replace them.
4 Check to make sure the Spire is spinning properly with each shot of your marker. If necessary, turn
on the sensitivity.
5 If you are using Reballs, turn the Drive Pressure setting to 4 or higher.

SPIRE III IS POPCORNING OR PULSING WHEN FULL //
™
1 Ensure that your batteries are fresh and a good quality. Off brand batteries frequently cause poor
performance.
2 Ensure that you have the latest firmware update by using the Spire App to download and
flash your Spire III.
3 Check that the Yellow Drive Pressure Setting is set to Auto Mode. Or if necessary, set it to 2.
4 Check the condition of the Spire drive fingers. If they are excessively soft or worn, replace
them.
MANUAL // PAGE 12
>www.virtuepb.com/Spire III

FCC NOTICE:
VIRTUE SPIRE III MANUAL
BUILT TO WIN
FOR MORE INFORMATION, VISIT: VIRTUEPB.COM
This setting allows you to turn the LEDs off. This can be useful for example when playing night games or if
you want to conserve power.
Setting 1: Heads-Up LEDs are on. The LEDs automatically dim occasionally to 40% power when the
loader is idle to conserve battery life.
This device complies with Part 15 of the FCC Rules.
Operation is subject to the following two conditions:
( 1 ) This device may not cause harmful interference, and
( 2 ) This device must accept any interference received, including interference that
may cause undesired operation.
FCC ID: SH6MDBT40
MADE IN TAIWAN
USA Office
Virtue Paintball ,LLC
40-14 Oser Ave
Hauppauge, NY 1788
USA
Europe Office
Virtue Paintball GmbH
Wienerstrasse 42 / 2
2120 Wolkersdorf
Austria
™
Table of contents