VisioBraille Visio 24 User manual

Visio 24
User Guide
Version 3
English 10/2021

Contents 2
VisioBraille - see with different eyes
VisioBraille GmbH is convinced of the screen-reading devices as VISIO
family, the VARIO braille displays and Poet reading devices!
With these innovative tools we want balancing the restrictions of blind
and visually impaired people as best as possible, strengthening their in-
dependence and providing assistance on the way to an independently
designed everyday life.
This goal is achieved through our high level of commitment in the devel-
opment of high-quality products. Many years of experience in this area,
excellent know-how and the aid of the most modern technologies, im-
prove the livability of our customers significantly.
Ergonomics, design and quality of the products developed and produced
in Germany meet the highest demands.
Both in the private sector, as well as in training and at work, you can
overcome barriers by using our high-quality products, and drive your
success further.

Contents 3
Contents
1ABOUT THIS USER GUIDE...............................................................................................4
2ABOUT VISIO 24................................................................................................................5
3BEFORE SWITCHING ON FOR THE FIRST TIME ..........................................................6
3.1 EQUIPMENT /ITEMS DELIVERED:.................................................................................6
4SETTING UP THE VISIO 24 ON THE TABLE ..................................................................7
5SWITCHING ON FOR THE VERY FIRST TIME AFTER ASSEMBLY.............................8
6THE CONTROL UNIT OF VISIO 24.................................................................................10
7BRIEF OVERVIEW OF THE CONTROLS.......................................................................11
8GET TO KNOW YOUR NEW VISIO 24 ...........................................................................12
9TROUBLESHOOTING......................................................................................................18
10 DEFECTS AND REPAIR..................................................................................................20
11 SERVICE BOX..................................................................................................................21
12 COMPLIANCES................................................................................................................22
12.1 CE KONFORMITÄT ....................................................................................................22
12.2 FCC CONFORMITY ...................................................................................................22
12.3 ENVIRONMENTALLY FRIENDLY DISPOSAL ACCORDING TO EU-DIRECTIVE 2012/19/EU23
13 WARRANTY .....................................................................................................................25
14 FOR YOUR SAFETY........................................................................................................26
15 TECHNICAL DATA ..........................................................................................................29

© 2021 VisioBraille GmbH
1 About this user guide
This manual is intended for all users of VISIO 24. The device has already been
set up by your dealer so that you have a fully functional device at your disposal.
In this manual you will find all information required to use your VISIO 24.
The manual is a part of your device. Please read this manual with care and atten-
tion as it contains important instructions and tips with regard to operating the de-
vice and its safety. Please keep the manual always within reach of your device
and do pass it on to a next owner.
Copyright © 2021 VisioBraille GmbH, Ossmaritzer-Strasse 4c, D - 07745 Jena,
Germany. All rights reserved. No part of this publication may be reproduced or
distributed in any form or by any means, or stored in a database or retrieval sys-
tem, without prior written permission from VisioBraille GmbH.
All efforts have been made to ensure that information contained in this document
is correct at the time of issue. Neither VisioBraille GmbH nor its representatives
assume any responsibility for errors or omissions. Nor is any liability assumed for
damages resulting from the use of information contained herein.
Licenses and trade marks
All licenses and trade marks are the property of their respective owners.

About VISIO 24 5
2 About VISIO 24
Attractive design, simple operation, excellent image quality - that's what VISIO 24
stands for.
Visio 24 has a high-resolution camera and a 24 “widescreen monitor in 16:9 for-
mat with energy-saving and high-contrast LED lighting. The high resolution of the
camera ensures a razor-sharp image even at the smallest magnification.
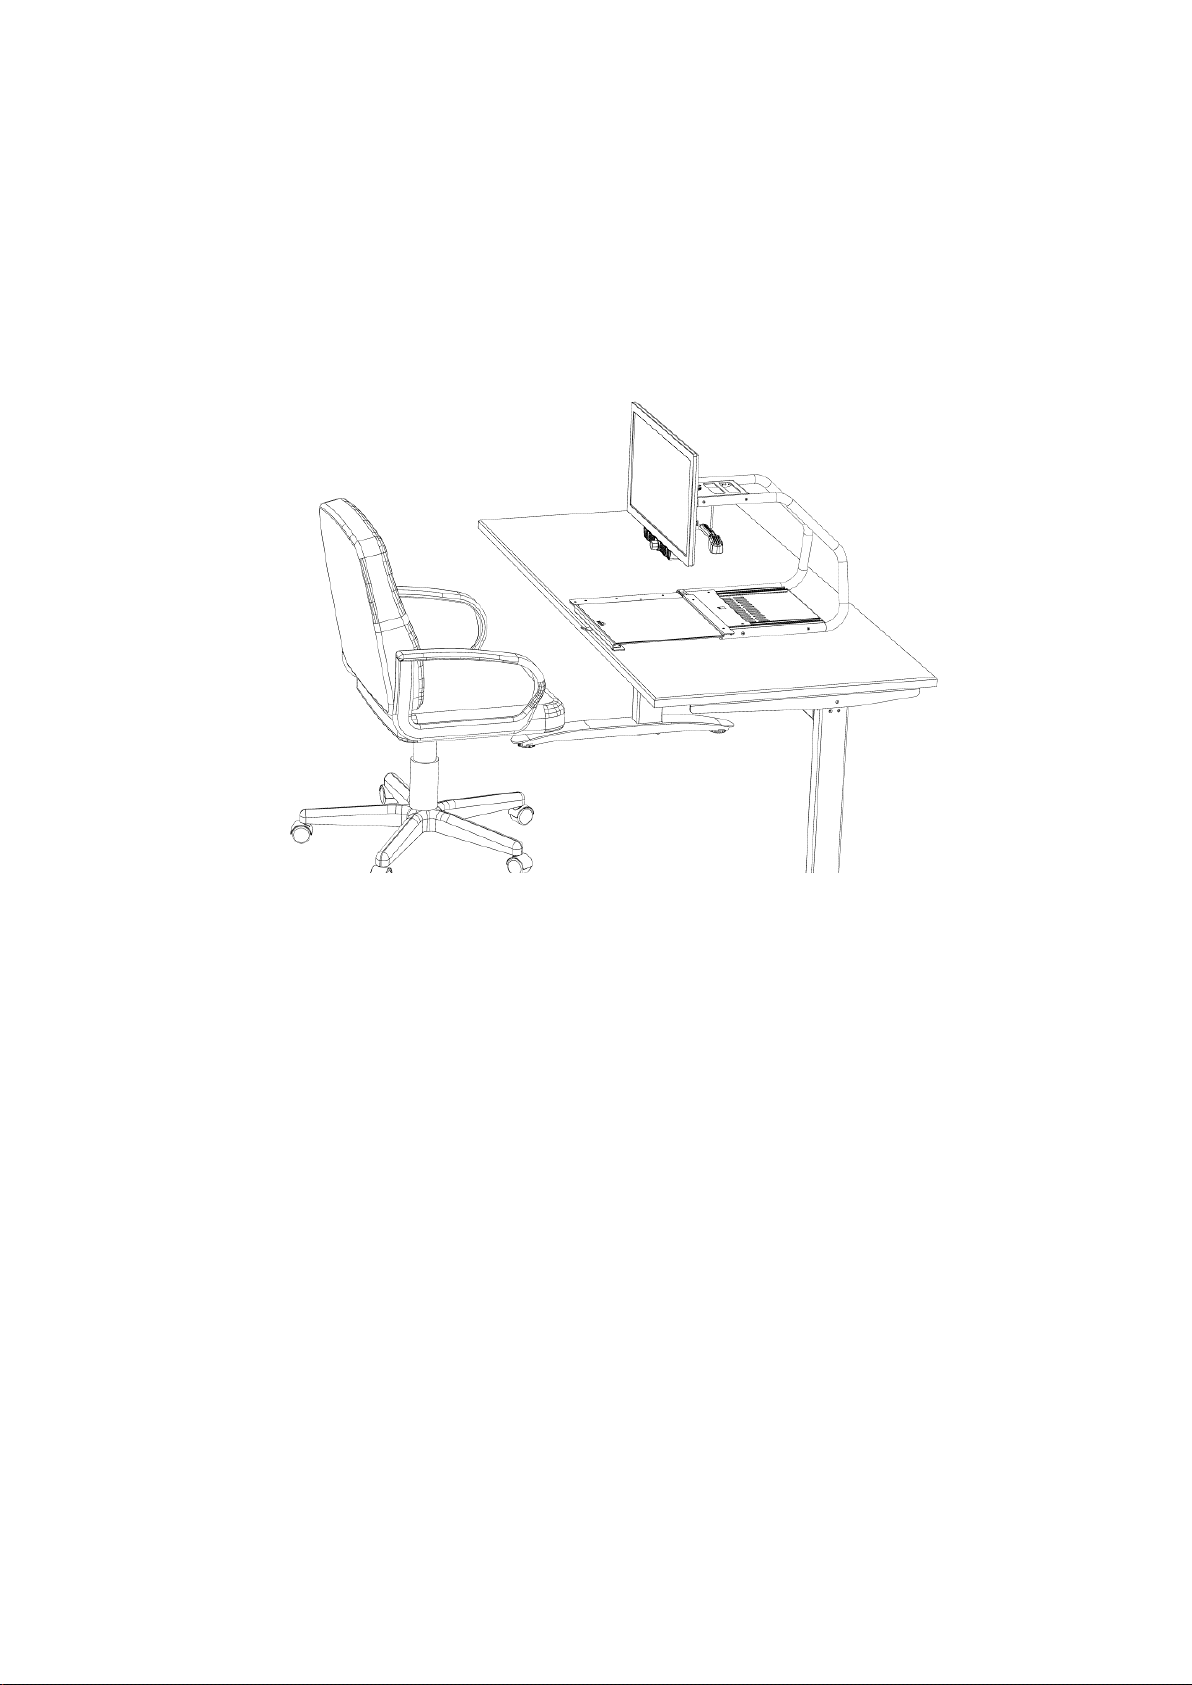
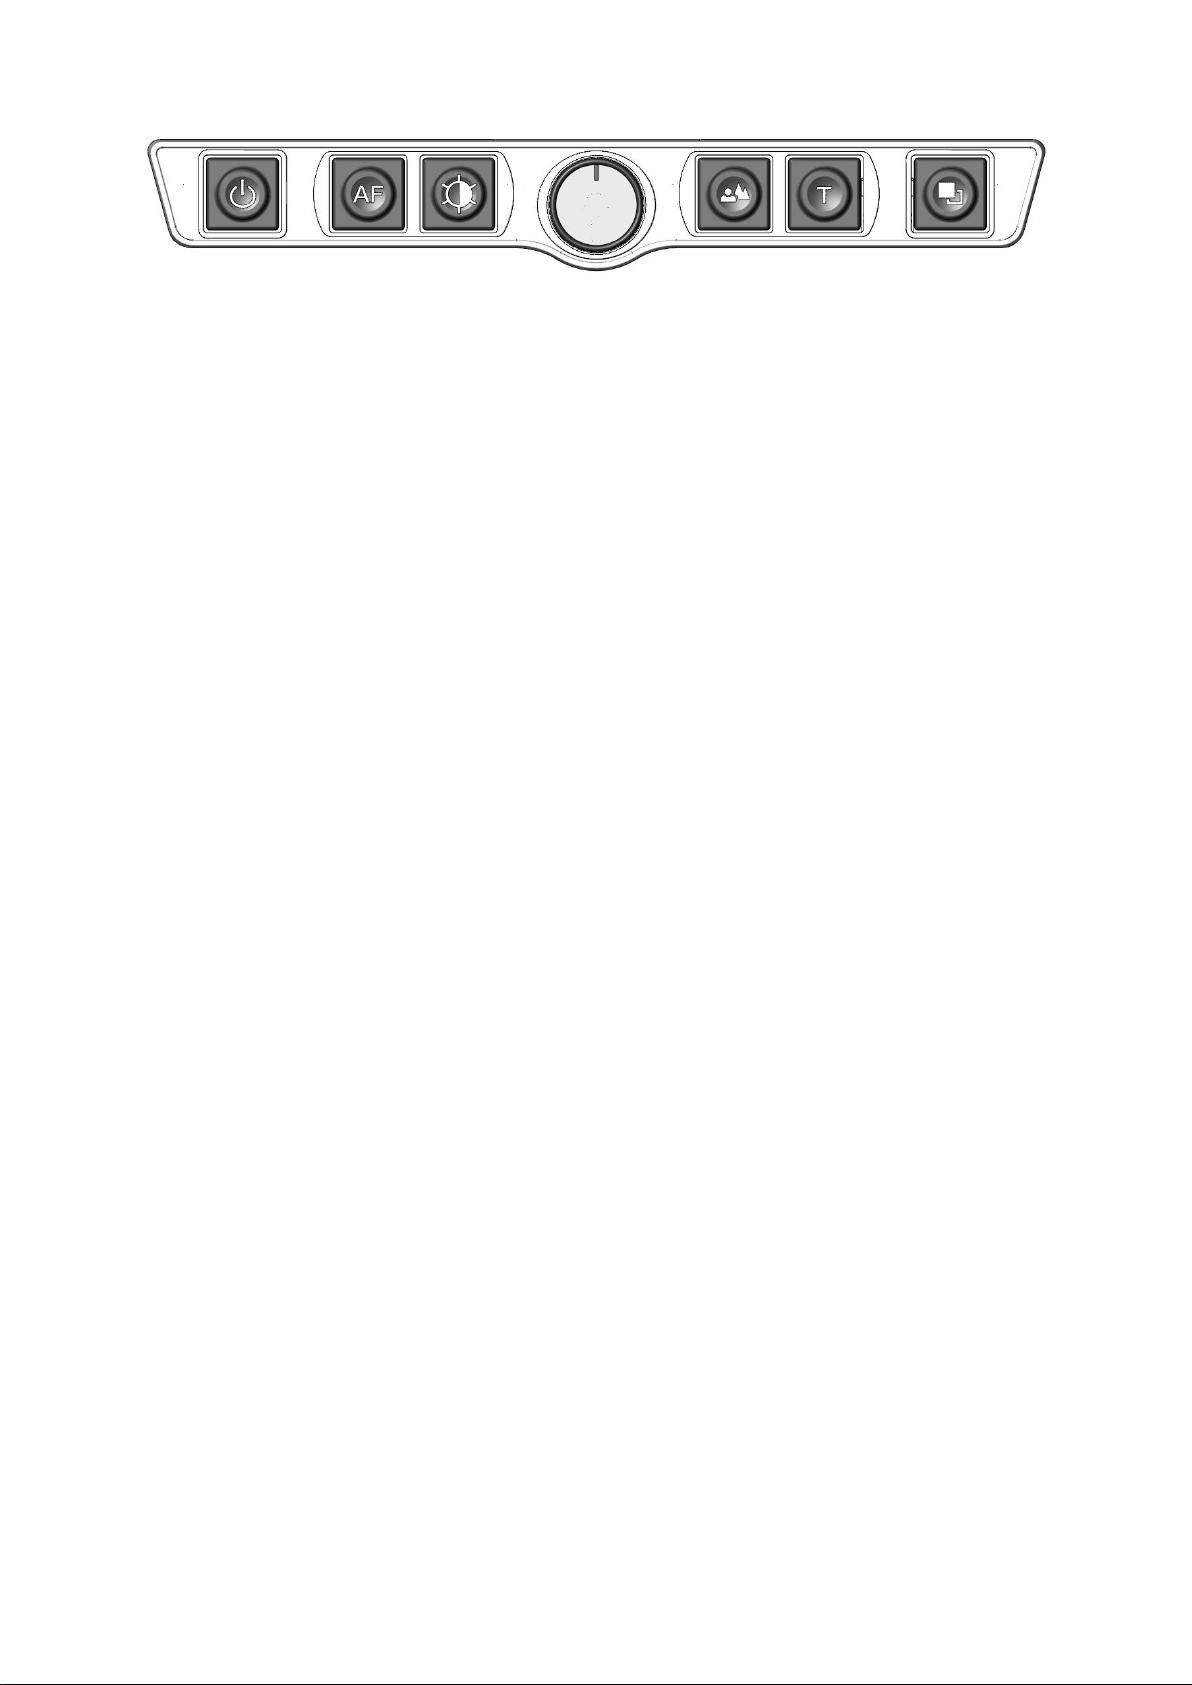
The VISIO 24 has a XY-table and a color camera, also has 6 control buttons and
offers an extremely wide range of functions such as an adjustable reading line.
VISIO 24 is one of the one of the smallest, lightweight and best designed devic-
es. It is characterized by its extraordinary design. VISIO 24 has all the properties
you would expect from an excellent screen-reading device.
In addition to full color display and autofocus, VISIO 24 has numerous false color
display options. Reversal of foreground and background color is of course also
available. There is also the option to switch off the auto focus, e.g. to fill out forms
or to make handwritten notes. Thanks to the image optimization function, VISIO
24 always offers optimal image quality.
VISIO 24 is able to display even documents of very poor quality, such as pale
print or crumpled, dirty paper, in a legible manner on the screen. Despite the high
technical effort, it can happen that in rare cases an original cannot be displayed
more legibly, e.g. with highly reflective reading material.

BEFORE SWITCHING ON FOR THE FIRST TIME 6
3 BEFORE SWITCHING ON FOR THE FIRST
TIME
Please read the safety instructions at the end of this manual and check that the
scope of delivery is correct.
3.1 Equipment / Items delivered:
1 VISIO 24 screen-reading device
1 AC-Adapter
1 power line cable
1 handbook
1 assembly guide

Setting up the VISIO 24 on the table 7
4 Setting up the VISIO 24 on the table
Place your VISIO 24 on your table in such a way that the front edge of the XY-
table, which has been fully extended to the front, is just flush with the edge of the
table. Even with maximum movement of the XY-table to the left or right, it must
not protrude over one of the table edges. This ensures that the device is in a safe
position.
Picture 1

Switching on for the very first time after assembly 8
5 Switching on for the very first time after
assembly
You can skip this chapter, as the following steps were usually carried out when
the device was delivered and are only mentioned here for the sake of complete-
ness.
Connect the power pack of your VISIO 24 to a live power socket and the plug on
the other side of the power pack into the camera unit. The power supply input
(see Figure 2) is on the right-hand side of the camera unit. The ready LED lights
up immediately after plugging in and lights up continuously.
Picture 2
Power IN
HDMI© output
Readiness LED
Power-OUT to display
Control-panel connector

Switching on for the very first time after assembly 9
Press the power switch on the far left of the control unit below the monitor for
about a second. As soon as the lighting switches on, you can release the switch.
The monitor also switches on immediately. (Note: The white control lamp on the
right at the lower edge of the monitor lights up continuously.)
If necessary, the power-on-switch of the monitor is directly under the control
lamp. You can place your finger on the lower right edge of the screen and move it
to the left until you feel the slight bump of the power button. After pressing this
button, the power-on control lamp lights up white. VISIO 24 from now automati-
cally switches on the monitor.
Picture 3
These steps only need to be done when switching on for the first time after deliv-
ery. Then it is sufficient to switch VISIO 24 on and off on its control unit.
Screen Power-LED
Lights up when switched on
No light when switched off
Screen Power Botton
Screen control buttons

The control panel of VISIO 24 10
6 The control panel of VISIO 24
Picture 4

Brief overview of the controls 11
7 Brief overview of the controls
Power button
Press for about 1 second (until lighting comes on) to
switch on the device.
Long press to turn off.
Autofocus
Switches between auto focus on and off.
An autofocus always has a sharp image.
Auto focus off when taking handwritten notes.
Image optimization
Switches between the 5 image optimization levels. Im-
proves the image quality with difficult originals.
Zoom / Enlargement & Reading Line / Reading Gap
Turning to the left reduces the magnification,
Turning to the right increases it.
Pressing it briefly shows the reading line.
Repeated short presses hide the reading line again.
A long press shows the reading gap.
Repeated long presses hide the reading gap again.
Picture
View pictures or documents in real color. Also recom-
mended for reading documents with poor print quality.
Text –inversion
Use text mode to read. The contrast is greatly increased
so that you can read more relaxed. Press the key again to
reverse the foreground color and background color.
False colors
In text mode: Press this button to choose between the 12
false color displays. (The text key reverses the foreground
and background)
In picture mode: white balance - neutral white, warm red
tone, cold bluewhite.

Get to know your new VISIO 24 12
8 Get to know your new VISIO 24
You have already learned how to set up VISIO 24 optimally on your table and
how to supply VISIO 24 with power.
You can tilt the screen slightly for more comfortable reading. Do not try to tilt the
screen too far by going past the stop.
VISIO 24 has a height adjustment of the screen!
Move the monitor up and down together with the control panel. You do not need
any tools for this.
Picture 5
Proceed as follows:
[Important: always keep one hand at the bottom of the monitor]
Tilt the monitor back slightly.
Turn the two fixing screws (see arrows in Figure 5) on the back of the monitor
half a turn to the left.
Grasp the top and bottom of the monitor and slide it to the desired height.
Tighten the two fixing screws again to the right.

Get to know your new VISIO 24 13
Now switch on VISIO 24 to use it.
The control unit is located directly in the middle under the screen. The on-
switch is on the far left. Press the power button for about a second to turn on the
device. As soon as the lights come on, you can let go of the switch. The monitor
may display the message like "out of range ..." until you see the enlarged original
on the screen after a few seconds.
To switch off VISIO 24, you have to press the on switch for longer than a second.
This prevents you from switching off the VISIO 24 by accidentally briefly touching
the switch. Practice turning it on and off a few times, then leave it on for the next
few steps.
Place a template on the XY-table. Take something colored, maybe a brochure or
magazine with text and colored pictures.
To align the template exactly horizontally, push it back against the silver rear
edge of the XY-table. If you now slide the XY-table from left to right, you will not
slip in the line, as the template aligns itself on the edge parallel to the guide direc-
tion. This little trick will make your reading a lot easier.
The XY-table has a brake for locking. You will find the brake lever on the front
edge of the XY-table. Move the lever all the way to the left to be able to move the
XY-table freely in all directions. With the lever in the middle position, you can
move the XY-table slightly to the right and left; the movement to the front and
back is blocked. In the rightmost position, the table is firmly locked in all direc-
tions.
Now align your template with the rear edge of the XY-table and move the brake
lever all the way to the left.
Attention: Avoid getting your fingers or clothing into the mechanics of the
XY-table below the reading plate to prevent them from being trapped. Keep your
hands above the plate or on the front edge. Do not reach under the side or rear
edges of the reading plate.
Now let's try the buttons on the control unit. You already know the on-switch on
the far left of the control unit.

Get to know your new VISIO 24 14
There is a round knob in the middle of the control unit. This is the zoom or mag-
nification slider that you use to adjust the magnification. Turning clockwise in-
creases the magnification, turning counterclockwise decreases it. Now turn the
zoom control counterclockwise as far as it will go to minimum magnification.
The minimum enlargement level is less for reading and more for providing an
overview of the original. This makes it easier for you to find the area that you
want to look at enlarged. Visio 24 always starts at the last zoom level set.
Now press the Image button. The Image button is located directly to the right of
the zoom slider. Pressing the image button switches on the real color display, i.e.
the VISIO 24 image mode. This setting is ideal for viewing photos, but it is also
useful for reading documents that are of poor print quality. You see all colors and
gray values in a natural representation.
Now move the XY-table so that you can see one of the images of the template. If
the image is too small, you can increase the magnification by rotating the zoom
lever clockwise. If you got “lost” on the template because you accidentally moved
the template, turn the zoom control counterclockwise to a smaller magnification,
look for the correct position in this overview and then enlarge the image again.
Now that you have learned a lot about your new VISIO 24, let's read a text.
Move the XY-table to a point on the template where you can find related text.
Now press the text button. The Text button is to the right of the Image button, i.e.
the second button to the right of the zoom controller. The original is now dis-
played with increased contrast and only two false colors. Press the Text button
again to swap the foreground color and background color. Press the Text button
a few times to familiarize yourself with the changes to the display and also toggle
between image display and text display. Do you know the difference? In text
mode, the font appears much clearer and richer in contrast, in picture mode you
can see all the colors and gray values.
Don't like the two colors in text mode? No problem!
You have the choice between 12 different false color combinations. With the in-
version, i.e. reversing the foreground and background color, you have a choice of
24 different representations. Select a different color combination by pressing the

Get to know your new VISIO 24 15
false color key. This is the rightmost button on the control unit. Each time you
press this button, the color combination changes. When you have done all 12
combinations, it starts again with the first one. To swap the foreground and back-
ground color, press the text key.
The following color combinations are available:
Black-White, Black-Yellow, Black-Green, Black-Magenta, Black-Cyan, Blue-
Yellow, Blue-White, Black-Ivory, Black-Soft_Yellow, Black-Soft_Peach, Black-
Soft_Pink, Blue-Ivory
Select your preferred color combination with the false color key and, if necessary,
press the text key to swap the foreground and background color. Take the time to
find the setting that works best for you.
In picture mode, the false color key has a different function. Here you can change
the white balance. Press this button to toggle between a neutral white (default
setting), a warm shade of red, which is good for viewing photos with skin tones,
or a cool blue and white, which is especially suitable for reading colored text.
Note: VISIO 24 remembers the setting of the false colors. So if you switch from
text mode to picture mode and then return to text mode, you will find the previ-
ously set color combination and inversion there.
Now that you have found your preferred color setting for reading in text mode, we
now want to turn to the more problematic templates. In most cases, VISIO 24 will
display your enlarged original with good contrast, thanks to its automatic expo-
sure. This is also easy with clean, black printing on pure white paper.
Sometimes it happens, however, that the template is not ideal and the automatic
system does not find the best setting. This can happen, for example, with colored
writing or a colored background, or with poor photocopies with pale letters on
gray paper. In these cases we use the image optimization button. It's the third
button from the left, just to the left of the zoom controller. With this button you can
regulate the automatic capture range in five stages.
So if you ever get a poorly legible picture from VISIO 24, simply press this button
until the picture is best represented.
This button is effective in picture mode and text mode.

Get to know your new VISIO 24 16
Note: Often you just know that the last setting was the best when you are already
one too far and the picture gets worse again. Since there are five different set-
tings that run up and down, you only need to press the button seven times in
succession to return to the previous setting.
Another help to find your way around a text is the reading line.
To activate the reading line, first set the desired magnification on the magnifica-
tion control.
Now press the center of the magnification control and release it shortly after-
wards. You will notice that a black horizontal line is now displayed over the pic-
ture on the screen.
You can now adjust this reading line with the magnification control clockwise up-
wards and counterclockwise downwards, the magnification does not change.
You can hide the reading line again by briefly pressing the magnification control
repeatedly.
Reading gap feature is used to hide the image area above and below a line to
be read and is activated by pressing and holding the zoom control. When you are
in picture mode and have set the desired magnification, press the magnification
control for about a second and release it than.
A reading gap is now shown in the middle of the screen. You can adjust the width
of this reading gap to your needs using the magnification control. To widen the
reading line, turn the magnification control to the right; to display it more narrowly,
turn the magnification control to the left.
The rest of the picture is black. You can hide the reading gap by pressing the
zoom control again for about a second.
Note: The reading line and reading gap can also be displayed in all false color
modes In addition, the reading line adapts to the false colors. For example, if
you set yellow font and black background, the reading line is automatically yel-
low. You can also display the colored reading line in real color mode by pressing
the image button. After restarting the Visio 24, the reading line color is always
black.
Now we will explain the function of the autofocus button. It may sound compli-
cated, but it is very easy!
After switching on, the autofocus, i.e. automatic focusing, is always switched on.
This means, no matter how thick the book you want to read, or how curved its
surface, VISIO 24 always shows the enlarged section in focus. This is why you
will usually work with this setting.

Get to know your new VISIO 24 17
Sometimes, however, you want to fill out a form or a crossword puzzle, you may
also want to paint your fingernails or take a closer look at a 3-dimensional object.
This is where the fixed focus comes into play.
The autofocus button is the second from the left on the control unit. If you press
this, you switch the autofocus between on and off.
Now let's try how it works. If you've messed around with this button, press the au-
tofocus button once and turn the zoom control a little to the right.
VISIO 24 enlarges the original and focuses it automatically.
If this is not the case, press the autofocus button repeatedly and the VISIO 24 will
focus the original.
Now place your hand on the template. VISIO 24 now enlarges your hand and you
can see that your skin is now in focus and the letters at the edge are blurred. The
same thing can happen when you want to fill out a form. Instead of making the
letters sharp, it is possible that your hand, which is holding the pen, is sharp and
the letters are blurred. If you take your hand away, the letters become sharp
again.
Now let's try the same thing with the autofocus off. To do this, place a form on the
XY-table. You can see that the letters are sharp, press the autofocus button
again to switch it off. If you now fill in the form with a pen, VISIO 24 will still keep
the letters in focus and will no longer focus your hand. When you're done, don't
forget to turn the autofocus back on with the autofocus button.
An additional feature of your Visio 24 is to switch itself off after 4 hours without
use. Should you accidentally not switch off your Visio 24, it will switch off itself af-
ter this time.
You did it! You are now familiar with all the setting options and functions of VISIO
24.
We hope you enjoy your new VISIO 24 CCTV device.

Troubleshooting 18
9 Troubleshooting
So now it happened. VISIO 24 does not work as expected and you are clueless if
it is broken. Very often, a small reason can cause a big problem, which can be
resolved easily. So please read the following checklist and try to find out what is
wrong. If this does not help, please switch VISIO 24 off, unplug the power cable
from mains and contact our service department.
Display and lights remain dark
Please try to switch VISIO on again. If this does not help, make sure power sup-
ply is connected to both the VISIO and wall outlet and that wall outlet is live. You
may want to connect another device to the wall outlet to check.
Are all plugs seated properly in their sockets?
Only display remains dark, lights are on
Is the light in the display’s lower right edge on? Is it red?
If not, switch VISIO 24 off and on again or press the sensor button in lower right
edge of display. Best you touch the edge and move your finger leftwards. Now
the light should be on and redd.
If not, please check if power cable in back of display is seated properly. At VISIO
24, the short power supply cable for the display comes out of the camera housing
behind the display.
Image is blurred
Check if protective plastic foil is still covering camera lens (remove this foil) or
whether this lens is dirty. If so, clean with a dry, soft cloth.
Turn zoom knob clockwise in middle position.
Document cannot be read
Turn zoom knob clockwise.
Try different setting of Image optimizer button.
XY-Table is not moving
Move lever to leftmost position.
Letters are fluttering
Increase zoom by turning zoom knob clockwise.
Try different settings of Image optimizer button.

Troubleshooting 19

Defects and Repair 20
10 Defects and Repair
If VISIO 24 is broken –what to do?
Did you check all settings and connections according to the manual?
Did you remove the protective plastic film from the camera lens?
Are you sure the mains outlet is live?
Do not use a broken device! Unplug broken device from mains! Please do not
hesitate to contact your local distributor or VisioBraille GmbH.
You can reach VisioBraille GmbH at telephone number +49 (0) 3641 2816-400 in
Germany. We will help you check your VISIO 24 and in case it is broken we can
mail a service box for shipping VISIO 24 to our repairs department. Show this
manual to the person who will help you packing VISIO 24 in the service box.
Contact:
VisioBraille GmbH
Ossmaritzer-Strasse 4c
D-07745 Jena
Germany
Phone: +49 (0) 3641 2816-400
Web: www.visiobraille.de
Email: info@visiobraille.de
Table of contents
Popular Machine Vision System manuals by other brands

Allied Vision Technologies
Allied Vision Technologies Vimba C API Programmer's manual

Baumer
Baumer LXC-20M user guide

Nivisys
Nivisys PVS-7B/D Quick reference guide

Advantech
Advantech AIIS-3411 Series user manual

Humanware
Humanware Victor Reader Classic 3.1 manual

Cognex
Cognex In-Sight 5000 Series Addendum sheet

illunis
illunis RMV-16000 Operation manual

Daheng Imaging
Daheng Imaging MERCURY2 USB3 user manual

JAI
JAI GO-5100MP-USB user manual

Ocular Robotics
Ocular Robotics RobotEye REV25-ST user manual

Ark Vision Systems
Ark Vision Systems ArkVisionUnit 7 product manual

CIS
CIS VCC-5CXP3R Product specification & operational manual