INSTRUCTION SHEET
Thank you for selecting OMRON product. This sheet
primarily describes precautions required in installing and
operating the product.
Before operating the product, read the sheet thoroughly
to acquire sufficient knowledge of the product. For your
convenience, keep the sheet at your disposal.
Model
FLV-CL□
© OMRON Corporation 2013 All Rights Reserved.
PRECAUTIONS ON SAFETY
●Meanings of Signal Words
●Alert Statements in This Sheet
This product is not designed or rated for ensuring safety of
persons either directly or indirectly. Do not use it for such
purposes.
Do not disassemble the product. Doing so may cause
electric shock due to the high voltage portion. Burn also
may result due to high temperature. Do not attempt to
disassemble, deform by pressure, incinerate, repair, or
modify this product.
Indicates a potentially hazardous situation which, if not
avoided, will result in minor or moderate injury, or may
result in serious injury or death. Additionally, there may
be significant property damage.
WARNING
Indicates a potentially hazardous situation which, if not
avoided, may result in minor or moderate injury or in
property damage.
CAUTION
WARNING
CoaxialLighting
The following notice applies only to products that carry the CE mark:
Notice:
This is a class A product. In residential areas it may cause radio
interference, in which case the user may be required to take adequate
measures to reduce interference.
Manufacturer:
Omron Corporation,
Shiokoji Horikawa, Shimogyo-ku,
Kyoto 600-8530 JAPAN
Ayabe Factory
3-2 Narutani, Nakayama-cho,
Ayabe-shi, Kyoto 623-0105 JAPAN
TRACEABILITY INFORMATION:
Representative in EU:
Omron Europe B.V.
Wegalaan 67-69
2132 JD Hoofddorp,
The Netherlands
2280615-1D
②
■Specifications
Item
ApplicableControllers
Lightingcolor(peakwavelength)
Lightsource
LEDSafety
Electricity
InsulationResistance
AmbientTemperature
AmbientHumidity
DegreeofProtection
VibrationResistance(destructive)
ShockResistance(destructive)
Materials
Weight
Accessories
Model
White
Red
Blue
FLV-CL30W
FLV-CL30R
FLV-CL30B
FLV-TCC4□/-TCC1□/-TCC3HB□,FLV-ATC□1024-□
W:White,R:Red(Typ.635nm),B:Blue(Typ.460nm)
LED
RiskGroup1(IEC62471)
2.4W
1.4W
2.4W
20MΩ(250VDC)
Operating:0to+50℃,Storage:−15to+60℃(withnoicingorcondensation)
Operatingandstorage:35%to85%(withnocondensation)
IP20(IEC60529)
10to150Hz,(0.7mmdoubleamplitude)80min.eachinX,Y,andZdirections
150m/s23timeseachin6directions(up/down,left/right,forward/backward)
Case:Aluminum
Approx.110g
Instructionsheet(thissheet)
FLV-CL40W
FLV-CL40R
FLV-CL40B
3.9W
2.3W
3.9W
Approx.170g
FLV-CL60W
FLV-CL60R
FLV-CL60B
10.4W
5.7W
10.4W
Approx.380g
FLV-CL80W
FLV-CL80R
FLV-CL80B
10.8W
7.2W
10.8W
Approx.580g
FLV-CL100W
FLV-CL100R
FLV-CL100B
22.7W
15.2W
22.7W
Approx.820g
Do not use it exceeding the rated voltage.
There is a possibility of failure and fire.
Do not connect amplifier units to AC power supply.
Risk of explosion.
Looking into the LED light continuously may cause visual
impairment. Do not look directly into the LED light.
CAUTION
Beware of danger of burns.
Do not touch the case while the Lighting is ON or immediately
after the power is turned OFF, since it is extremely hot.
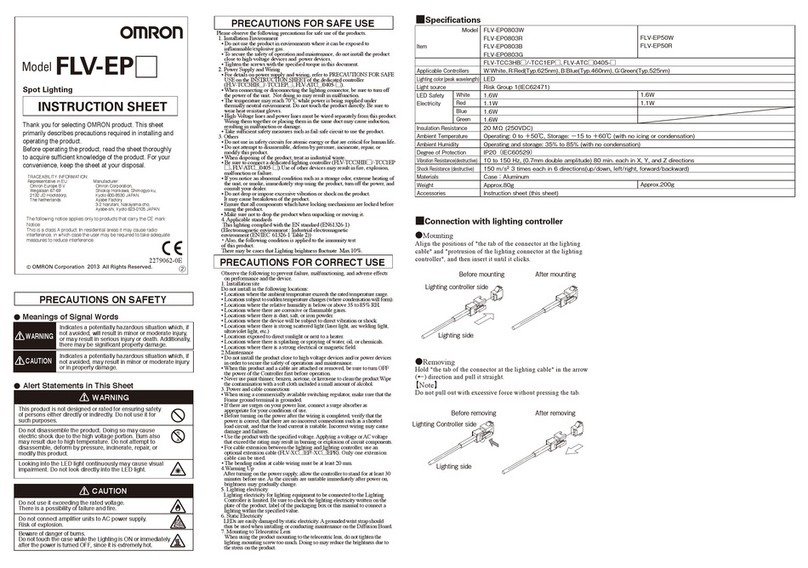
■Connection with Lighting Controller
・Mounting
Alignthepositionsof"thetaboftheconnectoratthe
lightingcable"and"protrusionofthelightingconnectorat
theLightingController",andtheninsertituntilitclicks.
・Removing
Hold"thetaboftheconnectoratthelightingcable"inthe
arrow(←)directionandpullitstraight.
[Note]
Donotpulloutwithexcessiveforcewithoutpressingthe
tab.Doingsomaybreakthewire.
Beforemounting
LightingControllerside
Lightingcontrollerside
Lightingside
Lightingside
Aftermounting
Beforeremoving Afterremoving
Please observe the following precautions for safe use of the products.
1. Installation Environment
•Do not use the product in environments where it can be exposed to
inflammable/explosive gas.
• To secure the safety of operation and maintenance, do not install the product
close to high-voltage devices and power devices.
• Tighten the screws with the specified torque in this document.
2. Power Supply and Wiring
• For details on power supply and wiring, refer to PRECAUTIONS FOR
SAFE USE on the INSTRUCTION SHEET of the dedicated controller
(FLV-TCC4□/-TCC1□/-TCC3HB□, FLV-ATC□1024-□).
• When connecting or disconnecting the lighting connector, be sure to turn off
the power of the unit. Not doing so may result in malfunction.
• The temperature may reach 70°C while power is being supplied under
thermally neutral environment. Do not touch the product directly. Be sure to
wear heat-resistant gloves.
• High-Voltage lines and power lines must be wired separately from this
product. Wiring them together or placing them in the same duct may cause
induction, resulting in malfunction or damage.
• Take sufficient safety measures such as fail-safe circuit to use the product.
3. Others
• Do not use in safety circuits for atomic energy or that are critical for human life.
• Do not attempt to disassemble, deform by pressure, incinerate, repair, or
modify this product.
• When disposing of the product, treat as industrial waste.
• Be sure to connect a dedicated lighting controller (FLV-TCC4□/-TCC1□
/-TCC3HB□, FLV-ATC□1024-□).Use of other devices may result in fire,
explosion, malfunction or failure.
• If you notice an abnormal condition such as a strange odor, extreme heating
of the unit, or smoke, immediately stop using the product, turn off the power,
and consult your dealer.
• Do not drop or impose excessive vibration or shock on the product. It may
cause breakdown of the product.
• Ensure that all components which have locking mechanisms are locked
before using the product.
• Make sure not to drop the product when unpacking or moving it.
4. Regulations and standards
This lighting complied with the EN standard (EN61326) with a EMC
directive (No.2004/108/EC).
PRECAUTIONS FOR SAFE USE
Observe the following to prevent failure, malfunctioning, and adverse effects
on performance and the device.
1. Installation site
Do not install in the following locations:
• Locations where the ambient temperature exceeds the rated temperature range.
• Locations subject to sudden temperature changes (where condensation will form).
• Locations where the relative humidity is below or above 35 to 85% RH.
• Locations where there are corrosive or flammable gases.
• Locations where there is dust, salt, or iron powder.
• Locations where the device will be subject to direct vibration or shock.
• Locations where there is strong scattered light (laser light, arc welding light,
ultraviolet light, etc.)
• Locations exposed to direct sunlight or next to a heater.
• Locations where there is splashing or spraying of water, oil, or chemicals.
• Locations where there is a strong electrical or magnetic field.
2. Maintenance
• Do not install the product close to high-voltage devices and/or power devices
in order to secure the safety of operations and maintenance.
• When this product and a cable are attached or removed, be sure to turn OFF
the power of the Controller first before operation.
•
Never use paint thinner, benzen, acetone, or kerosene to clean the product.Wipe
the contamination with a soft cloth included a small amount of alcohol.
3. Power and cable connections
• When using a commercially available switching regulator, make sure that the
Frame ground terminal is grounded.
• If there are surges on your power line, connect a surge absorber as
appropriate for your conditions of use.
• Before turning on the power after the wiring is completed, verify that the
power is correct, that there are no incorrect connections such as a shorted
load circuit, and that the load current is suitable. Incorrect wiring may cause
damage and failures.
• Use the product with the specified voltage. Applying a voltage or AC voltage
that exceed the rating may result in burning or explosion of circuit components.
• For cable extension between the lighting and lighting controller, use an optional
extension cable (FLV-XC□/-XC□R) or branch cable (FLV-XC□S2). Only
one extension cable and branch cable can be used.
• The bending radius at cable wiring must be at least 20 mm.
• In order to radiate a heat efficiently, set up the lighting with a space more than
the heat radiation space (specified in the outline drawing) between the
lighting and other devices.
4.Warming Up
After turning on the power supply, allow the controller to stand for at least 30
minutes before use. As the circuits are unstable immediately after power on,
brightness may gradually change.
5. Lighting electricity
Lighting electricity for lighting equipment to be connected to the Lighting
Controller is limited. Be sure to check the lighting electricity written on the
plate of the product, label of the packaging box or this manual to connect a
lighting within the specified value.
6. Static Electricity
LEDs are easily damaged by static electricity. A grounded wrist strap should thus
be used when installing or conducting maintenance on the Diffusion Board.
PRECAUTIONS FOR CORRECT USE
