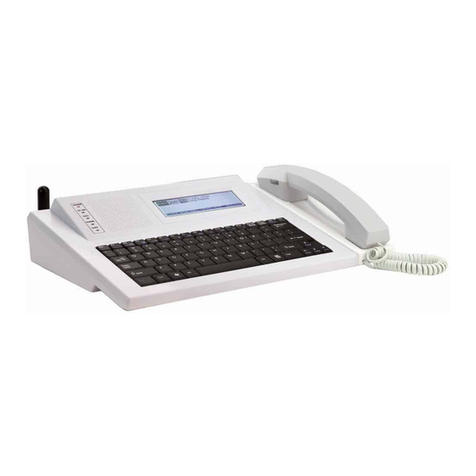
visiplex VS4810 Instruction manual

VS4810 Demo System – Quick User Guide – Version 1.14
VS4810 Demo System – Quick User Guide
System Setup
1. If your system is equipped with an external transmitter, connect the provided data cable between the DATA port on the external
transmitter and the DATA I/O port.
2. If your system is equipped with an external transmitter, connect the antenna to the RF-OUT port on the external transmitter.
Otherwise, connect the antenna to the RF-OUT port on the VS4810.
3. Turn on the VS4810 system. If your system is equipped with an external transmitter, turn it on.
Sending an Alert to Wireless Devices using the Keyboard or Keypad
1. Determine the type of wireless device to be activated and identify its number. The device number can be identified by the last 3
digits of its capcode (see label on back of each device).
2. Press 1from the Main Menu.
3. Enter a device number from the list below according to the type of device to be activated:
Pagers
a. Enter the device number of the individual pager (101-105) or enter 199 to access all pagers.
b. To retrieve a sample alphanumeric message, press F1. Otherwise, enter an alphanumeric message in the Message field.
c. Press the Enter key to send the message.
Note: These devices are assigned with capcodes 0800101-0800105, Group capcode 0800900.
Wireless Speaker for Live Voice Announcements
a. Enter the device number of the individual speaker (201-205) or enter 200 to access all speakers.
b. Follow the instructions on the LCD display and use the provided microphone to announce your message.
c. To end the transmission, press the Esc key.
Note: These devices are assigned with capcodes 0760201-0760205, Group capcode 0760904.
Wireless Speaker for Pre-Programmed Voice or Tone Announcements
a. Enter the device number of the individual speaker (301-305) or enter 300 to access all speakers.
b. To retrieve a sample tone activation command, press F5.
c. Press the Enter key to send the command.
d. For additional sample voice activation command, repeat the procedure with F6.
Note: These devices are assigned with capcodes 0760201-0760205, Group capcode 0760904.
Alphanumeric LED Display
a. Enter the device number of the individual display (401-405) or enter 400 to access all displays.
b. To retrieve a sample alphanumeric message, press F1.
c. Press the Enter key to send the message.
d. To clear the LED display, enter device number 499, press F2 followed by Enter.
Note: These devices are assigned with capcodes 0400401-0400405, Group capcode 0400904.
Intercom Stations
a. Enter the device number of the individual intercom station (501-505).
b. Follow the instruction on the VS4810 LCD display.
Strobe Lights
a. Enter the device number of the individual strobe light (601-605) or enter 600 to access all strobe lights.
b. To turn the strobe light ON, press F7 (sends “ST415999990*” command).
c. Press the Enter key to send the command.
d. To turn the strobe light OFF, press F8 followed by Enter (sends “ST0*” command).
Note: These devices are assigned with capcodes 0600601-0600605, Group capcode 0760904.
Dome & Corridor Lights
a. Enter the device number of the individual dome light (701-705) or enter 700 to access all dome lights.
b. To turn the dome light ON, press F9 (sends “VSA1*” command).
c. Press the Enter key to send the command.
d. To turn the dome light OFF, press F10 followed by Enter (sends “VSA0*” command).
Note: These devices are assigned with capcodes 0700701-0700705, Group capcode 0700904.
FM Radio Reception
a. Enter the device number of the individual speaker (301-305) or enter 300 to access all speakers.
b. To turn on FM reception, press F3. To turn off FM reception, press F4.
c. Press the Enter key to send the command.
Note: These devices are assigned with capcodes 0760201-0760205, Group capcode 0760904.

VS4810 Demo System – Quick User Guide – Version 1.14
Special Setup Devices
a. Auto PTT Option: 898 (Wireless Speaker)
b. Auto Phone Option: 899 (Wireless Speaker)
c. Master Clock Sync: 799 (Alphanumeric Pager)
Sending Text Message to Wireless Devices using the Telephone
1. Verify that an analog telephone line or extension is connected to the PHONE port of the VS4810 (Requires VS3003 Option).
2. Using another phone, dial the number of the telephone line or extension connected to the VS4810. The system will answer with a
Beep or “Please Enter Pager” voice prompt.
3. Enter a device number of pager/s (101-105 or 199), and alphanumeric display/s (401-405 or 400) and press the #key on the
telephone keypad. The system will respond with a Beep or “Please Enter Message” voice prompt.
4. Enter a numeric message using the telephone keypad or use one of the alphanumeric messages already pre-programmed in to
the VS4810 demo unit by entering *followed by the two digits representing the message from the following list:
01 - Sample Message
02 - Clear Alphanumeric Display
5. Press the #key on the telephone keypad to send the message. The system will respond with a Beep or “Page Sent” voice
prompt.
Note: Alphanumeric messaging is supported using the Alpha-By-Phone feature. See PABX Messages or Page by Phone on the
enclosed manual. Contact Visiplex tech support for more details.
Sending Live Voice Message to Wireless Speaker using the Telephone
1. Verify that an analog telephone line or extension is connected to the PHONE port of the VS4810 (Requires VS3003 Option).
2. Using another phone, dial the number of the telephone line or extension connected to the VS4810. The system will answer with a
Beep or “Please Enter Pager” voice prompt.
3. Enter a device number of Live Voice wireless speakers/s (201-205 or 200) and press the #key on the telephone keypad. Shortly
after, the system will respond by another Beep or “Please Speak Message” voice prompt.
4. Speak your message using the telephone handset and press the #key on the telephone keypad to send the call. The system will
respond with a “Page Sent” voice prompt.
Activating Pre-Programmed Voice or Tone Announcements on Wireless Speaker using the Telephone
1. Verify that an analog telephone line or extension is connected to the PHONE port of the VS4810 (Requires VS3003 Option).
2. Using another phone, dial the number of the telephone line or extension connected to the VS4810. The system will answer with a
Beep or “Please Enter Pager” voice prompt.
3. Enter a device number of Pre-Programmed Voice or Tone wireless speakers/s (301-305 or 300) and press the #key on the
telephone keypad to activate the announcement. The system will respond with a Beep or “Please Enter Message” voice prompt.
4. To use one of the activation commands already pre-programmed in to the VS4810 demo unit, enter *followed by the two digits
representing the command from the following list:
05 - GM023212 (Activate tone 2 stored in the VNS22xx, VNS24xx, VNS26xx memory)
06 - GM053212 (Activate tone 5 stored in the VNS22xx, VNS24xx, VNS26xx memory)
If you wish to customize the wireless command, enter an activation command using the **8ttlvdr format as shown below:
t is the Alert Type (two digits number from 01 to the number of alerts supported by the receiver)
l is the Length (digit between 0 and 9)
v is the Volume (digit between 1 and 4)
d is the Delay (optional, digit between 0 and 9)
r is the Repeat (optional, digit between 0 and 9)
For example, to send tone 2 with length 5, volume 2, 3 repeats and a delay of 4 seconds between each repeat, enter
**8025243.
Note: The ttlvdr format is also used to activate pre-recorded messages using the GM command (01, 02, 07, 08 are alert tones,
03 to 06 are voice announcements).
5. Press the #key on the telephone keypad to send the activation command. The system will respond with a “Page Sent” voice
prompt.
Other manuals for VS4810
1
Table of contents
Other visiplex Accessories manuals
Popular Accessories manuals by other brands

Caldwell
Caldwell 795234 Usage and Assembly Instructions
Linea 2000
Linea 2000 Domo DO604ED Instruction booklet
Meade
Meade Equatorial Wedge installation instructions
Alpha
Alpha Alpha Top Easy-Flue 500 mm installation instructions

Thermo Scientific
Thermo Scientific Heracell 150i operating instructions
B&C Speakers
B&C Speakers Hf Compression Drivers DE 25 Specification sheet
