Vissani VXK320BSSE User manual
THANK YOU
We appreciate the trust and con dence you have placed in Vissani through the purchase of this kegerator. We strive to continually create
quality products designed to enhance your home. Visit us online to see our full line of products available for your home improvement needs.
Thank you for choosing Vissani!
Item # 1009025767
Model # VXK320BSSE
USE AND CARE GUIDE
18 IN. 1/6 BARREL BEER KEG DISPENSER WITH
Questions, problems, missing parts? Before returning to the store,
call Vissani Customer Service
8 a.m. – 7 p.m., EST, Monday-Friday, 9 a.m. – 6 p.m., EST, Saturday
1-855-847-7264
HOMEDEPOT.COM
ELECTRONIC CONTROL IN STAINLESS STEEL
2
Table of Contents
Table of Contents..........................................................2
Safety Information.........................................................2-3
Warranty.............................................................................4
What is covered...................................................................... 4
Pre-operation.....................................
4
...................................... 5
Before you begin............................... ......................................... 5
What is not covered................................................................. Operation..........................
..................................................... .10
Installation...................................
.............................................7-9
Maintenance...........................................................................11
Care and Cleaning................................................................11
Troubleshooting ....................................................................12
Safety Information
□This appliance is not intended for use by persons
(including children) whose physical, sensory or
mental capabilities may be different or reduced, or
who lack experience or knowledge, unless such
persons receive supervision or training to operate
the appliance by a person responsible for their safety.
□This appliance is intended to be used in household and
similar applications such as:
□Staff kitchen areas in shops, of ces and other
working environments;
□Farmhouses and by clients in hotels, motels and
other residential type environments;
□Bed and breakfast type environments;
□Catering and similar non-retail applications.
□This appliance must be grounded. Grounding
reduces the risk of electrical shock by providing an
escape wire for the electrical current. This appliance
has a cord that has a grounding wire with a 3-prong
plug. The power cord must be plugged into an
outlet that is properly grounded. If the outlet is a 2-
prong wall outlet, it must be replaced with a
properly grounded 3-prong wall outlet. The serial
rating plate indicates the voltage and frequency the
appliance is designed for.
DANGER:
□Risk of re or explosion. Flammable
refrigerant used. Do not puncture
refrigerant tubing.
□Do not use mechanicaldevices to defrost
refrigerator.
□Ensure that servicing is done by factory
authorized service personnel, to minimize
product damage or safety issues.
□If the power supply cord is damaged, it
must be replaced by the manufacturer, its
service agent or similar quali ed person in
order to avoid hazard.
□Consult repair manual or owner’s guide
before attempting to service this product.
All safety precautions must be followed.
□Dispose of properly in accordance with
federal or local regulations.
□Follow handling instructions carefully.
□Do not store explosive substances such
as aerosol cans with a ammable
propellant in this appliance.
□Risk of child entrapment. Before throwing
away an old appliance:
□Remove the door or lid.
□Leave shelves in place so that children
may not easily climb inside.
□Do not add a lock to the door or lid. This
can cause child entrapment and harm.
5
Package contents....................................................................
6
WARNING:
□Keep ventilation openings, in the
appliance enclosure or in the built-in
structure, clear of obstruction.
□Do not use mechanicaldevices or other
means to accelerate the defrosting
process, other than those recommended
by the manufacturer.
□Do not damage the refrigerant circuit.
□Do not use electrical appliances inside the
food storage compartments of the
appliance, unless they are of the type
recommended by the manufacturer.
□Improper use of the grounding plug can
result in a risk of electric shock. Consult a
quali ed electrician or service agent if the
grounding instructions are not completely
understood, or if doubt exists as to
whether the appliance is properly
grounded.
CAUTION: Children should be supervised to ensure
that they do not play with the appliance.
NOTE: Do not connect your appliance to
extension cords or together with another
appliance in the same wall outlet. Do not splice
the power cord. Do not under any
circumstances cut or remove the third ground
prong from the power cord. Do not use
extension cords or ungrounded (two prongs)
adapters.
Setting up the appliance.........................................................
.5
Tools Required........................................................................

WARNING: CO2 can be dangerous!
CO2 cylinders, when charged, contain high-
pressure compressed gas which can be
hazardous if not handled properly. Read and
understand the following procedures for CO2
cylinders before installation.
□Always check the D.O.T. (Department of Transportation)
as well as the T.C. (Transport Canada) test date located
on the neck of the cylinder before installation. If the date
is older than five (5) years, do not use! Return the gas
cylinder to a gas supplier for recertication (service
charges may be applicable).
□Always connect a CO2 gas cylinder to a regulator. Failure
to do so could result in an explosion which can possibly
result in death or injury when the cylinder valve is opened.
□Always follow correct procedures when cylinders are
changed as per local codes.
□Always secure a CO2 gas cylinder in an “upright” position.
□Always keep a CO2 gas cylinder away from heat. Store
extra cylinders in a cool place (preferably 70°F/21°C).
Securely fasten with a chain in an upright position when
storing.
□Always ventilate and leave the area immediately after any
leakage of CO2.
□Never connect a CO2 gas cylinder directly to a beer keg.
□Never drop or throw a CO2 cylinder.
□
release. There are two safety mechanisms in the pressure
system:
One at or on the CO2 regulator.
One at or on the product container coupler in the
pressure gas line.
□
□
Never connect a keg without at least one safety pressure
Beer is easily available with this kegerator;
however, it is not intended to be available to people
under the legal age to consume beer. Vissani
does not assume liability for the unlawful use or
consumption of the beer.
PLEASE DRINK RESPONSIBLY AND PLEASE DON’T
DRINK AND DRIVE!
WARNING: CO2 gas can be dangerous.
CO2 cylinders contain high-pressure
compressed gas which can be hazardous
if not handled properly. Make sure to read
and understand all safety procedures for
CO2 cylinders before installation.
Safety Information (continued)
WARNING: If it becomes difcult to breathe
and/or your head starts to ache, abnormal
concentrations of carbon dioxide (CO2)
may be present in the area. Close the main
valve on the CO2 cylinder, ventilate and
leave the room immediately!
□
□
NOTE: The regulator and keg coupler supplied
3 HOMEDEPOT.COM
Please contact 1-855-847-7264 for further assistance.
with this appliance are inclusive of such
safety mechanisms.

4
Warranty
WHAT IS COVERED
This quality product is warranted to be free from manufacturer’s defects in material and workmanship, provided that the
unit is used under the normal operating conditions intended by the manufacturer.This warranty is available only to the
person to whom the unit was originally sold by The Home Depot and is non-transferable.
□Plastic parts are warranted for thirty (30) days from the date of purchase, with no extensions provided.
□During the rst twelve (12) months, any functional parts of this product found to be defective, will be repaired or
replaced, at warrantor’s option, at no charge to the original purchaser.
□To obtain service, contact The Home Depot where the unit was purchased. If service is performed on the unit by
anyone other than an authorized service depot, all obligations of The Home Depot under this warranty shall be void.
□It is the responsibility of the purchaser to transport the appliance to the nearest authorized service depot.
□Transportation charges to and from the service location are not protected by this warranty and are the responsibility
of the purchaser.
□Nothing within this warranty shall imply that The Home Depot will be responsible or liable for any spoilage or damage
to food or other contents of this appliance, where due to any defect of the appliance, or its use, whether proper or
improper.
WHAT IS NOT COVERED
No warranty or insurance herein contained or set out shall apply when damage or repair is caused by any of the
following:
1) Power failure.
2) Damage in transit or when moving the appliance.
3) Improper power supply such as low voltage, defective house wiring or inadequate fuses.
4) Accident, alteration, abuse or misuse of the appliance such as inadequate air circulation in the room or abnormal
operating conditions (ie. extremely high or low room temperature).
5) Use for commercial or industrial purposes (ie. If the appliance is not installed in a domestic residence).
6) Fire, water damage, theft, war, riot, hostility, acts of God such as hurricanes, oods etc.
7) Service calls resulting in customer education.
8) Improper installation (ie. building-in of a free standing appliance or using an appliance outdoors that is not approved
for outdoor application, including but not limited to: garages, patios, porches or anywhere that is not properly insulated
or climate controlled).
Proof of purchase date will be required for warranty claims; retain bills of sale. In the event that warranty service is
required, present the proof of purchase to our authorized service depot.
Contactthe Customer Service Team at 1-855-847-72641- or visit www.homedepot.com.
WARNING: Use two more people to move
and install the kegerator. Failure to do so
can result in back or other injury. Carefully
remove the packaging materials. Remove
any shipping tape and glue from your
kegerator before using. Do not use sharp
instruments, rubbing alcohol, ammable
uids, or abrasive cleaners to remove tape
or glue. These products can damage the
surface of your kegerator.
5
Pre-operation
SETTING UP THE APPLIANCE
□
The kegerator should be installed in accordance with local
electrical code requirements. The kegerator should also
be placed in a location that is strong enough to support its
total weight, keeping in mind that it will weigh substantially
more when fully loaded than when empty. Before you plug
the kegerator into a power supply, be sure to let it stand
upright for at least 24 hours to allow the compressor’s oils
to settle.
Finding a suitable location.
To ensure the kegerator will last, install it in a location where
there is proper air circulation and electrical connections.
Keep the refrigerator away from heat and direct sunlight.
This refrigerator is designed for indoor use only and should
not be used outdoors. It should not be placed in a built-in
or recessed area as it is designed to be a freestanding
kegerator.
The following dimensions are the recommended
clearances around the beer dispenser.
Sides: 2 to 3 in. (76 mm)
Back: 4 to 5 in. (127 mm)
Providing a proper power supply.
Before you move your kegerator into its nal location, it is
important to make sure you have the proper electrical
connection:
A standard electrical supply (115 V, 60Hz), properly
grounded in accordance with the National Electrical
Code and local codes and ordinances, is required.
It is recommended that a separate circuit, serving only
your kegerator, be provided. Use receptacles that
cannot be turned off by a switch or pull chain. The fuse
(or circuit breaker) size should be 15 Amps.
□
□
Before using your kegerator.
IMPORTANT: Do not remove any safety,
warning, or product information
labels from your kegerator.
BEFORE YOU BEGIN
IMPORTANT: If the appliance is
placed on its
back or side for any length of time during this
process, it must be allowed to remain upright
for 24 hours before plugging it in to avoid
damage to the internal components.
Read instructions carefully before operating.
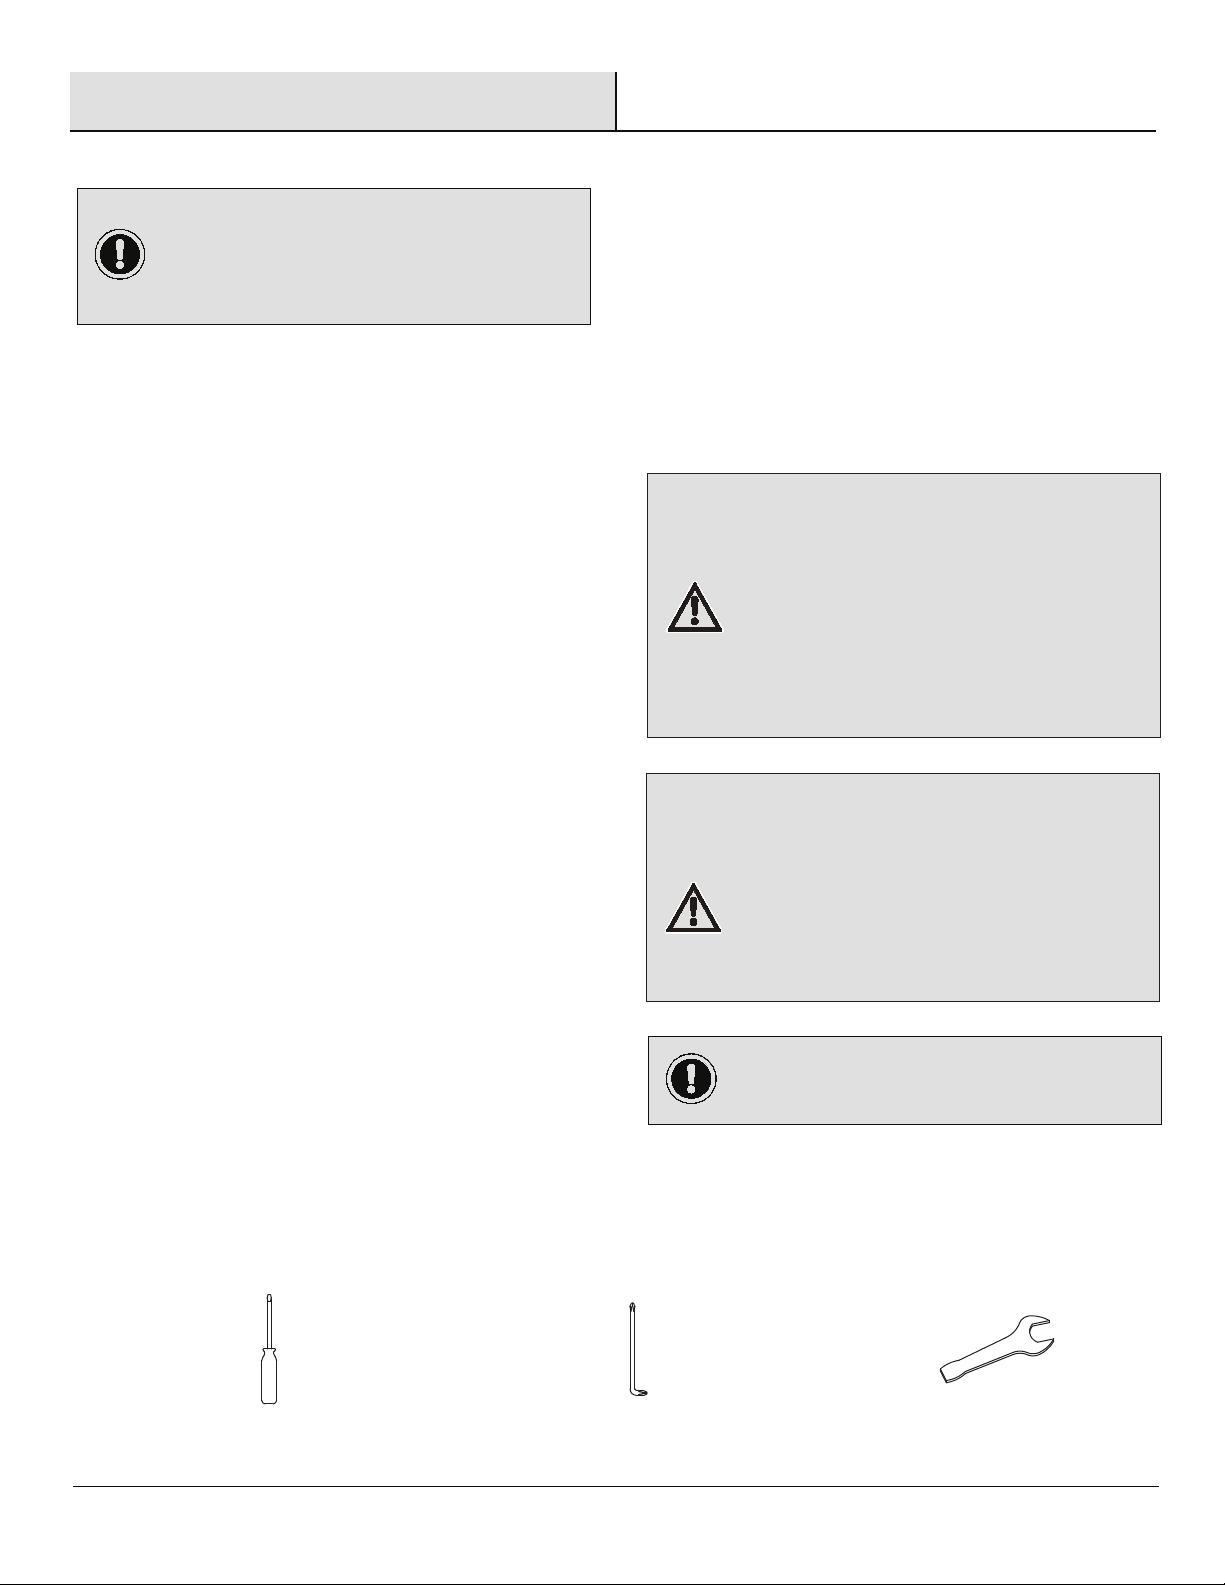
Flat head screwdriver Phillips head screwdriver Wrench
□
□
□
WARNING:
Plug into a grounded 3-prong outlet.
Never remove the grounding prong from
the plug.
Never use an adapter to bypass the
grounding prong.
DO NOT use an extension cord.
Failure to follow these instructions can
result in re, electrical shock, or death.
□
□
□
□
□
TOOLS REQUIRED
HOMEDEPOT.COM
Please contact 1-855-847-7264 for further assistance.

6
Pre-operation (continued)
PACKAGE CONTENTS
Part noitpircseD
A Evaporator
B Compressor
C Door
Flat shelf (2)
Flat shelf
Fan
D
E
F
Wine tray
G
H
Cabinet
Power plug
ILED light
Display panel
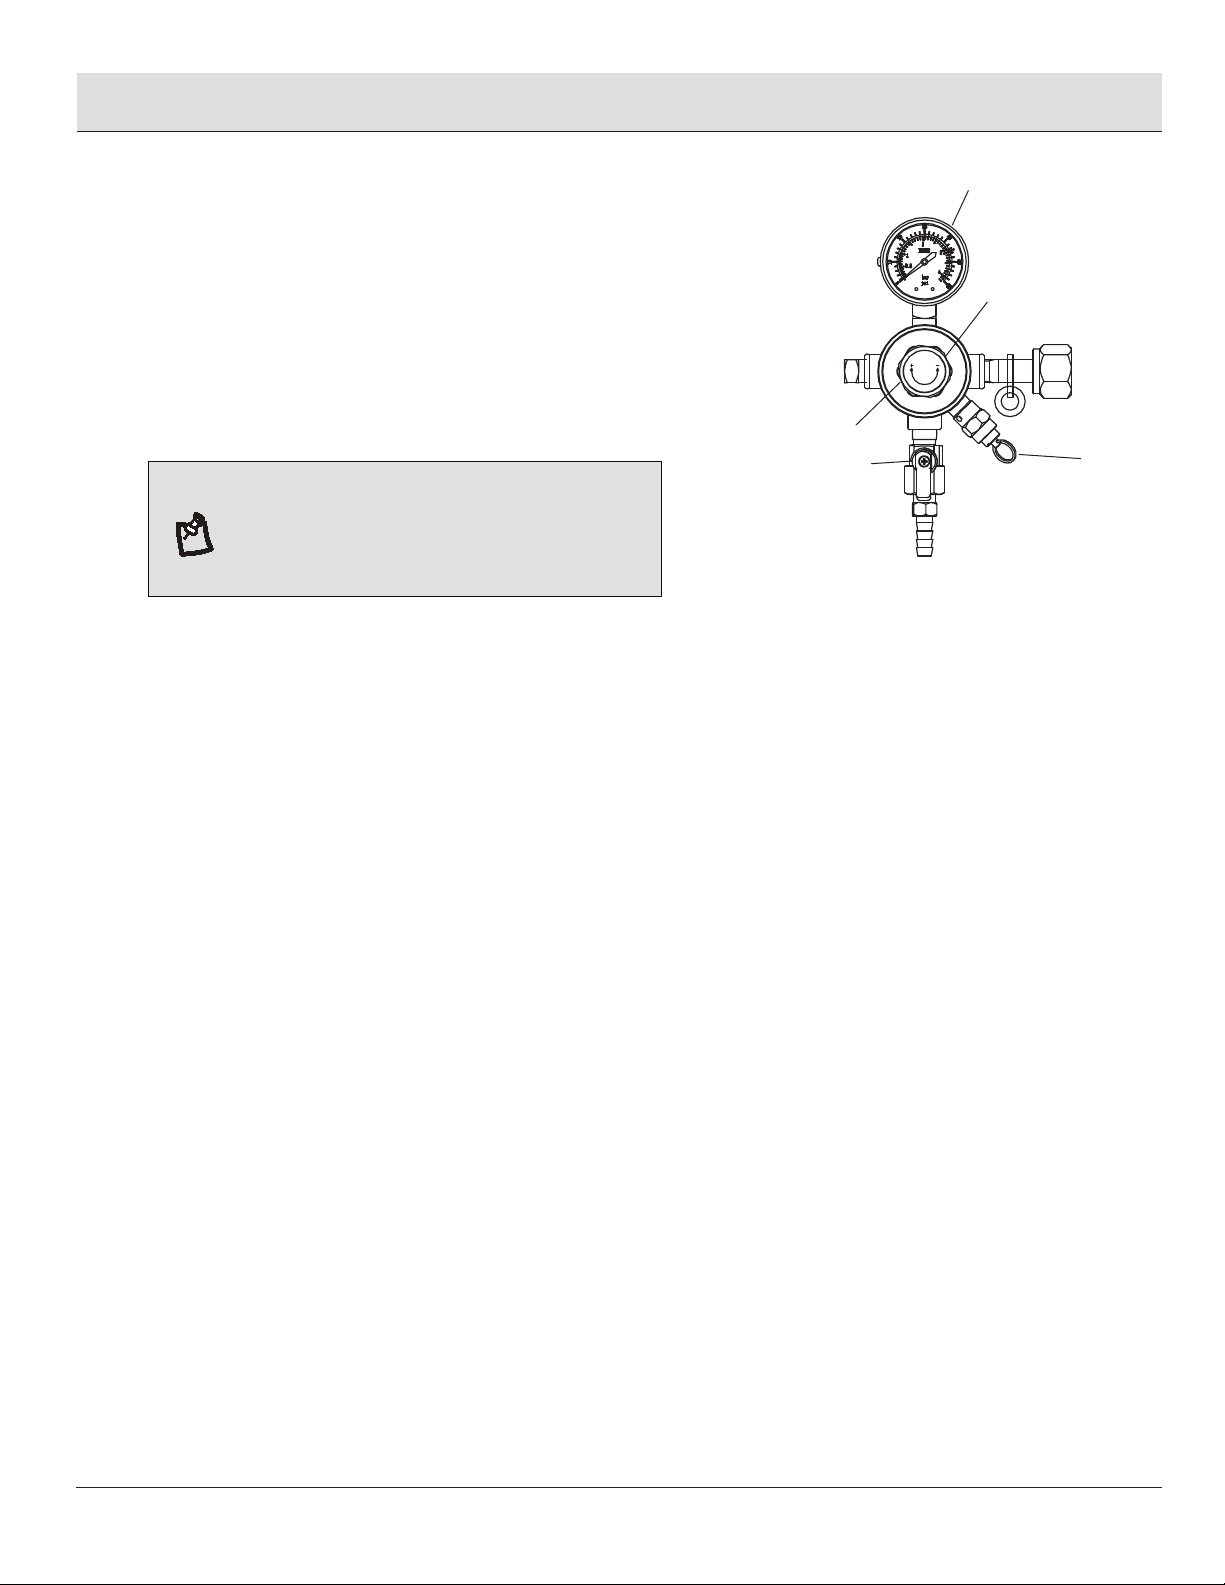
Regulator
K
L
M
ND-type coupler
OBeer tower
CO2 gas line
J
PBeer line
QTower plug
Part noitpircseD
Q
G
N
M
L
K
A
B
J
I
H
D
E
FO
P
C
IMPORTANT: Kegerator should be level before
installation.
1
Q
G
2
O
3
4
5
9
7
10
P
G
ML
Installation
7
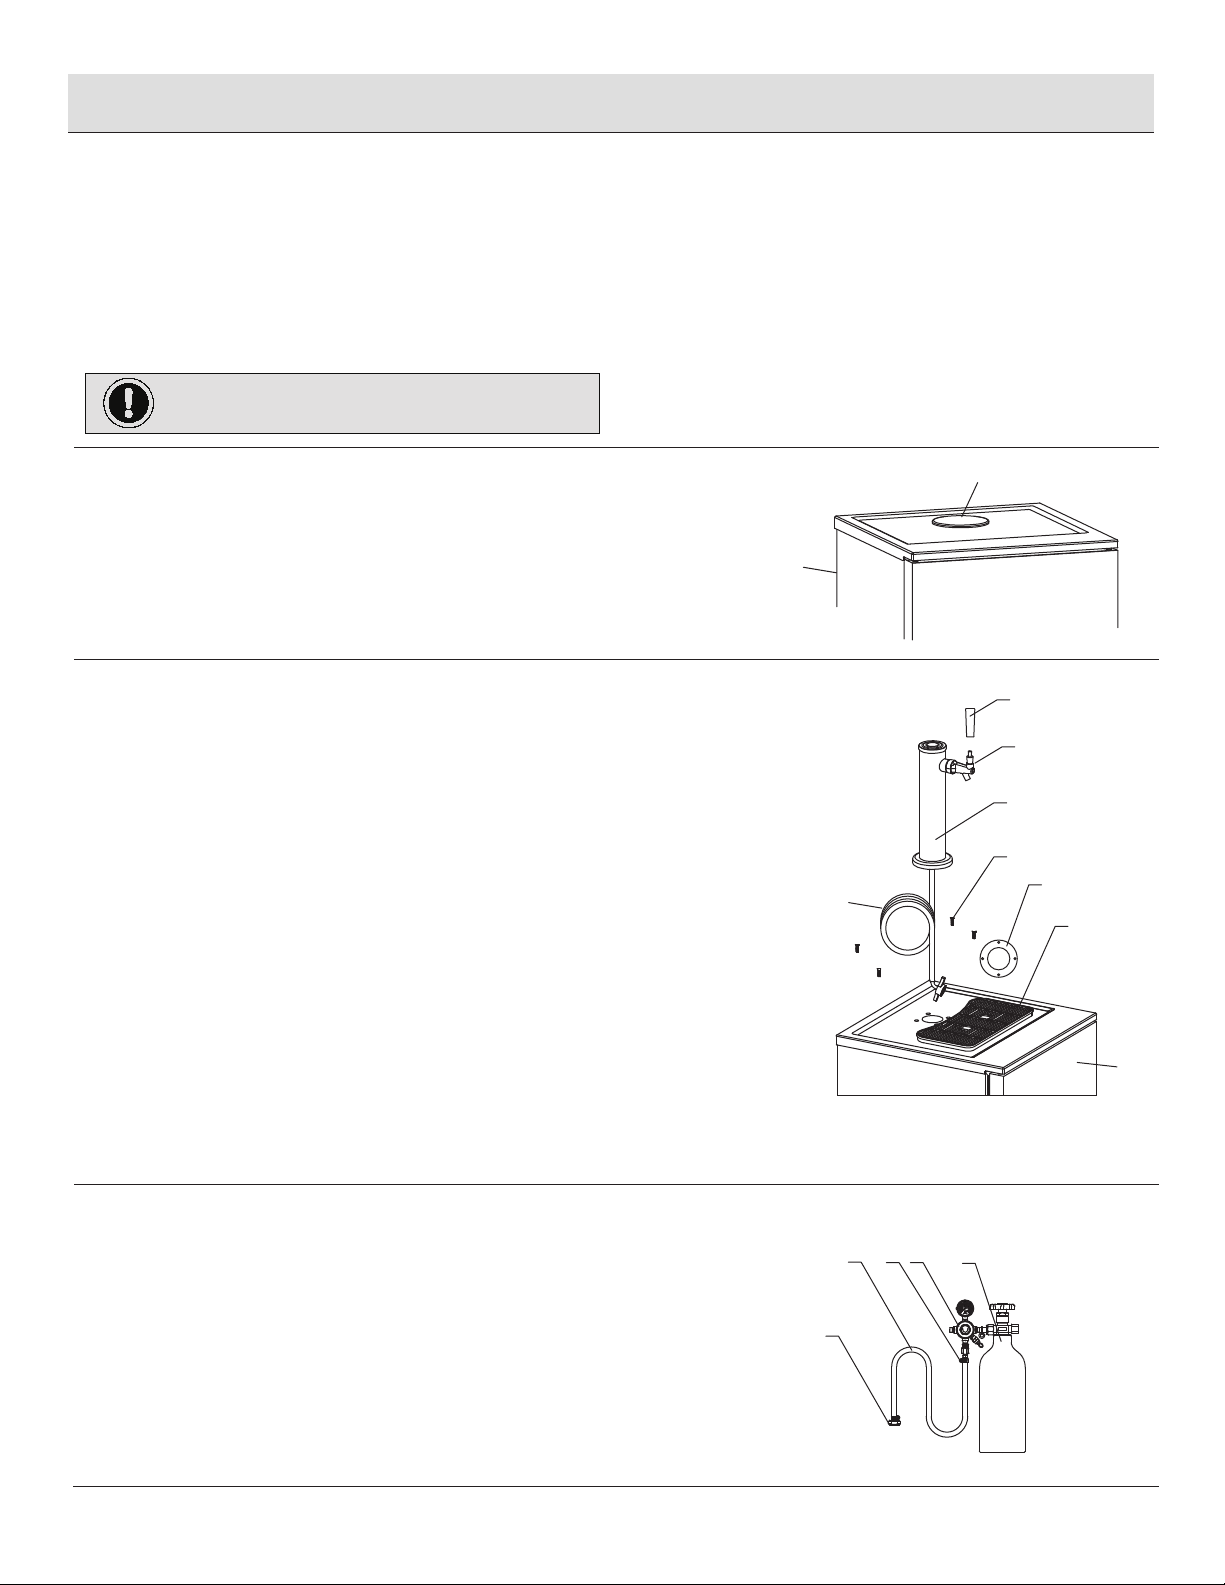
1
Leveling the Kegerator
2 Removing the Plug
□It is important for the kegerator to be leveled for optimum efciency.
It can be raised or lowered by rotating the plastic sheaths around each of the feet on the bottom of the machine.
If you nd that the surface is not level, rotate the feet until the kegerator becomes level. You may need to make
several adjustments to level it.
If available, place a carpenter’s level on top of the product to see if the kegerator is level from front to back and
side to side.
To adjust the height of the kegerator, simply turn the feet (right = lower / left = raise).
□
Carefully remove the tower plug (Q) located on the
top of the unit by opening the cabinet (G), and with your hand.
Push the tower plug (Q) through the top of the cabinet (G) from
the inside.
Use a at head screwdriver as a prying tool if necessary.
3 Mounting the Tower
□
□
□
Place the black rubber tower gasket (4) at on the
top of the cabinet (G) and line up the pre-drilled holes.
Unbox the beer tower (O) and unravel the beer line hose (P)
from the bottom. Feed the clear beer line (P) through the
large opening at the top of the cabinet (G).
Place the beer tower (O) on top of the unit and align the screw
holes at the bottom of the beer tower (O) to the pre-drilled holes
located on the top of the cabinet (G). Secure the tower (O) by
attaching the four tower screws (3) with a phillips head
screwdriver to the top of the cabinet (G).
The faucet connection for the tower (O) should now face the front
of the cabinet (G).
If the faucet (2) is not facing the front of the cabinet (G), remove it and
reinstall it to the proper position.
Screw the black faucet handle (1) onto the faucet (2).
□
4 Feed a hose clamp (10) over the end of the CO2 gas line (M).
Attach that end to the gas line connector (7) on the CO2 regulator (L).
Tighten the clamp to prevent leaks. Leave about ½ inch between
the top of the clamp and the end of the hose.
Attach the CO2 regulator (L) to the CO2 tank (9) by screwing the
regulator nut onto the CO2 tank (9) valve and tightening with an
adjustable wrench.
Installing the CO2 Regulator and Tank
□
□
□
□
□
□
□
□
□
□
□
□
HOMEDEPOT.COM
Please contact 1-855-847-7264 for further assistance.

N
13
12
15
14
P
M
O
11
8
5
Remove the rubber protective cap(14) located on the side
of the D-type coupler (N).
Secure the hex nut at the end of the CO2 gas line (M) to the
side of the D-type coupler (N).Use a wrench to tighten hex
nut to the coupler.
Do not remove or discard the gray check valve located
on the side of the coupler. This part prevents liquid from
going into the regulator and also provides a seal between
the air line and coupler.
Remove the rubber cap (13) from the top of the D-type
coupler (N). Place the neoprene washer (12) located under
the rubber cap to the top of the coupler (N).
Take the hex nut from the end of the beer line (P) and screw
it onto the top of the keg coupler (N) so that the neoprene
washer is between it.
To connect the D-type coupler (N) to the keg (11), rst
make sure the black pull handle of the D-type coupler (N) is in
the up position (45° angle). Insert the D-type coupler (N) into
the valve on top of the keg and turn clockwise until it
stops about 90° to lock the coupler into place.
Pull the tap handle out (away from the D-type coupler (N)
and push down until it locks into position. Listen for the
“click” of the pull handle when it shifts into the nal
downward position. The keg is now tapped.
Suitable CO2 tank size (lb): 2.5 or 5
□
□
□
6 Place the CO2 tank inside the kegerator for a cleaner look.
Attach the tank through the retainer and secure it with the
provided bolt and nut.
Position the tank so you can read the gauge and have easy
access to the shut-off valve.
Attaching the CO2 Tank
Barrel Liters Gallons Ounces 12 oz. Glasses
1/6 20 5.2 661 55
Installation (continued)
Installing the Keg Coupler
□
□
□
□
□
□
□
□
18
19
20
16
17
9
Make sure that the shut-off valve (17) is closed (sideways =
closed, down = open), then slowly turn the main valve
on the CO2 tank counterclockwise until it is fully open.
Release the adjustment lock nut (18), behind the regulator
adjustment knob (19), by turning it counterclockwise about
5-7 turns.
Turn the regulator adjustment knob (19) clockwise to increase
pressure. The needle on the gauge (20) starts to climb. Set the
gauge to 10-12 PSI.
Open the shut-off valve (17) to allow gas to ow into the keg.
When the tank is at the correct pressure, tighten the
adjustment lock nut (18) by turning it clockwise.
Allow several minutes for the keg to pressurize.
The gauge (20) may show a drop in pressure while this
happens. Adjust as needed.
Plug the kegerator/beverage cooler into a 120V, 60Hz,
15 Amp grounded outlet.
□
□
□
□
□
□
□
Adjusting the CO2 Regulator
Installation (continued)
NOTE: When adjusting pressure from a high
pressure to a lower pressure, you will need
to release the higher pressure by pulling the
manual pressure release valve ring (16)
located on the bottom right of the regulator.
7
HOMEDEPOT.COM
Please contact 1-855-847-7264 for further assistance.
NOTE: Whether your kegerator can reach a cooler
temperature depends on the ambient
environmental conditions.
CAUTION: If you powered off the unit, please
wait at least 5 minutes before powering it
back on.
IMPORTANT: Do not touch the power plug
when your hands are wet. Never unplug the
unit by pulling on the power cord.
CAUTION: Store the unit out of the reach of
children. If you have children, you may want to
take additional precautions such as removing the
door to prevent a child from being trapped inside
the unit!
10
2
13
+
-
Operation
1
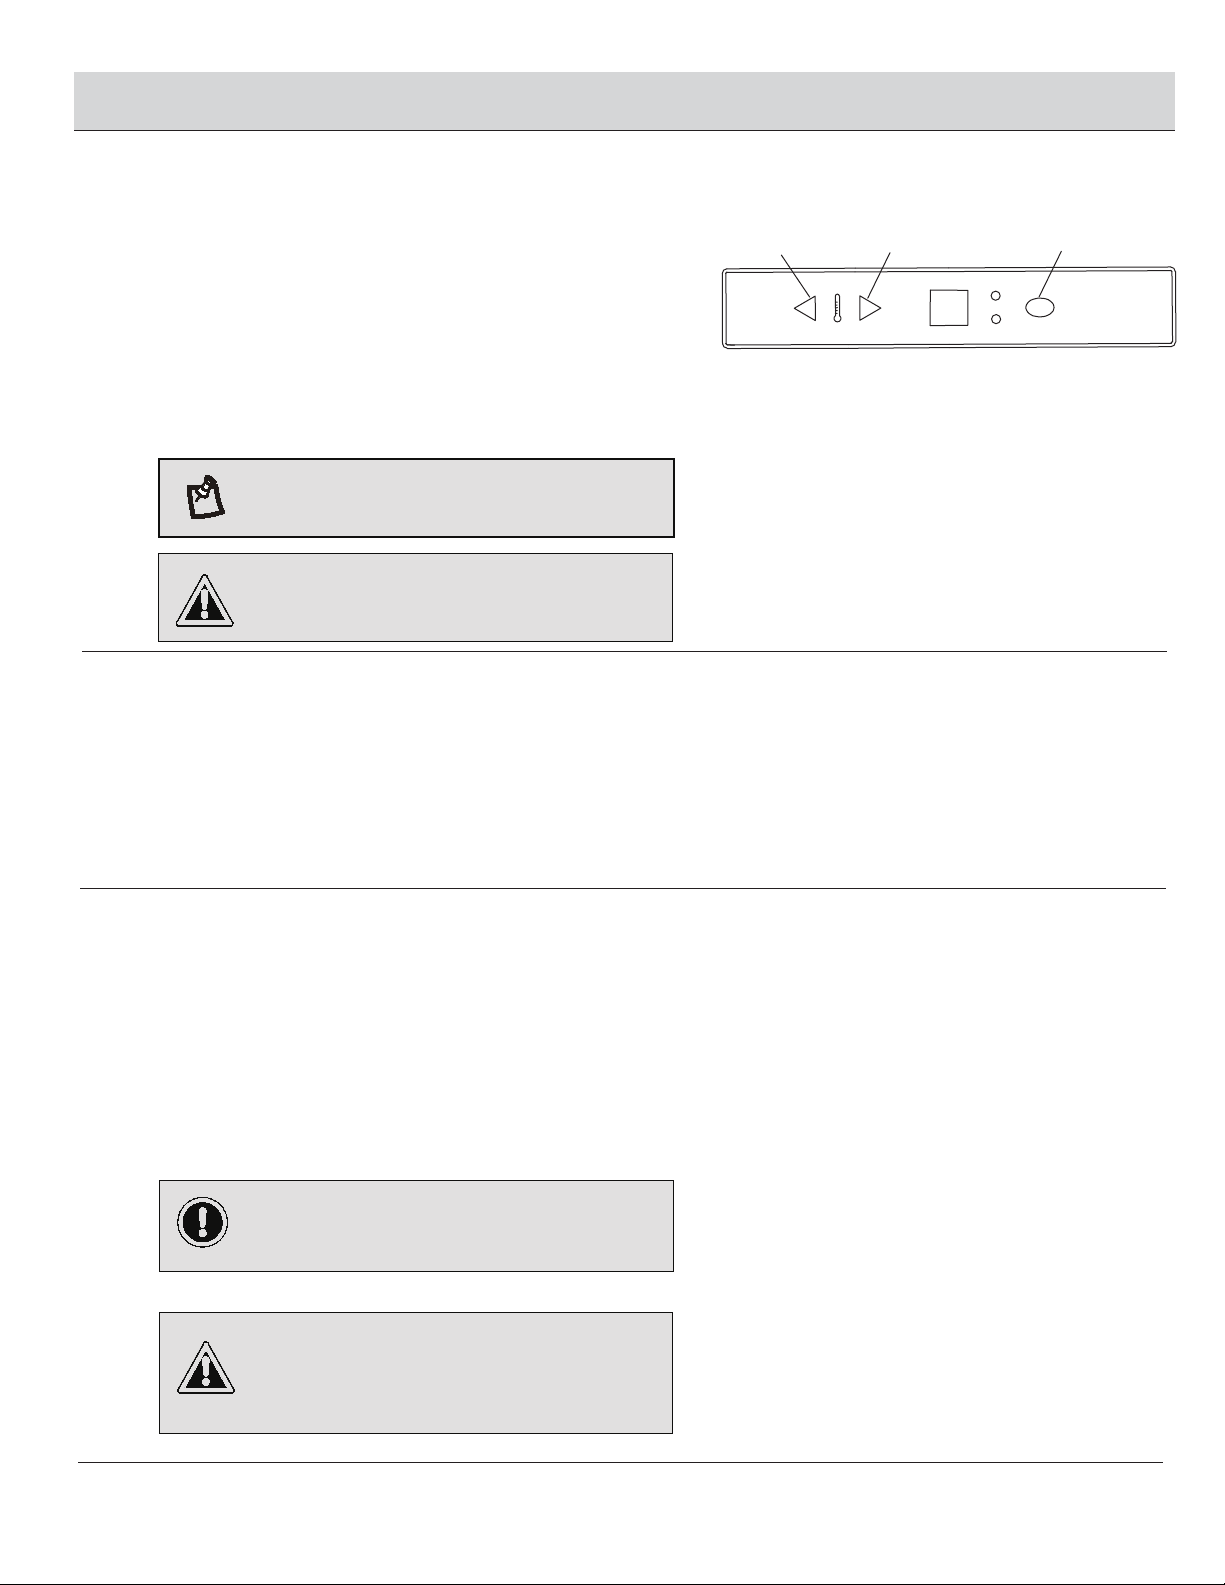
Using the Temperature Control Panel
2
Defrosting
3
Preparing the Kegerator For Storage
This kegerator has digital control panel located on the
top of the inside of the cabinet. Pressing the temperature
buttons will make the unit colder or warmer. Press the “-“
button (1) to lower the temperature by one degree. Press the
“+” (2) to raise the temperature by one degree. This unit has
a temperature range of 32-55° F.
Press the F and C button (3) to change the display from °F to °C.
The unit will run automatically once plugged in. Unplug
the unit to turn it off.
□
□
□
There is no need to defrost your kegerator/beverage cooler.
The defrost water collects at the back of your cooler and
passes through a drain outlet into a tray located above the
compressor where it evaporates.
If the kegerator will not be used for a long time, or is to be
moved to another place, it will be necessary to defrost the
unit and dry the interior.
Disconnect the unit from the power supply by removing
the power plug from the wall socket.
Leave the door open to allow for air circulation and to
prevent mold, mildew and unpleasant smells.
□
□
□
□
℉/℃
℉
℃

REPLACING KEGS
REPLACING THE CO2 TANK
11
Maintenance
□Turn the kegerator/beverage cooler off and disconnect power from the wall outlet.
Close the main valve on the CO2 tank.
Close the shut-off valve on the CO2 regulator.
Pull the black handle on the keg coupler and press it upward to close the connection between the beer keg and the
keg coupler.
Pull on the tap handle(s) to help drain beer from the lines.
Disconnect the beer line(s) and CO2 gas line(s) from the keg coupler.
Put the beer lines in a bucket to drain the remaining beer from the lines.
Remove the beer keg(s).
Remove the keg coupler(s) from the keg(s).
Follow the steps in "Installing the keg coupler" to insert a new keg.
□
□
□
□
□
□
□ Turn the kegerator/beverage cooler off and disconnect power from the wall outlet.
Close the main valve on the CO2 tank.
Close the shut-off valve on the CO2 regulator.
Disconnect CO2 gas line from the keg coupler.
Remove the CO2 tank.
Follow the steps in "Installing the CO2 regulator and tank" to insert a new tank.
□
Care and Cleaning
□
□
□
□
□
□
□
CONVERTING YOUR BEER DISPENSER TO A BEVERAGE REFRIGERATOR
□ Follow the steps in "Replacing kegs" and "Replacing the CO2 tank."
Remove the draft arm assembly and pull the beer line through the top of the cabinet.
Replace the top cabinet plug.
Install the two wire shelves.
Adjust the temperature as desired.
□
□
□
□
HOMEDEPOT.COM
Please contact 1-855-847-7264 for further assistance.
CLEANING AND MAINTENANCE
The door and cabinet may be cleaned with a mild detergent and lukewarm water solution such as 2 tablespoons
of baking soda to one quart of water.
Do not use solvent based or abrasive cleaners.
Use a soft sponge and rinse with clean water.
Wipe with a soft clean towel to prevent water spotting.
If the door panel is stainless steel, it can discolor when exposed to chlorine gas and moisture.
Clean stainless steel with a cloth dampened with a mild detergent and warm water solution.
Never use an abrasive or caustic cleaning agent.
The kegerator’s interior should be cleaned occasionally.
Disconnect power to the unit.
Open the door and remove the contents.
Wait until the unit defrosts.
With a clean cloth, wipe down the interior of the unit.
Reconnect power to the unit.
□
□
□
EXTERIOR CLEANING
□
INTERIOR CLEANING
□
□
□
□
□
A regular cleaning once every two weeks of the faucet, beer hose, and keg coupler is extremely important when
the kegerator is used frequently. If this is not performed, the beer will foam. Additionally bacteria,
yeast, mold, and beer stone will build up and quickly degrade the quality of draft beer. A few minutes spent
cleaning on a regular basis will add life to your system, and improve the quality of your draft beer!
□
□
□
□
□
12
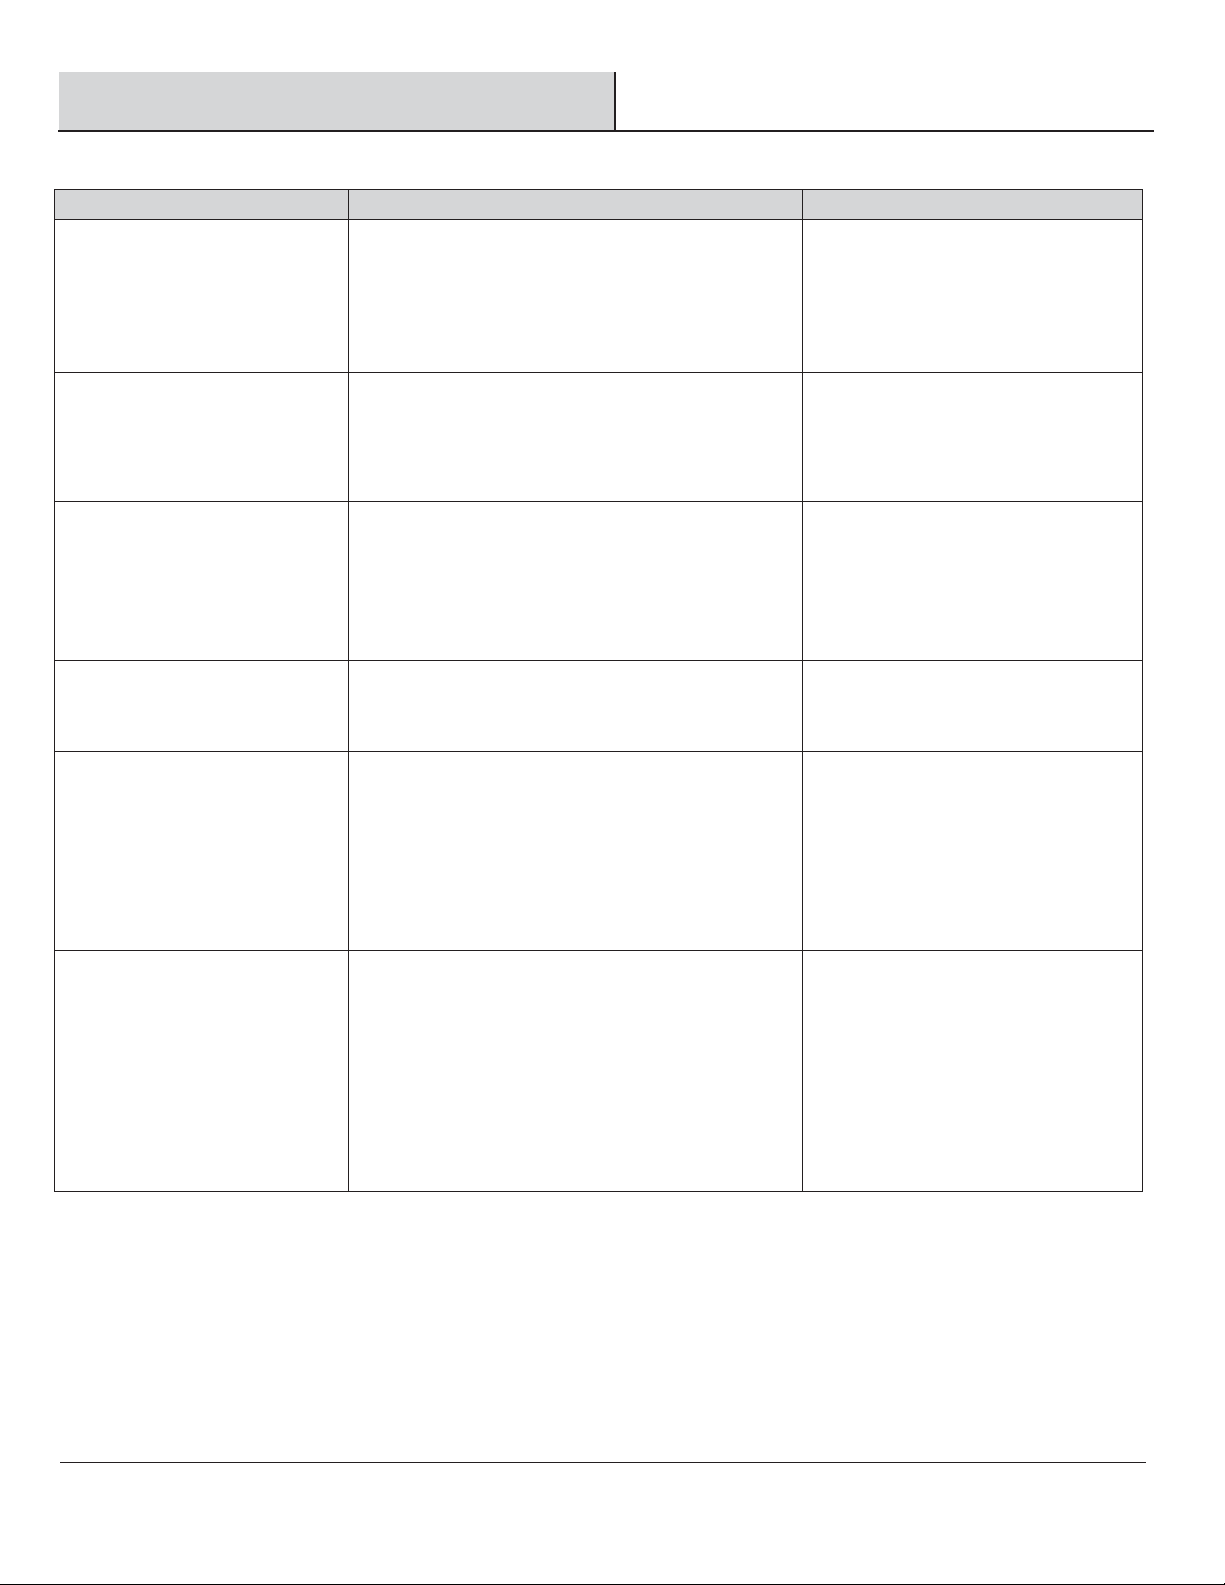
Troubleshooting
Problems Possible Causes Solutions
The kegerator does not turn on. □There is a power failure.
The unit is not plugged in.
A house fuse has blown or the circuit
breaker is tripped.
□
Ensure the unit is plugged in
and the power outlet has power.
Plug the unit in to a power outlet
that has sufcient amperage.
Replace the broken fuse in your
fuse box or reset the breaker.
□
□
□
□
□
□
□
□
□
□
□
□
The environment is humid.
The ambient temperature is too low.
The door is being opened too frequently.
□
□
□
Your unit is not level.
The door gasket is dirty.
The door gasket is not installed correctly.
The keg used is too large.
□
□
□
Make sure the unit is on a level
surface.
Clean the door gasket.
Make sure the door gasket is
properly installed.
This kegerator will not t
oversized kegs.
□
□
□
□
□
The kegerator will not reach the
desired temperature
The unit is placed too close to a heat source.
The door is opened too frequently or for a
long period of time.
Keep the unit away from direct
sun light or other heat sources.
Close the door tightly and do
not open the door too frequently
or for a long period of time.
The kegerator is making
strange noises Certain sounds are normal.
The unit is not level or is touching another
appliance.
Read the “Normal Sounds”
section.
Check to make sure that the
kegerator is level, and that it is
not in contact with another
appliance or furniture.
The body of the kegerator is
electried. The unit is not grounded properly. Contact your local electrician to
test your electrical grounding
system.
Frost is forming in the
kegerator.
If frost builds up, manual
defrosting may be required.
You can try running the
kegerator on a warmer
temperature setting, minimizing
the number of times you open
the door, or unplugging the unit
to allow the frost to melt.
The door will not shut properly.
□□
□
□

Questions, problems, missing parts? Before returning to the store,
call Vissani Customer Service
8 a.m. – 7 p.m., EST, Monday-Friday, 9 a.m. – 6 p.m., EST, Saturday
1-855-847-7264
HOMEDEPOT.COM
Retain this manual for future use.
This manual suits for next models
1
Table of contents
Popular Dispenser manuals by other brands


DEMA
DEMA Nitro Express manual

AQUABEVE
AQUABEVE Aqua Lavit manual

Tork
Tork 430690 instructions

Parker
Parker SciLog LabTec Series Installation, Operation & Maintenance Instruction Manual

Adast Systems
Adast Systems AdBlue V-line 47 Series user manual

K&M
K&M FSD3000 Translation of the original operating manual