Vita Spa GRAPHIC SERIES User manual

health and relaxation for life
GRAPHIC SERIES
OWNER’S MANUAL
VITA INTERNATIONAL
2320 N.W. 147th Street Miami, Florida 33054


GRAPHIC SERIES
OWNER’S MANUAL
VITA INTERNATIONAL
2320 N.W. 147th Street Miami, Florida 33054
OWNER’S RECORD
DATE PURCHASED: _____________________________________
DATE INSTALLED: _______________________________________
DEALER: _______________________________________________
ADDRESS: _____________________________________________
_ _ _ _ _ _ _ _ _ _ _ _ _ _ _ _ _ _ _ _ _ _ _ _ _ _ _ _ _ _ _ _ _ _ _ _ _ _ _ _ _ _ _ _ _ _ _ _ _ _ _ _ _ _ _
TELEPHONE: ___________________________________________
SERIAL #: ______________________________________________
MODEL #: _____________________________________________
To contact our Technical Service Department, please write to Vita International,
2320 NW 147th Street, Miami, FL 33054 or call 1-305-685-2063, during nor-
mal business hours, Monday through Friday, 8:30 am to 5pm, EST.
The Serial Number is located along the base of the spa. Please verify that the
serial number is noted on your dealer’s purchase contract.
❋
❋


GENERAL INFORMATION
•
Owner's Record and Service Information
..
front piece
•Important Safety Instructions........................ 2-3
•
Manufacturer's Do's and Don'ts/WARNINGS
.... 3
SET UP AND INSTALLATION
• Electrical Information............................................... 4
• Cover Installation...................................................... 5
OPERATION INSTRUCTIONS
• Initial Setup............................................................. 6-7
• Using Your Spa ..........................................................8
Mood Setting ........................................................ 8
Media Setting ....................................................... 9
Therapy Setting................................................... 10
Setup Setting.........................................................11
• Special Feature .......................................................12
My Spa Setting.....................................................12
Status Feature.......................................................13
• Advanced Feature ..................................................14
Maintenance Setting ..........................................14
• Jet Operation ...........................................................15
A. Select-A-Swirl Jet ......................................... 15
B. Pulsator Jet .................................................... 15
C. Quad Stream ................................................ 15
D. Turbo Jet ........................................................ 16
E. Three Way Power Diverter Valve ........... 16
F. Cluster ............................................................ 16
G. Tension Ease ................................................ 16
H. Air Control ..................................................... 17
I. Waterfall Operation ...................................... 17
J. Aromatherapy Injector ................................ 17
• VitAroma Therapy System ..................................18
• Water Purification System ...................................19
• Sparkle Clear ............................................................19
SPA MAINTENANCE
• Filter Maintenance .................................................20
• Draining Your Spa ..................................................20
• Winterizing Your Spa .............................................21
• Excel Plus™ Cabinet Maintenance....................21
• Cover Maintenance ................................................21
• Spa Light Colors & Lenses ..................................21
• Spa Light Bulb Replacement .............................21
• Care of Acrylic Surface and Spa Pillows .......21
• Diverter Valve Cleaning .......................................22
• Priming the Pump .................................................22
• Fountain Jet .............................................................22
WATER QUALITY & MAINTENANCE
• Sanitizing ................................................................. 23
• pH Control .............................................................. 23
• Important Maintenance Procedures ............. 24
• Balancing Spa Water .................................... 25-26
• Water Maintenance Do’s and Don'ts ........... 27
• Water Troubleshooting ................................ 28-29
DIAGNOSTICS & TROUBLESHOOTING
• Diagnostic Messages .......................................... 30
• Maintenance Log Recording Area ........... 31-33
TABLE OF CONTENTS


PA G E 2
Congratulations!
Thank you for the purchase of your new VITA SPA. You are now the proud owner of
one of the most comfortable and therapeutic spas in the world.
This Owner’s Manual has been designed to familiarize you with your Vita Spa
operations and general maintenance. We suggest that you take some time to carefully
review it. Please keep this manual available for reference.
If you have any questions regarding your Vita Spa set-up, operations, or maintenance,
please contact your Authorized Vita Spa Dealer.
Consumer satisfaction is important to us. We welcome your comments and suggestions.
Please share them with us via telephone, letter, or E-mail us at
.
Sincerely,
Eric Dormoy,
President
DM Industries, Ltd.
PAGE 1

PAGE 2
WARNING – To reduce the risk of injury, do not
permit children to use this product unless they
are closely supervised at all times.
DANGER – RISK OF ACCIDENTAL DROWN-
ING.
Extreme caution must be exercised to
prevent unauthorized access by children. To
avoid accidents, ensure that children can not
use the spa unless they are supervised at all
times.
A ground terminal
(pressure wire connector)
is provided on the control box inside the unit to
permit connection of a minimum No. 8 AWG
(8.4 mm2) solid copper bonding conductor
between this point and any metal equipment,
metal water pipe, metal enclosures of electrical
equipment, or conduit within five feet (1.5m)
of the unit.
DANGER – To reduce the risk of injury to
persons, DO NOT remove suction fittings. The
suction fittings on this spa are sized to match
the specific water flow created by the pump.
Should the need arise to replace the suction
fittings or the pump, be sure that the flow
rates are compatible. Never operate the spa if
the suction fittings are broken or missing.
Never replace a suction fitting with one rated
less than the flow rate marked on the original
suction fitting.
Install the spa
–
so proper drainage is provid-
ed
for the compartment containing electrical compo-
nents.
DANGER – RISK OF ELECTRICAL SHOCK –
Install at least 5 feet (1.5 m) from all metal
surfaces. (A spa may be installed within 5 feet
of a metal surface if each metal surface is
permanently connected by a minimum No. 8
AWG (8.42 mm2) solid copper conductor
attached to the wire connector on the terminal
box that is provided for this purpose). National
Electrical Code ANSI/NMFP A70-1993.
DANGER – RISK OF ELECTRICAL SHOCK-Do
not permit any electrical appliances, such as a
light, telephone, radio, or television within 5 feet
(1.5 m) of the spa.
WARNING – TO REDUCE THE RISK OF INJURY:
A.
The water in a spa should never exceed
40 degrees Celsius (104 degrees F). Water
temperatures between 38 degrees C (100 F)
and 40 degrees C (104 F) are considered
safe for a healthy adult. Lower water temper-
atures are recommended for extended use
(exceeding 10 minutes) and for young chil-
dren.
B.
Since excessive water temperatures have a
high potential for causing fetal damage during
the early months of pregnancy, pregnant or
possibly pregnant women should limit spa
temperature to 38 degrees C (100 F).
C.
Before entering a spa, the user should meas-
ure the water temperature with an accurate
thermometer, since the tolerances of water
temperature regulating devices vary.
D.
The use of alcohol, drugs, or medication,
before or during spa use, may lead to uncon-
sciousness with the possibility of drowning.
E.
Persons suffering from obesity or with a
medical history of heart disease, low or high
blood pressure, circulation system problems,
or diabetes, should consult a physician before
using a spa.
F.
Persons using medication should consult a
physician before using a spa since some
medication may induce drowsiness, while
other medication may affect heart rate, blood
pressure and circulation.
IMPORTANT SAFETY INSTRUCTIONS
WHEN INSTALLING AND USING THIS ELECTRICAL EQUIPMENT, BASIC SAFETY
PRECAUTIONS SHOULD ALWAYS BE FOLLOWED, INCLUDING THE FOLLOWING:
SAVE THESE INSTRUCTIONS

PAGE 3
DO’S AND DON’TS
DO —Make sure the spa is connected to a Ground Fault Circuit Interrupter (GFCI)
protected circuit. This GFCI is required by the National Electrical Code (NEC)
and must be installed by a licensed electrician. Test the GFCI monthly.
DO —Test the water with your hand before entering the spa to be sure it is
c o m f o rt a b l e .
DO —Remember that wet surfaces can be slippery. Take care when entering and
exiting the spa. Only enter by way of the steps in the spa. Do not step on spa
edges or filter lids.
DO —Use the thermal cover when the spa is not in use, empty or full.
DO —Take steps to prevent the intrusion of sand and dirt into the spa.
DO —Maintain proper water chemistry.
DO —Clean the filter cartridge weekly.
DON’T —Use the spa for long periods of time at temperatures over 104º F.
DON’T —Operate the spa without water. Turn the circuit breaker off before emptying the
spa and while it is empty.
DON’T —Store chemicals in the spa’s equipment compartment.
DON’T —Open the electrical box. There are no user serviceable parts inside.
DON’T —Operate the pump(s) on hi-speed for extended periods of time with the cover
on. Extended hi-speed pump operation will cause a slow heat build-up due to
water friction, which could trip the spa’s hi-limit thermostat.
WARNINGS
Prolonged immersion in water that is warmer than normal body temperature can result in a dangerous
condition known as HYPERT HE RMIA. The causes, symptoms, and effects of hyperthermia may be described
as follows: Hyperthermia occurs when the internal temperature of the body reaches a level several degrees
above the normal body temperature of 98.6 degrees F. The symptoms of hyperthermia include dizziness,
fainting, drowsiness, lethargy, and an increase in the internal temperature of the body. The effects of
hyperthermia include (1) unawareness of impending hazard, (2) failure to perceive heat, (3) failure to
recognize the need to exit the spa, (4) physical inability to exit the spa, (5) fetal damage in pregnant women,
and (6) unconsciousness resulting in a danger of drowning.
WA RNING –The use of alcohol, drugs, or medication can greatly increase the risk of fatal hyperthermia in spas.
Persons taking medications that induce drowsiness such as tranquilizers, antihistamines or anticoagulants
should not use the spa. Pregnant women and persons with a medical history of heart disease, circulatory
problems, diabetes or high blood pressure should consult their physician before using the spa.
Children are especially sensitive to hot water. At no time should children have unsupervised access to the spa.
The use of elevated decking may encourage children to climb onto the thermal cover – IT IS NOT DESIGNED
AS A SAFETY OR CHILD RESISTANT COVER!
Every Vita Spa comes with a thermal cover which is provided with locking straps. Install the locks for your
child’s safety.

1. The spa must be permanently connected
(hardwired) to the power supply. No
extension cords or plug-type connections are
to be used in conjunction with the operation
of the spa. Failure to supply power to the spa
that is not in accordance with these
instructions could create a potential health
hazard and will void both the manufacturer’s
warranty and the independent testing agency
l i s t i n g .
2 . The National Electrical Code (NEC )
requires that the power supply to this spa
must be a dedicated, ground fault circuit
(GFCI) protected circuit with no other
appliances or lights sharing power on this
c i r c u i t .
3. Refer to the wiring diagram posted inside
the electrical equipment door to determine
the current, voltage, and wire size
requirements for your spa.
4. T HHN type wire is recommended. The wire
size for the distance of the wire run must
conform to NEC and local electrical codes.
5. To ensure proper connections use copper
conductors only.
DO NOT USE ALUMINUMWIRE.
6. The spas’ power terminal strip is located
within the electrical control box.
7. Feed supply conductors through power
supply inlets provided on the spa and
install into the control box. Modifications
to the electrical equipment box are not
permitted. Drilling holes in the electrical
control box to provide access for wires in
areas other than those provided for will
void the manufacturer’s warranty and the
independent testing agency listing.
8. Connect wires to terminal block (TBI) color for
color. All wires must be connected or damage
may result. TIGHTEN SEC U RE LY !
PAGE 4
ALL WIRING TO THE SPA SHOULD BE IN ACCORDANCE WITH ALL
LOCAL AND NATIONAL ELECTRICAL CODES. ALL WIRING SHOULD BE
PERFORMED BY A LICENSED ELECTRICIAN KNOWLEDGEABLE IN THE
OPERATION AND WIRING OF A GFCI PROTECTED SYSTEM.

PAGE 5
INSTALLING THE SPA COVER
1. Position the cover squarely over the spa.
2. Position the locks for the tie-downs on the sides of the spa. You should allow approximately 1/2” to
3/4” slack in the straps for ease of insertion into the locks and to allow for material shrinkage during
temperature changes.
3. Using the screws provided, attach the locks and insert the cover tie-down straps. Utilizing the cover
anytime the spa is not in use will reduce heat loss and thereby reduce the amount of running time
required to make up that loss by the heating system.
Keep cover fastened down at all times when not in use.
DANGER - RISK OF INJURY
To reduce the risk of potential injury:
1. Never leave a spa uncovered or unattended.
2. Never leave a spa cover unlocked.
3. Do not stand, sit, or lie on the cover.
ALWAYS REMOVE SNOW FROM THE COVER. THE COVER HAS NOT BEEN
DESIGNED TO SUSPEND THE WEIGHT OF WET SNOW.
COVER INSTALLATION
Key
Cov e r
Tie Down
Str a p
Lo c k
S c r ews (2)

OPERATING INSTRUCTIONS
PAGE 6
The first step is to touch the but-
ton next to the “DISPLAY” box.
This will open a screen that
allows you to brighten or darken
the display.
Use the UP or DOWN arrows
to adjust the display to your
preferred level of viewing.
Welcome and congratulations on your purchase of the newest a latest
technological topside control for hot tub performance and personal
comfort.
Before we start getting to know the operations of the topside control,
let’s go over a few things. The six buttons alongside the display screen
work in conjunction with the displayed boxes. Pressing any one of them
will open or activate the item identified in each box.
Once that is accomplished, you may want to invert the screen
to make it easier to read from your position inside or out of
the hot tub.
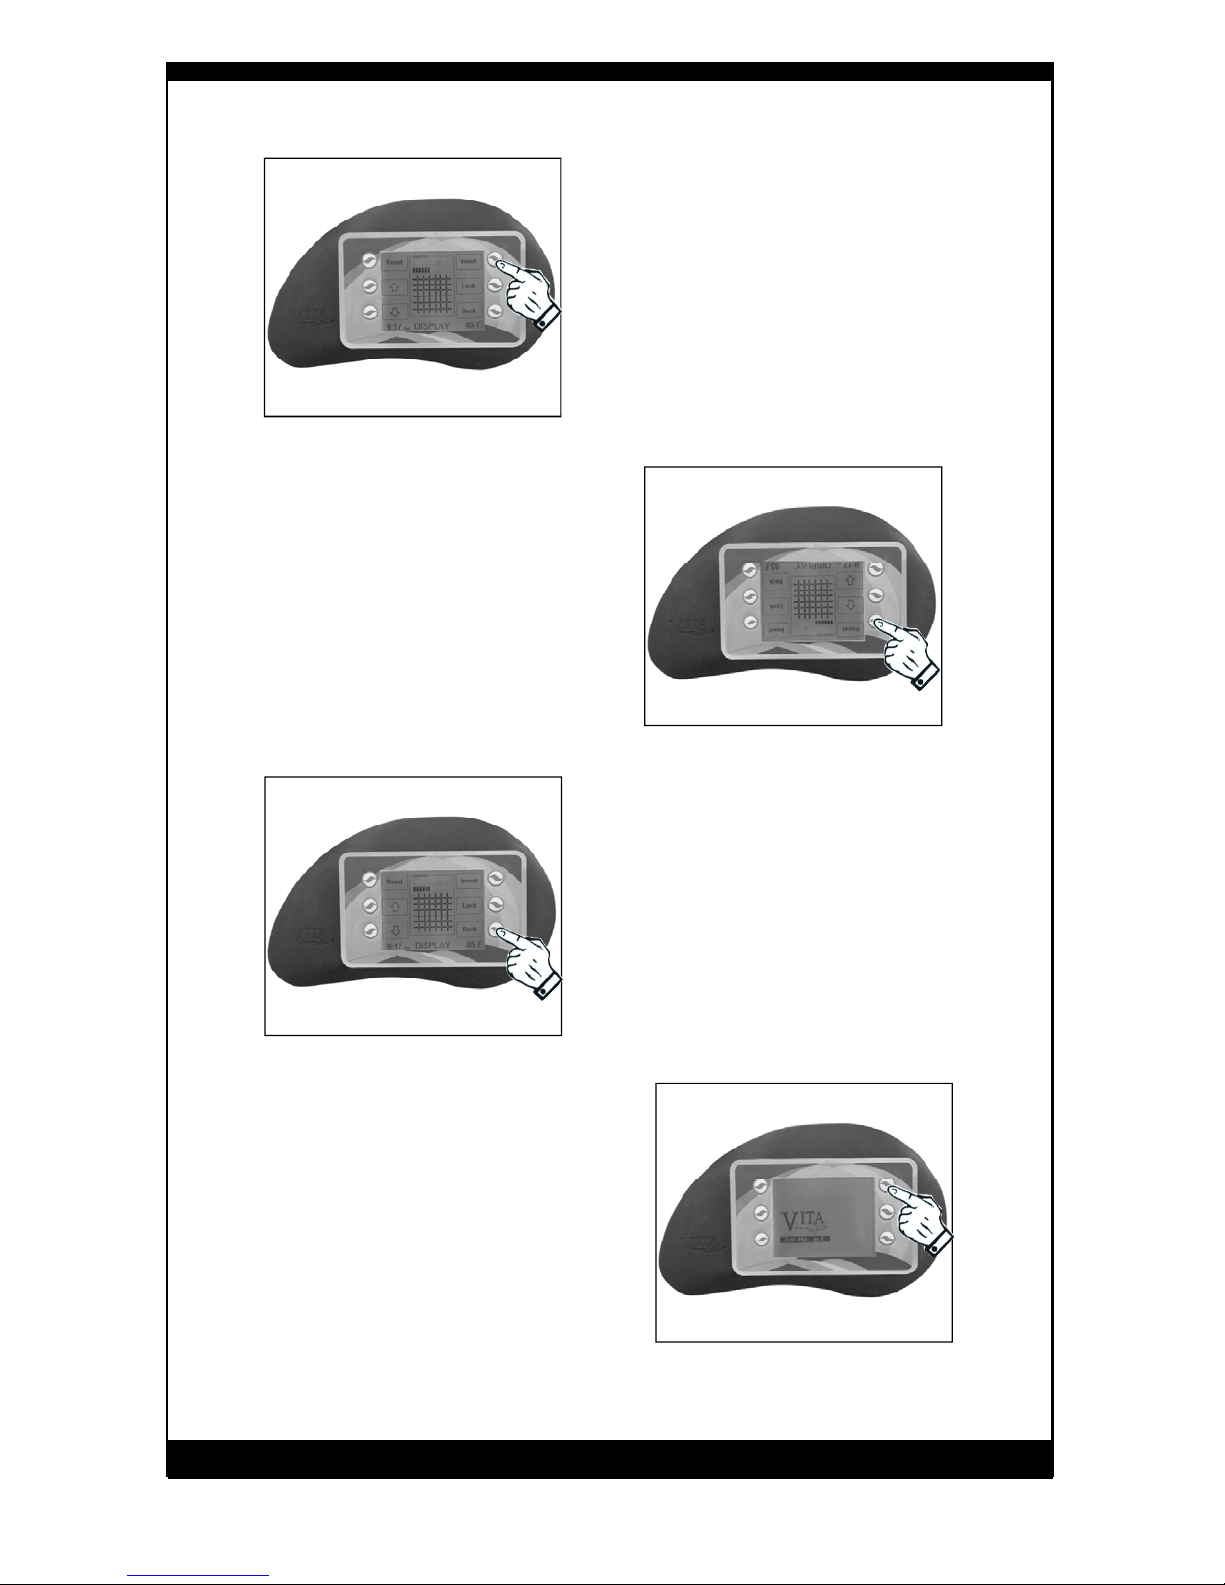
PAGE 7
Press the “INVERT” button and the
screen will clear and reset itself.
As with many computer screens, the
change in display may take up to 30
seconds to be completed.
If at anytime you choose to
change your viewing setting to
the factory default, merely press
“RESET” to return to the default
settings
So now let’s go back to the
beginning by pressing the
“BACK” button.
“Screen Saver” appears
when display has been
idling for more than 1
minute.
Press any button to restore
d i s p l a y.

PAGE 8
“Welcome” screen give you the
option of going into any of the
operations
Press “Mood” for spa options.
Press “Help” to view directions
for this screen
Press “Back” to return to “Mood”
display.
Press “LIGHTS” to cycle through light sequences.
Use “ON/OFF” button to activate
lights
Use “ARROWS” to select color
The upper right button shows the
level of brightness.
Press the button to cycle through
SOFT, NORMAL, or BRIGHT lights.
USING YOURSPA

PAGE 9
Press “MEDIA” to enter stereo
mode
Use “BACK” to return to
“MOOD” display
Use “SOURCE” to cycle through
Line, TV, AM, and FM
Use “SELECT” to change from media
to “VOLUME”to“BASS”
Use “ARROWS” to adjust accordingly.

PAGE 10
Press “BACK” to return to
welcome screen.
Press “DISPLAY” to enter displaying
mode.
Press “THERAPY” to operate the
pumps.
Press “SOA K” to operate Low
Speed on pumps 1 and 2
Press “JET 1” to operate high speed
pump 1
Press “JET 2” to operate high speed
pump 2
Press “JET 3” to operate high speed
pump 3.
Press “BLOWER” to operate the
aroma therapy option.
Press “Back” to return back to main
screen.

The setup section will allow
adjustments to
“TEMPERATURE”
“TIME / DATE”
“SKIM AWAY”
“CIRCULATION”
“LOCK SPA”
“FEHRENHEIT”
“CELCIUS”
“COUNTRY CODE”
Press “SETUP” to enter section.
Use “UP” and “DOWN” arrows to cycle past the selections. Use
the “SELECT” key to choose your selection then adjust accordingly.
Press “BACK” to return to main screen.
Let’s continue so this may be personalized for you.
PAGE 11

PAGE 12
After pressing “E D I T ” y o u
may now enter name then
“SAVE”. You will notice your
name displayed on main
screen.
The name entered and all
your own personal setting
are saved on the system
The set programming name
setting will appear on screen
in the
“WELCOME” area
The set programming name setting will appear on screen in the
“WELCOME” area.
Press “MY SPA” to enter
your personal settings.

If there is an error that the spa has
found it will flash “RUN SELF TEST”
will flash on your screen.
You then press “MAINT” to enter
the maintenance mode you will
have to be in.
Press “STATUS” to view status of
pump setting, amp draw, and other
settings
Status screen, press any button
to return
PAGE 13

Press “MAINT” to enter
servicing section.
Press “TEST” to enter systems
check.
Press “BEGIN” to start 4:00
minute countdown for testing.
“Error: ”
Problem found will display
“ALL GOOD”
No problems found
PAGE 14
Table of contents
Other Vita Spa Hot Tub manuals

Vita Spa
Vita Spa xStream User manual

Vita Spa
Vita Spa 100 Series User manual

Vita Spa
Vita Spa L200 series User manual

Vita Spa
Vita Spa L100 SERIES User manual

Vita Spa
Vita Spa L100 SERIES User manual

Vita Spa
Vita Spa Spa User manual

Vita Spa
Vita Spa DUET User manual

Vita Spa
Vita Spa M15 Series User manual

Vita Spa
Vita Spa LX series User manual
Popular Hot Tub manuals by other brands


Canadian Spa
Canadian Spa Vancouver UV Spa KH-10032 owner's manual

Balboa Water Group
Balboa Water Group 500DZ Series Operation guide

Image Fitness
Image Fitness Renew 615 Spa user manual

Pooli
Pooli OS030979B product manual

KBL
KBL megaSun 5600 operating instructions

Jetta
Jetta Affinity Owner's manual & installation guide