Vita Spa DUET User manual

DUET

1
VITA SPA DUET
SAVE THESE INSTRUCTIONS.
WARNING:
Children should not use spas or hot tubs
without adult supervision.
WARNING:
Do not use spas or hot tubs unless all suction
guards are installed to prevent body and hair
entrapment.
WARNING:
People using medications and/or having an
adverse medical history should consult a
physician before using a spa or hot tub.
WARNING:
People with infectious diseases should not
use a spa or hot tub.
WARNING:
To avoid injury, exercise care when entering
or exiting the spa or hot tub.
WARNING:
Do not use drugs or alcohol before or during
the use of a spa or hot tub to avoid
unconsciousness and possible drowning.
WARNING:
Pregnant, or possibly pregnant, women should
consult a physician before using a spa or hot tub.
WARNING:
Water temperature in excess of 104° F or 40° C
may be injurious to your health.
WARNING:
Before entering the spa or hot tub measure
the water temperature with an accurate
thermometer.
WARNING:
Do not use a spa or hot tub immediately
following strenuous exercise.
WARNING:
Prolonged immersion in a spa or hot tub may
be injurious to your health.
WARNING:
Do not permit electric appliances (such as a
light, telephone, radio, or television) within
1.5m of the spa or hot tub.
WARNING:
Maintain water chemistry in accordance with
manufacturer’s instruction.
WARNING:
The use of alcohol or drugs can greatly
increase the risk of fatal hyperthermia in hot
tubs and spas.
IMPORTANT SAFETY WARNINGS

2
VITA SPA DUET
TABLE OF CONTENTS
Important Safety Warnings 1
Table of Contents 2
Important Safety Instructions 3
Do’s and Don’ts 4
Hyperthermia 5
Spa installation 6
Site and Positioning 6
Outdoor Installation 6
Indoor Installation 6
Water Capacity 18
Spa System Components 8
Spa Components 9
Jets, Air Controls & Valves 10
Jets 10
Cleaning or Replacing Jets 11
Air Controls 11
Diverter Valve 11
Cleaning or Replacing Valves 11
Electrical Information 12
Important Safety Instructions 12
Ground Fault Circuit Interupter 12
Installation Options 12
Cord Connect 13
Start Up Procedures 14
Priming Your Spa 14
Pr Message 14
Powerworks® 300 Control System 15
Operating Instructions 15
User’s Pads 15
Temperature Controls 16
Jet / Pump Operation 16
Standard/Economy/Sleep Modes 16
Filtration Cycles 17
Preset Filter Cycles 17
Changing Filter Cycle Duration 17
17
Panel Messages 25
Troublershooting 25
Ozone Operation 20
Safety Features
Automatic Time Outs 18
Common LCD Messages 43
Maintenance 19
Water Chemistry 19
Sanitizing 19
pH Level 19
Sanitizing With Ozone 20
Specialty Chemicals 20
Draining Your Spa 20
Filter Maintenance 21
Winterizing 21
Spa Cabinet Care 23
Spa Surface Care and Cleaning 23
Light Bulbs 23
Spa Cover Care 23
Thermal Creep 24
Panel Messages 25
Common Water Problems 29
Common Hardware Problems 32
Spa Soaking Guidelines 34
300 Series System Wiring Diagram 35
Safety sign 36
Limited warranty summary 36
Copyrights and trademarks 37

3
VITA SPA DUET
IMPORTANT SAFETY INSTRUCTIONS
1. READ AND FOLLOW ALL
INSTRUCTIONS
2. WARNING - To reduce the risk of injury,
do not permit children to use this prod-
uct unless they are closely supervised at
all times.
3. A wire connector is provided on this unit
to connect a minimum 6 AWG (5.15 mm2)
solid copper conductor between this unit
and any metal equipment, metal enclosu-
res of electrical equipment, metal water
pipe, or conduit within 5 feet (1.5m) of
the unit.
4. (For cord-connected/convertible units)
DANGER - Risk of injury.
a. Replace damaged cord immedi-
ately.
b. Do not bury cord.
c. Connect to a grounded, ground-
ing type receptacle only.
5. DANGER - Risk of Accidental Drown-
ing. Extreme caution must be exercised
to prevent unauthorized access by
children. To avoid accidents, ensure that
children cannot use this spa unless they
are supervised at all times.
6. DANGER - Risk of injury. The suction
ttings in this spa are sized to match the
specic water ow created by the pump.
Should the need arise to replace the
suction ttings or the pump, be sure that
the ow rates are compatible.
Never operate spa if the suction ttings
are broken or missing. Never replace a
suction tting with one rated less than
the ow rate marked on the original suc-
tion tting.
7. DANGER - Risk of Electric Shock. Install at
least 5 feet (1.5m) from all metal surfaces.
As an alternative, a spa may be installed
within 5 feet of metal surfaces if each
metal surface is permanently connected
by a minimum 6 AWG (5.15 mm2) solid
copper conductor to the wire connector
on the terminal box that is provided for
this purpose.
8. DANGER - Risk of Electric Shock. Do not
permit any electric appliance, such as a
light, telephone, radio, or television,
within 5 feet (1.5m) of a spa.
9. WARNING - To reduce the risk of injury:
a. The water in a spa should never
exceed 40°C (104°F).Water tem-
peratures between 38°C (100°F)
and 104°F (40°C) are considered safe for a
healthy adult. Lower water temperatures
are recommended for young children and
when spa use exceeds 10 minutes.
b. Since excessive water temperatures
have a high potential for causing fetal
damage during the early months of preg-
nancy, pregnant or possibly pregnant
women should limit spa water tempera-
tures to 38°C (100°F).
c. Before entering a spa the user should
measure the water temperature since the
tolerance of water temperature-regulat-
ing devices varies.
d. The use of alcohol, drugs, or medica-

4
VITA SPA DUET
tion before or during spa use may lead
to unconsciousness with the possibility of
drowning.
e. Obese persons and persons with a
history of heart disease, low or high
blood pressure, circulatory system prob-
lems, or diabetes should consult a physi-
cian before using a spa.
10. SAVE THESE
INSTRUCTIONS
NOTE: Check with your state/local code
enforcement ocer to determine electrical
code requirements and compliance. Use a
qualied licensed electrician to complete all
spa nal electric connections.
TO AVOID RISK OF ELECTRICAL SHOCK:
1. A green colored terminal or a terminal
marked G, GR, Ground, Grounding, or the
international symbol is located on
the side of the supply terminal box or
compartment. This terminal must be
connected to the grounding means
provided in the electric supply service
panel, using a continuous copper wire
equivalent in size to the circuit conductors
supplying this equipment.
*IEC Publication 417, Symbol 5019.
2. At least two lugs marked “BONDING
LUGS” are provided on the external sur-
face or on the inside of the supply termi-
nal box or compartment. Connect the
local common bonding grid (house-hold
ground) in the area of the hot tub or spa
to these terminals, using an insulated or
bare copper conductor not smaller than
No. 6 AWG.
3. All eld-installed metal components such
as rails, ladders, drains or similar hard
ware located within 5 ft. of the spa or
hot tub shall be bonded to the equip-
ment grounding bus with copper con-
ductors not smaller than No. 6 AWG.
4. Never connect unit to a power supply
with a load controller.
5. Install to provide drainage of compart-
ment for electrical components.
6. The electrical supply for this product
must include a suitably rated switch
or circuit breaker to open all ungrounded
supply conductors. This disconnecting
means must be readily accessible for
operation but installed at least 6 ft (1.8m)
from the spa. All electrical connections
should comply with local regulations.
Do’s and Don’ts
For years of spa enjoyment:
Do:
• Save these instructions!
• Replace the cover immediately after use.
•
Keep the cover locked when spa is not
in use.
• Be aware of the dangers of a wet and
slippery surface. Use caution when
entering and exiting your spa.
• Have a licensed electrician make all nal
electrical connections.
•
Replace worn, frayed or broken electrical cords.
• Keep the water chemistry correctly
balanced. Untreated spa water will cause
problems with your spa and equipment
as well as being a health risk.
• Clean the spa lter monthly or as needed.
• Position the spa so that all sides remain
Caution: Risk of electrical shock.
Read and follow all instructions.

5
VITA SPA DUET
accessible for maintenance.
• Use a bathing cap for long hair.
• Refer to information on hyperthermia,
next page.
• Use only authorized spa care products
for the best performance and to keep
the water properly balanced.
Don’t:
• Use the spa at 104°F (40°C) for long
periods of time (more than 30 minutes).
See Hyperthermia, below.
• Use an extension cord to power your spa.
• Allow anyone to stand on the spa cover.
It is not designed to support weight.
• Power the spa unless it is lled with water
to 1/8” below the top of the Weir door.
• Operate the pump on high speed for ex-
tended periods of time with the cover in
place. Extended operation can cause heat
build-up and interfere with spa operation.
Hyperthermia
The causes, symptoms, and eects of
hyperthermia may be described as follows:
Hyperthermia occurs when the internal
temperature of the body reaches a level
several degrees above the normal body
temperature of 98.6°F (37°C). The symptoms
of hyperthermia include an increase in the
internal temperature of the body, dizziness,
lethargy, drowsiness, and fainting. The eects
of hyperthermia include:
a. Failure to perceive heat
b. Failure to recognize the need to exit spa
or hot tub
c. Unawareness of impending hazard
d. Fetal damage in pregnant women
e. Physical inability to exit the spa or hot
tub, and
f. Unconsciousness resulting in the danger
of drowning.
WARNING The use of alcohol, drugs,
or medication can greatly increase the
risk of fatal hyperthermia.

6
VITA SPA DUET
SPA INSTALLATION
Danger: Electrical shock risk. Install at
least 1.5m from all metal surfaces.
The electrical supply for this product must
include a suitably rated switch or circuit
breaker to open all ungrounded supply
conductors to comply with Section 422-20
of the National Electrical Code ANSI/NFPA70-
2008. The disconnecting means must be
readily accessible but installed at least 6 feet
(1.8 meters) from the spa water. All electrical
connections should comply with article 680-IV
of the NEC.
Site and Positioning
Locate the spa on solid, level foundation or
ooring, keeping in mind the weight of the
lled spa [in excess of
4,000 bls. (1.800 kg.)
on
some models]. If you have any doubts about
the load bearing ability of your chosen site,
contact an architect or a building contractor.
The entire perimeter of the spa cabinet and
the spa bottom must be evenly supported.
If your spa is installed outdoors, we
recommend that you provide a concrete pad
for the spa to rest on 8ft x 8ft x 4in (2,5m x
2,5m x 10cm level pad). Failure to provide
a at level surface could structurally
damage your spa and void the warranty.
The spa must be installed to allow access for
service and maintenance on all four sides;
therefore, below grade level installation is
not recommended.
Outdoor Installation
The following considerations apply when
installing your spa outdoors:
1. Local codes pertaining to fencing.
2. Local electrical and plumbing codes.
3. View from your house.
4. Wind direction.
5. Exposure to sunlight.
6. Location relationship to trees (twigs,
leaves and shade).
7. Dressing and bathroom location.
8. Storage area for maintenance equipment
and chemicals.
9. Location to facilitate adult supervision.
10. Landscaping and nighttime lighting.
11. Accessibility to equipment.
12. Power supply location and foot trac.
Indoor Installation
The following considerations apply when
installing your spa indoors:
1. Indoor spas promote high humidity. Using
either ventilation fans or commercial
grade de-humidiers will help to reduce
the humidity. Consult your dealer for
details.
2. Floor drains must be provided near the
spa to drain o water that may cause
falls and /or water damage.
3. Floor area should be at with a non-skid
nish. Carpeting is not recommended.
4. Walls, ceilings, woodwork should be made
of materials capable of withstanding high
humidity (redwood, cedar).
5. Be sure oor load bearing capacities are
adequate to support the concentrated
spa weight.
6. Spas should be double checked for leaks
before installing to avoid possible water
damage. Dealer installation may include
this service.

7
VITA SPA DUET
7. Indoor sun rooms are capable of
maintaining high ambient temperatures
which may eect the spa water
temperature. It is NOT recommended
that you operate your lter cycles for
longer than 4 hours per day under these
conditions.
SEE THERMAL CREEP: page 24

8
VITA SPA DUET
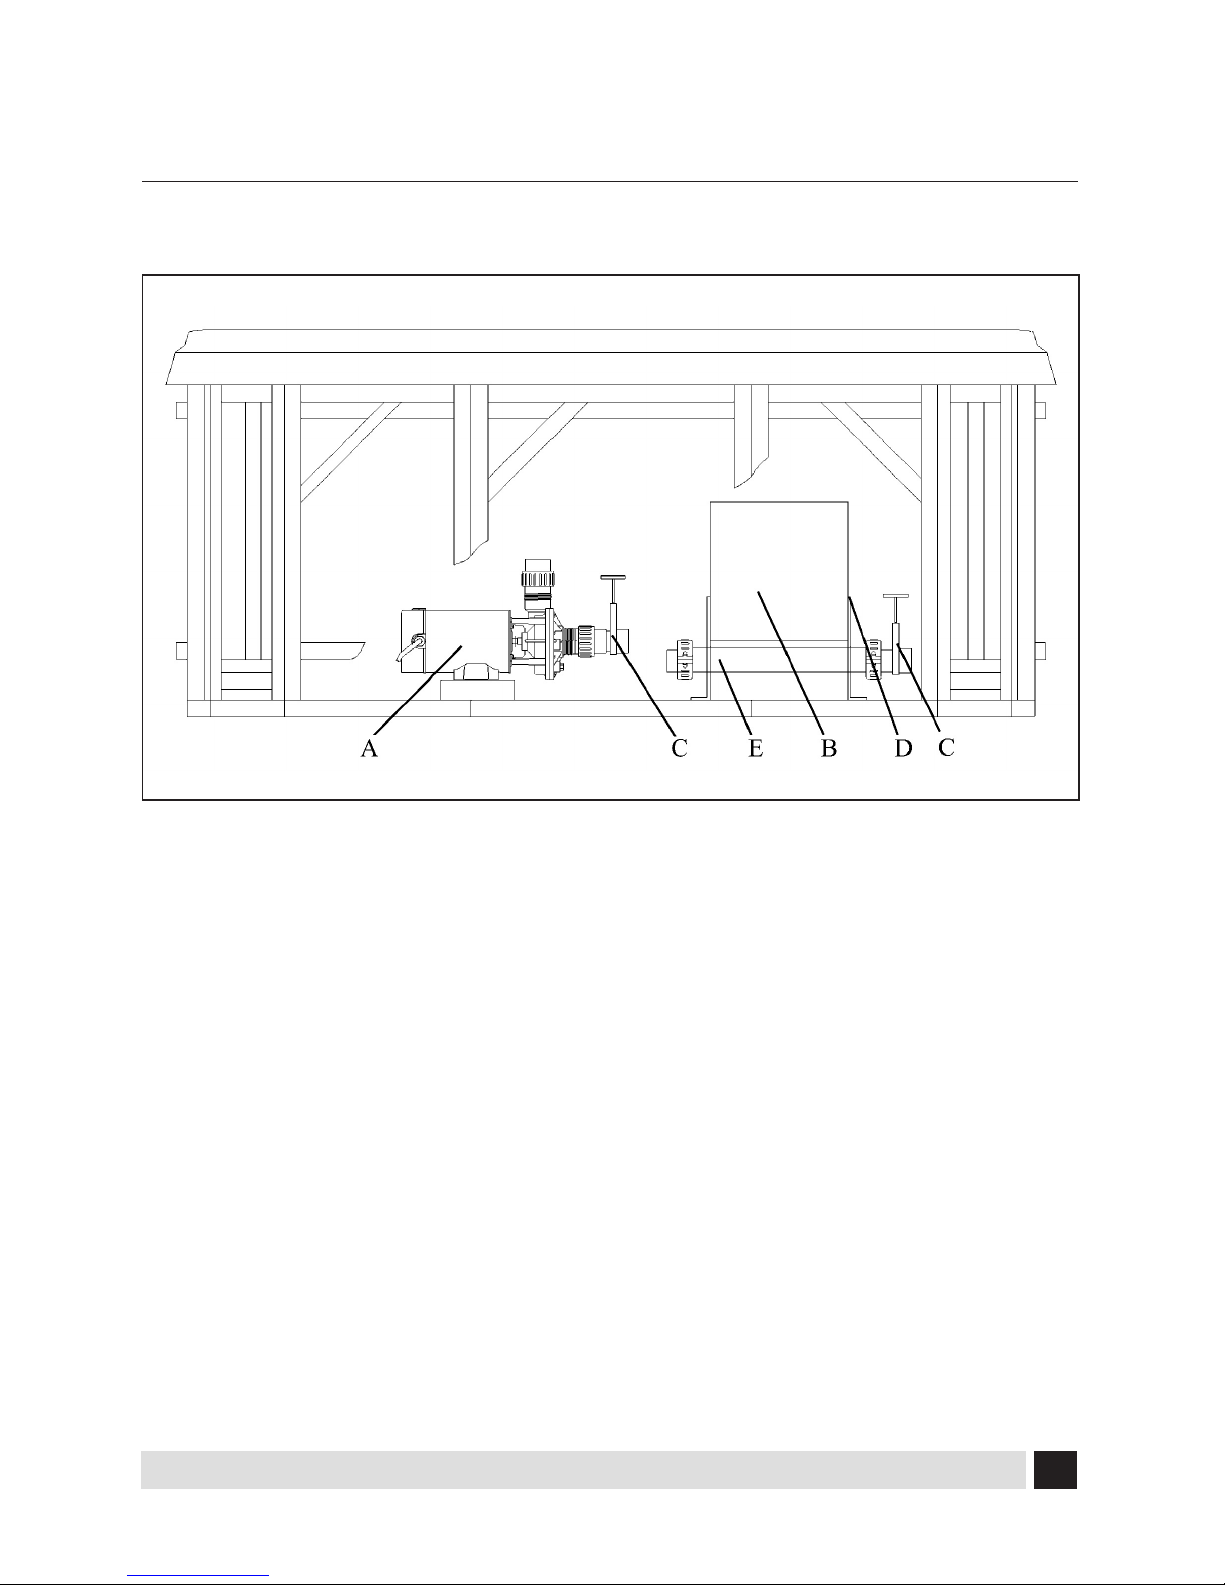
SPA SYSTEM COMPONENTS
A. Topside Control Panel: Used to control
temperature setting, pump for jets,
and light.
B. Filter Skimmer/Weir Door: Removes
oating debris from the water surface,
provides a water return path to equipment,
and houses water lter element. (not
shown)
C. Air Controls: Increases or decreases air
entering the jets. Close during heating for
maximum eciency.
D. Equipment Pack Service Panel (no user
serviceable parts): Spa support system
consisting of pump, heater, and
associated electrical controls (not shown).
E. Drain Access: (Adjacent to the equipment
service panel) Spa drain faucets. (not
shown)
F. Diverter Valve: Diverts water from one set
of jets to another.
G. Manufacturer’s Identication Label:
Contains identication information
for warranty service (serial number, model
number, etc.) and electrical information
(ampere rating and ampere requirements)
(not shown).
A
B D
C
E
F
G
9
VITA SPA DUET
SPA COMPONENTS
Reference only. Equipment is not always as shown
A. Pumps, : Low speed for ecient water
circulation during ltration and heating;
high speed for maximum action of the
jets. The pump functions are activated by
topside controls
B. Warning and Installation Label:
Contains important safety information
and installation instructions.
C. Slice Valve: Used to shut o water ow
from the spa to the equipment while
servicing. Quantity will vary depending
on model. All should be open during
normal operations.
D. Spa Pack: Houses the electronic circuit
board. All equipment and incoming power
connections are made here .
E. Heater Assembly: Thermostatically
controlled and equipped with an
overheat safety shut-o.
Note: No consumer serviceable parts.
Do NOT attempt to service any of these
components yourself. Contact your dealer
for assistance.

10
VITA SPA DUET
JETS, AIR CONTROLS & VALVES
Jets
All spa jets are individually engineered
to provide a unique hydro-massage.
Depending on the model, your spa will have
a combination of the following jets:
Directional Therapeutic
(200, 300, and 400 Series Wave Style):
Positioned to focus on large muscle groups,
these jets deliver a concentrated, high
volume stream of water for a deep massage.
Each jet is fully adjustable, allowing users to
set the water ow to the most comfortable
setting. The nozzle can be rotated to target
sore muscle areas.
Rotational or Spinning Jets
(200, 300, and 400 Series Wave Style):
Positioned to focus on muscle tension
zones, these jets deliver a spinning water
stream for a gentle, pulsating massage.
Each jet is fully adjustable, allowing users to
set the water ow to the most comfortable
setting.
Swim Jet( non-adjustable):
Positioned to create overall water
circulation, this multi-purpose, high volume
jet provides whirlpool action throughout
the entire spa.
Euro Jets:
Positioned in the foot well or shoulder areas
of the spa, these jets deliver a penetrating
massage to dissolve tension. This jet may be
the entry point for ozone produced during
the automatic ltration cycles, and, as such,
is not adjustable.
Note: Ozone production is activated when
the low speed pump is activated.
Many full sized jets are adjustable from a fully
open to closed position. It is very important
that you NEVER SHUT ALL FULL SIZED JETS
OFF AT ONE TIME! WHEN EXITING THE SPA,
OPEN ALL CLOSED JETS.
Cleaning or Replacing Jets
Hard water can cause calcium/mineral
buildup that can restrict or bind the jets. A jet
consists of a face plate and a nozzle. Rotate
these parts weekly and remove/clean monthly
to ensure free movement.
NOTE: It is not necessary to drain the spa to
clean or remove the jets.
Rotating the jet face plate and nozzle
• Rotate the jet face left and right
(open and closed).
• Return the face plate to the full open
position.
• Turn the jets on to high speed.
• Twist the nozzle left and right.
• Rotate the nozzle in the socket.
NOTE: If the jet insert disengages from the
spa housing, see steps to reinstall below.
Cleaning the jets
To remove the jet insert, use the palm of your
hand to exert pressure on the face of the jet.
Turn counterclockwise until the jet ‘clicks’.
Gently pull the jet assembly from the housing.

11
VITA SPA DUET
To clean the jet insert and housing, use a
pressurized hose and spray the inside of
the jet housing. Soak the jet in a diluted spa
cleaning solution, rinse. Wipe the inside of the
housing to remove any debris.
To reinstall the jet, line up the tab on the
backside of the barrel with the groove in the
body. Use the palm of your hand to gently tap
the jet until it snaps into position.
Air Control
The intensity of the jet action can be
controlled by altering the amount of air
injected with water through the jets. Your
spa has 1 air control located on the lip of
the spa. Each control activates air to specic
jets in the spa allowing you to create various
combinations and levels of jet action to
suit individual preferences. Turn the control
counter- clockwise to turn the air o and
clockwise to turn air on.
NOTE: Air controls should be closed
during heating cycles for maximum
energy eciency.
Diverter Valve: Diverts water from one set
of jets to another. The diverter valve should
be tested weekly to clean the lines and to
help prevent debris from building up.
NOTE: The diverter valve should be cleaned
regurally. Remove the handle by pulling
upward and rocking it back and forth,
unscrew the cap and pull the valve stem out.
To clean the valve stem and housing, use a
pressurized hose and spray the inside of the
valve housing. Soak the valve stem in a diluted
spa cleaning solution, rinse. Wipe the inside of
the housing to remove any debris.

12
VITA SPA DUET
ELECTRICAL INFORMATION
Important Safety Instructions
All electrical connections to this spa package
MUST be accomplished by a qualied
licensed electrician in accordance with
National Electrical Code (NEC) and with state/
local electrical codes in eect at the time of
installation.
NOTE: Prior to performing any service to
the spa equipment, turn OFF all primary
electrical power at the main circuit breaker
or disconnect panel.
To make spa electrical connections, remove
the exterior equipment pack service panel,
locate the electrical control box, remove
the control box cover and follow the wiring
diagram on the inside of the control box cover.
Connections should be made using copper
conductors only. Connecting wires, circuit
breakers, or fuses must all be sized to
accommodate the Total Ampere load as
specied on the equipment label.
This equipment is designed to operate on
60Hz alternating current only, at 120 volts.
NOTE: All unions must be hand-tight and
all slice valves must be locked in the OPEN
position before lling or relling spa!
A clip is provided to help keep the slice
valve open. Run spa and check for union
water leaks before reinstalling exterior
panel.
Ground-Fault Circuit Interrupter
A qualied licensed electrician shall connect
the spa to a circuit protected by a GFCI. This
is a requirement by the National Electric
Code, article 680-42 and 680-43, and is also in
compliance with Underwriter’s Laboratories,
Inc.
Installation Options
A hole will need to be drilled in the pedestal
or base to bring the electrical conduit into
the spa cabinet.
Refer to the manufactures’s nameplate
located on the kick plate to determine your
spa’s ampere requirements.
The Model Duet comes factory set for 120
volt service.
Electrical Requirements:
120 Volt Installation
• 120 volt, 60 Hz, single phase, 15 amp.,
3-wire service (line 1, neutral, and
ground)
The heater can only be activated with the
pump on low speed. Only the spa light
can be operating at the same time without
disabling the heater.
Caution: Risk of electrical shock.
Read and follow all instructions.

13
VITA SPA DUET
ELECTRICAL INFORMATION
REQUIREMENTS
The spa must be connected to a dedicated
120 volt, 15 amp, grounded circuit.
The term “dedicated” means the electrical
circuit is not being used or shared for any
other electrical items (patio lights, appliances,
garage circuits, etc.). If the spa is connected
to a non-dedicated circuit, overloading may
result in “nuisance tripping” at the main panel.
CORD CONNECT
The Vita Spa Duet Model comes with a power
cord which contains the GFCI breaker. All
electrical connections from the control pack
to the outlet should be done by a qualied
electrician.
For your safety, when the electrician is
installing the 15 amp single electrical outlet
and waterproof cover, the outlet should be no
closer than 6 feet (1.83 meters) and no farther
than 10 feet from the spa [reference N.E.C.
Article 680 and all local codes]
The Ground Fault Circuit Interrupter (GFCI) is
located on the power cord. This device is for
your protection. It is very important to protect
it along with the moisture resistant cover from
damage. Test once a month, with the plug
connected to the power supply.
NEVER CONNECT THE SPA TO AN
EXTENSION CORD!
A pressure wire connector is provided on
the exterior surface of the control box, inside
the spa. This is to permit the connection of a
ground bonding wire between this point and
any metal equipment, enclosures, reinforced
concrete pad, pipe, or conduit within 5 feet
of the spa (if needed to comply with local
building code requirements). The bonding
wire must be at least a #10 AWG solid copper
wire.
Bond the spa to all exposed metal equipment
or xtures, handrails, and concrete pad per
N.E.C. Article 680 and all local codes.
1. Push the “TEST” button on the GFCI breaker.
The spa should stop operating and the GFCI
power indicator will go out.
2. Wait 30 seconds, then push the “RESET”
button. Power will be restored to the spa and
the GFCI power indicator will turn on.
If the GFCI fails to operate in this manner, your
spa may have an electrical malfunction, and
you may be risking electrical shock. Turn o
all circuits and do not use the spa until the
problem has been corrected by an authorized
service agent.
WARNING: Removal of the GFCI from the
spa’s power cord will result in an unprotected
spa and will void the spa’s warranty.
IMPORTANT: Should you ever nd the
need to move or relocate your Vita Spa, it
is essential that you understand and apply
these installation requirements. Your Vita
Spa has been carefully engineered to provide
maximum safety against electric shock.
Caution: Risk of electrical shock.
Read and follow all instructions.

14
VITA SPA DUET
START UP PROCEDURES
Follow recommendations for site location
and electrical connection. The water line on
the weir door is the level at which the water
should be maintained.
1. Fill the spa through the lter hole to
1/8” below the top of the Weir door. with
tap water. Never use ‘softened’ water in
your spa. Softened water can impact the
chemical balance of the water and lead to
degradation of metal plumbing ttings.
2. Turn power on to unit at circuit breaker or
disconnect panel.
3. Open the air controls, located on the top
lip, and cycle the jets from high to low.
Water should come from the therapy jets.
If water ow is not established, turn o jets
and see Priming Your Spa (this page).
4. Add chemicals. Ask your dealer for
additional information.on start up or
getting the water balanced.
Follow Operating Instructions for your
particular model to set heat to the desired
temperature. Initially, you may nd that
the spa requires 12 to 14 hours on 120 Volt
installations to reach temperature. Keep your
thermal cover on the unit and close the air
control to help the heating process.
Priming Your Spa
When lling your spa for the rst time or,
after draining and relling the spa, you
may need to bleed air from the system.
Should you experience an air-lock on
Pump 1, remove the lter cover,
insert a garden hose through the center
hole that holds the lter as far as possible
without using force. Hold the hose in place
and turn on the water. Cycle pump 1 from
low to high several times, this forces water
into the pump and forces the air out. If
this does not work , remove the side panel
and locate the pump. Slowly loosen the
discharge (top) pump union until water
starts to trickle out. Once water is trickling
out, hand tighten the union (do not over
tighten as this could cause the union to
crack) and replace the side panel
Pr - This is Not an Error Message
The Spa has just been powered up and is in
Priming Mode for up to 4 Minutes. Pumps
can be turned ON and OFF to remove any
air from the plumbing lines and the Heater.
Cycle the pumps on and o to verify good
water ow and wait 4 minutes or press any
temp related button to exit Priming Mode.
Important: Do not operate the spa
without full water ow.
15
VITA SPA DUET
POWERWORKS ®300 CONTROL
The 300 Series Powerworks™ Controls oer
you the ultimate in spa control. The backlit,
Liquid Crystal Display (LCD) displays current
temperature, set water temperature, and
operating mode settings. Each feature is
actuated through the control panel pad.
Touch the appropriate button to activate
the desired function.
At start up, when power is supplied to the spa,
the controls will operate properly and safely
under the factory settings. The spa will be in
Standard mode, have a temperature setting of
100°F (38°C), and a ltration cycle duration of
1 hour. To fully utilize the unique capabilities
of the control system, it is important to know
how to set the temperature, operate the
pumps, operate the light, adjust the mode
setting, and change the ltration cycle.
Note: In event of a power outage or failure,
the 300 Series Control System may retain
settings. If settings are lost, re-program per
the instructions in this manual.
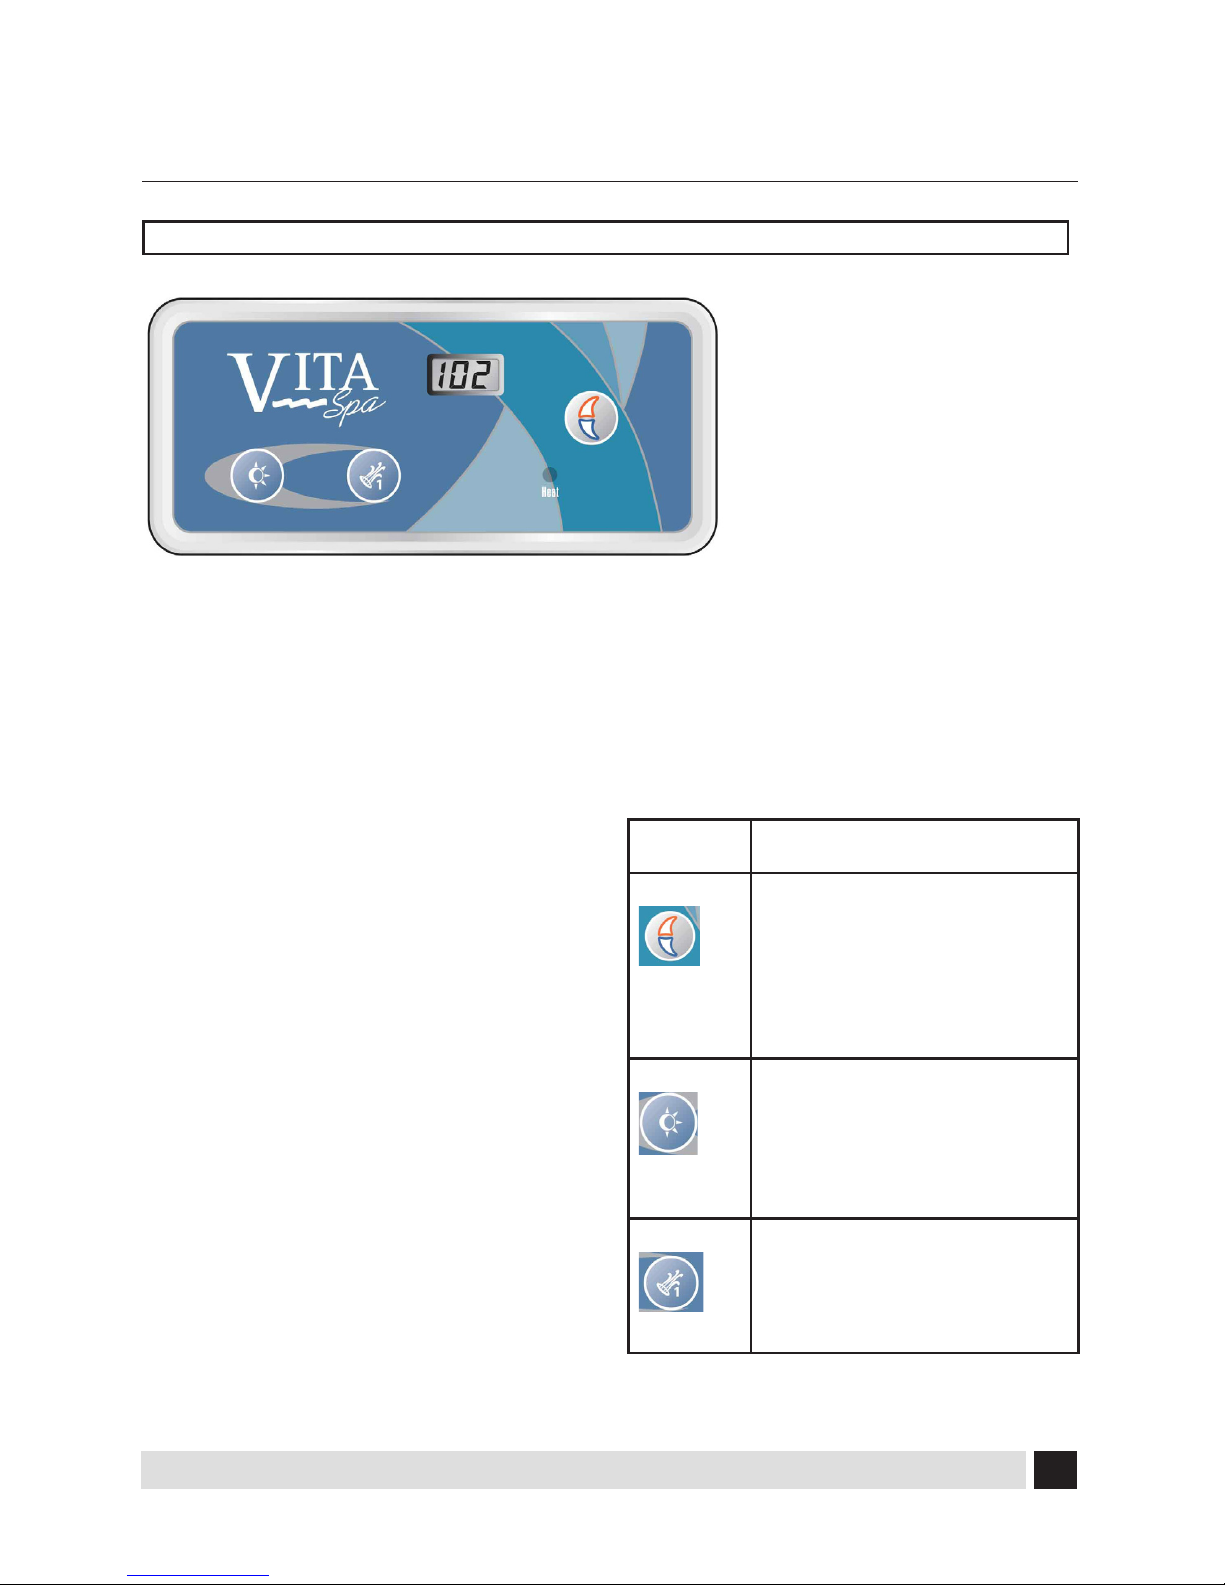
User’s Pads
User’s Pads are the buttons located on the
topside control panel and are used to program
various spa functions (i.e., turn on spa light, set
temperature, etc.). The following table denes
the buttons:
Your Topside Control looks like
this, your spa has the following
features:
• Internal Light
• 1 Dual Speed Pump
Duet
Pad Use
Temp
• Decrease temperature
• Increase temperature
• Switch modes
• Change ler cycle durations
Lght
• Turn internal spa light on or o
• Switch modes
Jets
• Activate therapy pump
• Set duration of lter cycles

16
VITA SPA DUET
ltration pump. The sequence of the jet action
is:
1 touch = Low therapy jets
2 touches = High therapy jets
3 touches = O
The low speed operation of Pump 1 is timed
to automatically turn o after two hours
of operation. The high speed operation of
Pump 1 is timed to automatically turn o
after 15 minutes of operation.
NOTE: With the standard conguration,
pump 1 will automatically operate in
low speed whenever the spa calls for a
ltration cycle or heat. When this automatic
activation occurs, the low speed of Pump
1 cannot be turned o; however, all other
control functions can be activated.
MODES OF OPERATION:
In the standard conguration your spa can be
switched among Standard, Economy, and
Sleep modes by touching the ‘TEMP’ pad and
then the ‘LIGHT’ pad.
If your spa is in the
Standard mode,
the low speed op Pump 1 and the heater
will come on automatically to maintain the
set temperature of the water. The pump
will circulate for approximately one minute
several times throughout the day to sample
water temperature. If your spa is set in the
Economy mode,
the heater will operate ONLY during the
ltration cycles. If your spa is set in the
Sleep mode,
The spa will heat to within 20°F (11°C) of the
set temperature only during lter cycles.
The pump will operate either during a normal
ltration cycle or, the heater and pump
will be activated when the heater housing
Temperature
The maximum set temperature is 104°F (40°C)
and the minimum set temperature is 80°F
(26°C). The current water temperature or, if
the pump has not been running, two dashes,
will show on the display. If dashes are
displayed, you must rst start the pump by
pressing the PUMP 1 pad. Wait until the water
temperature is displayed (approximately 1
minute).
The set temperature of your spa may easily
be increased or decreased at any time using
the ‘TEMP’ pad. Press the ‘TEMP’ pad; the
set temperature will be displayed in the
LCD window. The next touch of ‘TEMP’ will
change the set temperature either up or
down 1°F (0,5°C). If you want to increase
the temperature and the displayed indicates
the temperature was increased by 1°F (0,5°C),
continue to press the‘TEMP’ pad until the
desired set temperature is reached.
If you want to decrease the set temperature
and the LCD indicates that the temperature is
increasing, STOP. Wait a few seconds until the
actual temperature is displayed. Then press
the ‘TEMP’ pad again. The set temperature
will be displayed. Press it again and the set
temperature will decrease by 1°F (0,5°C).
Continue pressing the‘TEMP’ pad until the
desired set temperature is reached.
If the spa is set in Standard mode or in a
ltration cycle, increasing the set temperature
may result in activating the heater. Decreasing
the set temperature will turn the heater o.
When the heater is operating, the LED below
the ‘HEAT’ icon will be lit.
Pump 1
Touch the ‘JETS’ pad to activate the primary

17
VITA SPA DUET
the 6 minute wait period). The cycle will begin
at 9:00 PM and will repeat beginning at 9:00
AM. Each cycle will run for the prescribed
number of hours.
Changing Filter Cycle Duration
The duration of a lter cycle can be set in one
hour increments of 1- 8. For example, a 2
hour cycle will complete once every 12 hours
for a total of 4 hours per day. The amount of
time needed to lter you spa will depend on
usage and ambient conditions.
You will need to program you lter cycles
based upon your personal use.
To change the duration of the lter cycles
touch the ‘TEMP’ pad and then touch the
‘JETS’ pad. Touch the ‘TEMP’ pad to adjust
the cycle duration to the desired setting. After
each press, the duration of the cycle will be
displayed in the LCD window as follows:
F1 1 Hours for each cycle, 2 hours per day
F2 2 Hours for each cycle, 4 hours per day
F3 3 Hours for each cycle, 6 hours per day
F4 4 hours for each cycle, 8 hours per day
F5 5 hours for each cycle, 10 hours per day
F6 6 Hours for each cycle, 12 hours per day
F7 7 Hours for each cycle, 14 hours per day
F8 8 Hours for each cycle, 16 hours per day
To exit the lter-set procedure, touch ‘JETS’.
The LCD window will display the current water
temperature.
If a change is made to the duration while the
spa is in a ltration cycle, it will take eect
immediately. If the change is made outside a
ltration cycle, it will take eect at the start of
the next scheduled cycle.
NOTE: When power to the spa is denied
(disconnect, power outage), the controls
may revert to the default factory settings.
temperature drops below 45°F (7.2°C).
The selected mode will be displayed in the
LCD window of the control panel.
When in Standard mode, the letters‘ST’
are displayed beiey, followed by the water
temperature. When in Economy mode, the
letters ‘EC’ are
displayed alternately with the
water temperature.
When in Sleep mode, the letters ‘SL’ are
displayed alternately with the water temperature.
Setting the Time and Filtration Cycles
You can decide when your lter cycles start
and you also have choices on how long they
run.
Preset Filter Cycles. The spa control system
is designed with two lter cycles. The rst
lter cycle turns on 6 minutes after power is
supplied to the spa. The second lter cycle
turns on 12 hours later. Filter cycles are pre-set
for a two hour duration.
Note: To properly clean and maintain spa, a
total lter time of at least two hours per day
is recommended. If an ozonator is installed,
4 hours is recommended.
Changing Filter Cycle Start Time
The start/stop times of the lter cycle begin 6
minutes after the spa set time is established.
Set time is based on the time of day that
the spa is powered up. Set time may only be
changed by disconnecting power from the
spa and re-connecting it at the desired start
time. For example, if you want the lter cycle
to begin at 9:00 PM,turn o the spa breaker
and turn it back on at 8:54 PM (remember

18
VITA SPA DUET
THERMAL CREEP: see page 24
OZONE OPTION: see page 20
Any adjustments to set temperature
or lter cycle duration may need to be
reprogrammed.
Light
Touch the ‘LIGHT’ pad to turn all lights on and
o. The lights will automatically turn o after 4
hours of operation.
Automatic Time Outs
Your Vita Spa is equipped with an automatic
Time Out feature designed to protect both the
equipment and the user. To reduce unneces-
sary use of the pumps and lights, the Time Out
feature turns selected accessories o
autmatically.
MODEL GALLONS LITERS
DUET 103 390
Accessory Mode Shuts o in...
Accessory Mode Shuts o in...
Pump 1 Low 2 hours
Pump 1 High 15 minutes
Light 4 hours

19
VITA SPA DUET
MAINTENANCE
Water Chemistry
Water chemistry is critical in a spa system.
Chemicals are used to sanitize the water and
control the pH balance. The combination
of high water temperature and small water
volume means that the chemical balance must
be watched carefully. It is recommended that
you purchase a chemical start up kit, and
the additional chemicals needed to maintain
the proper/optimum chemical balance, from
your dealer.
Sanitizing
Sanitizing the water destroys harmful
organisms and keeps your spa healthy and
safe. Three commonly used spa sanitizer or
oxidizing agents are bromine, chlorine and
ozone. Chlorine or bromine are chemicals that
you add to the water. Ozone is a gas that is
produced by an ozonator and injected into
the water. It is important that a residual of
sanitizer remain in your water. High water
temperature, aeration and use will increase
the need for sanitizer.
In addition to maintaining a residual,
it is important to ‘shock’ your spa water
periodically and after heavy use. This addition
of substantial amounts of sanitizer super-
chlorinates the water and oxidizes non-
lterable organic residue. Allow the sanitizer
level to drop back to the residual amount
before using. Also use your Clean Up Cycle
after heavy use for additional ltration. Tests
should be done daily with your test kit to keep
a chlorine or bromine residual of 3.0 to 5.0
ppm.
pH Level
pH is the balance of acidity and alkalinity
in the water. Maintaining proper pH is
important for the eectiveness of your
sanitizer, for user comfort, and to prevent
corrosion of the spa equipment.
Caution: Never mix two chemicals together.
Caution: Never store chemicals in the
equipment compartment.
Caution: Do not use muriatic acid to balance
pH as it will damage your spa surface and
equipment.
Recommended Levels
pH: 7.2–7.6
(Ideal 7.4–7.6)
Sanitizer Residual: 3.5–5.0 ppm
Total Dissolved Solids: 100–200 ppm
Free Available Sanitizer: 3.0–5.0 ppm
Total Alkalinity: 80–100 ppm
ideal for dichlor,
trichlor, and
bromine
NOTE: Make sure you use fresh test kit
strips/chemicals. Test kits and test
chemicals should be stored in a cool,
dry location. Check the manufacturer’s
instructions to determine shelf life and
expiration date.
Ozone:
Equipping your spa with the Powerworks ™
Ozonator is a smart decision. The use of ozone
in conjunction with spa sanitizing and water
balancing chemicals helps to provide you with
a cleaner, healthier spa and reduces chemical
usage.
Table of contents
Other Vita Spa Hot Tub manuals

Vita Spa
Vita Spa M15 Series User manual

Vita Spa
Vita Spa GRAPHIC SERIES User manual

Vita Spa
Vita Spa xStream User manual

Vita Spa
Vita Spa L200 series User manual

Vita Spa
Vita Spa L100 SERIES User manual

Vita Spa
Vita Spa L100 SERIES User manual

Vita Spa
Vita Spa LX series User manual

Vita Spa
Vita Spa 100 Series User manual

Vita Spa
Vita Spa Spa User manual
Popular Hot Tub manuals by other brands


Canadian Spa
Canadian Spa Vancouver UV Spa KH-10032 owner's manual

Balboa Water Group
Balboa Water Group 500DZ Series Operation guide

Image Fitness
Image Fitness Renew 615 Spa user manual

Pooli
Pooli OS030979B product manual

KBL
KBL megaSun 5600 operating instructions

Jetta
Jetta Affinity Owner's manual & installation guide