VITRA ACRYLIC SHOWER TRAYS User manual

ACRYLIC SHOWER TRAYS
Installation and User Manual

CONTENTS
Foreword ................................................................................................................................................................3
General Characteristics of the Product ...................................................................................................................4
Matters requiring attention During Shipping and Transportation...............................................................................4
Shower Tray Installation...........................................................................................................................................5
• Installation of Shower Tray with Panels............................................................................................................5
• Installation of Flat Shower Trays and Shower Trays for Disabled.......................................................................6
• Installation of Profile Legs for Flat Shower Trays...............................................................................................7
• Installation of Monoblock Shower Trays...........................................................................................................8
• Installation of Zero-to-Surface Shower Trays....................................................................................................8
Maintenance of Shower Trays................................................................................................................................10
• Matters Requiring Attention...........................................................................................................................10
• Problems You May Encounter and Their Solutions.........................................................................................10
• Cleaning of Acrylic Shower Trays...................................................................................................................10
• Usage of Shower Tray Siphon Key.................................................................................................................10
Matters Not Covered Under Warranty....................................................................................................................11
• Transportation, Storage ................................................................................................................................11
• Installation.....................................................................................................................................................11
• Use, Cleaning and Maintenance....................................................................................................................11
October 2016
www.vitra.com.tr
This user manual applies to all VitrA Acrylic Shower Tray Models.
Manufacturer Company
Eczacıbaşı Yapı Gereçleri
San. ve Tic. A.Ş.
Șekerpınarı Cumhuriyet Mah.
İsmet İnönü Cad. No: 27
41420 Çayırova / Kocaeli
Tel : (0262) 648 95 00 (Pbx)
Faks: (0262) 658 85 94
Consultancy Line
0850 311 70 70
0532 755 75 00
General Distribution
Central Service
İntema A.Ş.
Ali Kaya Sk. No: 7
Levent 34394 İstanbul
Tel : 0212 350 80 00
Faks : 0212 350 85 80

3
Dear customers,
By ensuring a correct and purposeful use of this product which you have purchased, we would like it to deliver the best
performance to you.
1- Accept the purchased product by removing it from its carton at our sales point and/or at the delivery to address and
checking its parts one by one. If any missing materials or any breakage or damage is detected, inform the nearest
Authorized Seller or the Authorized Service. In such cases, please protect the product in its original packaging.
2- Have the User Manual of the product which you have received without any missing parts or any damages APPROVED
by the Authorized Seller.
3- We urge you to carefully read this guide in full before having our product installed and keep it for future reference.
4- Please call the Authorized Service after completing the preparations for the required infrastructure.
5- In the event you need service for installation, maintenance and repairs;
• Ask from our seller for the telephone number of the Authorized Service in the area you are living in.
• In places where we do not have a seller, you may get the necessary information from the telephone numbers given in the
guide.
• Ask the service personnel to display their “Vitra Artema Authorized Service Personnel Card”. Do not let people without a
personnel card perform the installation
• At the completion of the process, the technician is obliged to write the 'Service Form' correctly and in detail and have you
sign it and give a copy to you. Please keep the 'Service Form'.
• Some Authorized Services may have been shut down in time. You can learn the most reliable address from our website at
www.vitra.com.tr, which is continuously updated and/or by calling our consultancy lines at 0850 311 70 70 and 0532 755
75 00
• The items above have great importance for determining people who work under the name of special service and who are
not Authorized Services. Please take note of these.
6- In case our Seller or our Authorized Service cannot satisfy your request or complaint please contact the
communications means provided within the guide.
Sincerely yours,

4
• VitrA Acrylic Shower Trays are under warranty for 2 years from the purchase date.
• In order for you to benefit from “2-year warranty” application please have the Warranty Certificate
approved by the Intema Store or Intema Authorized Seller from which you purchase your product or
the VitrA - Artema Authorized Service which installed your shower tray.
• In case of any problem, please contact the nearest VitrA-Artema Authorized Service.
MATTERS REQUIRING ATTENTION DURING SHIPPING AND TRANSPORTATION
1- The products should be transported and placed according to the transportation and protection signs found on
the package.
2- During the forklift carriage of products shipped in crates or cardboard packaging you should make use of pallets.
3- In order to prevent products from breaking during their storage and protection they should be placed in
accordance with the direction indicated on the packaging and placing them on top of one another should be
avoided.
4- Product parts removed from packages opened for the purpose of carrying to floors should be checked and
carried in a protected manner.
5- The protective film layer on the product should not be removed before transportation, installation and repair
procedures are completed.
GENERAL CHARACTERISTICS OF THE PRODUCT
The highest quality polymethylacrylate, in other words, "Acrylic" is used as the primary material in the production of
VitrA Acrylic Shower Trays. Acrylic which has a high wear resistance is preferred because it can be easily cleaned
and does not host microorganisms.
Acrylic is known to be one of most accommodating materials for human nature. Having a flexible structure, acrylic
maintains its resilience against impacts and does not deform. Any small scratches which might occur on the surface
can easily be eliminated through polishing. Acrylic products do not lose their shine due to a homogenous
distribution of color cells, and saves the “first day appearance” over years.
The acrylic plates used in the production of VitrA Acrylic Shower Trays are supplied from Lucite International (ICI)
which is one of the leading producers of acrylic materials in the world and meets the EN 263 Standards for Acrylic
Plates. The plates are assured against wear and tear through a ten-year aging test conducted by TUBITAK.
Vitra Shower Trays which are produced to meet the TSEK – DIN 249 – GOSS Acrylic Shower Tray standards, also
meet TS301-DIN2440 standards in the leg sets and the EN 274 standard in the siphons.
The usage life of the product is 10 years as per the communiqué on “After-sale Services of Industrial products”
published by TR the Ministry of Industry and Trade.

INSTALLATION OF SHOWER TRAYS
Installation of Shower Trays with Panels
5
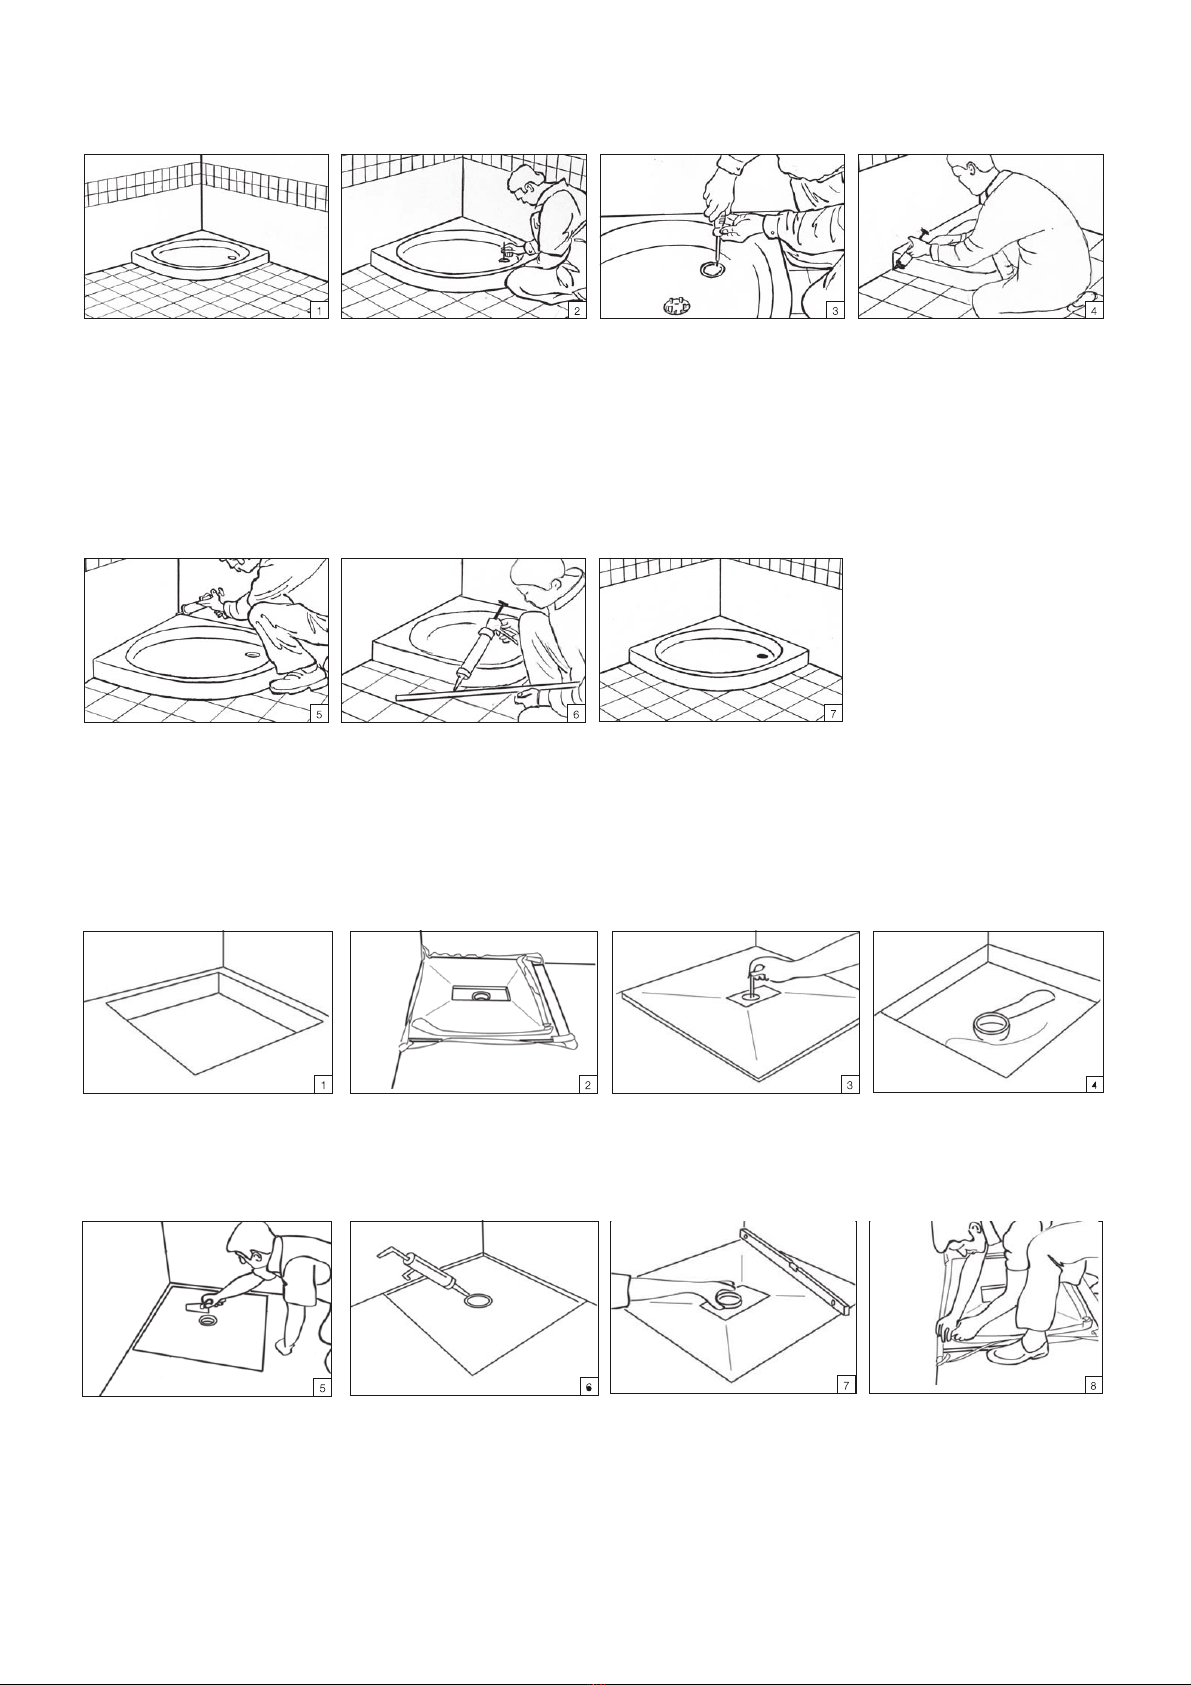
1- The shower tray should be installed to a structurally prepared floor.
Temporarily place the shower tray at the installation area. Remove the protective folio of the shower tray from its sides that are touching the wall
and from the area around the siphon. The remaining protective folio on the shower tray should be removed only after the shower tray installation
and other construction works in the bathroom are finished.
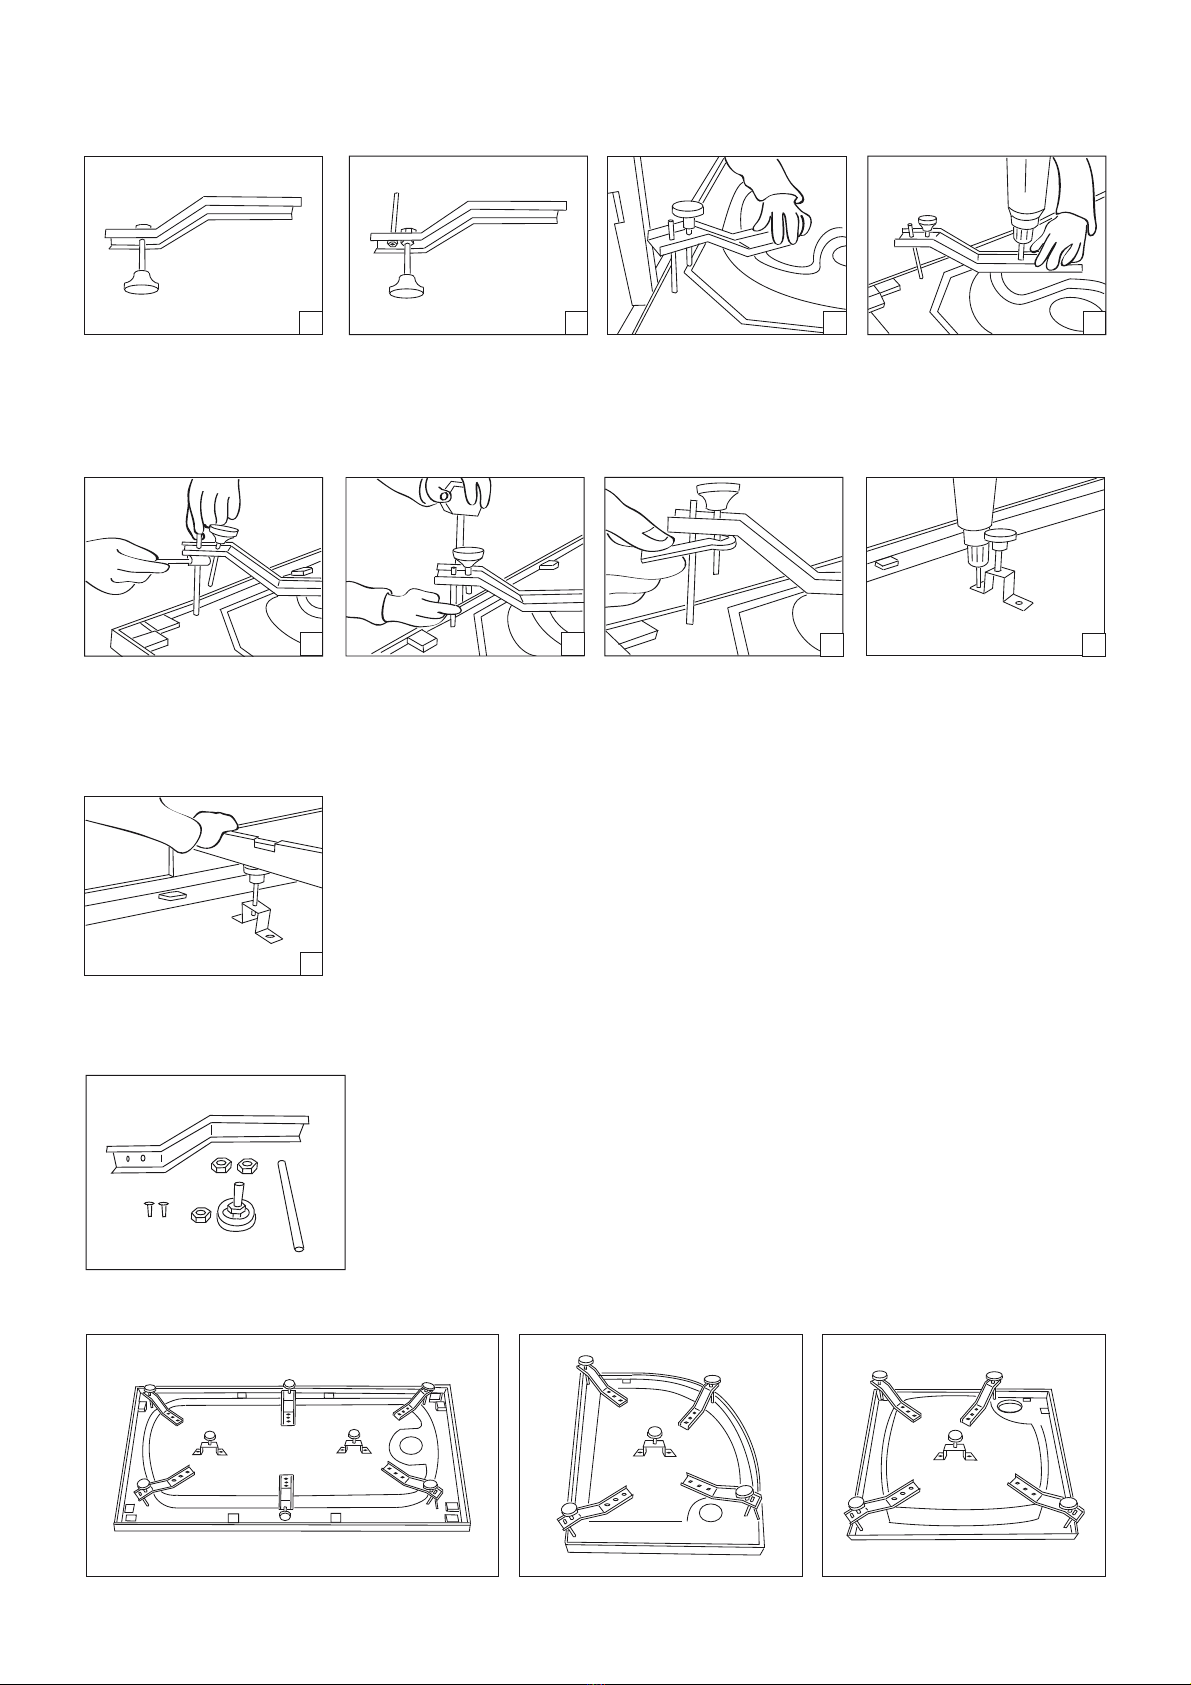
2- If the shower tray is purchased with a packaging on pallets, the leg sets must be installed to the shower tray. In this case the leg profiles are
prepared to be installed on the shower tray. The shower tray is placed upside down on a clean floor and the U shaped legs are inserted to the
toggle and fixed to the bottom of the product via two screws. If the shower tray’s legs are new profile legs then the New Profile Leg Installation
steps should be followed.
3- Adjust and level the leg set according to the height of the panel. Check the evenness with a scale. (See the Technical Data Sheet for the panel
height).
4- Tighten the let sets nuts.
5- The floor tiles are marked through the holes in the leg set’s plastic feet. Caution! Where wall hangers are used there’s no need to fix the legs of
the shower tray to the floor. However if there are un level walls the leg installation holes for the shower trays are drilled with a 7-8 tip drill. Caution!
No hole should be drilled on heated and isolated floors.
6- The points on the wall tiles are marked for installing the wall hangers. (The spots shown with “A” in in the "Plan” section of the Technical Data
Sheet).
7- The shower trays is removed from its location. The spots marked on the wall are drilled with a tip 10 drill (and if required, the spots marked on
the floor are drilled with a tip 7-8 drill), the pegs are inserted in the holes and the wall hangers are installed. (The spots shown as “Wall Hanger
Detail” in the Technical Data Sheet).
8- The siphon outlet connection is supported with silicone.
9- The prepared siphon is installed. (At this stage do not forget to remove protective folio on the shower tray around the siphon hole.) After the
siphon outlet is connected it is checked for leak proof ness.
10- The legs of the shower tray are screwed to the floor. However, as mentioned above, if wall hangers are used there’s no need to fix the legs of the
shower tray to the floor. The legs of the shower tray are fixed to the floor if there are un-level walls. (Caution! No hole should be drilled on heated
and isolated floors).
11- The shower tray is fixed to the wall using the wall hangers. (Technical details are shown as “Wall Hanger Detail” in the Technical Data Sheet).
12- The protective folios of the panels are removed.
Points that Require Attention:
• Because of the technical properties of the products, the installation of shower trays were classified into four methods and explained in the
following order:
1. Installation of Shower Trays with Panels
2. Installation of Monoblock Shower Trays
3. Installation of Flat Shower Trays and Shower Trays for the Disabled
4. Installation of Zero Surface Shower Trays
• For the technical details of shower trays, the technical data sheets should be consulted.
• Before installation it should be checked that the floor tiles are even and the walls are 90°C at the installation location.
• We recommend to install shower trays with panels and monoblock shower trays only after tiling the wall tiles and completing all construction
work in the bathroom.
• The installation of flat and zero surface shower trays should be performed before or during tiling
• Cold and hot water connections must be already realized.
Table of contents
Other VITRA Bathroom Fixture manuals
Popular Bathroom Fixture manuals by other brands

Kohler
Kohler Mira Sport Max J03G Installation and user guide

Moen
Moen 186117 Series installation guide

Hans Grohe
Hans Grohe Raindance Showerpipe 27235000 Instructions for use/assembly instructions

Signature Hardware
Signature Hardware ROUND SWIVEL BODY SPRAY 948942 Install

fine fixtures
fine fixtures AC3TH installation manual

LIXIL
LIXIL HP50 Series quick start guide