/ Yandan Çıkışlı Duş Kanalı Uygulama Adımları
• Sdeward Output Applcaton Steps
Installaton Steps / Montaj Adımları
•
• Shower channels should be appled wth the slope concrete before Ceramc applcaton.
REALIZE THE INSTALLATION IN LINE WITH THE USER GUIDE PROVIDED
• Slope should be gven to the floor accordng to techncal sheet, usng slope profiles suppled.
• Usng the solaton tape suppled n the package s necessary for applcatons.
• KUTU İÇERİSİNDEKİ TÜM PARÇALAR UYGULAMAYA YARDIMCI VE KULLANIM AMAÇLIDIR.
LÜTFEN MONTAJ VE BAKIM KULLANIM TALİMATINA UYGUN YAPINIZ.
• Kullanılacak mekanda seramk döșenmemș olması gerekr.
• Duș kanalları meyl beton așamasında uygulanmalıdır.
• Uygulamalarda paket çnden çıkan zolasyon bandı kullanılmalıdır.
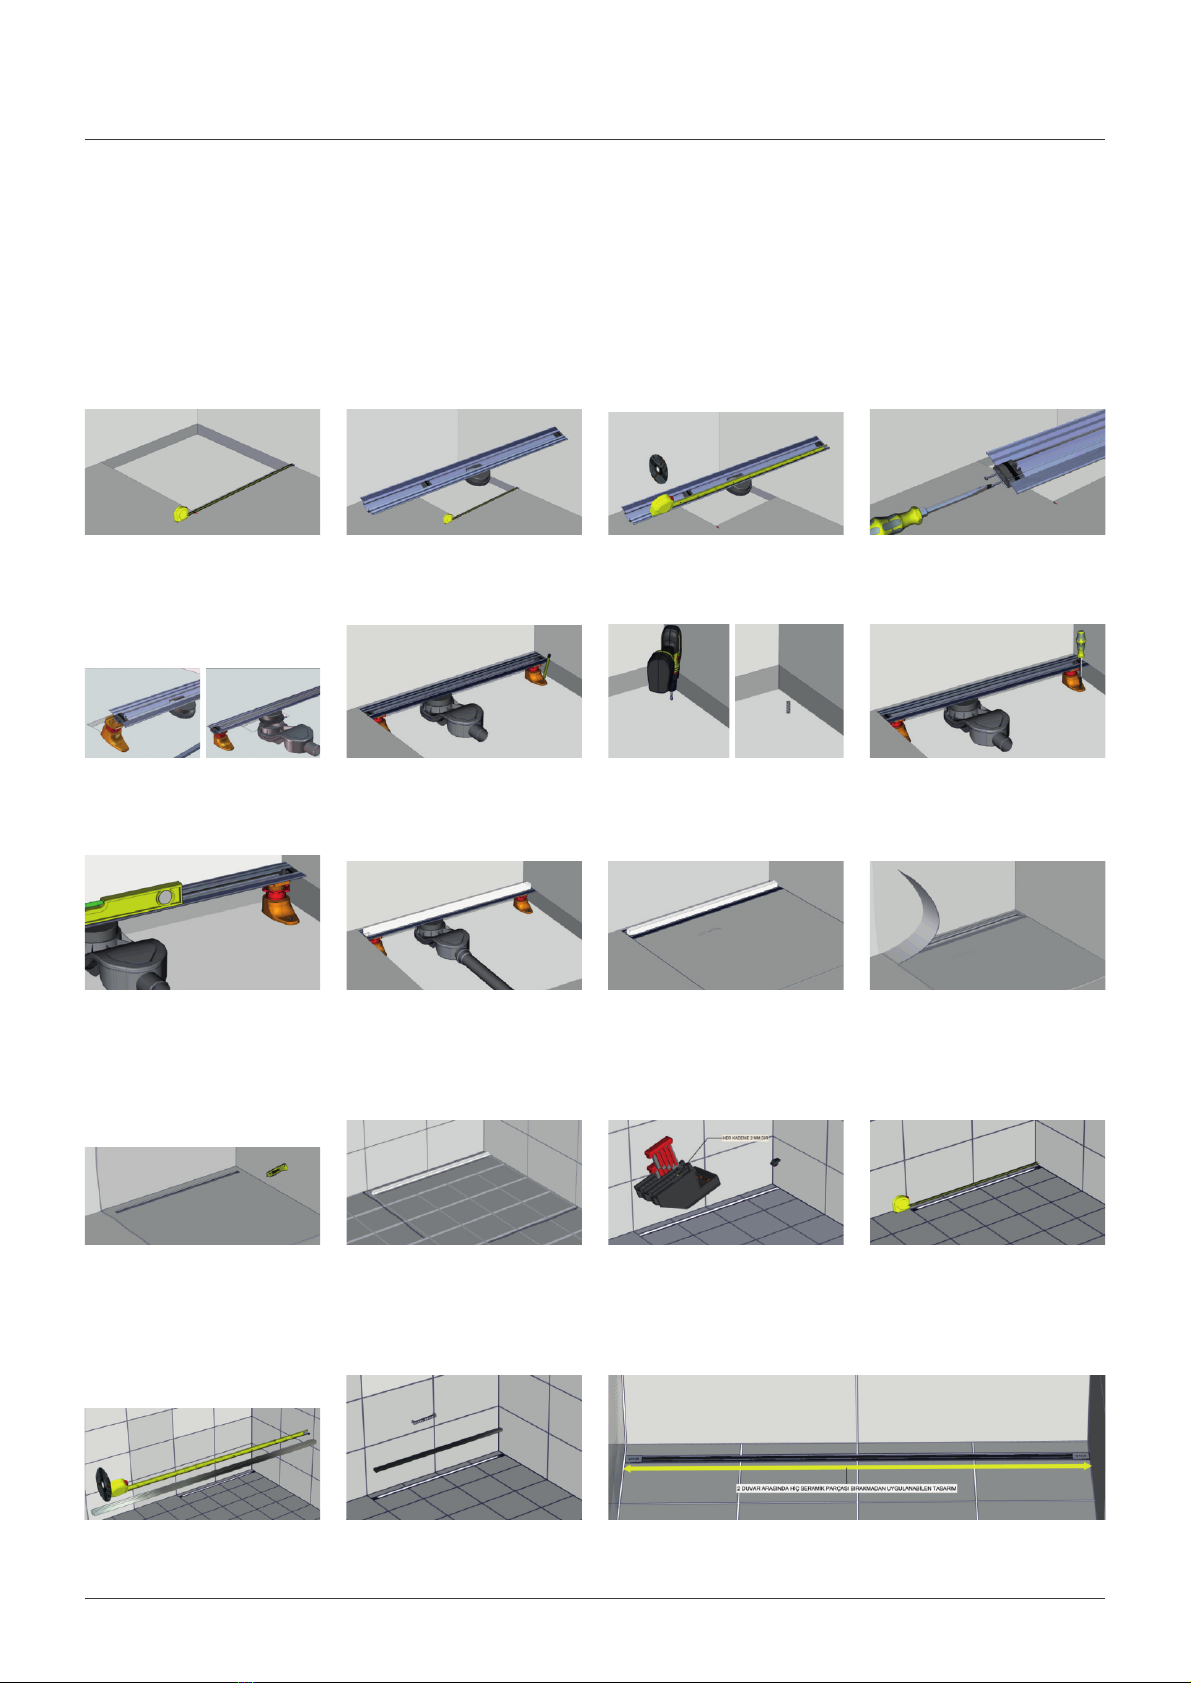
Uygulama yapılacak olan alanın genșlğn
belrleynz.
Determne the wdth of the applcaton area.
Gövde kenarndak plastk sızdırmazlık
parçalarını keslecek kısımda kalmayacak
șeklde çer kaydırınız.
Slde the plastc solaton parts nwards
makng sure t s not n the cut-out sde.
Gövdey daha önce belrlenen genșlğe nox
kescyle kesnz.
Cut the steel body to the wdth of the
applcaton area wth stanless stell cutter.
Sızdırmazlık kapaklarını tekrar gövde kenarına
getrerek vdalarn sıkınız.
Slde the solaton parts back to the edge and
fix usng screws.
Ayakları ve sfonu takıp ürünü montaj
yapılacak yere yerleștrnz. Sabtleme
vdalarının yern șaretleynz.
After nstallng legs and waste part, place the
product to nstallaton area. Mark the fixng
screw ponts.
Yükseklk ayar parçalarını gövdeye takınız.
Sfonu kanala bağlayınız..
Connect the heght adjustment parts of the
body. Connect dran to the channel.
İșaretl noktaları delp dübel çakınız.
Drll the marked ponts and nstall anchors.
Ürünü montaj yapılacak yere tekrar
yerleștrnz. Sabtleme vdalarını sıkınız.
Place the product to nstallaton area agan
and fix usng screws.
Br teraz yardımı le fotoğrafta kırmızı olarak
görünen parçayı çevrerek gövdey terazye
alınız.
Usng a level make sure the body s leveled
by turnng the part shown red n the photo.
Duș kanalını tessata bağlayınız ve koruyucu
straforu tıkanmaya karșı üzerne koyunuz.
Connect the shower channel to the
nstallaton and put the protectve styropor on
t n case of blockage.
Düzeltme betonunun meyln duș kanalına
doğru mn %1 eğmle vernz.
Bevel the slant of levelng concrete mn. 1%
towards shower channel.
Düzeltme betonuna astar sürünüz. İzolasyon
bandını metal-beton brleșmne yapıștırınız.
Ardından tüm alana en az 2 kat sürme
zolasyon uygulayınız.
Apply prmng coat to levelng concrete.
Adhere the solaton tape to the
etal-concrete. After that apply a least 2 layers
of solaton to all area.
Br bıçak yardımı le zolasyon bandını keserek
metal çerçevenn geçeceğ bölgey açınız.
Usng a knfe cut the solaton tape and open
the area that metal frame wll be nstalled.
Saç toplayıcı parça ardından metal çerçeve
ve kapak parçaları yerne yerleștrnz.
Install first har collector part then metal parts
of frame and cover.
Son olarak logolu kapakları yerne yerleștrnz. 23 cm butl bant kullanımında kesm çzgsnden
seramk uygulaması önces keslmeldr.
Fnally put the covers wth logo to each end. In 23 cm butl band usage should be cut from
secton lne before ceramc applcaton.
Seramk döșeme önces koruyucu straforu
tekrar yerne takınız ve döșeme sonrası
yernden çıkarınız.
Before ceramcs nstallaton, put the
protectve cover on the body agan. After
ceramcs nstallaton remove t.
Çerçeve plastk parçalarını karo üst yüzey le
aynı sevyede olacak șeklde ayarlayarak
yerne yerleștrnz. Kırmızı le gösterlen ayar
parçalarını kaydırarak yükseklk ayarlanablr.
Install frame plastc parts by adjustng heght
accordng to ceramcs. By changng poston
of red parts shown n the photo t can be
adjusted.
Çerçeve metal parçalarının geçeceğ genșlğ
belrleynz.
Determne the necessary wdth of the metal
parts of the frame.
Çerçeve metal parçalarını daha önce
belrlenen genșlğe kesnz.
Cut the frame metal parts to the wdth
determned.