Vitrifrigo WMF CENTER COOLER User manual

171209 –rev. 01 08/18 EN
REFRIGERATORS FOR MILK STORAGE
CENTER COOLER
INSTALLATION, USE AND SERVICE MANUAL
ORIGINAL INSTRUCTION

171209 –rev. 01 08/18 EN

171209 –rev. 01 08/18 EN
CONTENTS
1. Purpose of This Manual
2. Safety Warnings
3. Manufacturer Identification
4. Product Identification
5. General Description
6. Description of Operation
7. Installation and Use
7.1 Checking the packaging
7.2 Positioning
7.3 Electrical connection
7.4 Use
7.5 Defrosting
7.6 Installation of milk tube
7.7 Cleaning and maintenance
7.8 Non-ordinary maintenance and servicing
8. Disposal
9. Warranty Claims
10. Troubleshooting

171209 –rev. 01 08/18 EN
1 Purpose of This Manual
This manual for the WMF Center Cooler refrigerator, serves to provide
instructions and useful recommendations for the correct installation, start
up, use, maintenance and cleaning of the appliance as well as to point
out any residual risks or risks arising from incorrect use.
This manual must be considered an integral part of the appliance to
which it refers and as such, it needs to be kept with care.
Some figures in this manual may illustrate details or parts that differ
slightly from those on your appliance; this in no way modifies essential
information.
The manufacturer reserves the right to update this manual, as considered
necessary, at any time and without notice.
2 Safety Warnings
The safe and correct use of this product requires you to follow the rules
and guidelines in this manual. The manufacturer cannot be held liable for
any damage arising from failure to abide by the warnings in this manual.
The product referred to in this manual is made to store milk for human
consumption. No use other than that for which it was intended is
permitted. Any other use is considered improper and therefore,
hazardous.
Warnings and important safety Instructions in this manual do not cover all
possible conditions and situations that may occur. It is your responsibility
to use common sense, caution, and care when installing, maintaining,
and operating your appliance.
Carefully read the labels on the refrigerator; do not cover them under any
circumstances and be sure to replace them immediately should they
become damaged.

171209 –rev. 01 08/18 EN
R600a (flammable gas) is used as a refrigerant. You will find this label on
the compressor.
In this case, some special precautions must be taken:
-to reduce flammability hazards the installation of the appliance must
only be carried out by a suitably qualified person.
-place the refrigerator in a well sized ambient.
-handle the device paying attention in order to do not to increase the
risk of refrigerant loss.
-when positioning the appliance, ensure the supply cord is not
trapped or damaged.
-do not locate multiple portable socket-outlets or portable power
supplies at the rear of the appliance.
-do not damage the refrigerant circuit.
-do not use the refrigerator if it seems to be damaged.
-to avoid damages on refrigeration circuit, do not use mechanical
devices or any other means to accelerate the defrosting process.
-keep ventilation openings always free.
-if refrigerant leaks from the pipe, avoid any naked flames and move
anything flammable away from the product and ventilate the room
immediately.
-do not use electrical appliances inside the food storage
compartments of the appliance, unless they are of the type
recommended by the manufacturer.
-do not store explosive substances such as aerosol cans with a
flammable propellant in this appliance.
-the components must be replaced by the same components and
suitable for specific use, maintenance must be carried out only by
specialized and authorized personnel to minimize the risk of
possible explosions due to incorrect components or improper
maintenance.

171209 –rev. 01 08/18 EN
In case of malfunctioning, disconnect the refrigerator from the power
supply immediately.
If the power cable is damaged, it needs to be replaced by the assistance
servicing or authorized person.
Non-routine maintenance operation must be performed only by
professionally qualified persons.
Some points of the internal condensing unit of the refrigerator may be hot
or have potentially sharp edges.
Before carrying out non-routine maintenance or servicing operation,
disconnect the power supply and wait for the time needed for the
appliance to cool down. Always wear suitable personal protective
equipment, compliant with current standards, when performing cleaning
or maintenance.
The “Electric Shock Hazard” label found on parts, casings and/or covers
serves to warn that their removal means being exposed to the danger of
coming into contact with energised parts.
Do not expose the refrigerator to jets of water and never use toxic
substances for cleaning.
Do not expose the refrigerator to sources of heat.
In case of fire, use extinguisher powder.
The packaging material must be disposed in compliance with current
regulations.

171209 –rev. 01 08/18 EN
3 Manufacturer Identification
The product referred to in this manual is designed and made by
Vitrifrigo s.r.l.
Via Giuseppe Mazzini, 75 –Fraz. Montecchio
61022 Vallefoglia (PU) - Italy
Tel. +39 0721 154500
Fax +39 0721 497739
Mail [email protected]
4 Product Identification
Each refrigerator has an identification label with the following information:
- model
- unit identification code and serial number
- refrigerated compartment volume (or milk container volume)
- climatic class
N: functioning from 16°C up to 32 °C ambient temperature
4: functioning up to 30 °C ambient temperature and 55% rH
- compressor model
- power supply voltage and power frequency
- total current consumption of the refrigerator
- refrigerant type and quantity
- expanding gas for the insulation foam
- LP/HP pressures (only for USA products)

171209 –rev. 01 08/18 EN
5 General Description
The product referred to in this manual is expressly designed to be
coupled with WMF coffee machines for the guaranteeing the correct
storage of milk at a controlled temperature.
NOTE: refrigerator has not been designed to cool down the milk from the
ambient temperature (or above).
The max weight of the device (with its milk container) is 21 kg.
The A-weighted emission sound pressure level of the appliance is below
70 dB(A).
Fig.1
1-Main power switch
7-Door hinge
2-Digital thermostat
8-Inlet air ventilation
3-Key lock
9-Feet
4-Milk tube slot
10-IEC power plug
5-Removable gasket
11-Milk sensor plug
6-Inner liner
12-Outlet air ventilation

171209 –rev. 01 08/18 EN
6 Description of Operation
The refrigerator operates using a refrigerant vapour compression cycle
that transfers heat from the inside to the outside, making it possible to
keep the liquid for human consumption stored inside it at a constant, pre-
set temperature.
The refrigerant evaporates by removing the heat from the air via the cold
inside walls of the refrigerator (in contact with the evaporator through
which it flows) before entering the compressor. Here the pressure and
temperature of the refrigerant are increased, and it is then passed
through an air-cooled condenser, where it is condensed. Lastly, the
refrigerant fluid returns inside the evaporator via capillary and the cycle is
repeated.
The internal temperature can be varied using the digital thermostat in the
frontal part of the refrigerator.
7 Installation and Use
7.1 Checking the packaging
As soon as the package arrives, inspect it, making sure that it is not
upturned and that it has suffered no damage during transport. Remove
the packaging and inspect the unit for damage of any kind.
If there is any doubt as to the integrity of the system parts, do not use the
refrigerator.
You must inform your dealer of any damage and/or anomalies not later
than 24 hours from the delivery date.

171209 –rev. 01 08/18 EN
7.2 Positioning
The refrigerator has the overall dimensions in millimetres (in inches)
shown in the figure below.
Fig.2
Place the refrigerator on a horizontal surface.
When choosing the position of the refrigerator, remember that a gap of at
least 100 mm (4 in.) is required between the back panel of the refrigerator
and any wall to allow the warm air from condensation to escape.
We recommend leaving a gap of the same size 100 mm (4 in.) between
the top part of the refrigerator and any surface above it.
As far as any space requirements at the sides of the refrigerator are
concerned, there are no specific instructions.

171209 –rev. 01 08/18 EN
Fig.3
7.3 Electrical connection
The refrigerator is equipped with an IEC connection socket and a main
power switch on the frontal panel.
The power cord with the proper plug for the country where it will be used
is supplied with the refrigerator.
Before connecting the refrigerator to the main electrical line, make sure
that the supply has the same characteristics (voltage, number of phases,
network frequency and amperage) as those stated on the product label.
Grounding the appliance is obligatory and therefore you must ensure that
the electrical system to which the refrigerator will be connected is
grounded and that the grounding system is in perfect working order.
The manufacturer declines all liability for any damage suffered by people
or property as a result of failure to abide by the above instructions.
To connect the refrigerator to the main electrical line, insert the plug into a
socket without using, if possible, adaptors, multiple sockets and/or
extension cords. Should the use of any of these accessories be
unavoidable, only use items that comply with current safety standards
and take care never to exceed their capacity (in current).

171209 –rev. 01 08/18 EN
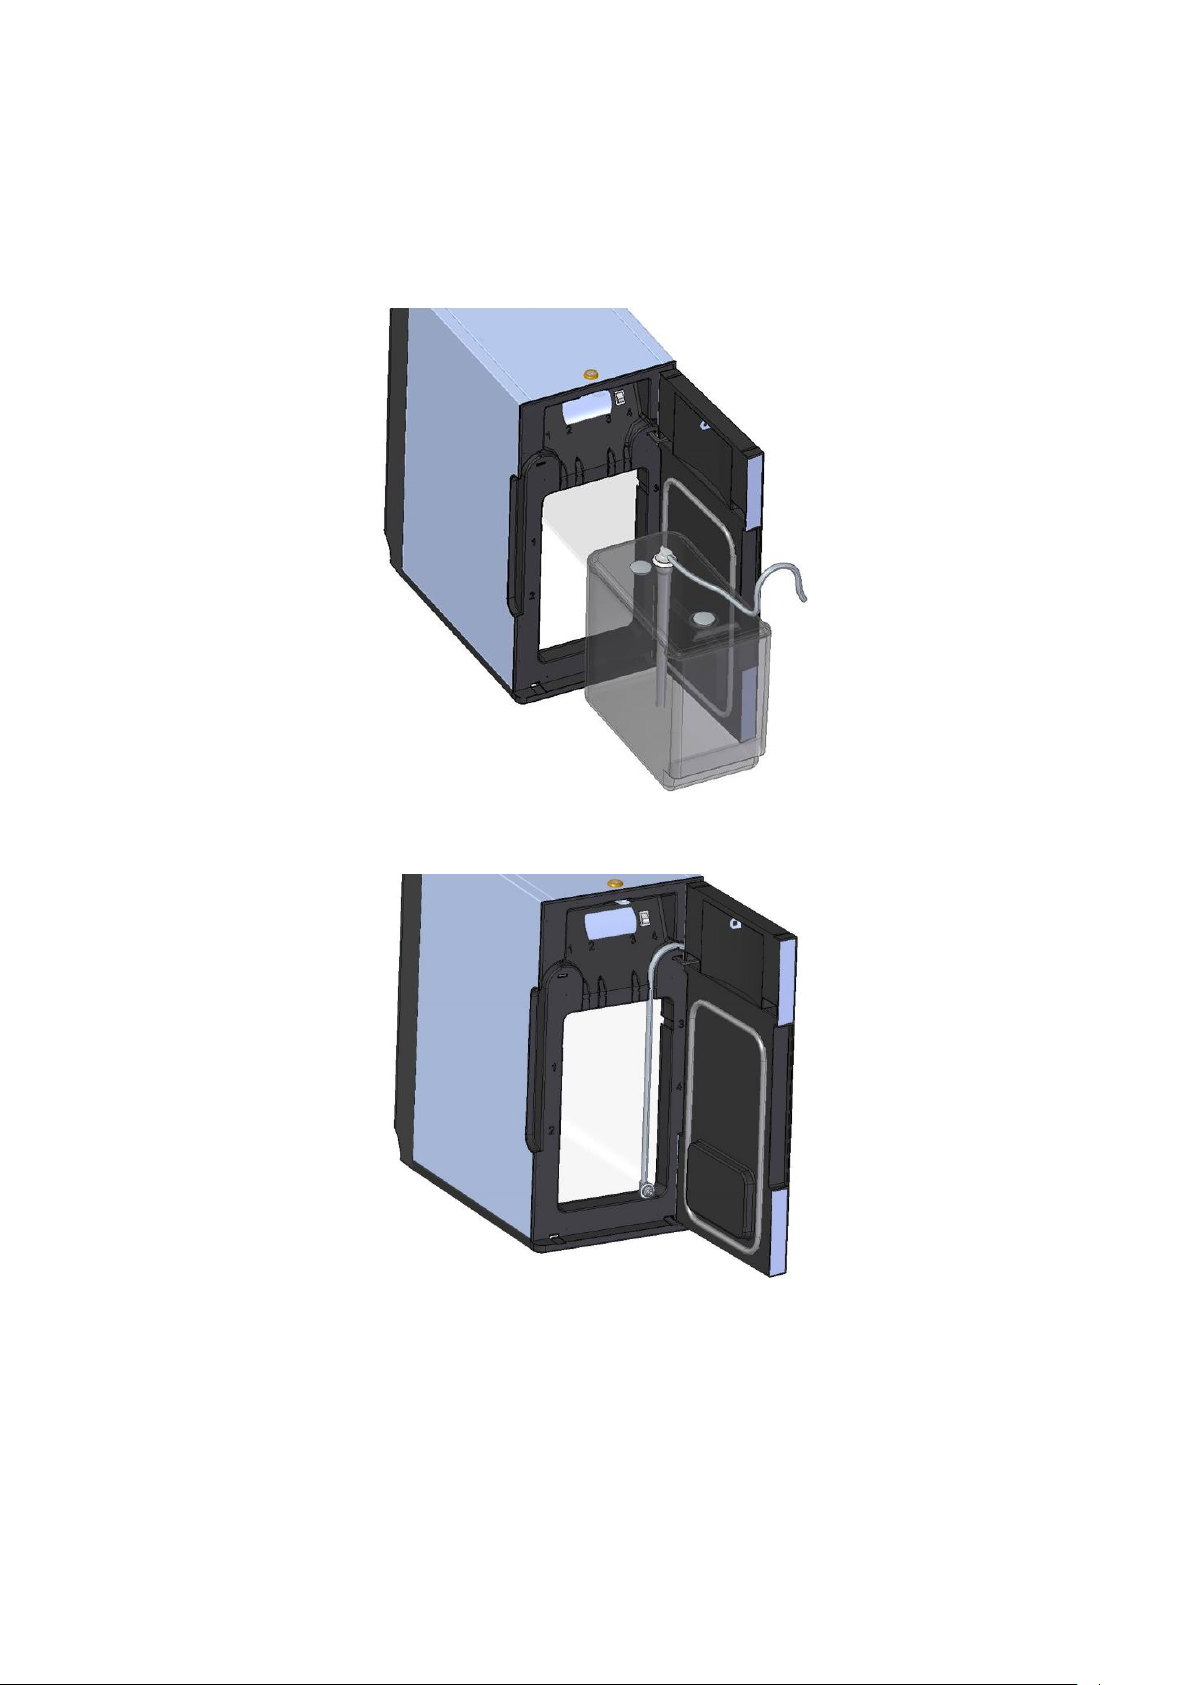
7.4 Use
The refrigerator has slots on the frontal part for ducting the pipe to pick up
milk from the container placed inside the refrigerator.
Fig.4
The refrigerator must be used only with the provided tank, in any case
with closed milk containers.
The refrigerator is provided of a digital thermostat placed on the frontal
panel.
Refrigerator switch on
When the refrigerator is switched on, but in standby mode, the
thermostat’s display shows alternatively “OFF” and the inside
temperature value.
To turn on the refrigerator, hold the button pushed for at least 3
seconds. You will see “ON” on the display and immediately after the
inside temperature value.
Once turned on, the fridge will start working, but it will take some time
(also depending on external conditions) to reach the required internal
temperature.
We recommended to put milk inside the refrigerator only when the
internal temperature has stabilized to the required value.

171209 –rev. 01 08/18 EN
Temperature setting
To set the desired temperature, push the button until you see the
current set point value flashing, then adjust the value using the button
(increase) and (decrease); to store the new value press the button
.
NOTE: To ensure that the milk is always maintained at temperature
allowed by the HACCP, the setpoint can be varied only within a specific
values range.
NOTE: The refrigerator can operate at lower temperatures than the level
obtained, by setting the thermostat to lower setpoint values. However,
since these temperatures are out of the envisaged range for storing milk
or similar liquids for human consumption, the manufacturer advises
against using the refrigerator in this way, stressing again that the
appliance is designed and made to store milk or similar liquids for human
consumption at a controlled temperature and not to chill such products
from room temperature.
Milk level sensor functioning
The refrigerator is provided with one milk level sensor which detects the
presence of milk in the container and generates an alarm when the level
falls below about 0.5 litres of milk. The refrigerator can be provided also
with two milk level sensors (optional) to be used with milk tank with wall
divider (for two milk kind).
The refrigerator needs to be connected to the coffee machine, the milk
level alarm will be shown on the coffee machine display.
NOTE: This refrigerator is designed to work with a full milk container
placed inside it. In this way, if the refrigerator is working without the
container or with a small amount of milk, the alarm will activate.
Refrigerator switch off
To switch off the refrigerator hold the button for at least 3 seconds.

171209 –rev. 01 08/18 EN
7.5 Defrosting
If the refrigerator is left to operate for very long periods of time, it is
possible for ice to form on its inside walls.
If the ice becomes considerably thick, it is advisable to defrost the
refrigerator in order to continue to guarantee good appliance efficiency
and avoid higher electricity consumption.
To defrost the appliance, switch it off, holding the button of the
thermostat for at least 3 seconds; we recommend leaving the refrigerator
door open to speed up this operation.
Never use tools or utensils of any type to remove ice as this could
damage the evaporator, which is in contact with the inside walls of the
refrigerator.
The manufacturer cannot accept any liability for damage to the appliance
caused by failure to abide by this recommendation.
NOTE: During defrosting operation, do not leave the milk container inside
the refrigerator.
At the end of the defrosting operation, after cleaning and thoroughly
drying the insides of the refrigerator, switch it on holding button of the
thermostat for at least 3 seconds.

171209 –rev. 01 08/18 EN
7.6 Installation of milk tube
The milk pumping system of Center Cooler is the assembly of following
components:
-Milk Tank (1);
-Silicon tube (2);
-Milk tube connection (3);
-Milk tank cap (4);
-Milk tube;
Fig.5

171209 –rev. 01 08/18 EN
You can use the Center Cooler refrigerator with a single coffee machine
or with two coffee machines. In the first case, insert the silicon tube (2)
and the milk tank caps (4) as in the figure 6A, while in the second case
use two silicon tubes (2) and the milk tank cap (4) as in the figure 6B.
A B
Fig. 6
171209 –rev. 01 08/18 EN
In all applications of Center Cooler showed in the figure 6, insert the milk
tube connection in the hole of silicon tubes, with the milk tube pre-
assembled (figure 7).
Fig. 7
Fig.8
Setting the right length for the milk tube. The milk tube with the connector
needs to reach the bottom of the cooler.

171209 –rev. 01 08/18 EN
In the figure 9 is showed the specific passage for the milk tube, in orange
the passage where the milk tube must be blocked. Push the milk tube
until the end surface of black frontal.
Fig. 9
In the black frontal of Center Cooler there are four slot tubes, and the slot
are highlight in orange in the figure 10.
Fig. 10
If the Center Cooler is used with 2 coffee machines, you need to use the
slots number 1 and 4 showed in the black frontal (figure 10). If the Center
Cooler is used with just one coffee machine, you need to use slot 1 or 4
depending on the relative position of the cooler respect to the machine.
171209 –rev. 01 08/18 EN
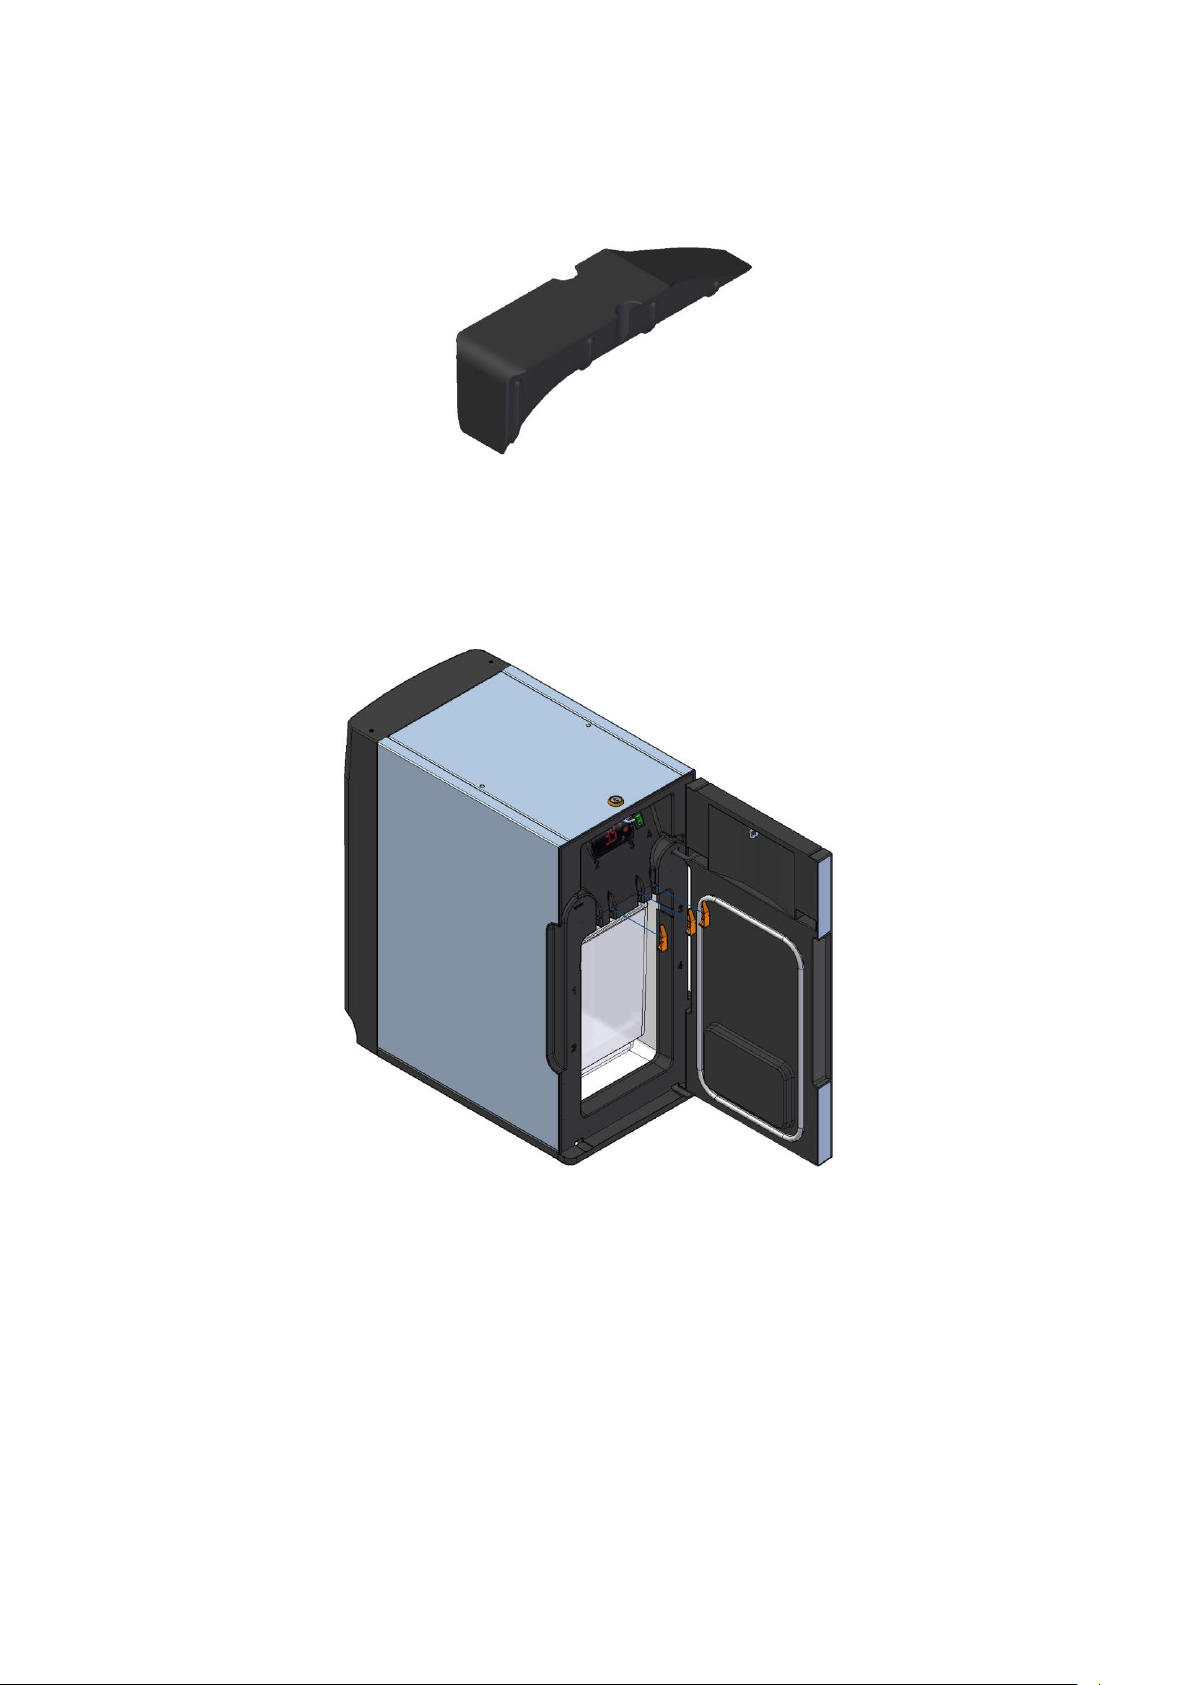
Three silicone caps are provided as accessories (figure 11).
Fig. 11
The silicone caps must be placed in the unused slots, as is showed in the
figure 12.
Fig. 12
It’s important that the silicone caps are used in the unused slots, because
if they are not present in the refrigerator, you will have cold air losses.
When you have done the operations specified in this section of the
manual, close the door of refrigerator and connect the milk tube at the
coffee machine.

171209 –rev. 01 08/18 EN
7.7 Cleaning and maintenance
Under the current regulations regarding health and safety, the operator is
responsible for the hygiene of food contact materials and must maintain
and clean the unit, preventing the bacteria formation.
Before performing any cleaning and / or maintenance operation,
disconnect the electrical supply to the refrigerator.
This important information is written on a plate placed on the back of the
product.
It’s good practice use sanitizing products for cleaning surfaces not directly
in contact with food.
The outside of the refrigerator (painted steel and/or painted plastic) can
be washed first with warm water and then rinsed in cold water and dried
with a soft cloth. Do not use abrasive products.
To clean the inside of the refrigerator, after removing any containers of
milk or similar liquids for human consumption, wipe with warm water and
if necessary, a little vinegar to remove any grease. Rinse with clean water
and dry with a soft cloth. Never use abrasive products, detergents or
soap.
It is recommended to clean the internal part of the milk cooler’s door
(areas highlighted in the picture below) using the brush supplied together
with the cooler.
Table of contents
Languages:
Other Vitrifrigo Kitchen Appliance manuals


