EPS EGV1.1 User manual

EGV1.1
Self-Monitoring Blood Glucose System
User’s Manual
Dear EGV1.1 SMBG System Owner,
Please read this User’s Manual thoroughly
Before using your blood glucose meter

Thank you for using the EGV1.1 Self-Monitoring Blood Glucose (SMBG) System. We designed this system to
be dependable, easy-to-use, compact, lightweight and portable to help you monitor your blood glucose on a
regular basis.
Please read this manual thoroughly before you begin testing. This manual provides you and your diabetes
care team with important information and step-by-step direction to use the EGV1.1 Self-Monitoring Blood
Glucose System. To start testing quickly, you can also refer to the Quick Reference Guide.
Thanks again for choosing the EGV1.1 SMBG.
Intended Use
The EGV1.1 Self Monitoring Blood Glucose System is intended for the quantitative measurement of
glucose in fresh capillary whole blood samples drawn from the fingertip, palm, or forearm. Testing is done
outside the body (In Vitro diagnostic use). It is indicated for use at home (over the counter [OTC]) by a single
patient with diabetes and should not be shared, as an aid to monitor the effectiveness of diabetes control. The
system is not to be used on neonates, nor for the diagnosis of, or screening for diabetes mellitus. Alternative
site testing can be only used during steady-state blood glucose conditions.

Important Safety Instructions
Lancing devices and meters are for single patient use only. A new, sterile lancet should be used each time
you perform a test. The lancing device, lancets and meter are NOT to be shared between users or other family
members. Do NOT use on multiple individuals. Sharing a lancing device and lancets may transmit blood
borne pathogens, such as viral hepatitis.
All parts of the kit are considered biohazardous and may transmit infection, even if you have performed
cleaning and disinfection. Wash hands thoroughly with soap and water after handling the meter or lancing
device.
For further information, please see: "FDA Public Health Notification: Use of Fingerstick Devices on More
than One Person Poses Risk for Transmitting Bloodborne Pathogens: Initial Communication" (2010)
http://www.fda.gov/MedicalDevices/Safety/AlertsandNotices/ucm224025.
"CDC Clinical Reminder: Use of Fingerstick Devices on More than One Person Poses Risk for Transmitting
Blood borne Pathogens" (2010) http://www.cdc.gov/injectionsafety/Fingerstick-DevicesBGM.html

Standard Accessories
The EGV1.1 Blood Glucose meter and accessories are working together to measure the amount of glucose
in your blood. The system includes:
Optional Accessories
• EGV1.1 Blood Glucose Meter
• Alkaline Battery (2 ct)
• EGV1.1 Blood Glucose Test Strips (10 pcs)
• Test Strip Instructions
• Lancets (10 pcs)
• Lancing device
• AST Lancing Device Cap
• User’s Manual
• Quick Reference Guide
• Self-Test Log Book
• EGV1.1 Level 2 Control Solution
• Control Solution Instructions
• Carrying Case
• EGV1.1 Level 3 Control Solution
Note:
1. EGV1.1 Level 2 Control Solution is included with the system.
2. EGV1.1 Level 3 Control Solution are available. For purchase, please call the Customer Care
Service toll-free at 866-994-3345 (Eastern Standard Time, Mon-Fri 8:00AM~6:00PM).

Why is it so important to test blood glucose regularly?
Testing your blood glucose regularly can make a big difference in how you manage your diabetes every day.
We have made this SMBG system as simple as possible to help you use it regularly. Your meter is easy to
use, and you can adjust the lancing device for your comfort.
Do you need help?
If you have questions or need assistance, please call the Customer Care Service toll-free at 866-994-3345
(Eastern Standard Time, Mon-Fri 8:00AM~6:00PM). During non-service hours, please contact your healthcare
provider.
Please complete your warranty card and mail it, so you receive the best customer service possible and news
about product update.
Note:
Although the EGV1.1 SMBG System is easy to use, you may need to consult with your
healthcare professional (this may be your doctor, pharmacist or diabetes nurse educator) for
instructions on how to use the system. Only the correct use of the system will ensure
accurate results.

Important Information about Your New Meter
EGV1.1 blood glucose meter is designed and approved for testing fresh capillary whole blood samples
from your fingertip, palm or forearm. The meter is for in vitro diagnostic use ONLY (for testing outside the
body). It should not be used to diagnose or screen for diabetes.
EGV1.1 blood glucose meter can only be used with EGV1.1 Blood Glucose Test Strips. Other test strips
will give inaccurate results.
Testing is not valid for neonatal blood specimens.
Do not disassemble the meter as this may cause damage to the components resulting in incorrect
readings. Disassembling the meter will also void the warranty.
Always keep the meter clean and store it in a safe place. Protect the meter from direct sunlight to ensure
a longer lifespan.
You should not store the meter and test strips in a car, bathroom, or freezer.
Keep the meter, test strips and lancing device away from children and pets.
Critically ill patients should not be tested with this meter.
Incorrect results may occur when performing the test. If you believe you are not feeling well, please
contact your healthcare professional.
Remove batteries if the meter will not be used for one month or more.

Note:
Consult with your healthcare professional before testing on your fingertip, palm or forearm.
Do not touch the strips with wet hands.
Do not use expired strips (the expiration date is shown on the bottle.)
Do not bend, cut or twist the strips.
Altitude up to 10,000 feet above sea level has no effect on readings.
It should not be used to diagnose or screen for diabetes.

Health-Related Information
If you are experiencing dehydration, frequent urination, low blood pressure, shock or hyperosmolar
hyperglycemic nonketotic coma (HHNKC), you may get an inaccurate glucose result. If you think you
have any of these conditions, contact your healthcare provider immediately.
If you have followed the steps in the user’s manual, but still have symptoms that don’t seem to match
your test results, contact your Healthcare Professional or physician immediately. If you have questions
regarding the use of the meter, please call the Customer Care Service toll-free at 866-994-3345 (Eastern
Standard Time, Mon-Fri 8:00AM~6:00PM). During non-service hours, please contact your healthcare
provider.
Please read your test strip instructions carefully for additional health-related information.
Table of Contents
Chapter 1: Understanding Your Meter ….......................................................................................................11

The EGV1.1 Blood Glucose Meter ….........................................................................................................11
The EGV1.1 Accessories............................................................................................................................13
Inserting Batteries......................................................................................................................................14
Setting The Time and Date - First Time Use..............................................................................................15
Using EGV1.1 Blood Glucose Test Strips ..................................................................................................16
Chapter 2: Control Solution Testing..............................................................................................................17
Why Run a Control Solution Test ...............................................................................................................17
About the Control Solutions ......................................................................................................................18
Running a Control Solution Test ................................................................................................................19
Understanding Control Solution Test Results ............................................................................................21
Chapter 3: Testing Your Blood Glucose .......................................................................................................23
Using the Lancing Device .........................................................................................................................23
Inserting a Lancet into the Lancing Device ................................................................................................24
Running a Blood Glucose Test with Blood from Your Fingertip .................................................................26
Alternative Site Testing (AST)……...……………….…………………………………………………………….28
Running a Blood Glucose Test with Blood from Your Forearm ……..........................................................30
Running a Blood Glucose Test with Blood from Your Palm ……...............................................................31
Discarding Used Lancets …......................................................................................................................32
Understanding Your Test Results - Expected Values………......................................................................33
Unusual Test Results…..............................................................................................................................33
Comparing Your Meter Result to Lab Results …........................................................................................34

Chapter 4: Meter Memory, Setup …...............................................................................................................35
Memory, Storing Test Results …................................................................................................................35
Viewing & Deleting Test Results….............................................................................................................36
Chapter 5: Maintenance and Troubleshooting ….........................................................................................37
Inserting Batteries …..................................................................................................................................37
Cleaning and Disinfecting Your Meter and Lancing Device....……...........................................................38
Cleaning and Disinfection Frequency.........................................................................................................40
Maintenance and Testing ...........................................................................................................................42
Screen Messages and Troubleshooting ….................................................................................................43
Chapter 6: Technical Information …..............................................................................................................48
Specifications ….........................................................................................................................................48
Limitations…...............................................................................................................................................49
Accuracy Study………………………….................................................................................................51
Device Information ….................................................................................................................................53
Warranty ...................................................................................................................................................53

11
Chapter 1: Understanding Your Meter
The EGV1.1 Blood Glucose Meter
Date
(on the left side)
AM
(Before Noon)
Time
(on the right side)
PM
(After Noon )
Control Solution
AC
(Before Meal)
Alarm
PC
(After Meal)
Test Result Error
Insert strip
Temperature
Application of blood
Glucose Unit
Battery status

12
Display-
Shows results,
messages, and results
stored in memory.
Left ( ) Button-
Press to enter memory,
adjust setting, and
scroll through results.
Test Strip Slot-
Insert test strip here.
Battery Door-
Flip open the
battery door by
pushing the tab in
the direction of the
arrow.
Right ( ) Button-
Press to enter
memory, adjust
setting, and scroll
through results.
Middle ( ) Button-
Press to turn on and off the
meter, confirm the setting.
13
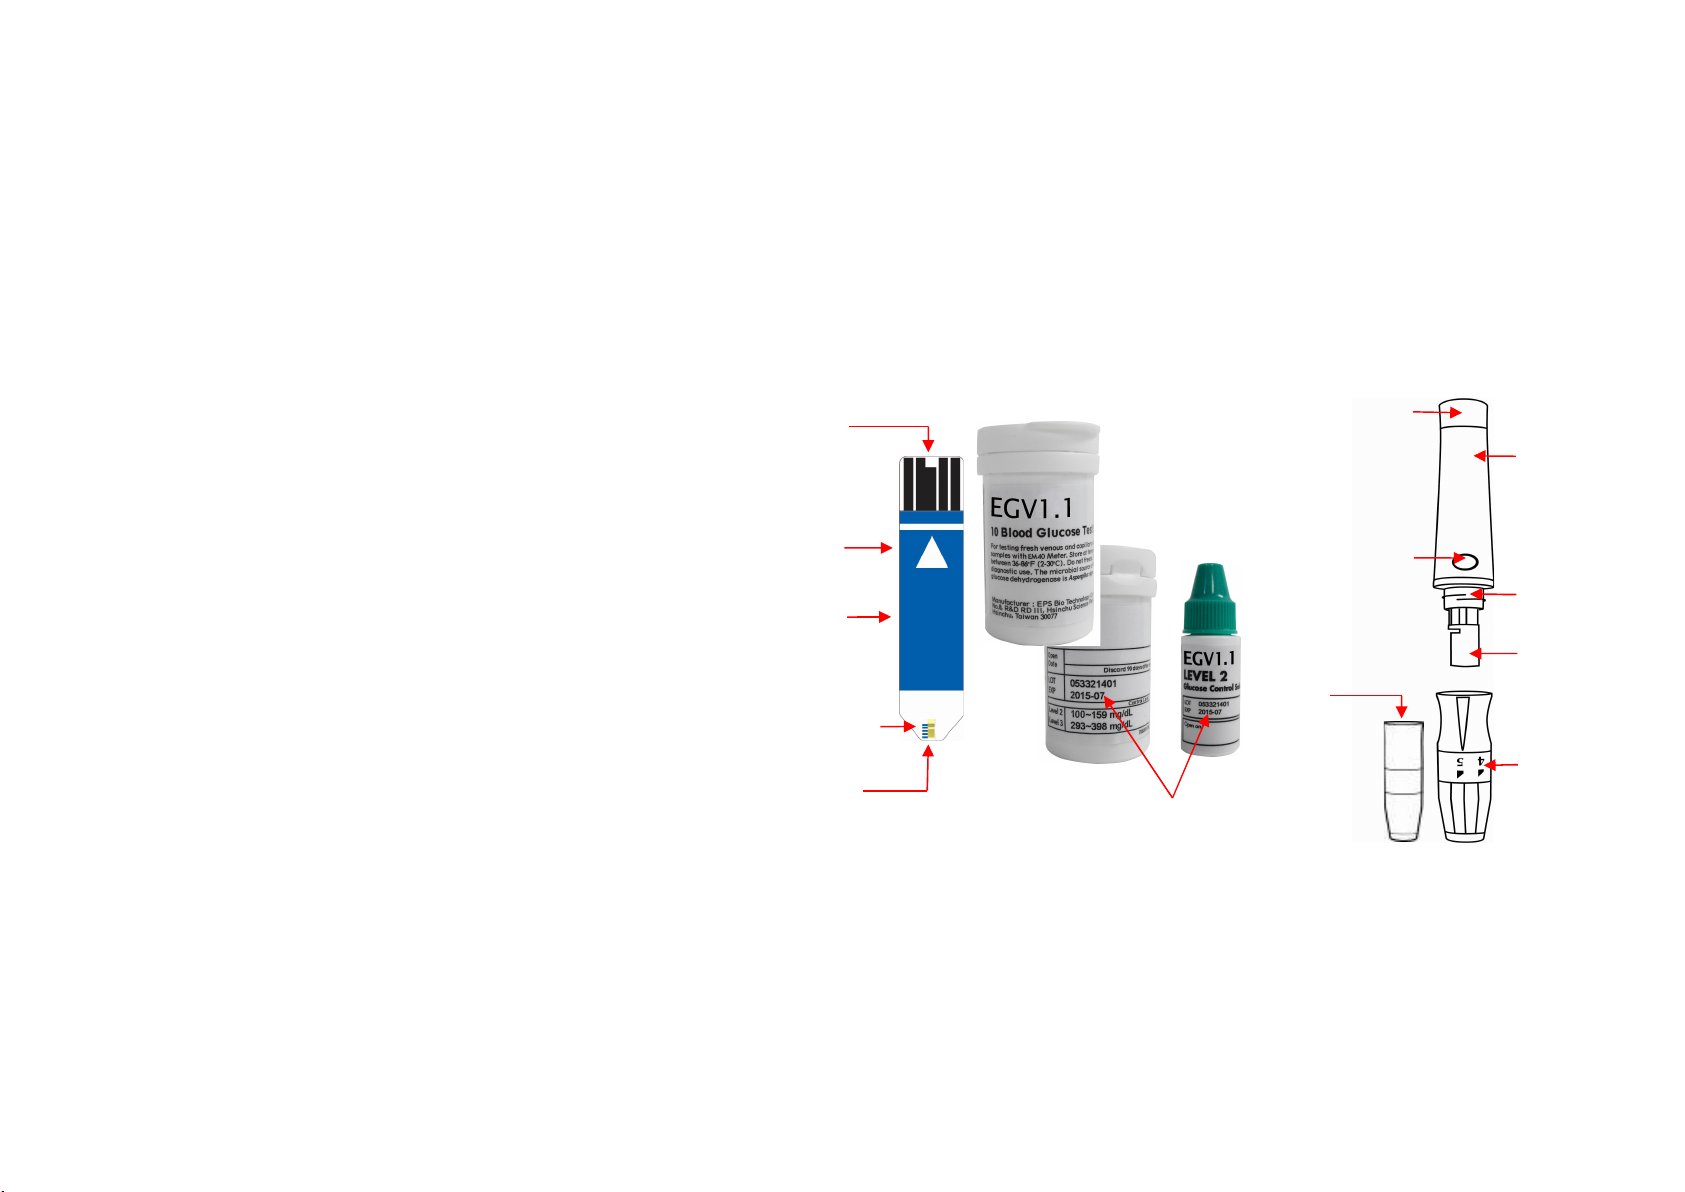
The EGV1.1 Accessories
Blood Glucose Test Strip
Trigger button
-
Press the trigger
button to activate
the lancing device
Carrier
-
Insert the lancet
into the carrier
Adjustable tip
-
Select the
desired
penetration depth
Hub
-
Unscrew or
Recap the Cap.
Sleeve
-
Hand Hold
Area
AST
Lancing
Device Cap-
Use this
transparency
cap for AST
testing
S
liding barrel
-
Pull on until it clicks
and then release to
enable lancing
device.
Test Strip Bottle
Control Solution Bottle
Lancing Device
Strip Insert
Direction
Reaction Area
Hand Hold
Area
Blood
C
ollection
Area
Electrode
Expiration
Date
14
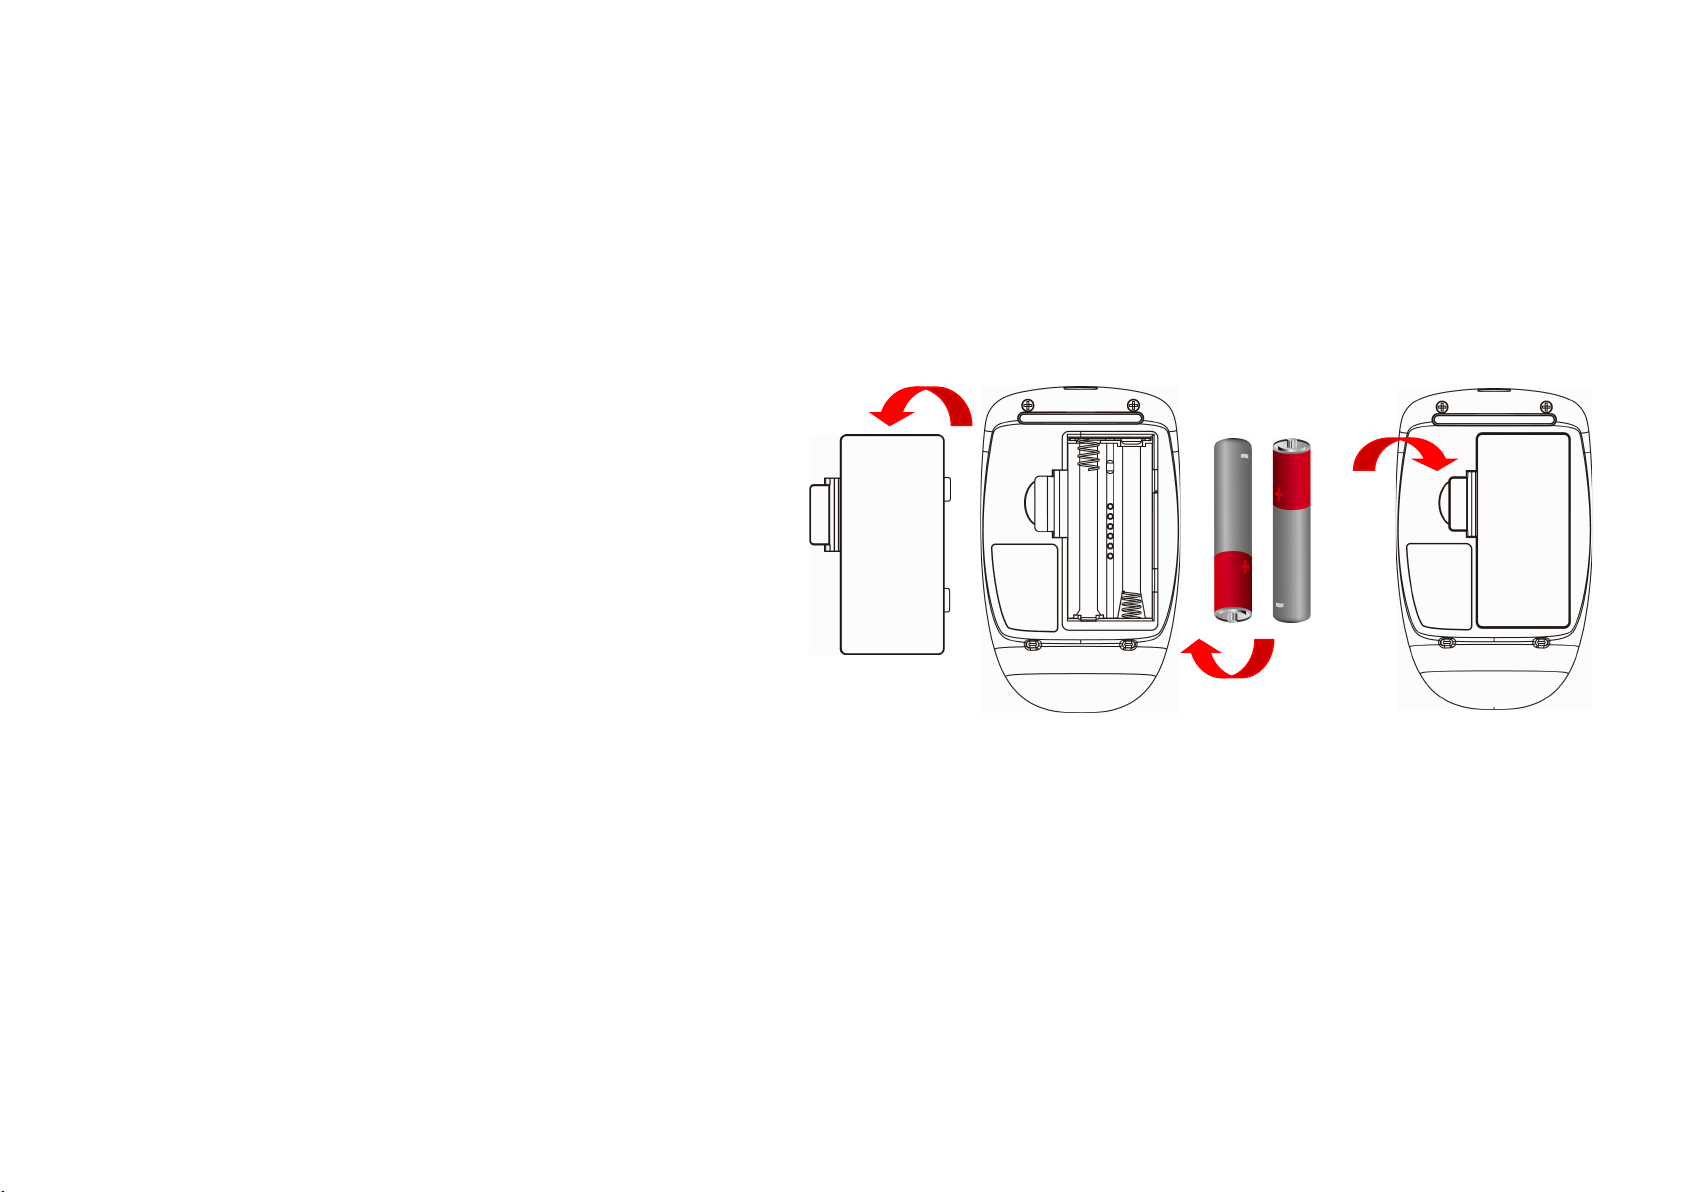
Inserting Batteries
1.
Open the battery door on the
back of the meter by pushing the
tab in the direction of the arrow.
2.
Insert two batteries. The meter
will beep to confirm the
batteries are inserted correctly.
3.
Put the battery door back in
place and snap it closed.
15
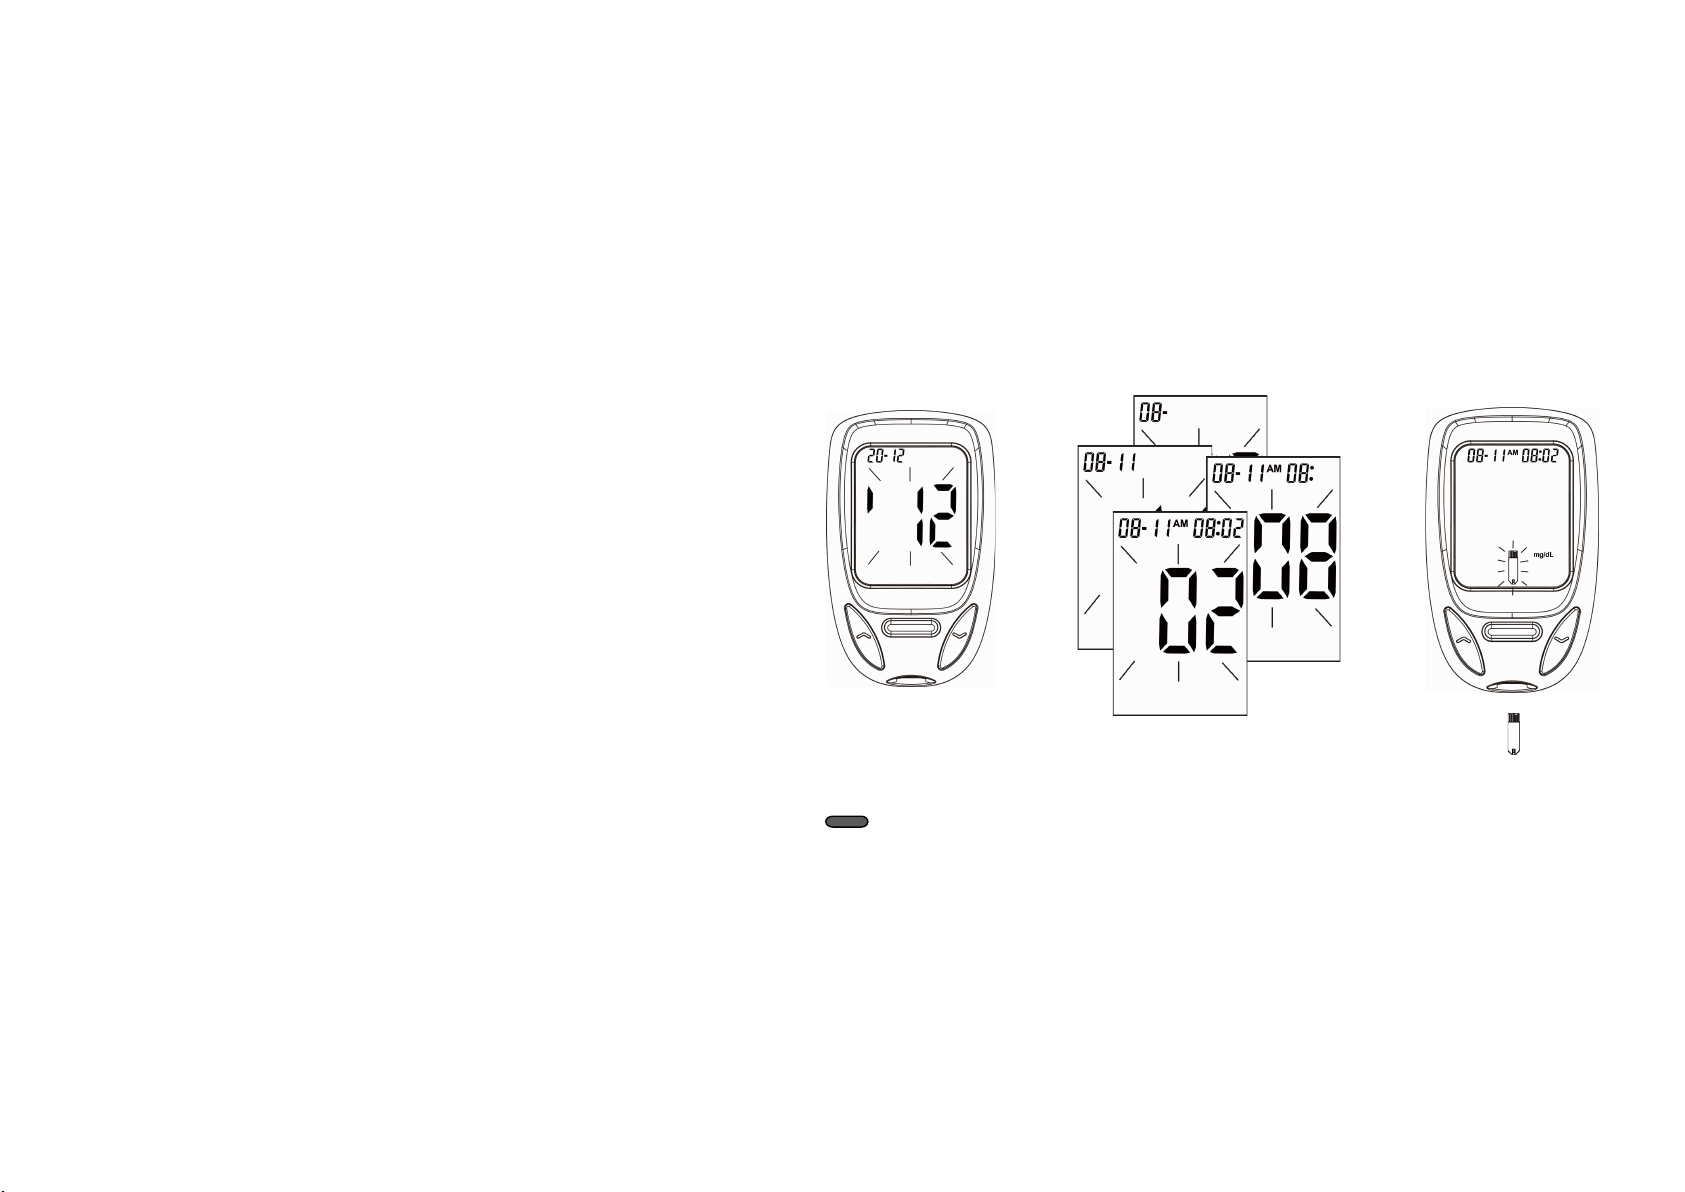
Setting The Time and Date—First Time Use
Setting the current time and date in your meter is important if you intend to use the meter memory.
3.
Repeat step 2 to set the date
and time. The flashing field is
the one you are currently
setting.
1.
After inserting batteries, the meter
turns on automatically.
2. The last 2-digits of the year flash at
the center of the display. Press
and to adjust the year and
Press to confirm the setting.
4
.
The icon of flashes on
the display. The meter is
ready to run the test.

16
Using EGV1.1 Blood Glucose Test Strips
Use only with EGV1.1 Blood Glucose Meter.
Run a control solution test every time you open a new box of test strips (See Chapter 2 "Control Solution
Testing.")
Keep the test strips in their original bottle.
After you take a test strip out of the bottle, tightly close the bottle immediately. This keeps the test strips
dry.
Use the test strip within three minutes after taking it out of the bottle.
The test strip is for single use only. Do not reuse it.
Record the date you open the test strip bottle. Be sure to check the expiration date on the test strip bottle.
The test strip is good for three months from the date the bottle is opened or until the expiration date on
the bottle, whichever comes first.
Store the test strip bottle and your meter in a cool dry place.
Store the test strips between 36°F - 86°F (2°C ~30°C) and 40%-85% RH. Do not freeze.
Do not apply blood or control solution to the test strip before you insert it into the meter.
Do not touch the test strip with wet hands. Do not bend, cut, or twist the test strips.
EGV1.1 Self-Monitoring Blood Glucose Test System is a “no code”system and does not require any test
strip calibration.

17
Chapter 2: Control Solution Testing
Why Run a Control Solution Test
We recommend that you run the EGV1.1 level 2 and level 3 control solution test because it lets you know that
your meter and test strips are working properly to give reliable results. You should run the control solution
tests when:
You use the EGV1.1 Blood Glucose Meter for the first time.
You open a new bottle of test strips.
You think the meter or test strips may be working incorrectly.
You drop the meter.
You have repeated a test and the test results are still lower or higher than expected.
You are practicing the test procedure.

18
About The Control Solutions
Use with EGV1.1 test strips.
Write the date you opened the control solution bottle on the bottle label. The control solutions are good
for three months from the date the bottle is opened or until the expiration date on the bottle, whichever
comes first.
Do not use a control solution that is past the expiration date.
Control solutions can stain clothing. If you spill it, wash your clothes with soap and water.
Close the bottle tightly after every use.
Left over control solution should not be added back into the control bottle.
Store control solution at room temperature, between 36°F - 86°F (2°C~30°C). Do not freeze.
If you would like to purchase EGV1.1 Control Solutions, please contact Customer Care Service toll-free
at 866-994-3345 (Eastern Standard Time, Mon-Fri 8:00AM~6:00PM).
19
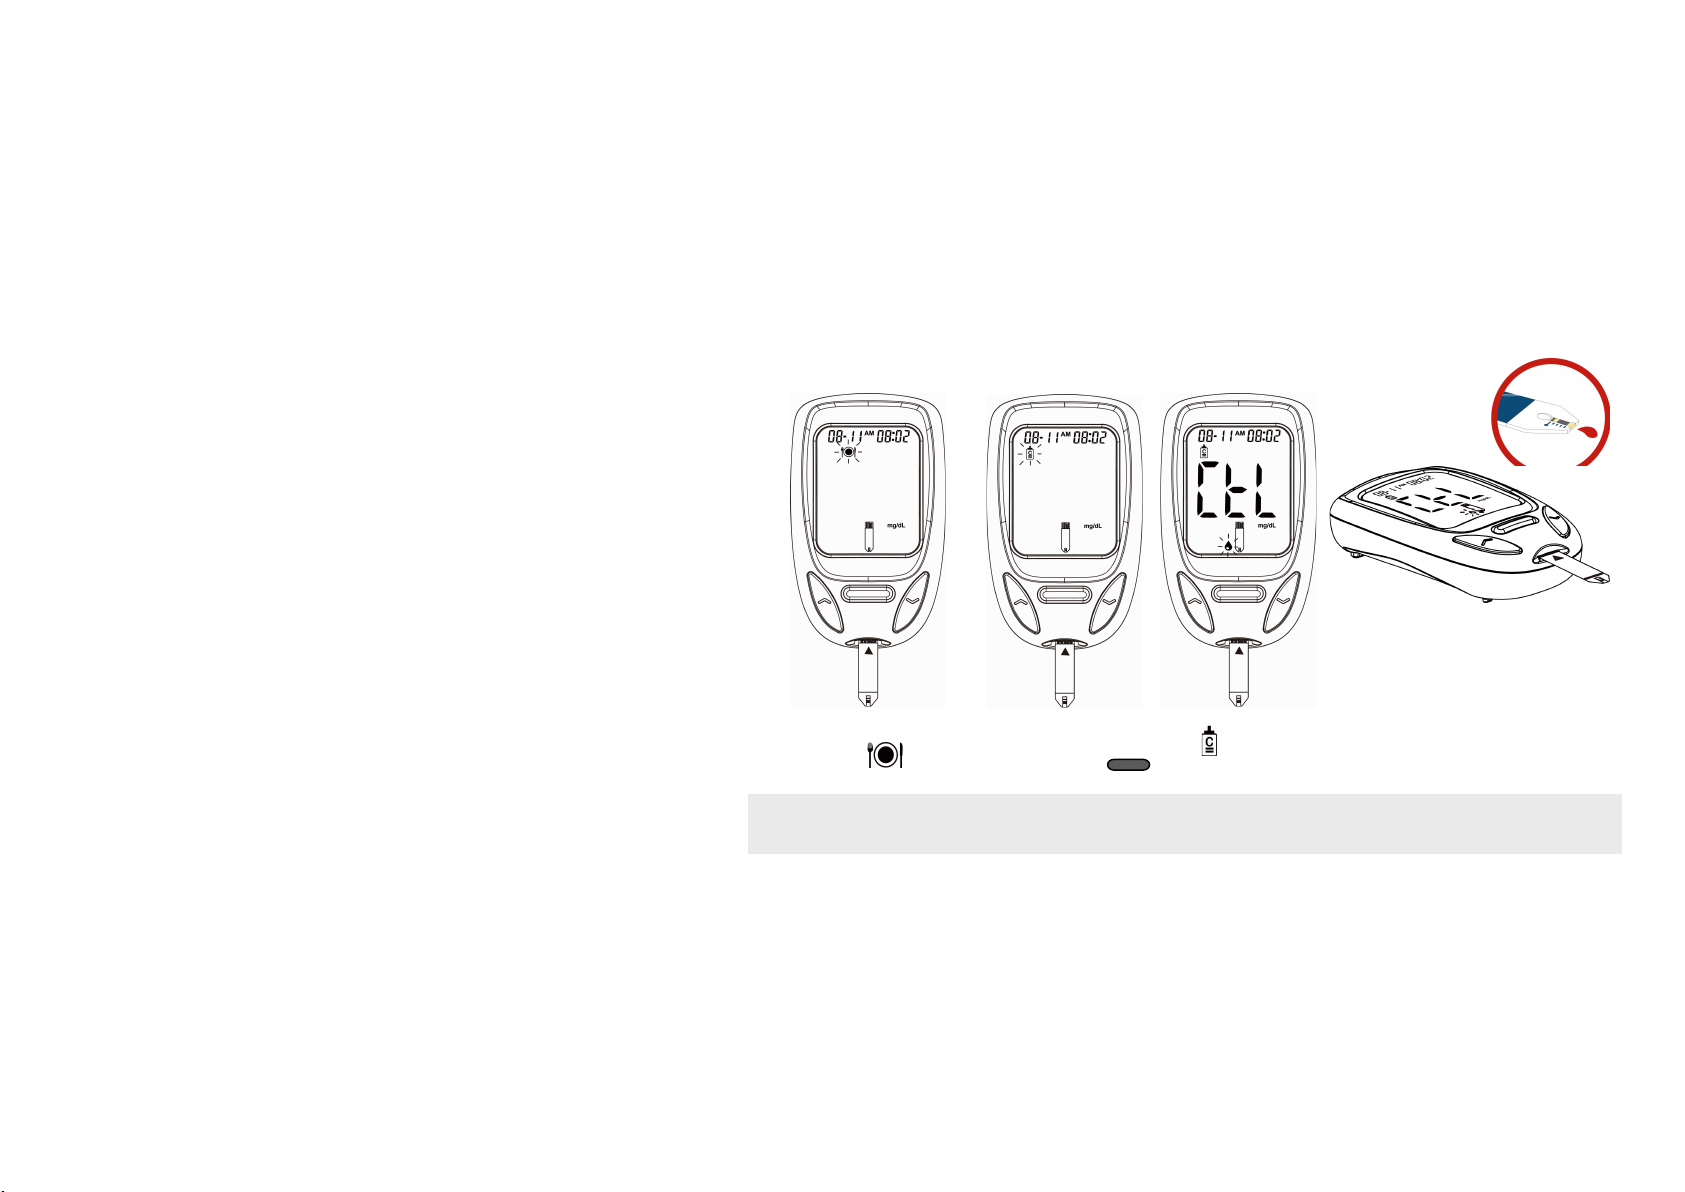
Running a Control Solution Test
You need the meter, a test strip, and control solution.
3. Place the meter on a flat surface,
like a table.
4. Remove the control solution bottle
cap and wipe the tip of the bottle
with a tissue.
5. Squeeze the bottle until a tiny
drop forms at the tip of the control
solution cap.
Note: Setting the meter in control solution mode
“
CTL
”
will prevent the control solution reading
from being added to your memory.
1. Put a test strip into the meter in
the direction of the arrow and
the icon of shows itself.
2. Press or to set the mode of
control solution “ ”.
Press to confirm the setting.

20
6
.
Touch the drop to the Blood
collection area at the end of
the test strip.
7. Do not put control solution on
top of the test strip.
8. When the icon of shows,
the meter beeps, you have
enough control solution for
the test.
9.
The meter starts to count down from 5
seconds and will show the results. A
result appears on the display.
10. Don’t remove the test strip yet. Check
if the reading falls within the range
printed on the test strip bottle.
Note:
1.
T
he ranges appearing on this picture are examples only
and not the ranges that the user should refer to when
determining if their control solution test is acceptable.
2. Level 2 and Level 3 ranges listed on your test strip
bottle are the two different control solutions. Please be
sure that you are looking at the correct range.
1
1
.
Remove the test strip and
dispose of it according to your
healthcare provider’s
instructions after you have
compared the reading to the
range printed on the test strip
bottle.
Table of contents


