Vmed Technology VetTab User manual


2
Table of Contents
1Safety.......................................................................................................................4
1.1 Safety Notices....................................................................................................4
1.2 Warnings and Cautions......................................................................................5
2Description of Monitor and Accessories...................................................................6
2.1 VetTab Description.............................................................................................6
2.2 Front panel identification....................................................................................6
2.3 Accessories........................................................................................................7
2.3.1 Standard Accessories..................................................................................7
2.3.2 Optional Accessories...................................................................................7
3Hardware Installation ...............................................................................................8
3.1 Unpacking and checking....................................................................................8
3.2 Connecting animal Sensors and Probes............................................................8
3.3 Charging the Battery..........................................................................................9
4Operation and Display............................................................................................10
4.1 Integral Display Description..............................................................................10
4.2 Interacting directly with the VetTab..................................................................11
4.3 Tablet Display and Interaction..........................................................................12
4.3.1 VetTab Android App Monitoring Display....................................................12
4.3.2 VetTab App Settings..................................................................................15
4.3.3 Bluetooth Connection to Android Device...................................................16
4.3.4 SpO2 Sensor Status Display.....................................................................18
4.3.5 NIBP Error Message Display.....................................................................19
4.3.6 NIBP Measurement Cycles........................................................................20
5Monitoring..............................................................................................................21
5.1 ECG Monitoring................................................................................................21
5.1.1 Skin preparation ........................................................................................21
5.1.2 3-Lead Electrode Placement .....................................................................21
5.1.3 Precautions................................................................................................22
5.1.4 Using the optional esophageal probes ......................................................23
5.1.5 Using the optional long-term monitoring electrodes...................................24

3
5.1.6 Using the optional loop electrodes.............................................................25
5.1.7 Using the optional exotic needle electrodes ..............................................25
5.2 SpO2Monitoring...............................................................................................26
5.2.1 Introduction................................................................................................26
5.2.2 Monitoring Procedure ................................................................................26
5.2.3 Measurement Limitations of SpO2.............................................................26
5.2.4 Precautions................................................................................................27
6NIBP Monitoring.....................................................................................................28
6.1 Introduction ......................................................................................................28
6.2 Monitoring Procedure.......................................................................................28
6.3 Cuff Selection and Placement..........................................................................28
6.4 Measurement Limitations.................................................................................29
6.4.1 Precautions................................................................................................29
7Temperature Monitoring.........................................................................................30
7.1 Measurement Procedure..................................................................................30
7.2 Precautions......................................................................................................30
8Specifications.........................................................................................................31
8.1 Battery and AC adapter....................................................................................31
8.2 Parameters Specifications................................................................................31
8.2.1 ECG...........................................................................................................31
8.2.2 SpO2..........................................................................................................31
8.2.3 NIBP..........................................................................................................31
8.2.4 Respiration ................................................................................................31
8.2.5 Temperature..............................................................................................31

4
1Safety
1.1 Safety Notices
BEFORE USING THIS DEVICE PLEASE READ THE ENTIRE MANUAL.
The safety statementspresented in this chapter aredescribed belowThese safety notices
appear throughout this manual and your careful attention is required.
WARNING
Indicates a potential hazard situation or unsafe practice that, if not
avoided, could result in death or serious injury.
CAUTION
Indicates a potential hazard or unsafe practice that, if not avoided,
could result in minor personal injury or product/property damage.
NOTE
Provides application tips or other useful information to ensure that
you get the most from your product.

5
1.2 Warnings and Cautions
WARNING
•Use of electro-surgical or cauterizing devices may cause injury to
the patient and may interfere with monitor performance.
•Do not use this device in the presence of flammable anesthetics,
explosive substances, vapors or liquids.
CAUTION
•Opening the monitor housing voids the warranty
•Users should guarantee the surface of the monitor is dry, clean
and prevent the exposure to liquids
•Avoid damage caused by dropping, impact, and strong vibrations
•Maintenance, service and upgrades should be done only by Vmed
or its authorized repair centers.
NOTE
•The software was developed per IEC601-1-4. And hazards arising
from errors in the software program is minimized.
•This monitor complies with the requirements of CISPR 11
(EN55011) class A.
6
2Description of Monitor and Accessories
2.1 VetTab Description
The VetTab is a small, battery operated surgical monitor with internal Bluetooth and
integral display that links wirelessly to a Bluetooth equipped Android device for easier
viewing. Monitoring parameters include ECG (Electrocardiograph), HR (Heart Rate from
ECG or SpO2), NIBP (Non-Invasive Blood Pressure), SpO2(pulse oximetry) and
temperature (from the temperature lead on the ECG cable).
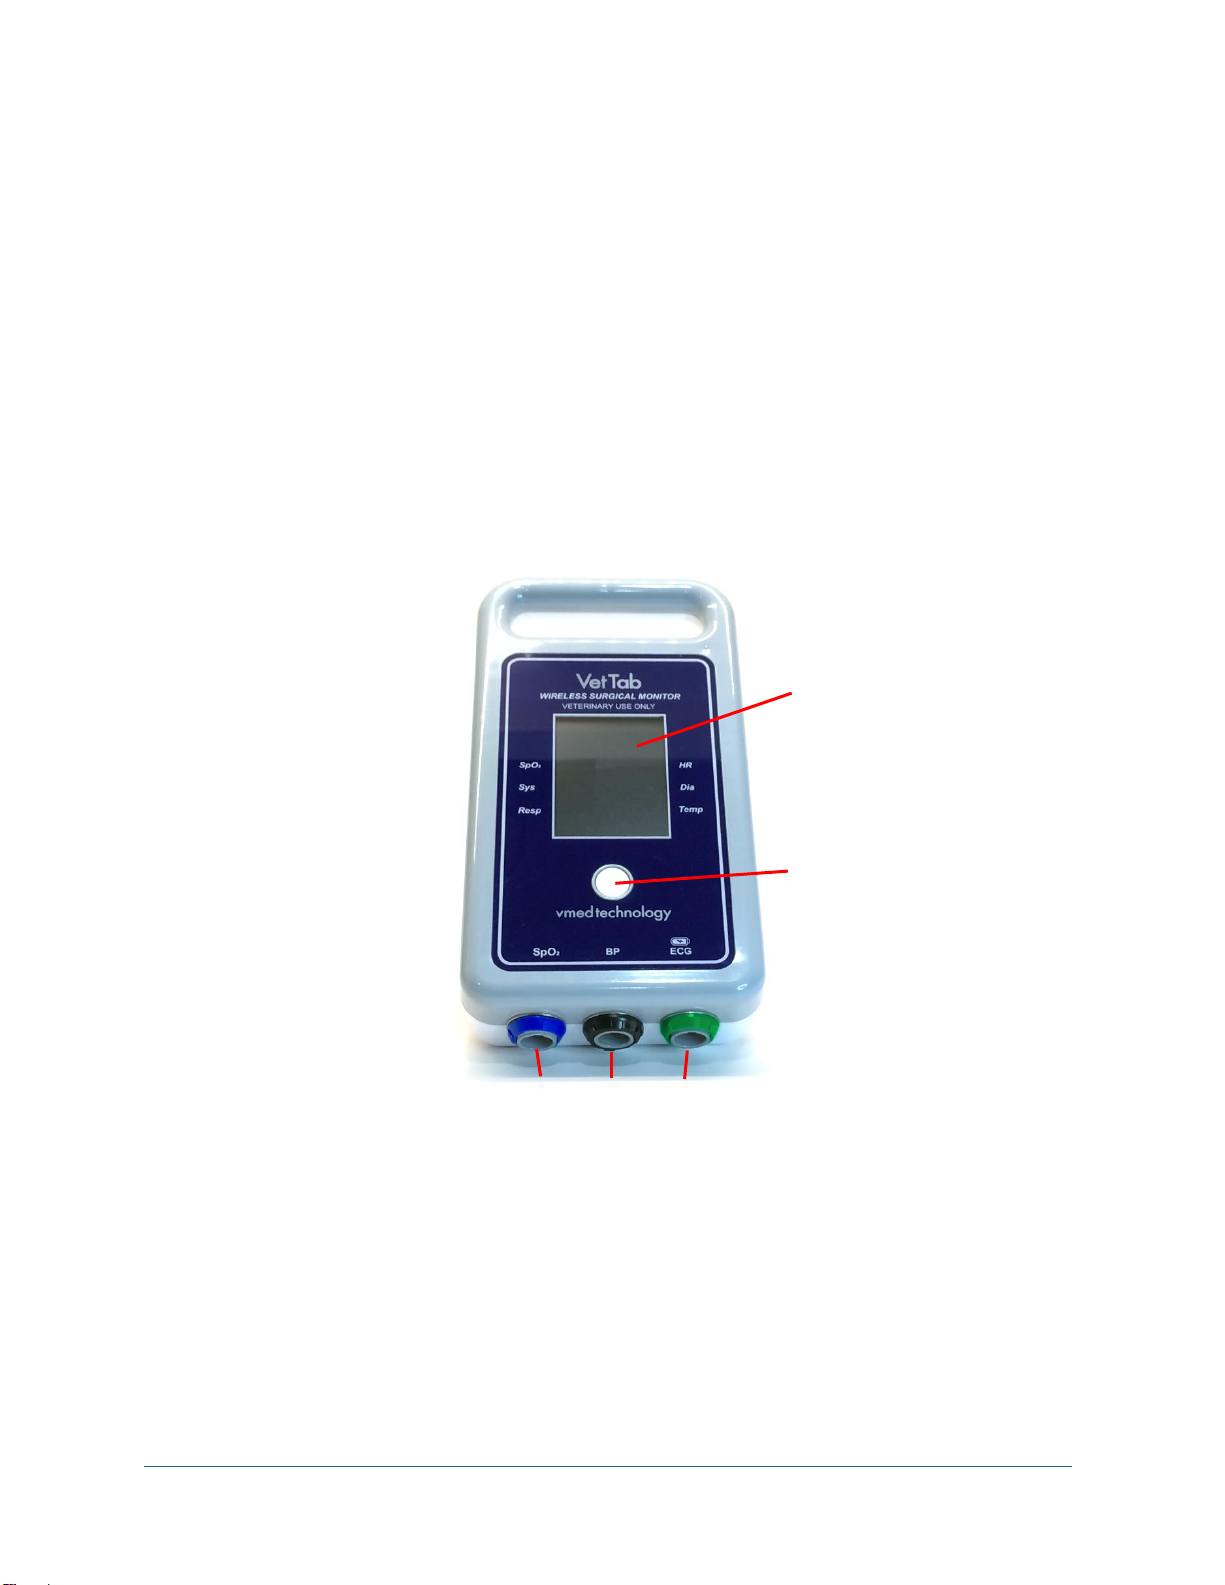
2.2 Front panel identification
Figure 1 - VetTab Front Panel
1. SpO2Connector: (Blue ring) SpO2sensor connector
2. NIBP Connector: (Black ring) NIBP hose connector
3. ECG & TEMP Connector: (Green ring) ECG and Temperature cable
connector or USB charging cable connector.
4. Display: Color LCD display
5. Select Button: Power and function selection
1 2 3
4
5

7
2.3 Accessories
2.3.1 Standard Accessories
•ECG & TEMP cable
•NIBP cuffs and hose
•SpO2sensor with two tongue clips
•USB AC charging cable
•AC charging plug
2.3.2 Optional Accessories
(contact Vmed for prices or visit vmedtechnology.com for description)
•Esophageal ECG and temperature probes
•Long term ECG monitoring leads
•ECG leg loops
•Exotic needle electrodes
•Tablet wall mount (See Amazon.com: 10” Wall Mounts)

8
3Hardware Installation
3.1 Unpacking and checking
Check all materials against the packing list and check for any mechanical damage.
Contact the Vmed Customer Service Department at 800 926-9622 to report any problem.
3.2 Connecting animal Sensors and Probes
Connect the necessary animal sensors or probes to the monitor.
SpO2cable to Blue connector
Part VT-SpO2
Blood pressure air hose to Black
connector
Part VT-BP
ECG/Temperature cable to the Green
connector
Part VT-ECGT

9
3.3 Charging the Battery
Plug the USB charging cable into the Green receptacle on the VetTab and the other end
of the cable into the USB port on your computer or into the AC plug provided. Full charge
is achieved in about 4-5 hours.
NOTE
The VetTab is designed to operate on battery power only. The battery
is charged automatically when the VetTab is connected to AC power
using the USB charging cable and AC adapter. During charging the
device will be on and able to communicate over Bluetooth, but its LCD
may or may not be on.
NOTE
You will not be able to make use of the ECG or temperature parameters
during charging.
The capacity of the internal battery is limited. When the battery capacity is too low, The
Battery Indicator will blink. When this occurs, plug the charger into the Green receptacle
to charge.
The operating time depends on the parameters being monitored. Measuring NIBP takes
more power and will result in a shorter battery life between charges.
10
4Operation and Display
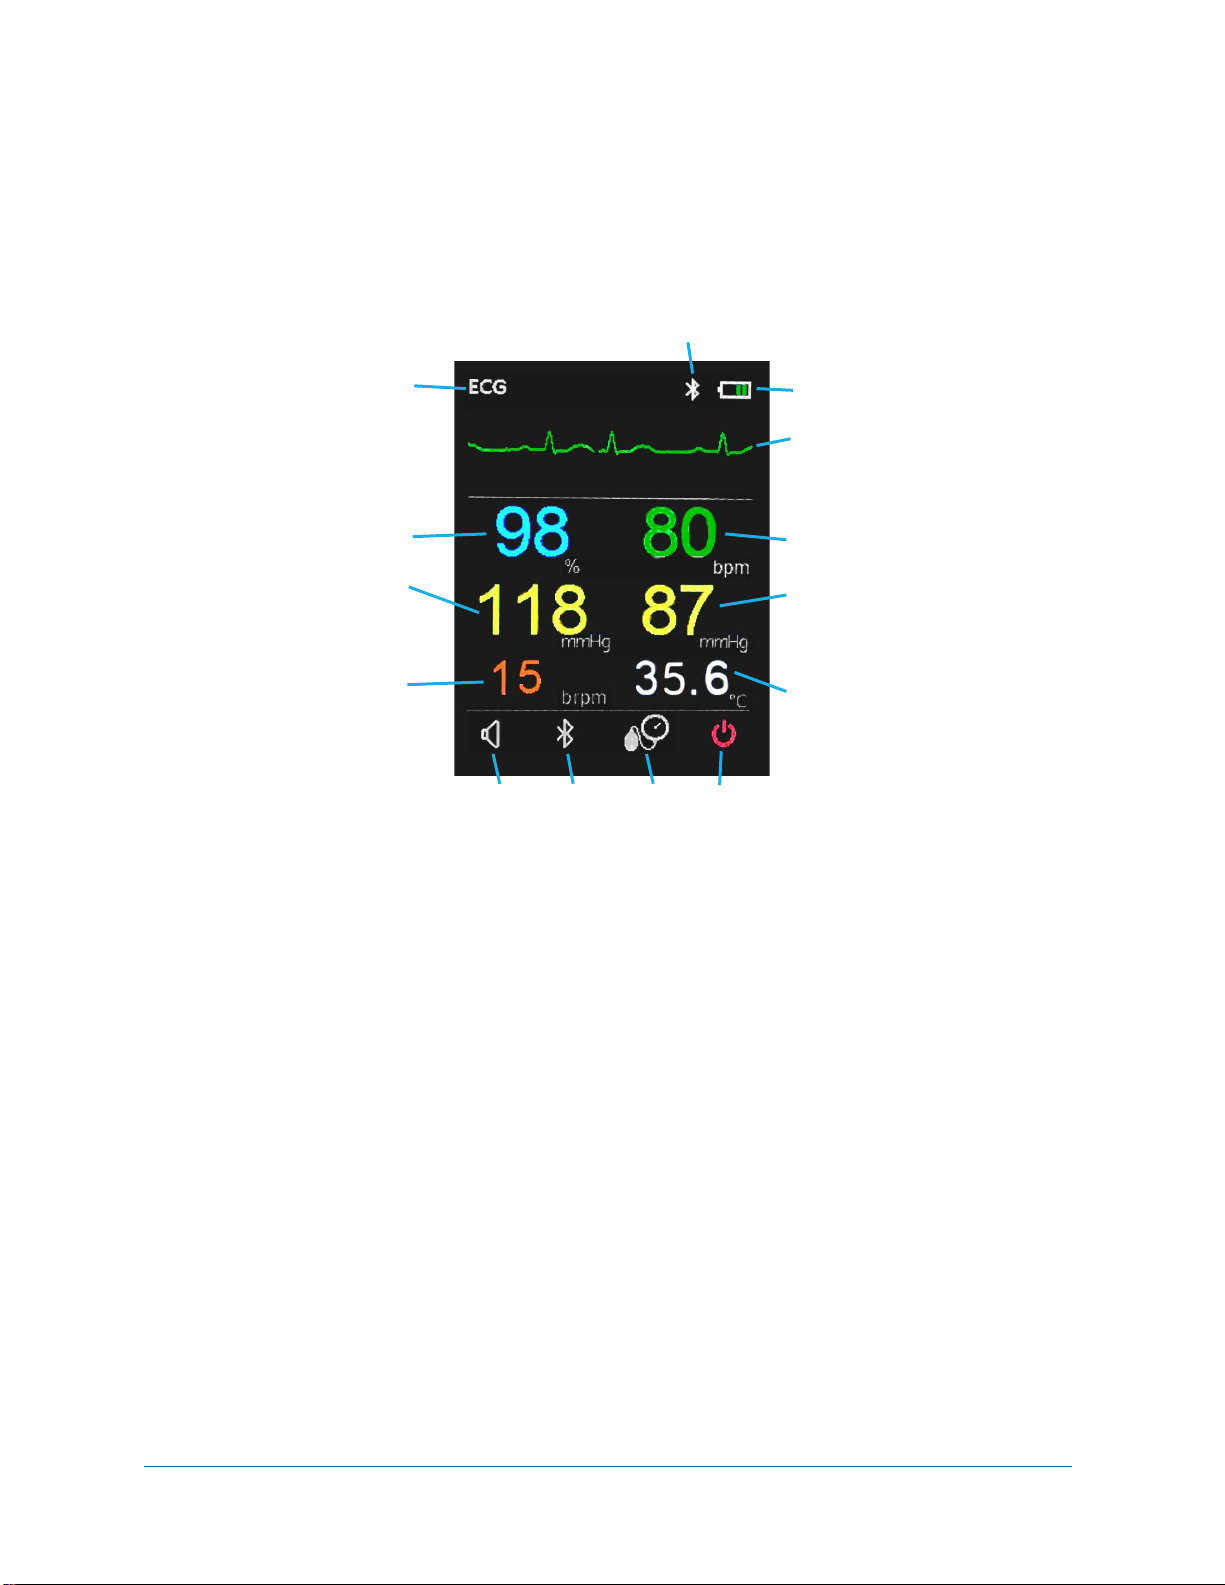
4.1 Integral Display Description
Refer to the references below for description on the integral screen:
Figure 2 - Main Screen
1. Waveform Indicator: Either ECG or SpO2waveform
2. Battery Level Indicator: Indicates battery power remaining
3. Waveform: ECG or SpO2.
4. SpO2: Oxygen saturation (%)
5. HR/PR: Heart Rate or Pulse Rate (beats per minute)
6. SYS: Systolic blood pressure (mmHg)
7. DIA: Diastolic blood pressure (mmHg)
8. RESP: Respiration Rate (breaths per minute)
9. TEMP: Temperature from ECG/temperature probe (˚C)
10.Audio Select: Device audio tone ON or OFF
11.Bluetooth Select: Bluetooth active or inactive
12.NIBP Select: Initiates or cancels BP measurement
13.Power off Select: Powers off the monitor
14.Indicator Icons: Shows whether audio and/or Bluetooth are
enabled
14
10 11 12 13
2
3
5
7
9
1
4
6
8

11
4.2 Interacting directly with the VetTab
Press the button on the VetTab monitor (see Section 2.2, #5) once to turn it on. Once the
monitor is powered on, you will see four selections on the bottom of the display (See
Figure 3 below) with the left-most icon (Audio) larger than the others. This denotes that it
is currently selected.
Figure 3 - Display selections
Press the button again and the next icon to the right will now increase in size, denoting
that it is now selected while the first icon returns to its normal size. Continuing to press
the button will select each icon to the right and then cycle back to the first icon on the left.
Once the icon of your choice is selected then press and hold the Select button for at least
1 second to activate your selection.
Each icon performs the following functions when activated.
Audio:
Activating the Audio icon will either enable or disable the
audible heart rate tone. If audio is active then a speaker icon
similar to this one will appear at the top of the display. It will
disappear if disabled.
Bluetooth:
Activating the Bluetooth icon will either enable or disable the
Bluetooth capability of this monitor. If disabled, no Android
device will be able to connect to it. When Bluetooth is enabled
a similar Bluetooth icon will flash at the top of the display. It
will disappear if disabled.
NIBP:
Activating the NIBP icon will either start a Blood Pressure
measurement or cancel one that is in progress. When a BP
measurement is in progress a small hourglass icon will
appear between the Systolic and Diastolic parameters on the
display.
Power:
Activating the Power icon will turn off the VetTab monitor, also
disconnecting any Bluetooth connection if active.

12
4.3 Tablet Display and Interaction
If you purchased your VetTab with a tablet, the tablet monitoring application is pre-
installed and ready to connect. If you are using your own tablet you can download the
Vmed VetTab monitoring application at no charge from Google Play or from the Vmed
Technology support website:
https://www.vmedtechnology.com/downloads_support.htm
NOTE
In order to install the Android app from the Vmed website you will need
to follow the instructions provided on our website to enable
“sideloading” of apps onto your Android device, which involves
disabling some security features within Android.
NOTE
VetTab Application is compatible with Android version 8.1 (Oreo) and
above only. For connection procedure see section 4.3.3 below.
4.3.1 VetTab Android App Monitoring Display
The VetTab Android app starts with the monitoring screen, which has parameter and
waveform data as presented below. Additionally, the right side of the screen has several
icons with which the user can interact. These allow the user to make a connection to a
VetTab monitor, initiate a Blood Pressure cycle, toggle the sound or adjust settings in a
separate Settings screen. Refer to Figure 4 below for illustration.
The VetTab Android app is designed for live-monitoring only and does not record
monitoring data. However, it does provide the ability to see both the waveform and
numerical data in a larger context, depending upon the size of the Android device on
which it is used. Through this app you can set up and activate a periodic blood pressure
measurement cycle and be notified when any of the shown parameters exceed their
individual alarm limits. You may also edit these alarm parameters using the Settings
screen (described in section 4.3.2).
13
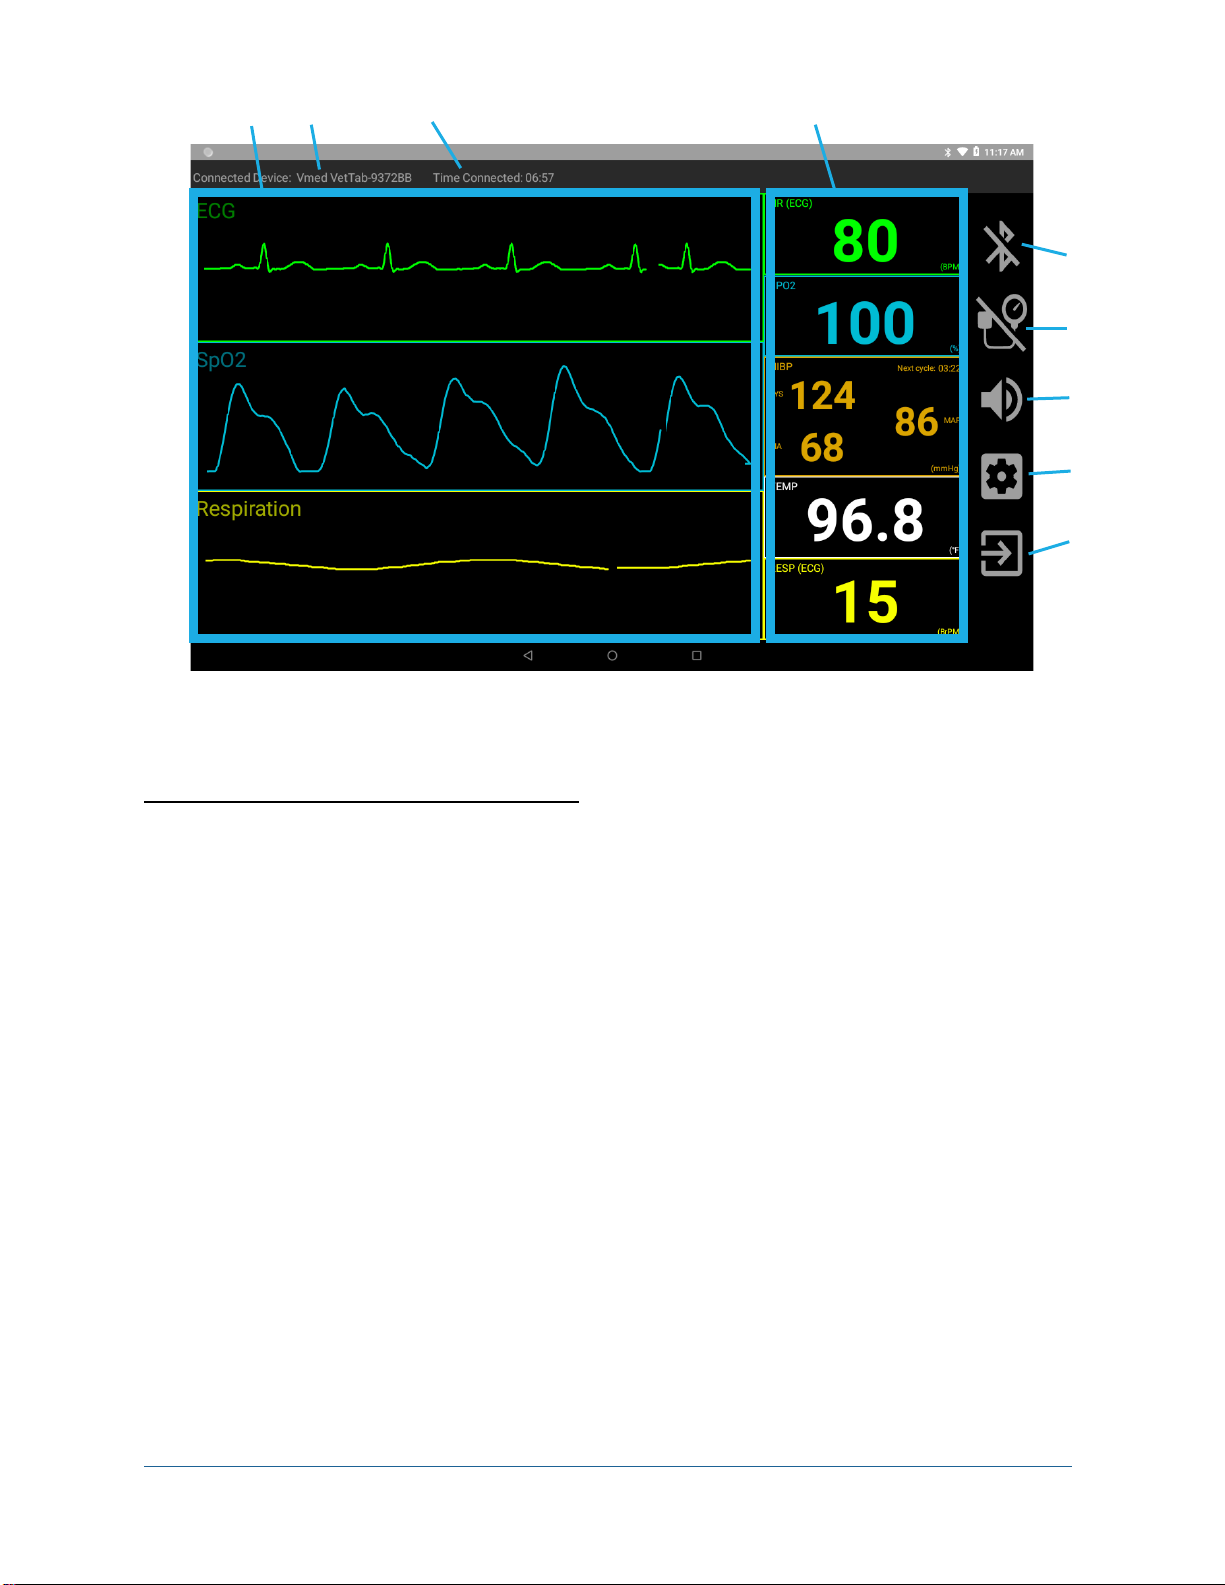
Figure 4 - Android VetTab App Monitoring Screen
VetTab App Monitoring Screen Elements:
1. Waveform Boxes (ECG, SpO2, Respiration)
2. Currently connected device
3. Elapsed Bluetooth connection time (i.e., monitoring time)
4. Parameter Boxes (HR, SpO2, NIBP, Temp, Resp)
5. Connect Button
6. NIBP Button
7. Audio Button (app only)
8. Settings Button
9. Exit Button
5
6
7
8
9
1 2 3 4

14
Each icon on the right side of the monitoring screen (items 5-9 above) has the following
functionality.
Connect to
VetTab:
Selecting the Connect button while this icon is shown will
initiate the Bluetooth connection process to a VetTab
monitor (see section 4.3.2). This icon will only appear if a
VetTab is not currently Bluetooth connected to this app.
Disconnect from
VetTab:
Selecting the Connect button while this icon is shown will
disconnect from the currently Bluetooth connected
VetTab monitor. This icon will only appear if a VetTab is
currently Bluetooth connected to this app.
Display Demo
Data:
Selecting the Connect button while this icon is shown will
begin the display of Demo data. This icon will only appear
if “Demo mode” is enabled and Demo data is not
currently displayed.
End Display of
Demo Data:
Selecting the Connect button while this icon is shown will
end the display of Demo data. This icon will only appear if
“Demo mode” is enabled and Demo data is currently
displayed.
Initiate Blood
Pressure
Measurement:
Selecting the NIBP button while this icon is shown will
begin the blood pressure measurement cycle. This icon
appears only if blood pressure cycle is inactive.
Cancel Blood
Pressure
Measurement:
Selecting the NIBP button while this icon is shown will
cancel a blood pressure measurement or its cycle. This
icon appears only if a blood pressure measurement cycle
is active (either during a measurement or while waiting
for a new measurement).
Disable Audio:
Selecting the Audio button while this icon is shown will
disable audio for the app’s heart rate tone or alarms. This
icon appears only if audio is currently enabled.
Enable Audio:
Selecting the Audio button while this icon is shown will
enable audio for the app’s heart rate tone or alarms. This
icon appears only if audio is currently disabled.
Settings:
Selecting this icon will open the Settings screen where
the alarm limits and other options can be modified.
Exit:
Selecting this icon will disconnect any active Bluetooth
connection and exit the VetTab Android app.

15
In addition to the icons on the right of the screen and the waveform and parameter data
the app’s monitoring screen gives additional information at the top. There you can find
the currently connected VetTab device (including its ID number in case you have more
than one VetTab device). You can also see the elapsed Bluetooth connection time, which
will reset the next time you establish a Bluetooth connection with your VetTab monitor.
4.3.2 VetTab App Settings
The Settings screen allows the user to modify default high and low alarm limits for the
Heart Rate, SpO2, Systolic, Diastolic, MAP, Temperature and Respiration parameters.
Figure 5 - Settings Screen
Each category has a blue heading such as “Heart Rate”, “Respiration”, etc. Each
category has its own toggle switch that allows the user to enable or disable the alarms
for that category (when the switch is blue then it is on and when it is gray then it is off,
disabling alarms for that category). Each parameter type also has both a high alarm limit
and a low alarm limit. You may change what is shown by default by tapping its text box
and then typing a new number in its place.

16
Additionally, you may set the temperature unit and the interval that the blood pressure
measurement will use between measurements. Demo Mode may also be selected
through the toggle switch under “General.” Enabling this and then returning to the
Monitoring screen will allow you to show pre-recorded vitals data on the screen once
the “connect” button is pressed.
If any change is made to a value or switch within the Settings screen you will need to
press the “Save Settings” button at the lower left corner of the screen in order to keep
these changes and return to the Monitoring screen.
Figure 6 - Save Settings Button
Instead, you may return to the Monitoring screen without saving any modified settings
by tapping the Android Back button at the bottom center of the screen.
Figure 7 - Android Back Button
4.3.3 Bluetooth Connection to Android Device
The internal Bluetooth on your Android device allows it to link wirelessly to the VetTab
communicating its monitoring data for display in the Android app.
Once the Vmed VetTab app has been installed on your Android device and you have
verified that Bluetooth is enabled on it, you can make use of the app by following these
instructions.
1. In your list of apps, select the Vmed VetTab app.
Figure 8 - Vmed VetTab App Icon

17
2. When it first opens it will show the main monitoring screen (see Figure 9).
Figure 9 - VetTab App Monitoring Screen
3. Press the Select button on the front of the VetTab to turn it on and make sure that
the Bluetooth icon ( ) is blinking at the top of the LCD indicating that Bluetooth is
enabled. If it is not blinking, follow the instructions in section 4.2 to enable it.
4. Touch the Connect button (see section 4.3.1) to initiate the Bluetooth connection.
Once your VetTab is discovered it will appear in the following list. If other nearby
VetTab monitors are also on, they will also be visible. Select your VetTab from the
list to initiate pairing.
Figure 10 - Bluetooth Discovery of VetTab
IMPORTANT
The VetTab will appear in this list during Bluetooth discovery with a
unique digital ID number corresponding to the VetTab ID number
printed on the back label (in Figure 10 it is “937A18”). Pay attention to
this ID number if more than one nearby VetTab is turned on to ensure
you connect to the right one.
18
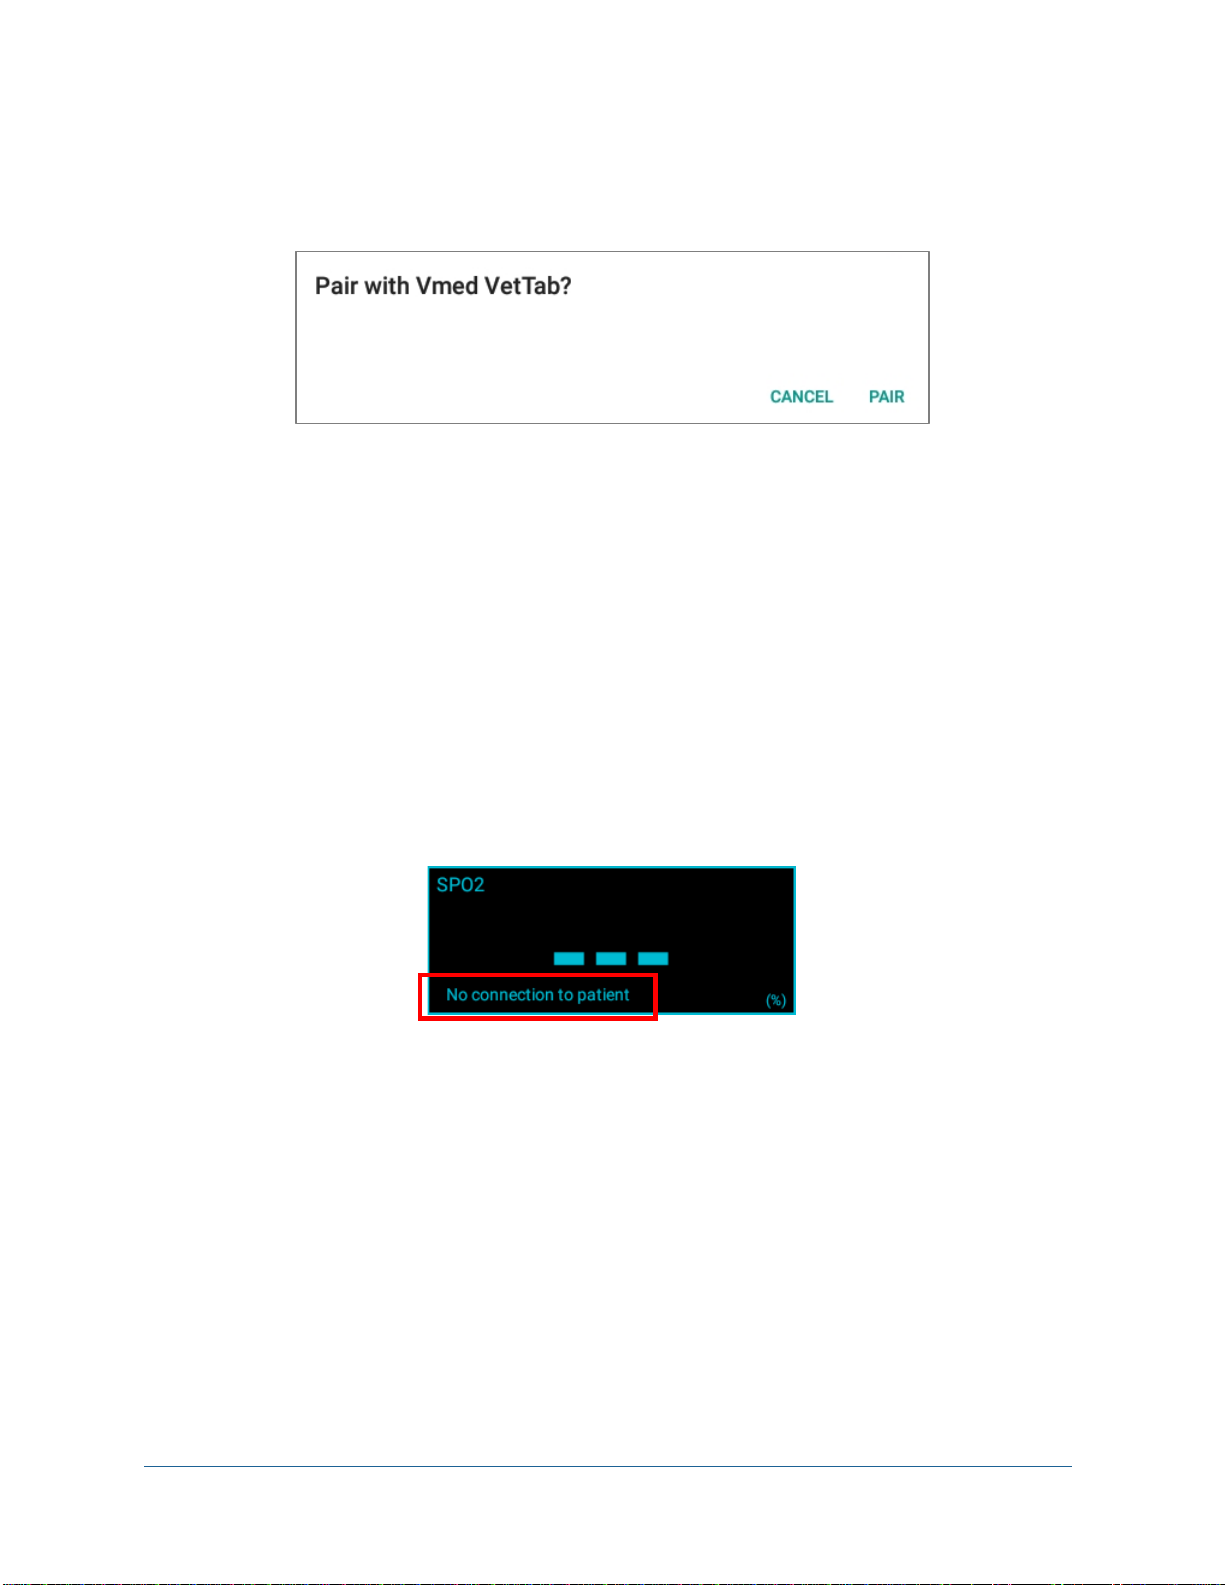
5. If your VetTab has not already been paired with this Android device, you will see
the following dialog. Select “Pair” to initiate the pairing. However, if your VetTab
has already been paired with this Android device then proceed to step 6.
Figure 11 - Bluetooth Pairing Dialog
6. The screen will now show that you are connected and waveform data will begin
traversing each waveform box.
4.3.4 SpO2 Sensor Status Display
Whenever the VetTab is not measuring a certain vital sign parameter from the patient
then that vital sign’s parameter box will display three hyphens (“---”) to indicate that there
is no value available. For the SpO2parameter there is an additional message at the
bottom left corner (see Figure 12) which gives further information about why there is no
available SpO2parameter value.
Figure 12 - SpO2Status Description
The descriptions indicate such reasons as:
•Sensor is unplugged –the SpO2sensor cable is not plugged into the VetTab
•No connection to patient –the SpO2sensor cable is plugged into the VetTab,
but the sensor itself is not connected to the patient
•Searching for pulse signal –the SpO2sensor may be attached to the patient but
is unable to detect a pulse to measure (this usually only takes a few moments)
•Pulse search timed out –Too much time passed while the SpO2sensor was
unable to detect a pulse to measure
19
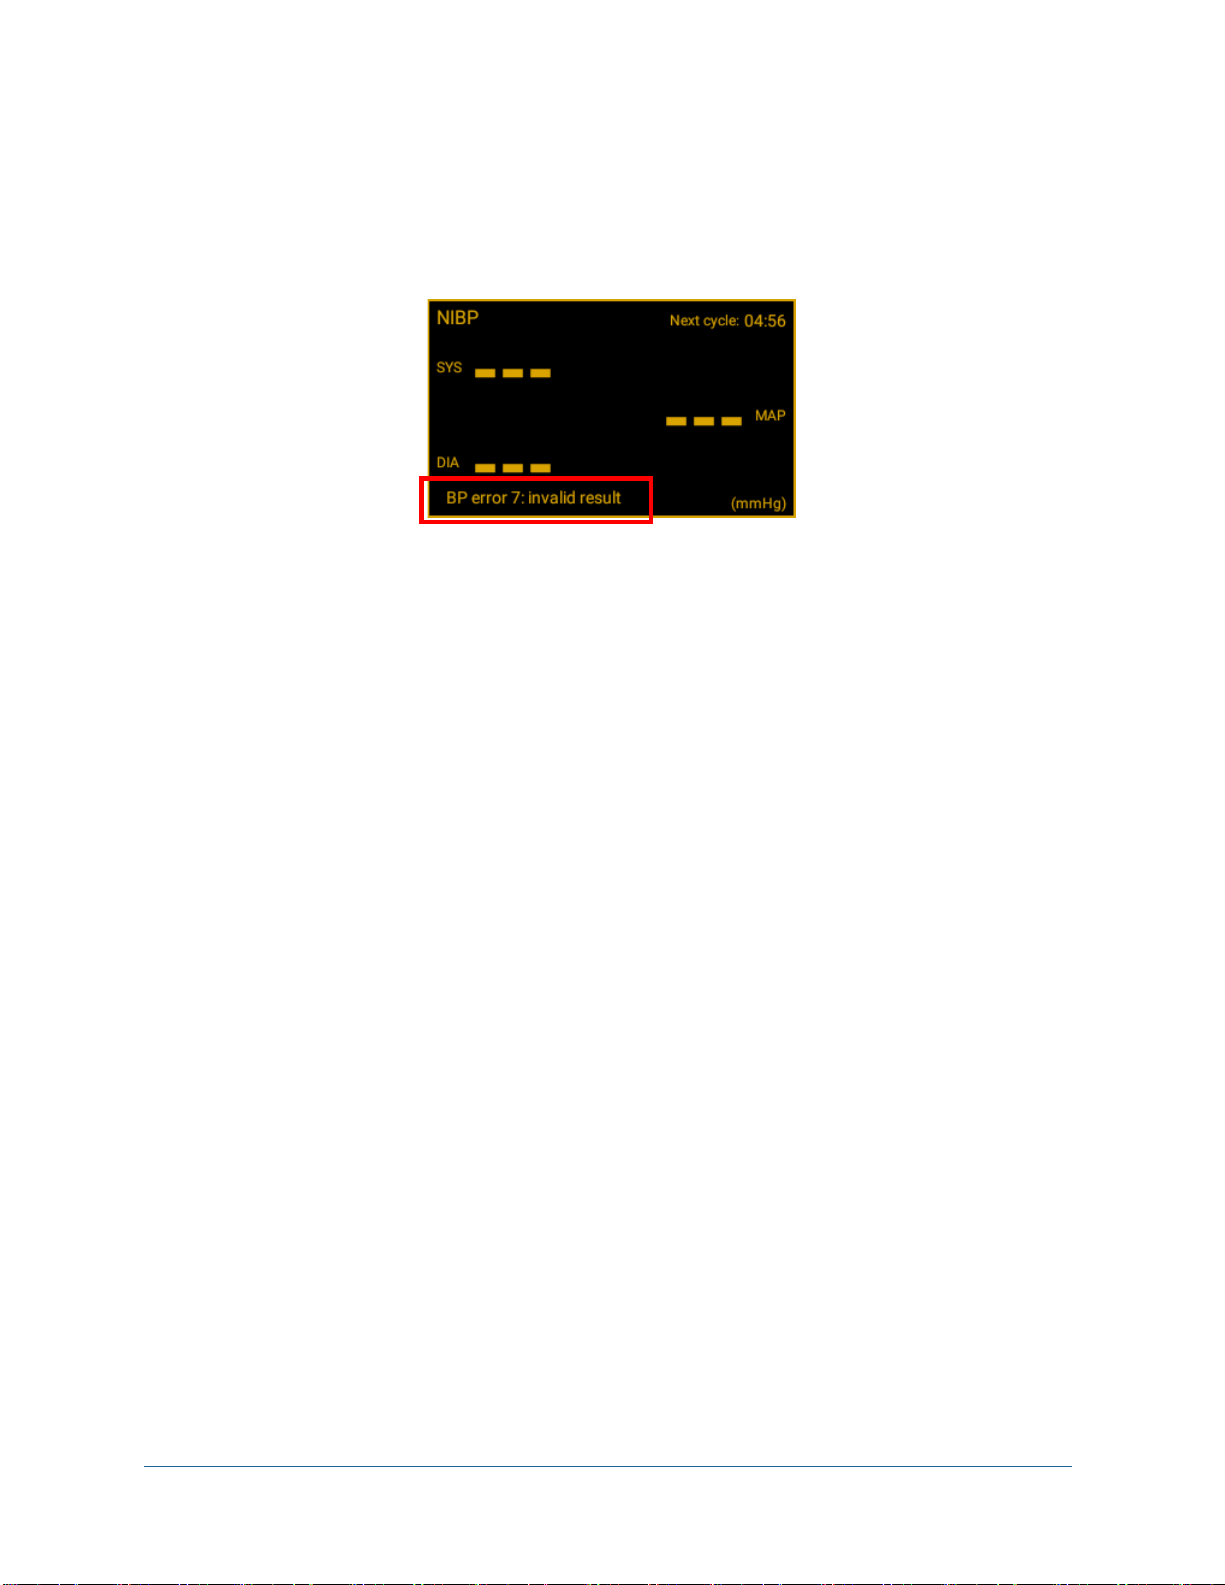
4.3.5 NIBP Error Message Display
Occasionally when performing a blood pressure measurement, the VetTab may not be
able to return a numerical result. In such an instance it should produce an error message
in the bottom left corner of the NIBP parameter box describing why this is.
Figure 13 - NIBP Error Message Display
Some of the more common errors are listed below with descriptions of what may have
caused them or what you may do to correct them.
•BP error 3: cuff pressure leak:
oCause: no cuff is attached to the hose
oCause: leak in the cuff so that it cannot inflate completely
oFix: attach a cuff without any leaks
•BP error 5: check cuff position:
oCause: the cuff is not connected to or improperly positioned on the patient
oCause: the wrong cuff size is used on the patient
oFix: follow instructions in section 6.3 for proper cuff placement and
position
•BP error 7: invalid result:
oCause: hose is kinked or blocked
oCause: cuff not properly connected to patient
oCause: cuff is too large (or loosely wrapped around patient)
oFix: make sure hose is not kinked or obstructed
oFix: follow instructions in section 6.3 for proper cuff placement and
position
•BP error 8: measurement cancelled:
oCause: the measurement was cancelled either by the user tapping the BP
button on the app or by selecting and activating BP on the VetTab screen.
This error would only appear in the middle of a measurement and not during
the interval between them.
20
4.3.6 NIBP Measurement Cycles
When monitoring a patient during a longer procedure you may wish to measure the blood
pressure multiple times at regular intervals. The automatic NIBP cycle feature allows you
to do so without having to remember to initiate a measurement each time. By selecting
one of several choices for “Automatic Interval” under the NIBP section of the App Settings
screen (see Figure 5 of section 4.3.2), you may designate the NIBP to automatically
initiate a new measurement 1, 3, 5, 10 or 15 minutes after the previous measurement
concludes. Or, you may turn off automatic measurement by selecting “Off”. When it is off
each tap of the BP button will initiate a single measurement.
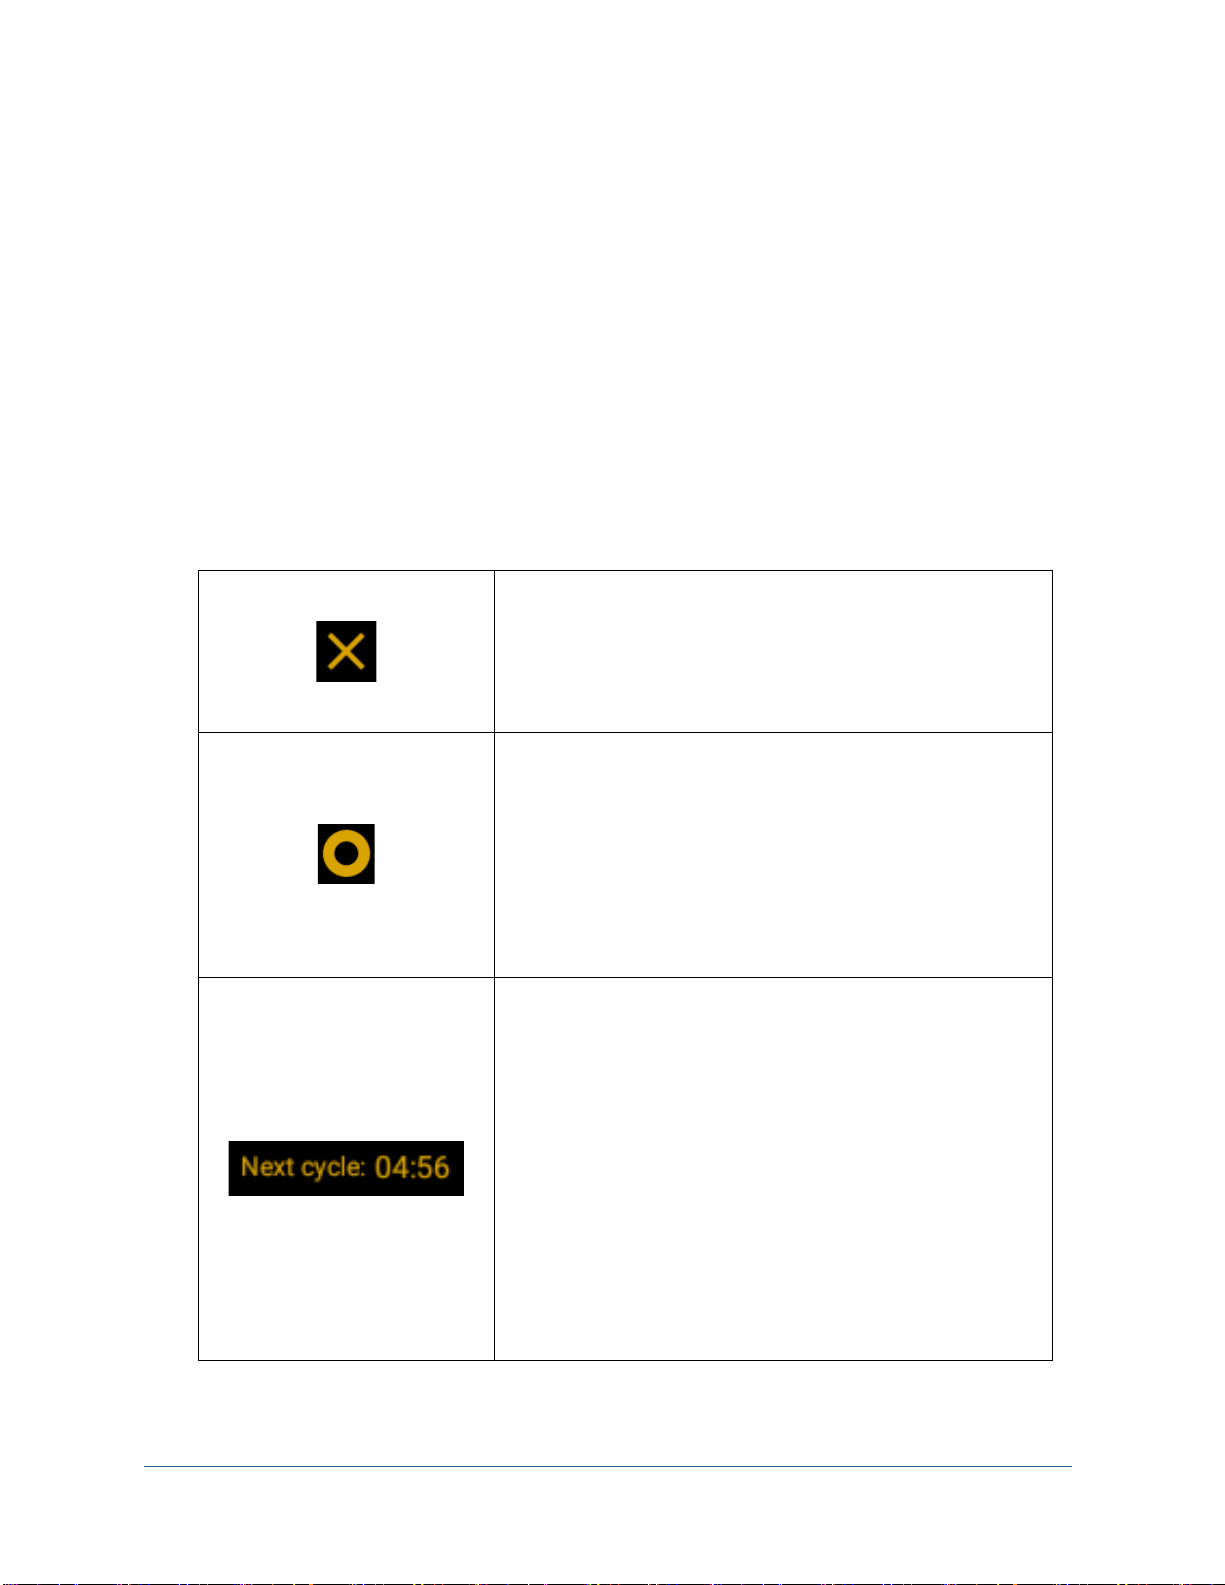
In the top right of the NIBP parameter box are 3 separate kinds of indicators which show
what state you are in for NIBP measurement cycles (see table below).
BP cycle is off. This ‘X’ symbol indicates that the
BP is neither measuring nor waiting to start a new
automatic measurement. To initiate a new cycle,
either tap the BP button on the app or select and
activate the BP icon on the VetTab remote device.
BP is measuring. This circular animation where
the center periodically grows larger and smaller
indicates that a blood pressure measurement is
currently active with the cuff at least partially
inflated. To cancel a measurement before it is
complete simply tap the BP button on the app or
select and activate the BP icon on the VetTab
remote device.
BP is in the automatic waiting interval: This text
shows a countdown in minutes and seconds from
the time interval selected in the App Settings. It
appears at the end of each measurement unless
“Off” is selected. Once it reaches “00:00” it will
automatically initiate a new BP measurement.
During this interval if you tap the BP button of the
app then it will cancel the BP cycle and return to
the Off state. Tapping the BP button again will start
a new measurement. However, if in the waiting
interval and you activate the BP icon on the VetTab
remote device then it will begin a new BP
measurement directly.
This manual suits for next models
1
Table of contents
Popular Medical Equipment manuals by other brands


Getinge
Getinge Arjohuntleigh Nimbus 3 Professional Instructions for use

Mettler Electronics
Mettler Electronics Sonicator 730 Maintenance manual

Pressalit Care
Pressalit Care R1100 Mounting instruction

Denas MS
Denas MS DENAS-T operating manual

bort medical
bort medical ActiveColor quick guide

AccuVein
AccuVein AV400 user manual


