Vogue 015251 User manual

Stroller Model # 015251
IMPORTANT!
RETAIN FOR FUTURE REFERENCE

03
Due to variations in the style and design of our products, the photographs and illustrations
shown in this instruction manual are generic, therefore product fabrics, colour and
design may vary from images shown. CNP Brands reserves the right to alter product
specications without notice as a result of our ongoing policy of product improvement.
Contents
Assembly contents list
Assembly / Operating instructions
How to care for your Vogue Childcare Stroller
Congratulations on your purchase of the
Vogue Childcare Stroller
This product has been designed and developed with
safety, comfort and functionality in mind. Please take
the time to read this manual carefully before using
this product and keep it in a safe place for future
reference.
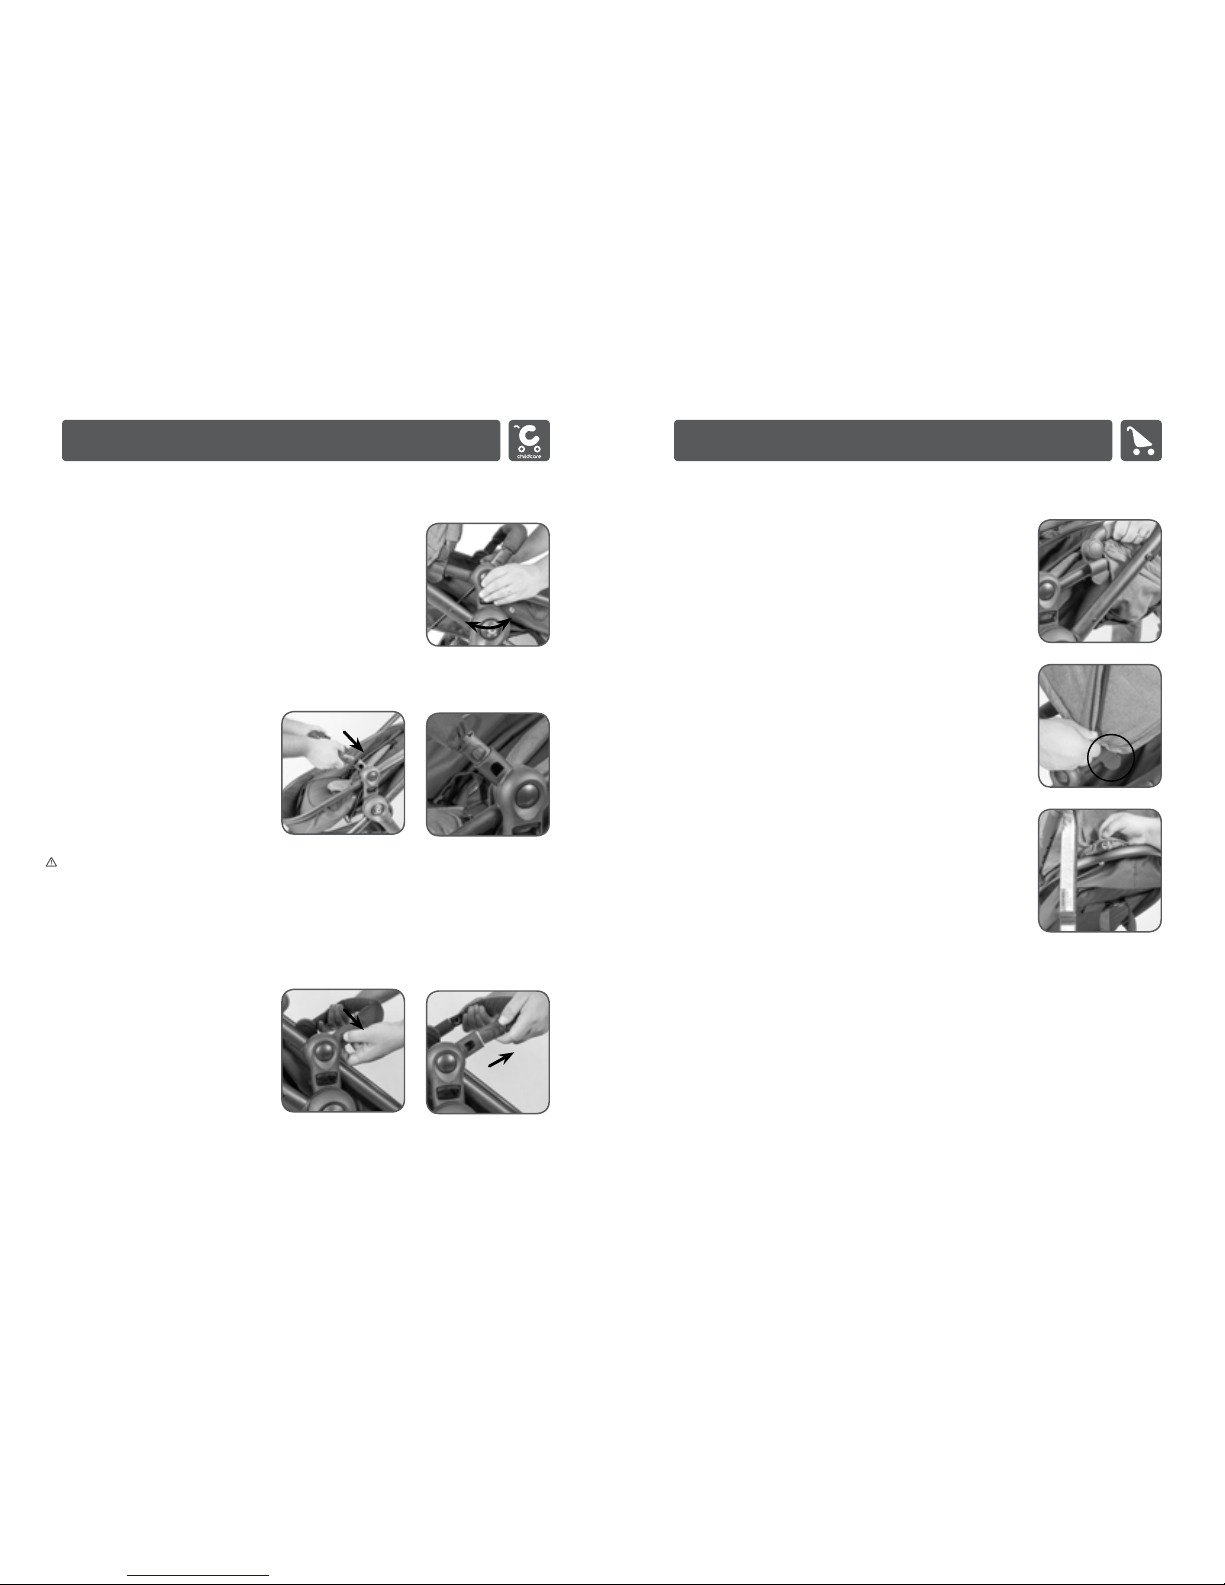
Fingers or parts of the body could be injured when the stroller is being folded or unfolded. Please
use caution when folding or unfolding the stroller.
Always check that safety locks are engaged before placing a child in the stroller.
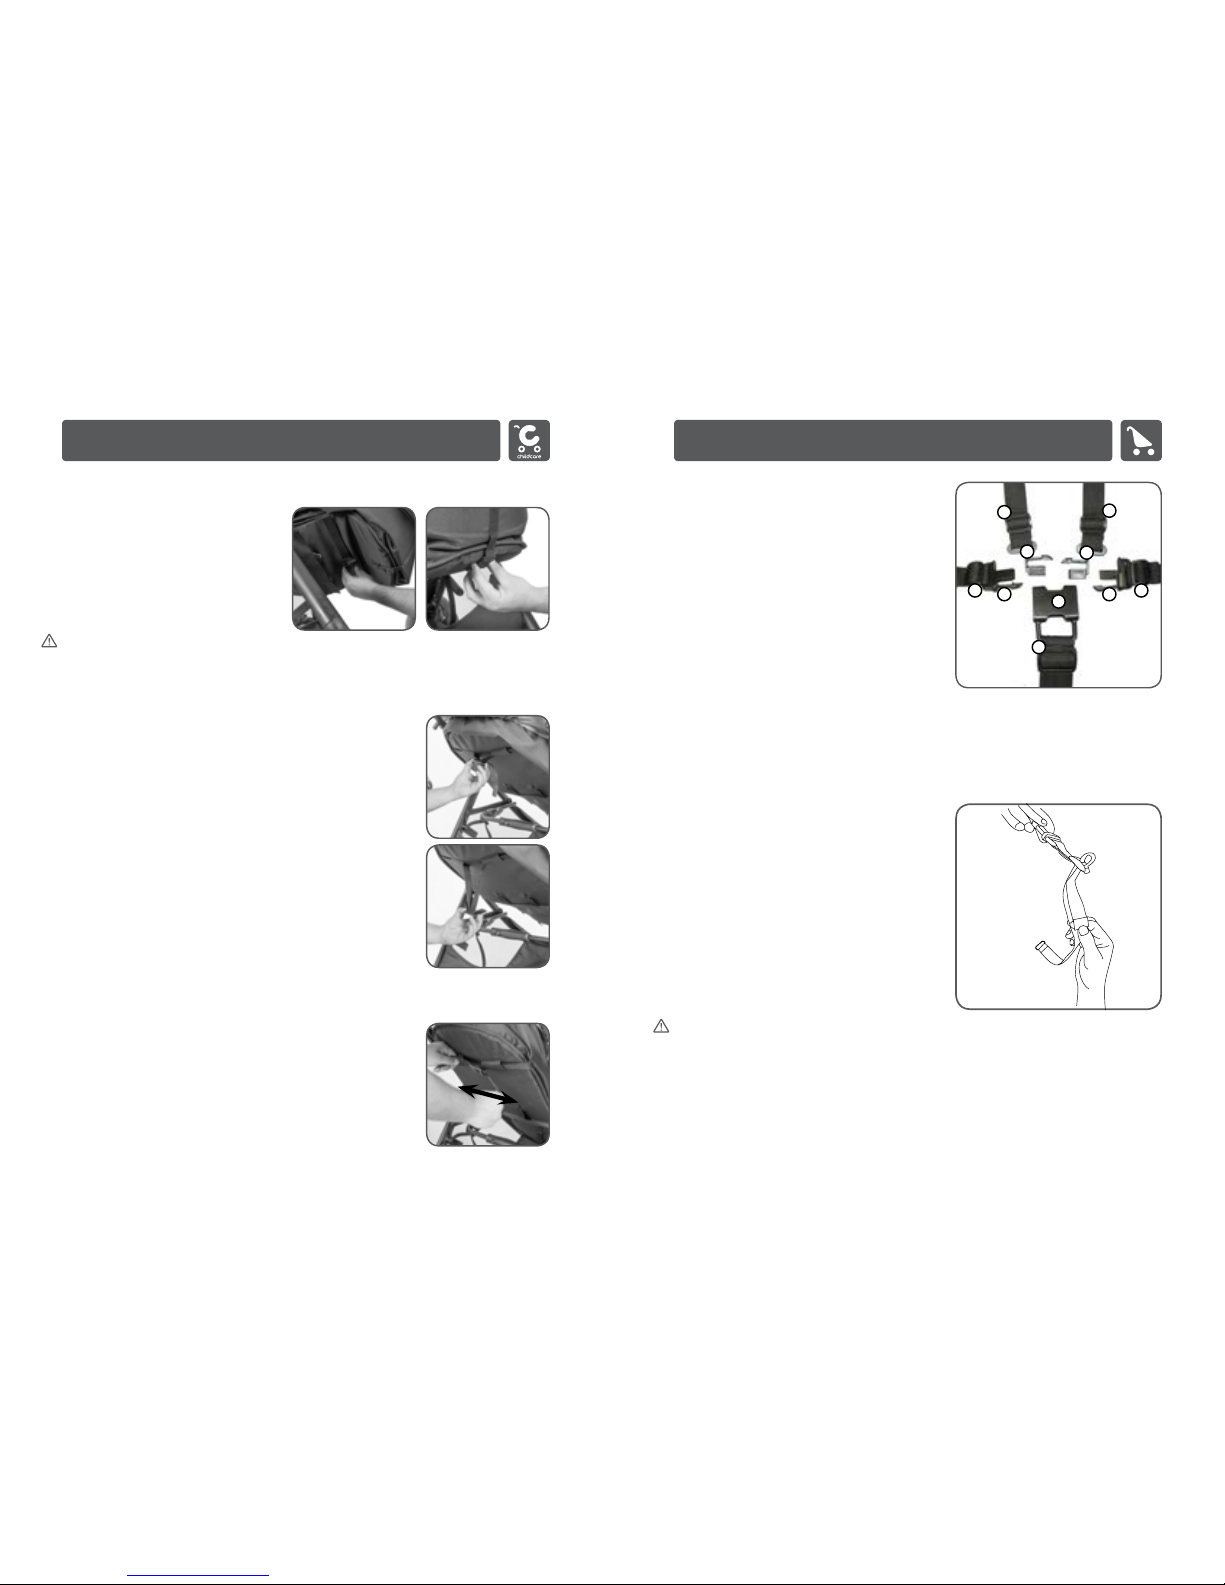
Ensure your child is secured with a correctly adjusted safety harness.
Do not allow children to stand on the seat.
Do not hang bags or goods from the handle as this could cause the stroller to tip over.
Do not place more than 5kgs in the basket or 1kg in the hood pocket (if supplied).
The weight of the child using the product should not exceed 20kgs.
The height of the child using the product should not exceed 96cm.
It is unsafe to use parts other than those approved by the manufacturer.
Never ride with more than one child in the stroller.
This stroller has been designed for use on at or gently sloped surfaces. Using this stroller on
uneven or higher sloped surfaces may cause the stroller to become unstable and tip over.
Regularly inspect all parts and locking devices, promptly replace worn out or broken parts.
Remove the child from the stroller before going up or down stairs and escalators.
To prevent the risk of the stroller catching re, do not park it near an open re, heater or barbeque.
Do not make any changes or alterations to this product, unless through an approved service agent.
To avoid the risk of suffocation, keep all plastic packaging materials out of reach of children.
Never leave safety harness connected when not tted to a child in the stroller as this may create
loops that could cause a strangulation hazard.
Ensure the storage latch is fully engaged when lifting or carrying the stroller
Read all instructions before assembly and use of the stroller. Keep
instructions for future use.
Safety Precautions
WARNING
TO AVOID INJURY OR DEATH:
ALWAYS APPLY THE BRAKES WHENEVER THE STROLLER
IS PARKED.
DO NOT LEAVE CHILDREN UNATTENDED.
SECURE THE CHILD IN THE HARNESS AT ALL TIMES.
DO NOT CARRY EXTRA CHILDREN OR BAGS ON THIS
STROLLER.
MAKE SURE CHILDREN ARE CLEAR OF ANY MOVING
PARTS IF YOU ADJUST THE STROLLER.
TO AVOID INJURY ENSURE THAT YOUR CHILD IS KEPT
AWAY WHEN FOLDING AND UNFOLDING THE STROLLER.
ENSURE THAT ALL LOCKING DEVICES ARE ENGAGED
BEFORE USE.
USE THE TETHER STRAP TO STOP THE STROLLER
ROLLING AWAY.
DO NOT USE THIS BASSINET ONCE THE CHILD CAN SIT
UP UNAIDED.
BE AWARE THAT MOVING PARTS MAY CAUSE INJURY IF
CARE IS NOT TAKEN.

0504
Check what you have received...
You have received 1 box. Please check the contents of the box against the list below. If anything is
missing, please contact Customer Service. In Australia, contact CNP Brands on 1300 667 137, in
New Zealand contact Wainhouse Distribution on 0800 567 5000.
Assembly / Operating Instructions
Assembly Contents
Supplied loose in box:
Carry cot/seat unit
Frame
Back wheels (x2)
Front swivel wheels
(x2)
Boot cover
Canopy
Bumper
x 1
x 1
x 1
x 1
x 1
x 1
x1
Right car seat adapter
(marked on the inside with “R”)
Left car seat adapter
(marked on the inside with “L”)

0706
Front swivel wheels assembly
1. Line up the front wheels with the bottom of the frame.
2. Push rmly until the wheel clicks into place. Repeat with other
side. Ensure wheels are both clicked rmly into place.
Swivel function
1. To lock swivel wheels, push lever outwards.
2. To unlock swivel wheels, push lever inwards.
WARNING: On unmade or uneven surfaces all swivels must be
locked.
Removing the front wheels
1. Push in the quick release tab,
then pull the wheel out of the
wheel - housing.
Assembly / Operating Instructions
Assembly Contents
Removing the back wheels
1. Push in the quick release tab,
then pull the wheel out of the
wheel - housing.
Back wheel assembly
1. Line up the back wheel with the
hole and push in wheel until you
hear a ‘click’ to ensure it’s correctly
in place.

0908
Assembling seat
1. Turn bassinet upside down, lift rear
bar.
2. Wrap velcro fabric around the bar and
press down rmly to secure.
Unfolding the stroller
2. Lift up the stroller by the handle and
move forward simultaneously until
the stroller opens and ‘clicks’ into
position.
1. Using your thumb, push the lock outward to release the stroller
(highlighted in the image).
Attaching the seat
1. Slide both sides of the seat into the
frame until you hear each side click
into position.
2. Once the seat is in position, pull up to
conrm it is secure.
Assembly / Operating Instructions
Assembly Contents
Using the rear brakes
1. To lock the brakes, push down on the brakes on the rear axle
with foot. Ensure that both brakes are engaged
2. To unlock brakes, lift the brakes on
the rear wheels with foot. Ensure
both brakes are disengaged.
WARNING: Always apply brakes when parking stroller.

11
Removing the bumper bar
1. Squeeze the buttons on the side
of the bumper bar as per image.
Pull outwards from seat.
Attaching the bumper bar
1. Insert front bumper bar into
openings on the sides of the seat.
Push gently until you hear a click
on both sides.
WARNING: The bumper is only used for the seat unit; do not use it for carrying the
carry cot._
Attaching the canopy
1. Slide each side of the canopy onto the frame mould in
each side until it clicks into place.
2. Loop the elastic over the area that is circled in the
image to the right on both sides of the canopy.
3. Ensure the 2 press studs are pushed in at the back of
the canopy to secure the canopy in place.
Assembly / Operating Instructions
Assembly Contents
10
Adjusting seat position
1. The seat can be adjusted to different positions. Push the
buttons in simultaneously and move the seat to the desired
position.

1312
Canopy functions
1. Pull the canopy cover forward or push backward.
2. Pull out the visor as per image for the sun visor
function.
Mesh canopy extension
1. To extend mesh extension, unzip zipper around middle of
canopy and pull forward. Close zip when not in use.
CAUTION: The canopy must be fully closed before folding
the stroller.
Canopy window
1. When window is not in use, keep
the ap secure with the velrco
pads.
2. To use the window, roll up neatly
and secure with toggle and elastic.
Disassembly / Assembly of canopy
1. To assemble the canopy, attach the canopy clips to each side
of the stroller frame (as pictured) by pushing the clips until they
snap into place.
2. Attach the press studs to the bar underneath to hold the
canopy into place.
3. To disassemble the canopy, repeat the steps above in reverse.
Assembly / Operating Instructions
Assembly Contents

1514
Boot cover
1. Wrap the boot cover around the bottom end of the bassinet or
seat. Attach press studs as shown in image. Match to the press
studs on the inside of the boot cover as shown.
2. Insert the top ap of the boot cover
underneath the bumper bar so it sits
on top of the boot cover.
3. Push rmly on the press studs of both
sides to secure it into place.
WARNING: Always remove boot cover before folding the stroller.
Tether strap
Ensure tether strap is used at all times. Make sure your hand is fed
through the loop as shown in the diagram.
Extend handle
1. Squeeze the handle in the middle of the bar to release the
mechanism. Move handlebar to desired position.
Bassinet Mode - Facing Baby
Recommended for newborn to
approximately
6 months of age or 9kgs.
WARNING: Bassinet cannot stand alone.
WARNING: Do not use this bassinet once the child can sit up unaided.
To assemble bassinet
1. Loosen the seat adjusting adjuster
straps under the backrest.
Assembly / Operating Instructions
Assembly Contents

1716
2. Push the buttons on the stroller frame
simultaneously and move the seat to
a parallel position until it clicks into
position.
3. Unclip the fasteners at the footrest end
of the bassinet and also underneath the
seat, as per image.
4. The bassinet mode is now ready. The
boot cover can also be attached in this
mode.
Stroller Mode
To convert to a stroller
1. Push the buttons on the stroller frame
simultaneously and move the seat
upright until it clicks into position.
2. Hold both straps of the seat adjuster and pull outward to
desired position.
Assembly / Operating Instructions
Assembly Contents

1918
3. Buckle the strap under the front of the
bassinet and also the footrest at the
end of the bassinet.
WARNING: Do not adjust backrest whilst the child is in the stroller
Adjusting the backrest
This stroller has an adjustable backrest. The upright position on the
backrest is not suitable for use with children less than six months old.
For use with a newborn (0-6mths), the seat should be fully reclined. The
backrest should only be adjusted to a more upright position as the child
grows older and is able to support their head without assistance.
1. To decline the seat adjuster, press and pull adjusting straps in a
downward motion and lower to desired position.
2. To incline the seat adjuster; hold both straps and pull outward to
desired position.
CAUTION: Do not adjust the backrest while child is in the stroller.
Declining the
seat adjuster
Inclining the
seat adjuster
Restraints - Harness
1. To secure the child in the harness, place left
hand buckle prong (b) on top of (a).
2. Hold both left hand buckle prongs (a) and (b)
together and insert it into buckle housing (e)
until it snaps into position.
3. Repeat previous steps for right hand buckle
prongs (c) and (d).
4. Once all attached, carefully adjust the harness
straps by pulling each slider (f) until the desired
t is achieved in the lap, shoulder and crotch
straps.
5. To release the buckles, squeeze the top and
bottom prongs (a) and (b), (c) and (d) together
until harness disengages.
CAUTION: Always adjust the harness when
changing the seating position of the child.
To adjust waist strap
1. To loosen waist strap, push up both top and
bottom straps through buckle.
2. To place waist strap in desired position, slide
the bottom strap into position then pull the top
strap and tighten into position.
(a), (b): Left hand buckle prongs
(c), (d): Right hand buckle prongs
(e): Buckle housing
(f): Strap adjustment sliders
f
ff
ff
a
b
c
d
e
Assembly / Operating Instructions
Assembly Contents
WARNING: Use this harness at all times.

2120
Car Seat Adapter
1. Remove the seat from the frame of the stroller. Insert the set
of plastic adapters into the slots where the seat normally sits
in position. Push gently until the adapters ‘click’ and lock into
place. The left adapter should be placed on the left when facing
the stroller from the front, and the right adapter on the right
when facing the stroller from the front.
This adaptor is designed for Maxi Cosi Car Seat; to be used with the
following strollers:
bebe care Rverse / Rverse XT / Rverse XLR / Childcare Vogue
IMPORTANT:
Insert car seat into adaptor
1. Insert the Maxi Cosi car seat as per car seat manufacturer’s
instructions by aligning the plastic side parts of the car seat into
the corresponding adaptor.
2. Push the car seat down until it clicks into place.
3. Swing the car seat’s handle down while pressing both grey
levers on the car seat side handle moulds until it locks into
position.
4. Car seat can be attached to stroller frame in either forward
facing or reverse facing.
5. To rotate car seat in opposite direction; rotate the car seat
together with the adaptors and insert them into the side stroller
frame’s slots until it ‘clicks’ and locks into place.
WARNING: Lift the Maxi Cosi Car Seat upwards to ensure that it
is fully engaged and locked before use.
To remove car seat from stroller frame
1. Simultaneously swing the car seat’s handle up while pressing
both grey levers on the car seat side handle moulds to release
the car seat.
2. Lift up car seat via the handle.
Folding stroller
NOTE: Both plastic adaptors can remain attached to the stroller frame when folding stroller.
Fold the stroller as per stroller manufacturer’s folding instructions.
To remove adaptor
To release the set of plastic adaptor from stroller, slide the red buttons
on the side of the plastic adaptor and lift them out of the stroller
frame slots.
Assembly / Operating Instructions
Assembly Contents
Tether strap
Ensure tether strap is used at all times. Make sure your hand is fed
through the loop as shown.

2322
Folding the stroller
1. To fold the stroller, pull the levers upwards on both sides of the
stroller frame simultaneously to disengage the stroller frame.
2. Push handle forward to the
front wheels. The stroller should
collapse onto itself.
3. Lift cental bar upwards by the handle to collapse unit.
4. Ensure the stroller is secure and
locked into place with the locking
mechanism. Ensure hood is folded
inwards.
Cleaning
To ensure the long-lasting use of your stroller, dry it with a soft absorbent cloth after use in rainy
weather. Use a damp cloth to clean the frame. Do not use abrasive cleaners. After using your
stroller on the beach, clean the frame and wheels thoroughly with water to remove the sand and
salt. Allow it to dry thoroughly. Removable and non-removeable fabric covers and trims maybe
cleaned using a damp cloth with soap or mild detergent. Allow it to dry completely before folding
or storing it away. Do not dry clean, or use bleach on fabrics or trims. Do not machine wash,
tumble or spin dry, unless the care labelling on the product permits these methods.
Maintenance
Check stroller regularly to ensure that locking devices and components are secure and working
properly. Always check parts regularly for tightness of screws, nuts and other fasteners – tighten or
replace if required. To maintain the safety of your stroller, seek prompt repairs for bent, torn, worn
or broken parts. Use only those parts and accessories approved by CNP Brands. If the wheels
squeak, use silicone based spray or light oil ensuring it penetrates the wheel and axle assembly.
To prevent mould or mildew, do not fold or store the product if it is damp or wet. Allow it to dry
thoroughly. Always store the product in a well ventilated area and away from direct sunlight.
If you have any difculties in assembling the stroller, please contact our Service Department. In
Australia, contact CNP Brands on 1300 667 137, in New Zealand contact Wainhouse Distribution
on 0800 567 5000.
Assembly / Operating Instructions
Assembly Contents

Table of contents