Volanti Displays xx-4KT Series User manual

Specifications subject to change without notice
© 2019 Volanti Displays – Ver 2.3 17 Feb 2019 Page 1 of 18
4K (UHD) TOUCH SCREEN MONITORS
RS-232 Commands For Use With
RS-232 & Ethernet Connection
Models: xx-4KT
Sizes: 32”, 55”, 65”
Volanti 4k touch screen monitors have both RS-232 and Ethernet connection for remote
commands using an RS-232 protocol command set.
The following guide provides information relating to use of these commands:
•Network connection
•RS-232 connection
•Application software
•RS-232 command set
oSwitch mount commands
oAudio & Image
oPicture in Picture related
oBacklight
oOn screen display
oOther
•ASCII table
•Browser screen functions
•Contact details

Specifications subject to change without notice
© 2019 Volanti Displays – Ver 2.3 17 Feb 2019 Page 2 of 18
Network connection
Volanti 4k touch screen monitors have a RJ-45 Ethernet port for control and monitoring over a
network. This application note introduces the two user interface modes:
•Command line direct mode, works with remote applications.
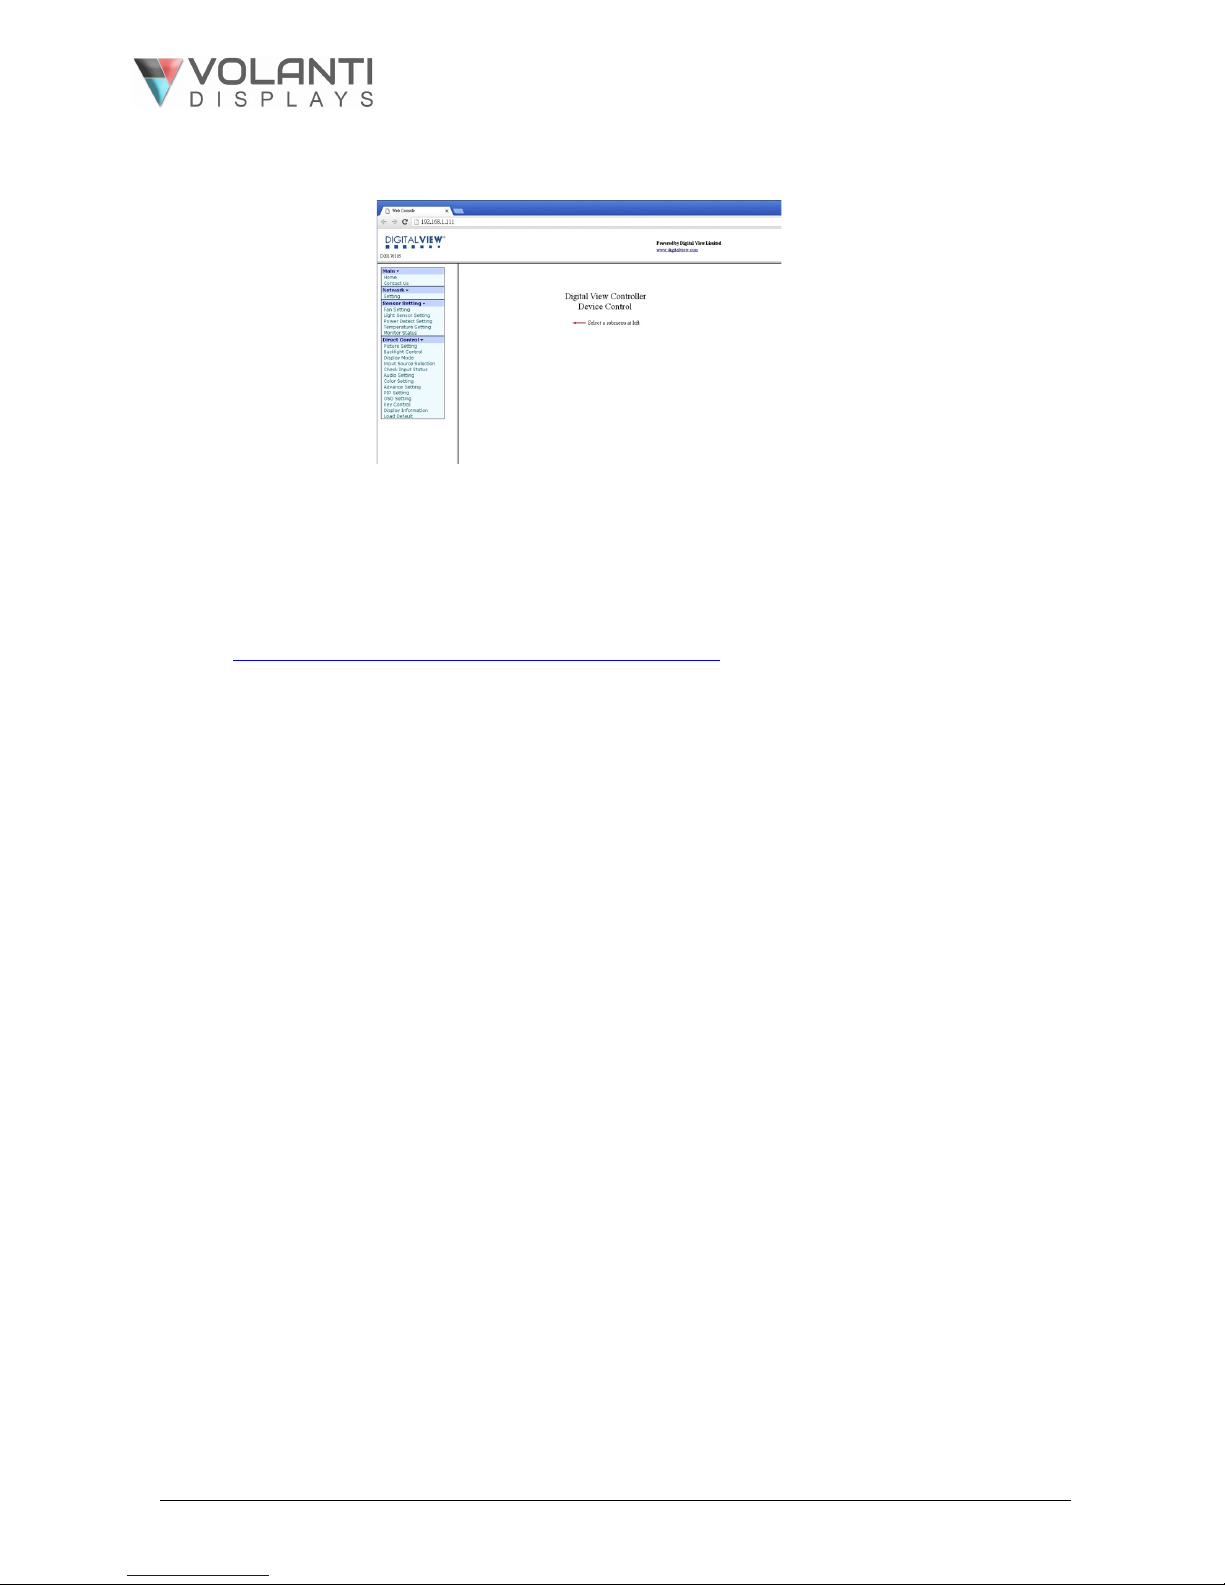
•Browser based web server mode.
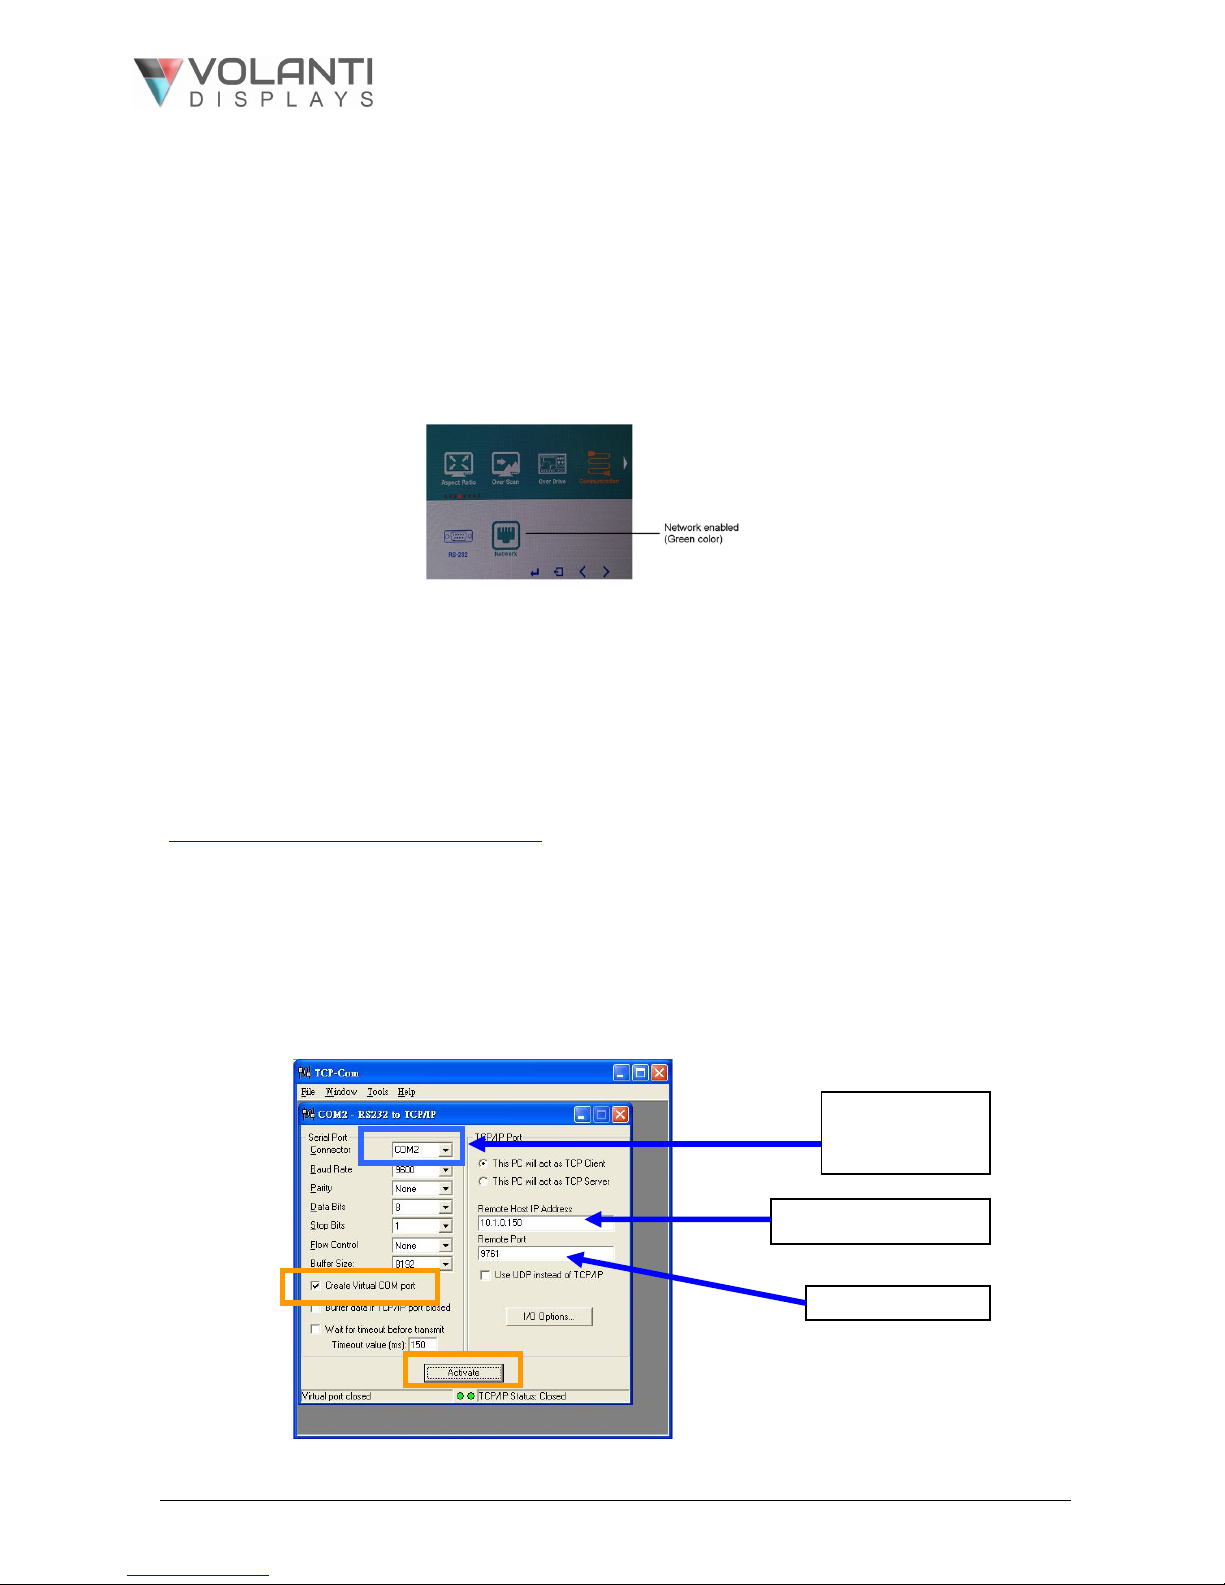
Before enter the above modes, make sure the Network option has been enabled in OSD menu
settings. On OSD menu, go to “Advanced” -> “Communication” -> “Network” -> Press Down key to
select and confirm. See below:
Network Connection – Quick Guide
For experienced users the following quick guide to trying out the network connection and functions
may be useful.
Command line direct mode: The RS-232 commands available are the same as documented in
Appendix III and writing a control application is very similar to the RS-232 type except the
commands must pass through the network. An alternative is to use an application written for RS-232
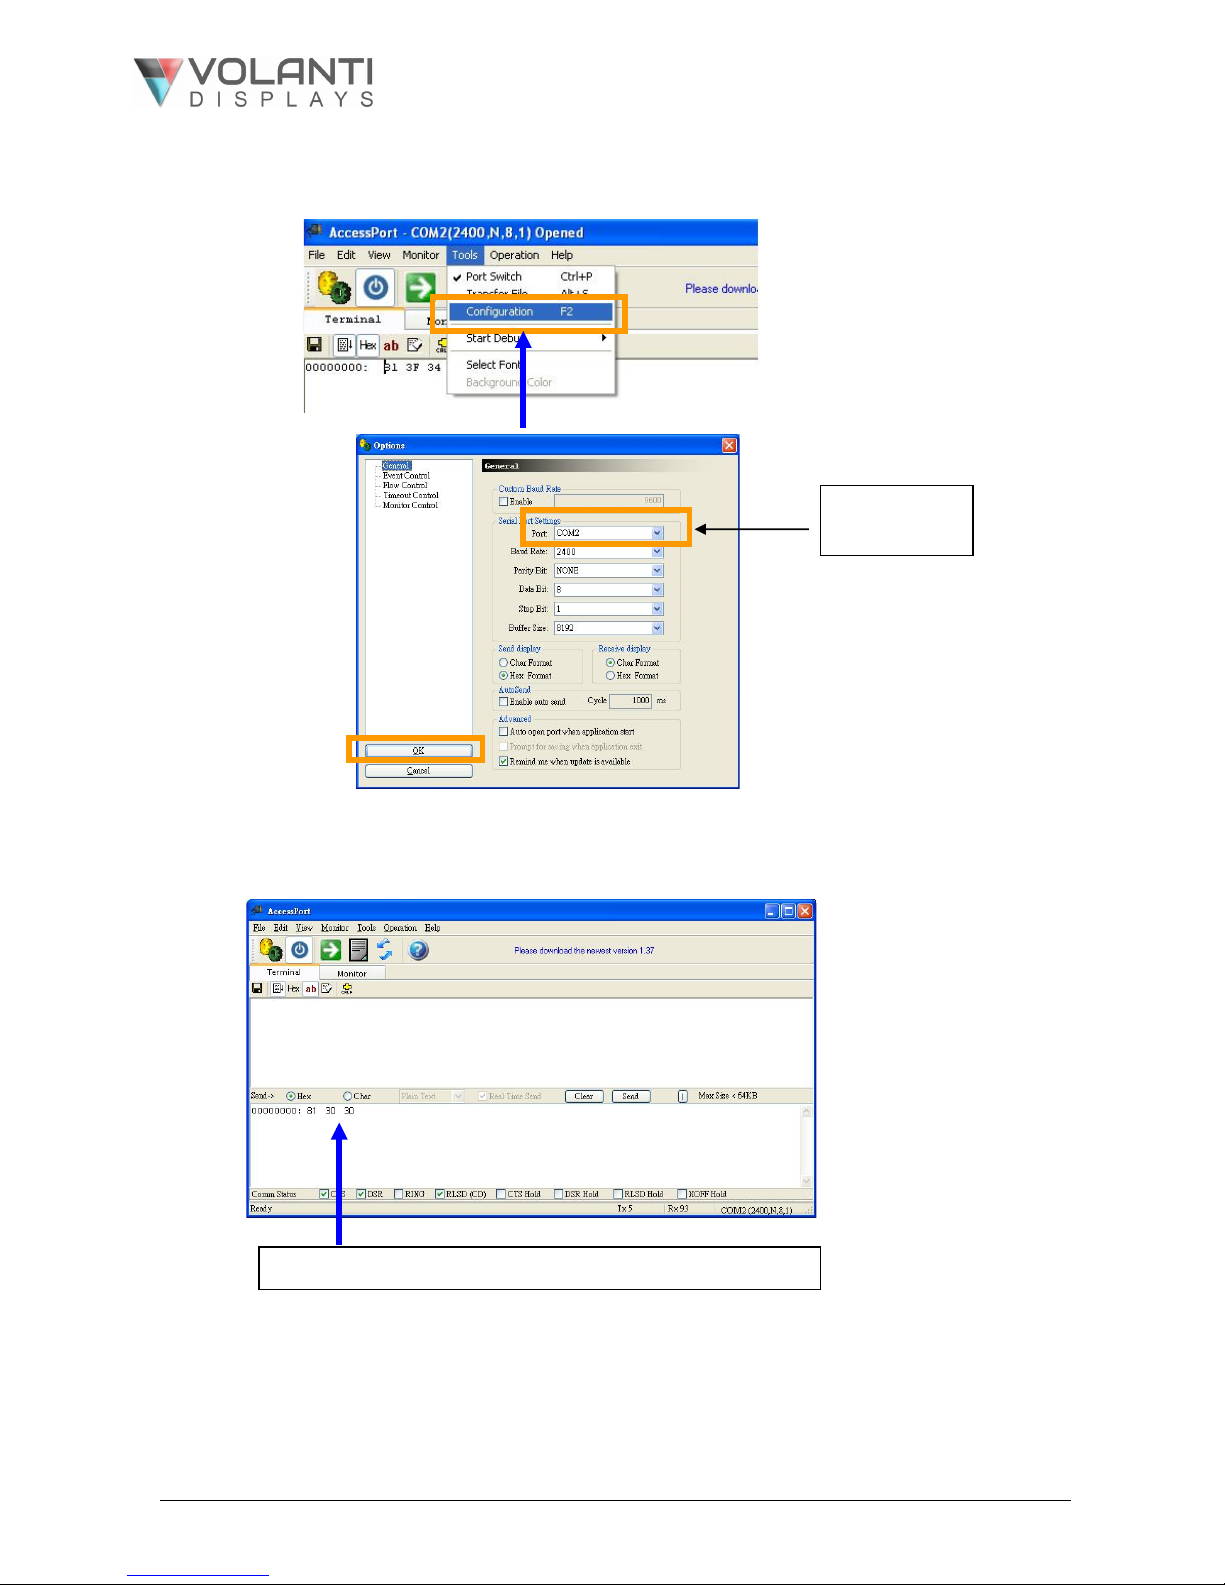
communication and use a virtual serial port program such as “TCP-COM”
(http://www.taltech.com/products/tcpcom.html)
This software can create “Virtual” RS-232 serial ports that are actually connections to a TCP/IP port.
This allows you to use existing Windows based serial communications software to send and receive
data across TCP/IP network. (Note: The 3rd party program is not warranted nor is it the responsibility of Digital View.)
Below are the example of using TCP-COM and serial communication software (e.g. Access Port) to
adjust the brightness value.
1. Open the “TCP-Com” program and set the following settings and then click activate.
Choose the COM
port without
occupied.
IP address of the monitor
Port is “9761”

Specifications subject to change without notice
© 2019 Volanti Displays – Ver 2.3 17 Feb 2019 Page 3 of 18
2. Open “AccessPort” serial communication software. Tick “Port Switch” and then go to “Tool” à
“Configuration” to follow the settings stated below :
3. Start to type RS-232 command under serial communication program (e.g AccessPort) to control the
monitor.
Some command examples:
C8 30 [Soft power off]
C8 31 [Soft power on]
81 36 34 [Adjust brightness to max. value]
98 50 31 [Jump to Display Port input]
Choose COM
port same as
TCP-COM
For example : Type “81 30 30” to adjust Brightness to min value. (0%)

Specifications subject to change without notice
© 2019 Volanti Displays – Ver 2.3 17 Feb 2019 Page 4 of 18
Browser based web server mode :
•Works with a normal network with DHCP, i.e. must use a router on LAN.
•Connect the 4k monitor to the LAN network and ensure power is on.
•Use the IP Locator utility available from the IP-60 web-page.
http://www.digitalview.com/media/downloads/IPLocator.zip (Windows only)
•Double click on the IP address in the IP Locator window, it will open the monitor browser
page in your default browser. Alternatively copy the IP address into your browser address
line.
•Test the functions that come up on the browser. The function list on browser can be found in
Appendix VII. (Some sensor functions might require alternative firmware version.)
•Summary of functions shown at the end of this guide.
For details, please refer to the separate application note.

Specifications subject to change without notice
© 2019 Volanti Displays – Ver 2.3 17 Feb 2019 Page 5 of 18
RS-232 connection
RS-232 Serial control (Baud rate 2400), 8 bits, 1 stop bit and no parity
Physical connection :
Controller side Computer side
Connector interface : CN8 Connector interface : Serial port
Mating connector : JST XHP-6 Mating connector : DB9 Female
PIN#
Description
PIN#
Description
4
RS-232 Tx Data
2
RS-232 Rx Data
5
Ground
3
RS-232 Tx Data
6
RS-232 Rx Data
5
Ground
Remark :
(1) : RS-232 connection cable, 600mm P/N 426090200-3 can be ordered separately for connection.
Software connection :
The OSD function can be controlled through sending the RS-232 protocol.
The RS-232 program can be custom-made to fit for application or it can be used the serial control program, like Accessport, Telix or
Serial Utility program developed by DigitalView. Please contact your local support for information.
Software Applications
Digital View free to download software: https://www.digitalview.com/accessories/software.html
This includes applications for RS-232 connection, Network connection, IP locator, Demo source
code.
For custom software development please contact Volanti or an authorized reseller.
54
6
3
1
789
Mating face of CN8
Mating face of RS-232 DB9 Male
5 4
631

Specifications subject to change without notice
© 2019 Volanti Displays – Ver 2.3 17 Feb 2019 Page 6 of 18
RS-232 command set
Commands to invoke switch mount control buttons
Function
Command
Description
Remark
Menu button
0xf7
Menu button pressed
Button equivalent
Select-down button
0xfa
Select-down button pressed
Button equivalent
Select-up button
0xfb
Select-up button pressed
Button equivalent
Right/+ button
0xfc
Right/+ button pressed
Button equivalent
Left/- button
0xfd
Left/- button pressed
Button equivalent
Audio & Image
Function
Command
Description
Acknowledge (if enabled)
Volume control -
left+right channel
0x80, “a” | “A”,
nn | “+” | “-” |
“r” | “R” |
“?”
Set audio (L+R) volume =
value/increment/decrement
Reset
Query
nn = 0x00~ 0x64 (0~100%)
Default: 0x32 (50%)
Volume control -
on/off (mute)
0x80, “m” | “M”,
“0” |
“1” |
“r” | “R” |
“?”
Disable audio output.
Enable audio output.
Reset
Query
“0” - audio off (mute).
“1” - audio on. (Default)
Audio selection
(in quad split PiP
mode)
0x80, “P”,
“n”
“?”
“r” | “R”
Select Audio Output
Query
Reset
“n” =
“0” - P1 (upper left picture) (Default)
“1” - P2 (lower left picture)
“2 ”- P3 (upper right picture)
“3” - P4 (lower right picture)
''A/a'' – Analog source
Note: P1~P4 audio source is available
when video source is either DP or
HDMI
Black level control
(acts similar to
brightness control
but does not affect
the backlight)
0x81,
nn | “+” | “-” |
“r” | “R” |
“?”
“m”
“n”
Set level =
value/increment/decrement
Reset
Query Current Source
Maximum query
Minimum query
nn = 0x00~ 0x64 (0~100%)
Default: 0x32 (50%)
Contrast control
0x82, “a” | “A”,
nn | “+” | “-” |
“r” | “R” |
“?”
“m”
“n”
Set contrast =
value/increment/decrement
Reset
Query
Maximum query
Minimum query
nn = 0x00~ 0x64 (0~100%)
Default: 0x32 (50%)
Color saturation
control
0x83,
nn | “+” | “-” |
“r” | “R” |
“?”
“m”
“n”
Set color saturation =
value/increment/decrement
Reset
Query
Maximum query
Minimum query
nn = 0x00~ 0x64 (0~100%)
Default: 0x32 (50%)
Hue control
0x84,
nn | “+” | “-” |
“r” | “R” |
“?”
“m”
“n”
Set tint =
value/increment/decrement
Reset
Query
Maximum query
Minimum query
nn = 0x00~ 0x64 (0~100%)
Default: 0x32 (50%)

Specifications subject to change without notice
© 2019 Volanti Displays – Ver 2.3 17 Feb 2019 Page 7 of 18
GAMMA value
select
0x9d,
n |
“r” | “R”
“?”
Select GAMMA value =
Value
Reset
Query
“n”:
“5” – 1.8,
“7” – 2.0,
“2” – 2.2, (Default)
“A” – 2.4
Colour temperature
select
0xb3,
n |
“r” | “R” |
“?”
Select colour temperature =
value
Reset
Query
“n” =
“2” – 6500K. (Default)
“4” – User
“5” – 9300K
“6” – 7500K
“7” – 5800K
“8” – sRGB
“9” – 3200K
“A” – 2600K (custom code)
Red level of User
colour temperature
0xb4,
nn | “+” | “-” |
“r” | “R” |
“?”
“m”
“n”
Set the level of the red channel
for the user colour temp. =
value/increment/decrement
Reset
Query
Maximum query
Minimum query
nn: 0x00~ 0xff (0~255)
Default: 0x80
Green level of User
colour temperature
0xb5,
nn | “+” | “-” |
“r” | “R” |
“?”
“m”
“n”
Set the level of the green
channel for the user colour temp.
=
value/increment/decrement
Reset
Query
Maximum query
Minimum query
nn: 0x00~ 0xff (0~255)
Default: 0x80
Blue level of User
colour temperature
0xb6,
nn | “+” | “-” |
“r” | “R” |
“?”
“m”
“n”
Set the level of the blue channel
for the user colour temp. =
value/increment/decrement
Reset
Query
Maximum query
Minimum query
nn: 0x00~ 0xff (0~255)
Default: 0x80
Color Effect
“0xee”, “0x71”,
“0x30”
“0”|”1”|”2”|”3”|”4”
|”5”
“?”
“r” | “R”
Select Color Effect
Value
Query
Reset
“0” = Standard (Default)
“1” = Game
“2” = Movie
“3” = Photo
“4” = Vivid
“5” = User
Phase control (only
for VGA port)
0x85,
nn | “+” | “-” |
“?”
Set phase =
value/increment/decrement
Query
nn = 0x00~ 0x64 (0~100%)
Image H position
(only for VGA port)
0x86,
nn | “+” | “-” |
“r” | “R” |
“?”
Set horizontal position =
value/increment/decrement
Reset
Query
nn = 0x00~ 0x64 (0~100%)
Image V position
(only for VGA port)
0x87,
nnnn | “+” | “-” |
“r” | “R” |
“?”
Set vertical position =
value/increment/decrement
Reset
Query
nn = 0x00~ 0x64 (0~100%)
Default: 0x32 (50%)
Sharpness
0x8a,
n | “+” | “-” |
“r” | “R” |
“?”
Set sharpness =
value/increment/decrement
Reset
Query
nn = 0x00~ 0x64 (0~100%)
Default: 0x32 (50%)

Specifications subject to change without notice
© 2019 Volanti Displays – Ver 2.3 17 Feb 2019 Page 8 of 18
Clock control (only
for VGA port)
0x8b,
nn | “+” | “-“ |
“?”
Set VGA clock=
Value/increment/decrement
Query
nn = 0x00~ 0x64 (0~100%)
Aspect Ratio
0x8c,
“0” | “1” | “9” | “A” |
“F”
“r” | “R” |
“?”
Set video aspect ratio=
Value
Reset
Query
“0” – 1:1
“1” – fill screen (Default)
“9” – 4:3
“A” – 16:9
“F” – 5:4
Set display
orientation
0x8e,
n |
“r” | “R” |
“?”
Set display orientation =
value
Reset
Query
“0” – normal (0 degree) (Default)
“4” – rotated 90
“5” – rotated 180
“6” – rotated 270
Note: Rotation is only allowed in 1P
mode
Input main video
(P1) select
0x98,
nn | “+” | “-” |
“r” | “R” |
“?”
Select P1 video input =
value/next input/previous input
Reset
Query
“nn” =
“0x41,0x31” A0: VGA
“0x50, 0x31”D0: DP (Default)
“0x48,0x31” D1: HDMI
“0x48,0x32” D2: HDMI
“0x48,0x33” D3: HDMI
“0x45,0x31” D3: HD-SDI (for custom
code only)
“0x46,0x31” D4: DVI
Auto source seek
0x99,
“0” | “1” |
“r” | “R” |
“?”
Set auto source seek =
Disable/Enable
Reset
Query
Default: “1” (Enable)
Source Layout
0x9a,
n |
“r” | “R” |
“?”
Select video source layout =
Single, PIP , PBP, 4P
Reset,
Query
“n”:
“0”- 1P (Single) (Default)
“1”- 2P PIP
“2”- 2P PBP (Left Right)
“3”- 2P PBP (Top Bottom)
“4”- 4P
Picture in Picture related functions
PIP H position
0xa4,
nn | “+” | “-” |
“r” | “R” |
“?”
Set PIP horizontal position=
value/go right/go left
Reset
Query
PIP window horizontal position.
Nn: 0x00(left)~0x64(right)
Default: 0x64
PIP V position
0xa5,
nn | “+” | “-” |
“r” | “R” |
“?”
Set PIP vertical position=
value/go down/go up
Reset
Query
PIP window vertical position.
Nn: 0x00(top)~0x64(bottom)
Default: 0x64
PIP window size
select
0xa6,
nn |
“r” | “R” |
“?”
Select PIP window size =
PIP window size value
Reset
Query
nn:
0x00(smallest)~0x0A (largest)
Default: 0x0A
PIP window
transparency Level
0xed,
nn | “+” | “-” |
“R” | “r” |
“?”
Select PIP transparency level =
value/increase/decrease
Reset
Query
nn:
0x00~0x0A (no ~ total transparency)
Default: 0x00
PIP /P2 source
select
0xa7,
nn |
“r” | “R” |
“?”
Select PIP or P2 video source =
Video source value
Reset
Query
P2 is:
2P PBP left right: right window
2P PBP top bottom: bottom window
4P: lower left window
“nn” =
“0x41,0x31” A0: VGA

Specifications subject to change without notice
© 2019 Volanti Displays – Ver 2.3 17 Feb 2019 Page 9 of 18
“0x50,0x31” D0: DP
“0x48,0x31” D1: HDMI (Default)
“0x48,0x32” D2: HDMI
“0x48,0x33” D3: HDMI
“0x45,0x31” D3: HD-SDI (for custom
code only)
“0x46,0x31” D4: DVI
Please note that PIP or PBP mode
should be enabled first before select
video source.
P3 source select
0xa7, “c”
nn |
“r” | “R” |
“?”
Select P3 video source =
Video source value
Reset
Query
P3 is upper right window in 4P mode
“nn” =
“0x41,0x31” A0: VGA
“0x50,0x31” D0: DP
“0x48,0x31” D1: HDMI
“0x48,0x32” D2: HDMI (Default)
“0x48,0x33” D3: HDMI
“0x45,0x31” D3: HD-SDI (for custom
code only)
“0x46,0x31” D4: DVI
Please note that 4P PBP mode should
be enabled first before select video
source.
P4 source select
0xa7, “d”
nn |
“r” | “R” |
“?”
Select P4 video source =
Video source value
Reset
Query
P4 is lower right window in 4P mode
“nn” =
“0x41,0x31” A0: VGA
“0x50,0x31” D0: DP
“0x48,0x31” D1: HDMI
“0x48,0x32” D2: HDMI
“0x48,0x33” D3: HDMI (Default)
“0x45,0x31” D3: HD-SDI (Default, for
custom code only)
“0x46,0x31” D4: DVI
Please note that 4P PBP mode should
be enabled first before select video
source.
Swap PIP / 2P
PBP video source
0xe3
Swap Main and PIP Source (PIP
mode), left & right source (PBP
LR) or Top & Bottom (PBP TB)
“0” – fail.
“1” – successful.
Backlight related functions
Backlight control
0xe0,
nn | “+” | “-” |
“R” | “r” |
“?”
Set Backlight level =
value/increment/decrement
Reset
Query
nn = 0x00~ 0x64 (0~100%)
Default: 0x64 (100%)
Backlight On/Off
0xe1,
“0” | “1” |
“R” | “r”
“?”
Backlight Off / Backlight On
Reset
Query
“0” – Backlight Off
“1” – Backlight On. (Default)
(non/Off
Backlight DA/PWM
0xe5
“0” | “1” |
“R” | “r”
“?”
Set backlight control method:
PWM / DA
Reset
Query
“0” – PWM (Default)
“1” – D/A

Specifications subject to change without notice
© 2019 Volanti Displays – Ver 2.3 17 Feb 2019 Page 10 of 18
Backlight PWM
frequency
0xe6,
nnn | “+” | “-” |
“R” | “r” |
“?”
Set backlight PWM frequency =
value/increase 20Hz/decrease
20Hz
Reset
Query
Value
100Hz : “0”,”6”,”4”
120Hz : “0”,”7”,”8”
140Hz : “0”,”8”,”C”
160Hz : “0”,”A”,”0” (Default)
180Hz : “0”,”B”,”4”’
200Hz : “0”,”C”,”8”
220Hz : “0”,”D”,”C”
240Hz : “0”,”F”,”0”
260Hz : “1”,”0”,”4”
280Hz : “1”,”1”,”8”
300Hz : “1”,”2”,”C”
320Hz : “1”,”4”,”0”
340Hz : “1”,”5”,”4”
360Hz : “1”,”6”,”8”
380Hz : “1”,”7”,”C”
400Hz : “1”,”9”,”0”
420Hz : “1”,”A”,”4”
440Hz : “1”,”B”,”8”
Backlight Invert
0xe7
“0” | “1” |
“R” | “r”
“?”
Set invert backlight level :
Off / On
Reset
Query
“0” – Off (Default)
“1” – On
Minimum backlight
level
0xee, “0x5C”
nn | “+” | “-” |
“R” | “r” |
“?”
Set minimum backlight level=
value/increment/decrement
Reset
Query
Minimum Backlight value.
nn: 0x00 ~ 0x32 (0~50%)
Default: 5%
On Screen Display (OSD)
Rotate OSD
0x8f,
“0” |
“1” |
“3” |
“?”
Normal OSD rotate
rotated 90
rotated 270
Query
“0” – normal OSD. (Default)
“1” – rotated 90 OSD.
“3” – rotated 270 OSD.
OSD H position
0x90,
nn | “+” | “-” |
“r” | “R” |
“?”
Set OSD horizontal position =
value/increment/decrement
Reset
Query
nn = 0x00~ 0x64 (left ~ right)
Default: 0x32 (middle)
OSD V position
0x91,
nn | “+” | “-” |
“r” | “R” |
“?”
Set OSD vertical position =
value/increment/decrement
Reset
Query
nn = 0x00~ 0x64 (top ~ bottom)
Default: 0x32 (middle)
OSD transparency
0x92,
nn | “+” | “-” |
“r” | “R” |
“?”
Set OSD transparency =
value/increment/decrement
Reset
Query
nn = 0x00~ 0x64 (0~100%)
Default: 0x00 (No transparency)
OSD menu timeout
0x93,
nn | “+” | “-” |
“r” | “R” |
“?”
Select menu timeout =
value/increment/decrement
Reset
Query
OSD menu timeout value.
nn = 0x0A – Always on
nn = 0x0B - 0x3C (11~60sec)
Default: 0x0B (11sec)
OSD status
enquiry
0xbb
Status of OSD
“0” – OSD turned off
“1” – OSD turned on
OSD turn off
0xbd
Turn off the OSD.
“0” – fail.
“1” – successful.
OSD switch mount
“0xee”, “0x62”
“0”- Unlock (Default)

Specifications subject to change without notice
© 2019 Volanti Displays – Ver 2.3 17 Feb 2019 Page 11 of 18
Lock
“0” |”1”
”?”
Unlock / Lock
Query
“1”- Lock, no response to OSD switch
mount keys
Hotkeys: User selectable shortcuts
Hot key 1 (plus and
minus keys)
0xa0, “1”,
n |
“r” | “R” |
“?”
Set Hot key 1=
Value
Reset
Query
“n”:
“1” – volume
“2” – brightness
“3” – contrast
“4” – color saturation
“5” – input source (P1 source)
“9” – PIP size
“B” – No hot key function (Default)
“D” – PIP Swap
“E” – Aspect ratio
“G” – Hue
“H” – Backlight level
“I” –VGA Auto picture adjust
‘’L’’ – Sharpness
‘’M’’ – Display mode (select 1P, 2P
PIP, 2P PBP or 4P)
Hot key 2 (up and
down keys)
0xa0, “2”,
n |
“r” | “R” |
“?”
Set Hot key 2=
Value
Reset
Query
“n”:
“1” – volume
“2” – brightness
“3” – contrast
“4” – color saturation
“5” – input source (P1 source)
“9” – PIP size
“B” – No hot key function (Default)
“D” – PIP Swap
“E” – Aspect ratio
“G” – Hue
“H” – Backlight level
“I” –VGA Auto picture adjust
‘’L’’ – Sharpness
‘’M’’ – Display mode (select 1P, 2P
PIP, 2P PBP or 4P)
Other control
Function
Command
Description
Acknowledge (if enabled)
Video horizontal
resolution enquiry
0xb7
Horizontal resolution (in pixels)
in 3 to 4 digit hex number
Video vertical
resolution enquiry
0xb8
Vertical resolution (in lines) in 3
digit hex number
Video horizontal
sync frequency
0xb9
Horizontal sync frequency (in
units of 100Hz) in 3 digit hex
number
Video vertical sync
frequency
0xba
Vertical sync frequency (in units
of Hz) in 3 digit hex number and
1 char
“nnnc” = vertical frequency
nnn = 3 digit hex
c= “i” (interlace) or “p” (progressive)
Display video
information box
0xbc,
“?” |
“0” |
“1”
Query
No video info box shown
After switching to a new video
source, the video info box is
displayed for 5 seconds.
“0” – disabled.
“1” – enabled. (Default)
Runtime counter
0xa1,
nnnnn |
Set runtime counter value =
nnnnn (* 0.5 hour)
Runtime = nnnnn.
Max. input = 0x1fffe (0x1fffe * 0.5 hour

Specifications subject to change without notice
© 2019 Volanti Displays – Ver 2.3 17 Feb 2019 Page 12 of 18
“r” | “R” |
“?”
Reset to zero
Query
= 65535 hours)
Runtime counter counts when
backlight is on
Auto power off
0x9f,
“0” | “1” |
“r” | “R” |
“?”
Set auto power save option =
Disable/Enable
Reset
Query
“n”:
“0” – Disable auto power off
“1” – Enable auto power off (Default)
Default Power
“0xee”, “0x6B”,
“0x50”
“0”|
“1”|
“?”
Default power state after
supplying power to controller
Off
On
Query
“0” - default power off
“1” - default power on
Select RS-232
acknowledge
0xc1, “0” | “1”
Disable/enable command
acknowledge.
“0” – acknowledge disabled.
“1” – acknowledge enabled. (Default)
VGA auto adjust
0xc3
Start VGA auto adjust
“0” – fail.
“1” – successful.
Command
availability
0xc4, nn / nnnn
Check whether a command is
available.
“0” – not available.
“1” – available.
e.g “0x81” command
send
“0xc4 0x38 0x31”
feedback
“0xc4 0x38 0x31 0x31”
e.g “0xee 0x5c” command
send
“0xc4 0x45 0x45 0x35 0x43”
feedback
“0xc4 0x45 0x45 0x35 0x43 0x31”
VGA auto color
gain
0xc5
Start VGA auto-calibration of
gain of the RGB amplifier.
“0” – fail.
“1” – successful.
Power On/Off
0xc8,
“0” | “1” |
“?”
Soft power on/off
off/on
query
“0” – soft power off.
“1” – soft power on.
Query video input
status
0xc9
Query the status of the
displaying video windows source
Input status nn nn:
“0”,”0” : no video source / disabled
“A”,”1” A0: VGA
“F”,”1” D4: DVI
“H,”1” D1: HDMI
“H,”2” D2: HDMI
“H,”3” D3: HDMI
“E,”1” D3: HD-SDI (for custom code)
“P,”1” D0: DP
Feedback 4 video windows status in
form of:
nn nn, nn nn, nn nn, nn nn (P1, P2,
P3, P4)
Query BIOS
version
0xcb, “0”
Read BIOS version
BIOS version “VV.YY.ZZ”
VV = Vx or Ex, (x is version digit)
V = Release version
E = Engineering Sample
YY= Version Number
ZZ= Customer Number
Query PCBA
number
0xcb, “1”
Read PCBA number
“nnnnn” = PCBA number
SVX-4096 = “41755”

Specifications subject to change without notice
© 2019 Volanti Displays – Ver 2.3 17 Feb 2019 Page 13 of 18
Query Revision
Number
0xcb, “3”
Read Revision Number
“nn” = Revision number AA in firmware
version no. “VV.YY.ZZ.AA”
Reset parameters
0xce
Reset all parameters to default
value
“1” – successful.
Reset all
parameters
0xcf
Reset all parameters, including
user color temperature setting,
for all video modes to default
value
“1” - successful.

Specifications subject to change without notice
© 2019 Volanti Displays – Ver 2.3 17 Feb 2019 Page 14 of 18
Hex / ASCII table
n = 1-byte ascii-coded hex number, e.g., parameter value of 0x1 is represented by “1” (0x31).
mn or nn = 2-byte ascii-coded hex number, e.g., parameter value of 0x1e is represented by “1”, “e” | “E” (0x31,
0x6e|0x4e).
The RS-232 command strings sent in one time can support up to 380 bytes via CN8 port
The RS-232 command string sent in one time can support up to 50 bytes via CN1 or J1 port.
n = 1-byte ascii-coded hex number, e.g., parameter value of 0x1 is represented by “1” (0x31).
mn or nn = 2-byte ascii-coded hex number, e.g., parameter value of 0x1e is represented by “1”, “e” | “E” (0x31,
0x6e|0x4e).
Please refer to the ASCII to Hex convert table below.
Hex to ASCII conversion table
Hex
ASCII
Hex
ASCII
Hex
ASCII
Hex
ASCII
0x30
0
0x41
A
0x61
a
0x2B
+
0x31
1
0x42
B
0x62
b
0x2D
-
0x32
2
0x43
C
0x63
c
0x3F
?
0x33
3
0x44
D
0x64
d
0x34
4
0x45
E
0x65
e
0x35
5
0x46
F
0x66
f
0x36
6
0x47
G
0x67
g
0x37
7
0x48
H
0x68
h
0x38
8
0x49
I
0x69
i
0x39
9
0x4A
J
0x6A
j
0x4B
K
0x6B
k
0x4C
L
0x6C
l
0x4D
M
0x6D
m
0x4E
N
0x6E
n
0x4F
O
0x6F
o
0x50
P
0x70
p
0x51
Q
0x71
q
0x52
R
0x72
r
0x53
S
0x73
s
0x54
T
0x74
t
0x55
U
0x75
u
0x56
V
0x76
v
0x57
W
0x77
w
0x58
X
0x78
x
0x59
Y
0x79
y
0x5A
Z
0x7A
z

Specifications subject to change without notice
© 2019 Volanti Displays – Ver 2.3 17 Feb 2019 Page 15 of 18
Functions list on browser page
The SVX-4096 also includes an Ethernet connection with Browser mode support, the following is a
summary of functions list on IP-60’s browser page.
Main
Network
Network(Configure
!"#$%&#'()'#*"+,
-./(.00#'**
1+*2(3&$'
41/5 6,(7688
95(.00#'**
:;<,'2(-&*=(.00#'**
4'8&;>2(?&2'%&@(.00#'**
(5#"$&#@(43:(.00#'**
Sensor.Setting
Fan(Setting
!&,(A 6,(7(688
!&,(B 6,(7688
!&,(A($",(#C$ (
!&,(B($",(#C$ (
Light(Sensor(Setting
D"EF2(:',*+# 6,(7(688
-",G()&>;' (
Power(Detect(Setting
5+%'#(:+;#H'(A(I5:AJ 6,(7(688
5+%'#(:+;#H'(B(I5:BJ 6,(7(688
5:A()&>;'
5:B()&>;' (
Temperature(Setting
9,2'#,&>(K'$CG(:',*+# 6,(7688
LM2'#,&>(K'$CG(:',*+# 6,(7688
9,2G(K'$CG(N&#,",E()&>;' )&>;'
LM2G(K'$CG(N&#,",E()&>;' )&>;'
Monitor(Status
!&,*(-+,"2+#(I!&,(AJ
!&,*(-+,"2+#(I!&,(BJ
K'$C'#2;#'(-+,"2+#(I9,2G(K'$CGJ
K'$C'#2;#'(-+,"2+#(ILM2G(K'$CGJ
5+%'#(-+,"2+#(I5:(AJ
5+%'#(-+,"2+#(I5:(BJ
D"EF2(-+,"2+#(ID"EF2AJ

Specifications subject to change without notice
© 2019 Volanti Displays – Ver 2.3 17 Feb 2019 Page 16 of 18
Direct'Control
Picture(Setting
!"#$%&'()) *+,-(
./'&"+)& *+,-(
0+&-"+&#/' *+,-(
0%+"1'()) *+,-(
2-( *+,-(
Backlight(Control
0/3&45/6(" 7'484733
!+9:,#$%&40&+&-) 7'484733
!+9:,#$%&4./'&"/, *+,-(
!+9:,#$%&45;<4="(>-('9? 5;<4@ABB2CDEEB2CF
Display(Mode
A5484G5HIJ484G5HK!484G5H5L5484E5 4
Input(Source(Selection 5A4L'1-&40/-"9( M#)1,+?45/"&82M<L4A82M<L4G82M<L4N8M*L8*OP
5G4L'1-&40/-"9( M#)1,+?45/"&82M<L4A82M<L4G82M<L4N8M*L8*OP
5N4L'1-&40/-"9( M#)1,+?45/"&82M<L4A82M<L4G82M<L4N8M*L8*OP
5E4L'1-&40/-"9( M#)1,+?45/"&82M<L4A82M<L4G82M<L4N8M*L8*OP
Check(Input(Status
.%(9:4<+#'4Q45L540/-"9( L'R+,#S8PJO!82M80M4./T1/'('&8M*L82M<L8M#)1,+?45/"&
Audio(Setting
<-&( 7'484733
*/,-T( *+,-(
0/-"9(40(,(9&#/' 5A85G85N85E8P'+,/$
Color(Setting
./,/"4K(T1("+&-"( NGBBU8VWBBU8XVBBU8YVBBU8ZNBBU8)JO!8[)("
[)("4D4J(S4I(R(,4./,/"4K(T1\ *+,-(
[)("4D4O"(('4I(R(,4./,/"4K(T1\ *+,-(
[)("4D4!,-(4I(R(,4./,/"4K(T1\ *+,-(
./,/"4]33(9& 0&+'S+"S8O+T(8</R#(85%/&/8*#R#S8[)("
O+TT+ 7338A\W8G\B8G\G8G\E
Advanced(Setting
P)1(9&4J+&#/ =-,,8AX^Z8E^N8V^E8A^A
M#)1,+?47"#('&+&#/' _/"T+,8P'&#D.,/9:6#)(4ZB8J/&+&(4AWB8P'&#D.,/9:6#)(4GYB

Specifications subject to change without notice
© 2019 Volanti Displays – Ver 2.3 17 Feb 2019 Page 17 of 18
PIP#Setting
Swap
PIP'Size (0'-'10)
PIP'Horizontal'Position Value
PIP'Vertical'Position Value
OSD#Setting
OSD'Status On''/'Off
OSD'Turn' On''/'Off
OSD'Horizontal'Position Value
OSD'Vertical'Position Value
OSD'Menu'Timeout Value
Key#Control
Menu/Down/Up/Left(-)/Right(+) '
Display#Information
BIOS'Version
Horizontal'Resolution
Vertical'Resolution
Horizontal'Frequency
Vertical'Frequency
Load#Default
Reset'All'Parameters Reset'all'parameters'to'default'value
Reset'Parameters Reset'all'parameters'for'all'video'mode'to'defualt'value

Specifications subject to change without notice
© 2019 Volanti Displays – Ver 2.3 17 Feb 2019 Page 18 of 18
CONTACT DETAILS
USA
Volanti Displays
18440 Technology Drive
Building 130
Morgan Hill,
California, 95037
USA
Tel: (1) 408-500 3500
WEBSITE
www.volantidisplays.com
This manual suits for next models
3
Table of contents
Other Volanti Displays Touch Panel manuals
Popular Touch Panel manuals by other brands

Digidim
Digidim Hevlar 924 Installation and user guide

Panasonic
Panasonic TY-TP42P10S - Touch-screen - Wired operating instructions

AMX
AMX Modero NXV-300 quick start guide

Emerson
Emerson Rosemount 752 Quick installation guide

YASKAWA
YASKAWA TP-smart HA1-71A41-0 manual

C-MORE
C-MORE EA9 Series quick start guide