Volkswagen VAS 6321 A Owner's manual

Usage Information
VAS A

Usage information VAS A
Version /
Read this usage information carefully before using the VAS 6321 A for the rst time, keep the instructions for later use and
pass this usage information on to other / further users.
The dissemination or reproduction of these instructions or the re-use or communication of its contents are not permitted,
unless expressly allowed.
All rights reserved, including the right to make technical changes and corrections.

Dear Customer,
Congratulations on your decision to purchase our VAS 6321 A.
With this repair system, you have not only purchased a quality product from the company Carbon, but also made a
future-oriented decision - we do hope that your work is successful with this equipment.
We have prepared this usage information with important notes to avoid possible dangers, to increase the service life of the
tools and last but not least to support you in your daily work as well as to achieve a better result with the repairs.
Our aim is to ensure the high quality of our products also by continuously developing the construction and features of our
products and the accessories available for them. This may result in deviations between this usage information and your
product - no claims can therefore be derived from the information, illustrations and descriptions.
The data and information contained in this usage information have been compiled with the greatest possible care. We have
done all that we can to ensure that the information contained in this usage information was accurate and up to date at the
time of dispatch.
Nevertheless, we are unable to guarantee that this information is absolutely error-free.
If you discover any errors or ambiguities while reviewing this usage information, please inform us. Please also let us know if
you have ideas or complaints about our product. We will be grateful for your feedback.
Carbon GmbH
Haldenhöfe 3
78253 Eigeltingen-Heudorf
E-mail: service@carbon.ag

Table of Contents
1. Important safety instructions. . . . . . . . . . . . . . . . . . . . . . . . . . . . . . . . . . . . . . . . . . . . . . . . . . . . . . . . . . . . . . . . . . . . . . . . . . . . . . . 6
2. Use / Guarantee. . . . . . . . . . . . . . . . . . . . . . . . . . . . . . . . . . . . . . . . . . . . . . . . . . . . . . . . . . . . . . . . . . . . . . . . . . . . . . . . . . . . . . . . . . . 8
2.1 Appropriate use. . . . . . . . . . . . . . . . . . . . . . . . . . . . . . . . . . . . . . . . . . . . . . . . . . . . . . . . . . . . . . . . . . . . . . . . . . . . . . . . . . . . . . . . . . 8
2.2 Guarantee . . . . . . . . . . . . . . . . . . . . . . . . . . . . . . . . . . . . . . . . . . . . . . . . . . . . . . . . . . . . . . . . . . . . . . . . . . . . . . . . . . . . . . . . . . . . . . . 8
3. Electrical supply . . . . . . . . . . . . . . . . . . . . . . . . . . . . . . . . . . . . . . . . . . . . . . . . . . . . . . . . . . . . . . . . . . . . . . . . . . . . . . . . . . . . . . . . . . . 9
4. The VAS 6321 A in use. . . . . . . . . . . . . . . . . . . . . . . . . . . . . . . . . . . . . . . . . . . . . . . . . . . . . . . . . . . . . . . . . . . . . . . . . . . . . . . . . . . . .10
5. Typical damage . . . . . . . . . . . . . . . . . . . . . . . . . . . . . . . . . . . . . . . . . . . . . . . . . . . . . . . . . . . . . . . . . . . . . . . . . . . . . . . . . . . . . . . . . .11
6. The VAS 6321 A at a glance . . . . . . . . . . . . . . . . . . . . . . . . . . . . . . . . . . . . . . . . . . . . . . . . . . . . . . . . . . . . . . . . . . . . . . . . . . . . . . . .12
7. CBR pulling tools at a glance . . . . . . . . . . . . . . . . . . . . . . . . . . . . . . . . . . . . . . . . . . . . . . . . . . . . . . . . . . . . . . . . . . . . . . . . . . . . . . .16
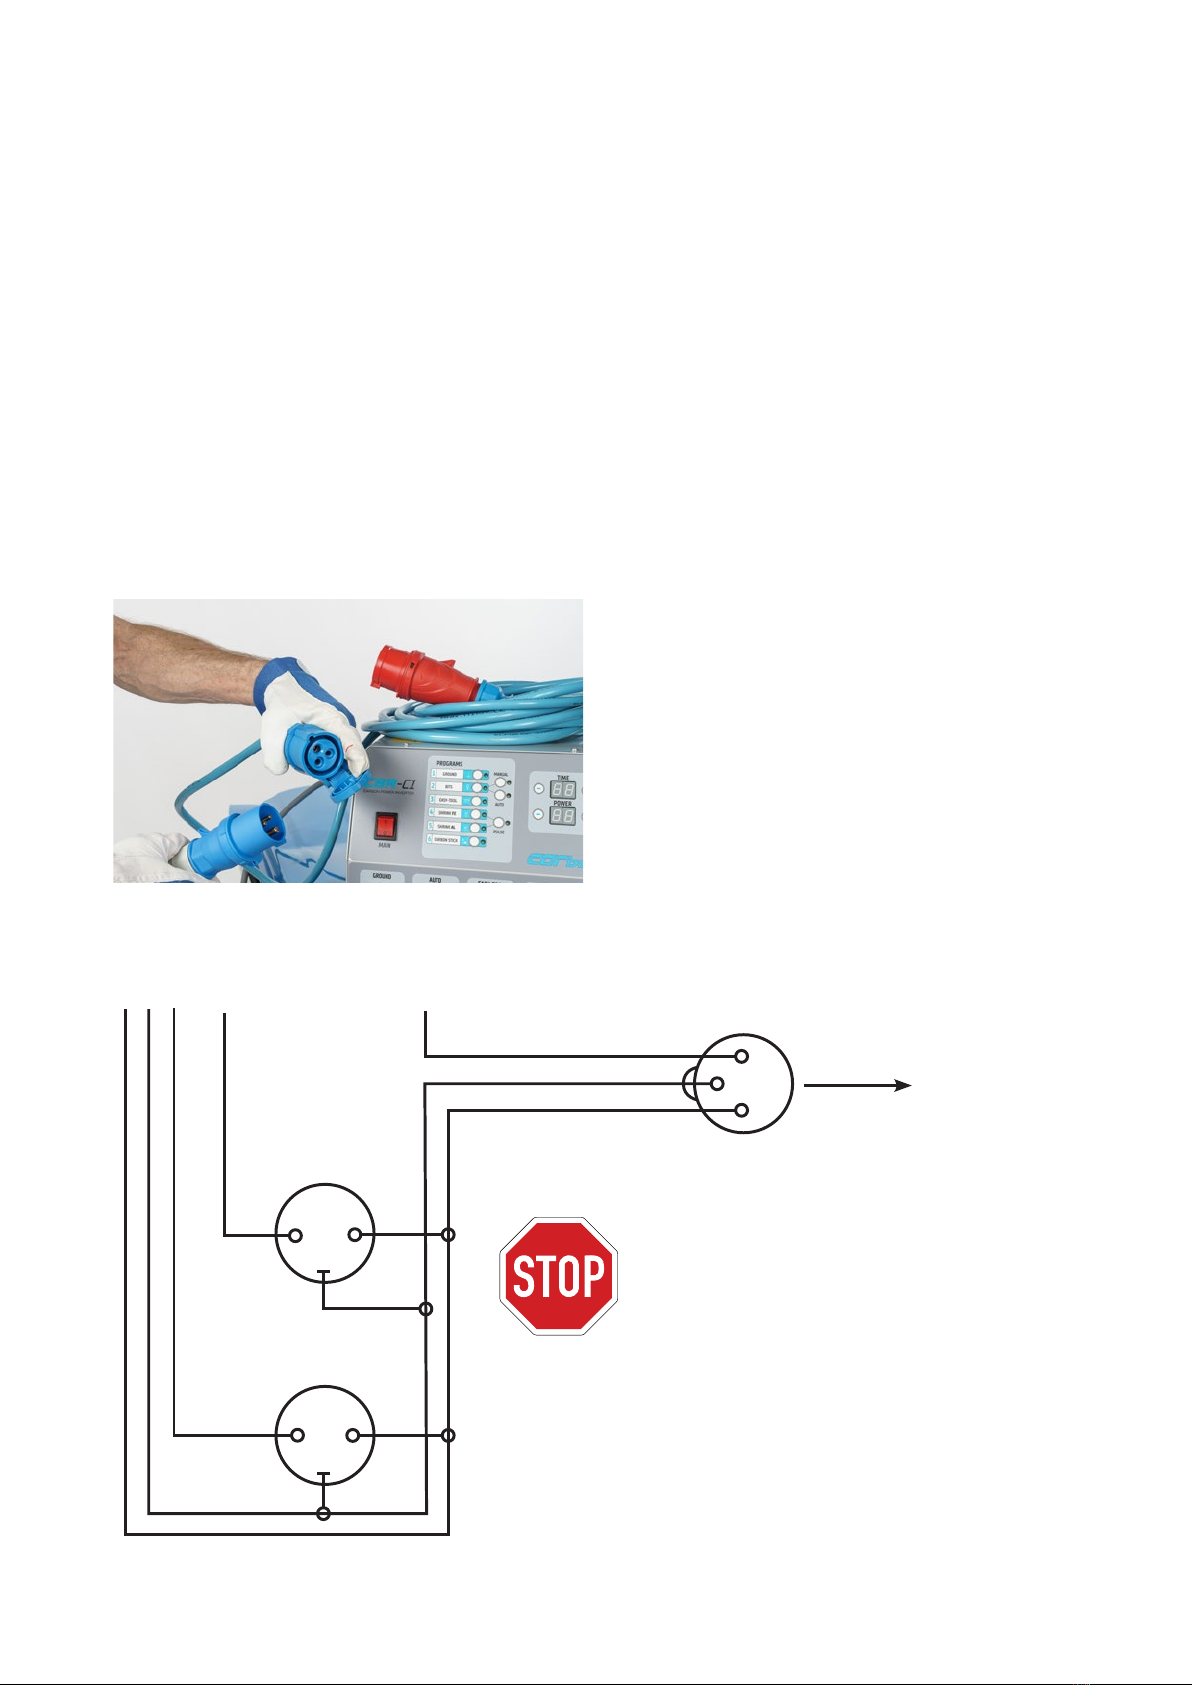
8. CBR-C1 PowerInverter | Power Source (VAS 6321 A/13) . . . . . . . . . . . . . . . . . . . . . . . . . . . . . . . . . . . . . . . . . . . . . . . . . . . . . . .18
8.1 The CBR-C1 PowerInverter. . . . . . . . . . . . . . . . . . . . . . . . . . . . . . . . . . . . . . . . . . . . . . . . . . . . . . . . . . . . . . . . . . . . . . . . . . . . . . . 18
8.2 The operation of the SQ . . . . . . . . . . . . . . . . . . . . . . . . . . . . . . . . . . . . . . . . . . . . . . . . . . . . . . . . . . . . . . . . . . . . . . . . . . . . . . . . . 19
8.3 Attaching the ground clamp with program 1. . . . . . . . . . . . . . . . . . . . . . . . . . . . . . . . . . . . . . . . . . . . . . . . . . . . . . . . . . . . . . 20
8.4 Welding on the ground clamp. . . . . . . . . . . . . . . . . . . . . . . . . . . . . . . . . . . . . . . . . . . . . . . . . . . . . . . . . . . . . . . . . . . . . . . . . . . . 20
8.5 Clamping the ground clamp . . . . . . . . . . . . . . . . . . . . . . . . . . . . . . . . . . . . . . . . . . . . . . . . . . . . . . . . . . . . . . . . . . . . . . . . . . . . . 21
8.6 Attaching the exible ground . . . . . . . . . . . . . . . . . . . . . . . . . . . . . . . . . . . . . . . . . . . . . . . . . . . . . . . . . . . . . . . . . . . . . . . . . . . . 22
9. Working with the CBR Bits . . . . . . . . . . . . . . . . . . . . . . . . . . . . . . . . . . . . . . . . . . . . . . . . . . . . . . . . . . . . . . . . . . . . . . . . . . . . . . . .23
9.1 The CBR Bits . . . . . . . . . . . . . . . . . . . . . . . . . . . . . . . . . . . . . . . . . . . . . . . . . . . . . . . . . . . . . . . . . . . . . . . . . . . . . . . . . . . . . . . . . . . . 23
9.2 Welding on the bits with program 2. . . . . . . . . . . . . . . . . . . . . . . . . . . . . . . . . . . . . . . . . . . . . . . . . . . . . . . . . . . . . . . . . . . . . . 24
9.3 Useful and interesting facts about bits . . . . . . . . . . . . . . . . . . . . . . . . . . . . . . . . . . . . . . . . . . . . . . . . . . . . . . . . . . . . . . . . . . . 25
9.4 Important notes on welding on the bits:. . . . . . . . . . . . . . . . . . . . . . . . . . . . . . . . . . . . . . . . . . . . . . . . . . . . . . . . . . . . . . . . . . 26
9.5 The CBR pull rods . . . . . . . . . . . . . . . . . . . . . . . . . . . . . . . . . . . . . . . . . . . . . . . . . . . . . . . . . . . . . . . . . . . . . . . . . . . . . . . . . . . . . . . 27
9.6 When to use which pull rods / pull rod diameter . . . . . . . . . . . . . . . . . . . . . . . . . . . . . . . . . . . . . . . . . . . . . . . . . . . . . . . . . . 27
10. BitCutter & recutting bits . . . . . . . . . . . . . . . . . . . . . . . . . . . . . . . . . . . . . . . . . . . . . . . . . . . . . . . . . . . . . . . . . . . . . . . . . . . . . . . . .28
10.1 The BitCutter and how it is used . . . . . . . . . . . . . . . . . . . . . . . . . . . . . . . . . . . . . . . . . . . . . . . . . . . . . . . . . . . . . . . . . . . . . . . . . 28
10.2 Important notes on use and care of the bits . . . . . . . . . . . . . . . . . . . . . . . . . . . . . . . . . . . . . . . . . . . . . . . . . . . . . . . . . . . . . . 29
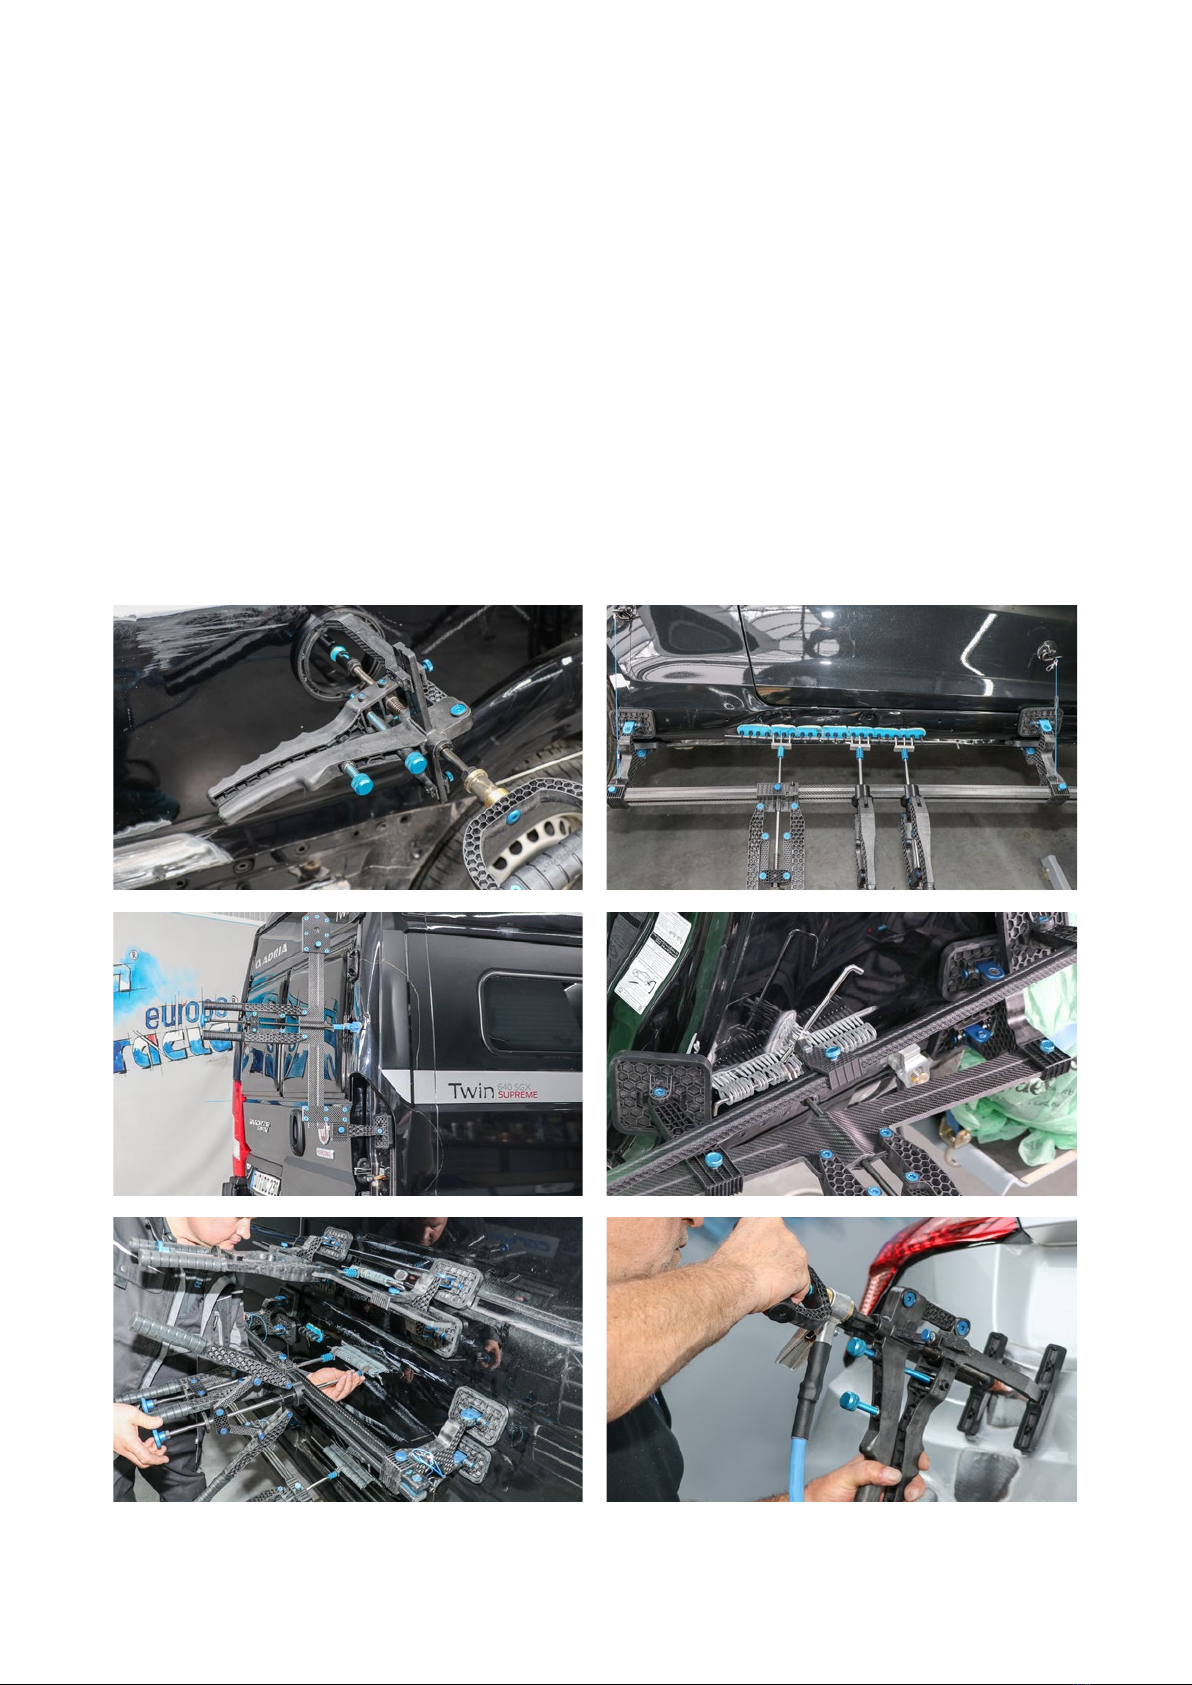
11. CBR StrongTool (VAS 6321 A/4) . . . . . . . . . . . . . . . . . . . . . . . . . . . . . . . . . . . . . . . . . . . . . . . . . . . . . . . . . . . . . . . . . . . . . . . . . . . .30
11.1 Components of the CBR StrongTool . . . . . . . . . . . . . . . . . . . . . . . . . . . . . . . . . . . . . . . . . . . . . . . . . . . . . . . . . . . . . . . . . . . . . . 31
11.2 Enhancement set CBR StrongTool (VAS 6321 A/2) . . . . . . . . . . . . . . . . . . . . . . . . . . . . . . . . . . . . . . . . . . . . . . . . . . . . . . . . . 32
11.3 Working with the CBR StrongTool . . . . . . . . . . . . . . . . . . . . . . . . . . . . . . . . . . . . . . . . . . . . . . . . . . . . . . . . . . . . . . . . . . . . . . . . 33
12. CBR LineTool (VAS 6321 A/6 and VAS 6321 A/7). . . . . . . . . . . . . . . . . . . . . . . . . . . . . . . . . . . . . . . . . . . . . . . . . . . . . . . . . . . . . .34
11.4 Working with the CBR LineTool . . . . . . . . . . . . . . . . . . . . . . . . . . . . . . . . . . . . . . . . . . . . . . . . . . . . . . . . . . . . . . . . . . . . . . . . . . 36
13. CBR EasyTool (VAS 6321 A/5) . . . . . . . . . . . . . . . . . . . . . . . . . . . . . . . . . . . . . . . . . . . . . . . . . . . . . . . . . . . . . . . . . . . . . . . . . . . . . .39
12.1 Components of the CBR EasyTool . . . . . . . . . . . . . . . . . . . . . . . . . . . . . . . . . . . . . . . . . . . . . . . . . . . . . . . . . . . . . . . . . . . . . . . . 40
12.2 Working with the CBR EasyTool in program 3 . . . . . . . . . . . . . . . . . . . . . . . . . . . . . . . . . . . . . . . . . . . . . . . . . . . . . . . . . . . . . 40
12.3 Program setting with the CBR EasyTool. . . . . . . . . . . . . . . . . . . . . . . . . . . . . . . . . . . . . . . . . . . . . . . . . . . . . . . . . . . . . . . . . . . 42

14. CBR LeverTool (VAS 6321 A/8) . . . . . . . . . . . . . . . . . . . . . . . . . . . . . . . . . . . . . . . . . . . . . . . . . . . . . . . . . . . . . . . . . . . . . . . . . . . . .45
14.1 Working with the CBR LeverTool . . . . . . . . . . . . . . . . . . . . . . . . . . . . . . . . . . . . . . . . . . . . . . . . . . . . . . . . . . . . . . . . . . . . . . . . . 46
15. CBR hand pullers & impact hammer . . . . . . . . . . . . . . . . . . . . . . . . . . . . . . . . . . . . . . . . . . . . . . . . . . . . . . . . . . . . . . . . . . . . . . . .47
15.1 The hand puller & the sliding puller . . . . . . . . . . . . . . . . . . . . . . . . . . . . . . . . . . . . . . . . . . . . . . . . . . . . . . . . . . . . . . . . . . . . . . 47
15.2 Working with the CBR HandTool . . . . . . . . . . . . . . . . . . . . . . . . . . . . . . . . . . . . . . . . . . . . . . . . . . . . . . . . . . . . . . . . . . . . . . . . . 48
16. Pull-in with the CBR . . . . . . . . . . . . . . . . . . . . . . . . . . . . . . . . . . . . . . . . . . . . . . . . . . . . . . . . . . . . . . . . . . . . . . . . . . . . . . . . . . . . . .49
16.1 The pull-in of steel sheets . . . . . . . . . . . . . . . . . . . . . . . . . . . . . . . . . . . . . . . . . . . . . . . . . . . . . . . . . . . . . . . . . . . . . . . . . . . . . . . 49
17. Thermal pull-in – copper electrode - ball . . . . . . . . . . . . . . . . . . . . . . . . . . . . . . . . . . . . . . . . . . . . . . . . . . . . . . . . . . . . . . . . . . . .50
17.1 The pull-in of steel sheets with program 4 . . . . . . . . . . . . . . . . . . . . . . . . . . . . . . . . . . . . . . . . . . . . . . . . . . . . . . . . . . . . . . . . 50
17.2 Pull-in with the copper electrode – ball. . . . . . . . . . . . . . . . . . . . . . . . . . . . . . . . . . . . . . . . . . . . . . . . . . . . . . . . . . . . . . . . . . . 50
18. Thermal pull-in – copper electrode - at . . . . . . . . . . . . . . . . . . . . . . . . . . . . . . . . . . . . . . . . . . . . . . . . . . . . . . . . . . . . . . . . . . . .51
18.1 Pull-in with the copper electrode –- at . . . . . . . . . . . . . . . . . . . . . . . . . . . . . . . . . . . . . . . . . . . . . . . . . . . . . . . . . . . . . . . . . . 51
19. Thermal pull-in - carbon electrode. . . . . . . . . . . . . . . . . . . . . . . . . . . . . . . . . . . . . . . . . . . . . . . . . . . . . . . . . . . . . . . . . . . . . . . . . .52
19.1 Pull-in and stabilizing with the carbon electrode . . . . . . . . . . . . . . . . . . . . . . . . . . . . . . . . . . . . . . . . . . . . . . . . . . . . . . . . . . 52
20. Thermal pull-in aluminum sheets . . . . . . . . . . . . . . . . . . . . . . . . . . . . . . . . . . . . . . . . . . . . . . . . . . . . . . . . . . . . . . . . . . . . . . . . . .53
20.1 Pull-in aluminum sheets. . . . . . . . . . . . . . . . . . . . . . . . . . . . . . . . . . . . . . . . . . . . . . . . . . . . . . . . . . . . . . . . . . . . . . . . . . . . . . . . . 53
21. CBR aluminum hammers . . . . . . . . . . . . . . . . . . . . . . . . . . . . . . . . . . . . . . . . . . . . . . . . . . . . . . . . . . . . . . . . . . . . . . . . . . . . . . . . . .54
21.1 The CBR aluminum hammers and plastic wedges . . . . . . . . . . . . . . . . . . . . . . . . . . . . . . . . . . . . . . . . . . . . . . . . . . . . . . . . . 54
22. Creative approaches to dierent repair methods. . . . . . . . . . . . . . . . . . . . . . . . . . . . . . . . . . . . . . . . . . . . . . . . . . . . . . . . . . . . .56
23. CBR EasyTool adhesive system (VAS 6321 A/11). . . . . . . . . . . . . . . . . . . . . . . . . . . . . . . . . . . . . . . . . . . . . . . . . . . . . . . . . . . . . .58
23.1 Paintless dent removal with the CBR adhesive system. . . . . . . . . . . . . . . . . . . . . . . . . . . . . . . . . . . . . . . . . . . . . . . . . . . . . 58
23.2 Adhesive system with the EasyTool. . . . . . . . . . . . . . . . . . . . . . . . . . . . . . . . . . . . . . . . . . . . . . . . . . . . . . . . . . . . . . . . . . . . . . . 58
23.3 Equipping the EasyTool with the adhesive system. . . . . . . . . . . . . . . . . . . . . . . . . . . . . . . . . . . . . . . . . . . . . . . . . . . . . . . . . 59
24. CBR adhesive system (VAS 6321 A/9) . . . . . . . . . . . . . . . . . . . . . . . . . . . . . . . . . . . . . . . . . . . . . . . . . . . . . . . . . . . . . . . . . . . . . . .60
24.1 Adhesive system with the StrongTool / LineTool / LeverTool . . . . . . . . . . . . . . . . . . . . . . . . . . . . . . . . . . . . . . . . . . . . . . . 60
24.2 Adhesive system with the LineTool . . . . . . . . . . . . . . . . . . . . . . . . . . . . . . . . . . . . . . . . . . . . . . . . . . . . . . . . . . . . . . . . . . . . . . . 62
24.3 Adhesive system with the StrongTool. . . . . . . . . . . . . . . . . . . . . . . . . . . . . . . . . . . . . . . . . . . . . . . . . . . . . . . . . . . . . . . . . . . . . 62
24.4 Adhesive system with the LeverTool. . . . . . . . . . . . . . . . . . . . . . . . . . . . . . . . . . . . . . . . . . . . . . . . . . . . . . . . . . . . . . . . . . . . . . 62
25. CBR GlueTech+(VAS 6321 A/10) . . . . . . . . . . . . . . . . . . . . . . . . . . . . . . . . . . . . . . . . . . . . . . . . . . . . . . . . . . . . . . . . . . . . . . . . . . . .63
26. Decommissioning the VAS 6321 A . . . . . . . . . . . . . . . . . . . . . . . . . . . . . . . . . . . . . . . . . . . . . . . . . . . . . . . . . . . . . . . . . . . . . . . . . .64
27. Declaration of Conformity. . . . . . . . . . . . . . . . . . . . . . . . . . . . . . . . . . . . . . . . . . . . . . . . . . . . . . . . . . . . . . . . . . . . . . . . . . . . . . . . .65
28. Notes . . . . . . . . . . . . . . . . . . . . . . . . . . . . . . . . . . . . . . . . . . . . . . . . . . . . . . . . . . . . . . . . . . . . . . . . . . . . . . . . . . . . . . . . . . . . . . . . . . .66

I
6
1. Important safety instructions
Scope of application of the dent removal system
Perform body repair work, such as dent removal using resistance welding techniques and straightening
devices. Local heating of the sheets of metal by using the copper electrode.
The VAS 6321 A/13 inverter welder and the pulling and straightening tools must not be used for
other purposes!
Structural changes, even minor, are not permitted and lead to the exclusion of the legal guarantee!
CARBON GmbH disclaims any liability for damages to persons, animals, property and the machine itself,
which are caused by a non-conforming use of the safety criteria specied in this usage information, even
by minor manipulations, as well as the use of non-original or non-compatible spare parts.
Persons
The use of qualied personnel is recommended when carrying out work with the VAS 6321 A. The persons
working with the system must in any case have been made aware of the possible risks and must have
read and understood this usage information.
Participation in the familiarization training is strongly recommended!
Safety instructions
Read the instructions carefully. Failure to observe the safety regulations and basic precautions may result
in serious physical injury and property damage. Make sure that employees working next to you are not
injured, such as by sparks that may occur during the work process.
Protective clothing
Wear work clothes with long sleeves, gloves, safety shoes, headgear, safety glasses, and hearing protec-
tion if necessary. The equipment heats sheets of metal to high temperatures and can spray sparks. To
avoid burns and other possible injuries, the general safety regulations of welding equipment and body
repair must be observed when working with the VAS 6321 A!
Important: Explosion hazard!
Do not make repairs to sheet metal or containers that contained inammable materials, such as a fuel tank.
Avoid a potentially explosive environment.
To avoid any risk, do not use the device near inammable liquids, gases or other ammable and danger-
ous objects. The sparks generated when using the device can otherwise lead to explosions.

I
7
Important: Risk of burns and poisoning!
The sheet metal parts to be machined can be heated to very high temperatures. Toxic vapors or gases
may be generated, depending on the composition of the surface coating on the front side, as well as on
the back side of the metal sheet, e.g. zinc, lacquers, sealing material, anti-drumming material, etc.
To avoid poisoning, appropriate precautions such as good ventilation in the workplace or the wearing of
respirators with insucient ventilation must be observed.
Always work attentively and concentrate!
Magnetic ields
Please note that the VAS 6321 A/13 welding inverter included in the VAS 6321 A generates powerful
magnetic elds that exert powerful attractive forces on magnetic metals. Watches, magnetic cards and
data carriers can be damaged by this.
Wearers of pacemakers must always consult their physician before approaching the welding area!
Important: To avoid damage to the vehicle electronics, the vehicle’s electrical system must be
switched o according to the vehicle manufacturer's specications before using the VAS 6321 A/13!

U / G
8
2. Use / Guarantee
2.1 Appropriate use
Our CBR Carbon Body Repair System is designed and manufactured exclusively for commercial use in repairing damage to
the body outer skin.
Usage in the non-commercial sector is expressly not recommended due to the lack of knowledge in car body repair and
especially in welding equipment, as well as lacking specic training.
Intended use also includes observing and understanding this usage information, observing the intervals and conditions for
tests and maintenance work on electrical components (in accordance with applicable legal regulations), as well as regular and
conscientious inspection of the pulling and striking tools for possible damage - damaged tools must not be used any further!
2.2 Guarantee
Please refer to our General Terms and Conditions for the scope of guarantee for our VAS 6321 A.
The guarantee does not cover damage caused by:
Ordinary wear and tear
Improper use and overloading
Transport and damage due to violence
Failure to observe the information in this usage information
Failure to adhere to the safety regulations
Any guarantee claim is void if conversions, changes and corrections are made to our products and if service and repair work
is not carried out by persons authorized by us.
At this point, we expressly point out that only spare parts, additional devices, components and consumables approved by us
may be used. The same shall accordingly apply to products and structural components installed by our suppliers.

E
9
Important safety instruction regarding the electrical supply
The VAS 6321 A trolley is supplied with a connection cable with a 16A plug type EN 60309-1. The connection cable must be
connected to a three-phase, grounded 400V (50-60 Hz) socket (L1, L2, L3, N and PE) with neutral and protective conductor
connected in accordance with the regulations and current standards for electrical installations.
Even if a cable extension is used, it is essential to ensure that all conductors (L1, L2, L3, neutral and PE) are present and
properly connected.
The VAS 6321 A/13 PowerInverter is supplied with a 16A plug DIN 60309, type Multigrip, 3-pole, 6h / 200-250V 2P. This is
connected to a 230V (50-60Hz) socket DIN 60309 (coupling), 3-pole, 6h / 230V 2P with grounding, located inside the
VAS 6321 A trolley.
If operation of the PowerInverter outside the VAS 6321 A
trolley is desired, the PowerInverter must be connected to a
single-phase 230V (50/60Hz) power supply (L, N and PE)
with a connected neutral and protective conductor using a
suitable adapter cable or an adapter plug.
3. Electrical supply
From the mains
N
N
N
N
PE
PE
PE
PE
L
L
L L
L
L
Into the device
The operation and use of damaged equipment is not
permitted.
Connecting cables and plug connections must be
checked for damage before each use.
Damaged cables and plug connections must be
replaced immediately by an authorized customer
service / electrical specialist in order to prevent hazards
and damage to users and equipment.

T VAS A
10
The VAS 6321 A is a complete, innovatively designed repair system for the economical and high-quality repair of the car
body outer skin.
By means of resistance welding techniques, various straightening devices and adhesive systems, almost unbelievable repair
results can be achieved with experienced craftsman after they have received instruction and training.
The combination with optional tools / accessories from the Paint damage-free Dent Removal (AOL) technology and the
Push/ Pull System open up further possibilities in body repair.
4. The VAS 6321 A in use
Application images

T
11
5. Typical damage
Attachment parts, as well as welded and bonded parts

T VAS A
12
LineTool 160
1EasyTool
2Hand Puller
PowerInverter
VAS 6321 A /13
Supports for EasyTool
4Dent removal hammers
Drawer for small
parts set
EasyTool connection
cable
Automatic
MultiTool
Connection cable 380 V
Ground cable
with clamp
5System trolley
6Manual MultiTool
9BitCutter
3Sliding Puller
Equipment for
paint removal 10
6. The VAS 6321 A at a glance
= VAS 6321 A
= Supplement and accessories
7
8

T VAS A
13
PowerInverter
VAS 6321 A /13
L-dent removal bracket
12
13 LineTool 100
15 StrongTool
Steel scale 1 m
Outriggers for StrongTool
17 Enhancement / extension for
StrongTool with L-support
14 LeverTool
Second pull-in unit
for LineTool
16
Stainless steel
pull-in electrode
Aluminum pull-in
electrode
18
19
Carbon electrode
Bit holding electrode - Narrow
Copper electrode - Ball
Copper electrode - Flat
20
LeverTool components
Outriggers for LineTool
CBR triple pull hook
CBR double pull hook
Rotating pull hook
11

T VAS A
14
The VAS 6321 A essentially consists of the components listed below, whose use and application is described in more detail
in this usage information:
*without illustration
VAS 6321 A/5 CBR EasyTool with three round and three square supports each, as well as four straight feet 1
CBR-ZH-01 CBR hand puller 2
CBR-ZH-02 CBR sliding puller 3
H01-HG CBR dent removal hammer small with removable rubber cap
4
H03-H CBR dent removal hammer large with horizontal n
H03-V CBR dent removal hammer large with vertical n
CBR-029 VAS 6321 A trolley for clear storage of the individual components 5
VAS 6321 A/7 CBR LineTool 160 with pull-in unit and double pull hooks, two single and two double feet 7
VAS 6321 A/13 PowerInverter with MultiTool (automatic) and connection cable, ground cable with ground clamp and
connection cable for EasyTool 8
CM-024 BitCutter 9
CM-023 Equipment for paint removal 10
CMA-121-1/2/3 CBR double pull hook / triple pull hook / rotating pull hook 11
CSH-65-0150-80 L-dent removal bracket 12
VAS 6321 A/8 CBR LeverTool with a single and a double foot, as well as a pull carriage with double pull hook 14
VAS 6321 A/4 CBR StrongTool with two single and two double feet and double pull hook 15
CBR-U-B14/B12/
B22/B10 Carbon electrode / Copper electrode - Ball / Copper electrode - Flat / bit holding electrode - Narrow 20
CM-060 Various small parts and accessories *
CM-025 CBR pull rods diameter 7 mm *
CM-026 CBR pull rods diameter 8 mm *

T VAS A
15
Das VAS 6321 A kann mit optionalen Teilen ergänzt werden:
*without illustration
C1-06 MultiTool for VAS 6321 A/ 13 (Manual) with control line and connection cable 6
VAS 6321 A/1 CBR LineTool 100 with pull-in unit and double pull hook 13
VAS 6321 A/3 Second pull-in unit with double hooks for VAS 6321 A/1 and VAS 6321 A/7 16
VAS 6321 A/2 Enhancement / extension for CBR StrongTool CBR-ST-00 17
CBR-U-B17 Stainless steel pull-in electrode for aluminum sheets 18
CBR-U-B16 Aluminum pull-in electrode for aluminum sheets 19
C1-17 MultiTool for VAS 6321 A/ 13 for upsetting and pull-in with connection cable *
VAS 6321 A/9 CBR adhesive system set for VAS 6321 A *
VAS 6321 A/10 CBR GlueTech plus for VAS 6321 A *
VAS 6321 A/11 CBR adhesive system set EasyTool *
CBR-080 Cover hood for VAS 6321 A trolley *
VAS 6321 A/14 Push / Pull System *

CBR
16
16
14
1
Second pull-in unit with
double hooks for LineTool
CBR EasyTool
CBR LeverTool
7. CBR pulling tools at a glance

CBR
17
17
7CBR LineTool 160
15 CBR StrongTool
Enhancement / extension for
CBR StrongTool with L-support
13 CBR LineTool 100

CBR-C PI | P S (VAS A/)
18
8. CBR-C1 PowerInverter | Power Source (VAS 6321 A/13)
8.1 The CBR-C1 PowerInverter
The VAS 6321 A/13 PowerInverter is the multifunctional power source (hereinafter referred to as SQ) at the heart of the
VAS 6321 A. It enables a wide range of applications in the repair of damage to the body outer skin.
The user has 6 programs available for dierent tasks, which are selected via pushbuttons (5-10). For all programs, our
technicians have worked out basic values which are stored in the control electronics of the SQ and are automatically set
after selecting the program.
The preset settings can be changed step by step and independently of each other with the keys (11-14), or adapted to the
respective conditions (material quality, metal sheet thickness, etc.) - the adaptation is shown in the displays for time (11/12), or
power (13/14).
AUTO EASY-TOOL MANUELL
ZEIT
LEISTUNG
AUTO
IMPULS
PROGRAMME
EIN/AUS
8. 8.
- +
8. 8.
- +
MANUELL
1MASSE
2BITS
3EASY-TOOL
4EINZIEHEN FE FE
5EINZIEHEN AL AL
6KOHLESTIFT C
MASSE
5
2
3
4
6
1
10
11
13
12
14
9
8
7
Switch
Manual / Auto
Ground clamp
connector
Program keys
Automatic MultiTool
connector
Pulse
On / O
Main switch On
/ O
Less time
Less power
Control line
connector
MultiTool manual connector
EasyTool
connector
More time
More power

CBR-C PI | P S (VAS A/)
19
8.1 The CBR-C1 PowerInverter
The VAS 6321 A/13 PowerInverter is the multifunctional power source (hereinafter referred to as SQ) at the heart of the
VAS 6321 A. It enables a wide range of applications in the repair of damage to the body outer skin.
The user has 6 programs available for dierent tasks, which are selected via pushbuttons (5-10). For all programs, our
technicians have worked out basic values which are stored in the control electronics of the SQ and are automatically set
after selecting the program.
The preset settings can be changed step by step and independently of each other with the keys (11-14), or adapted to the
respective conditions (material quality, metal sheet thickness, etc.) - the adaptation is shown in the displays for time (11/12), or
power (13/14).
AUTO EASY-TOOL MANUELL
ZEIT
LEISTUNG
AUTO
IMPULS
PROGRAMME
EIN/AUS
8. 8.
- +
8. 8.
- +
MANUELL
1MASSE
2BITS
3EASY-TOOL
4EINZIEHEN FE FE
5EINZIEHEN AL AL
6KOHLESTIFT C
MASSE
5
2
3
4
6
1
10
11
13
12
14
9
8
7
Switch
Manual / Auto
Ground clamp
connector
Program keys
Automatic MultiTool
connector
Pulse
On / O
Main switch On
/ O
Less time
Less power
Control line
connector
MultiTool manual connector
EasyTool
connector
More time
More power
8.2 The operation of the SQ
After switching on the SQ via the main switch (1), the MANUAL (2) and GROUND (5) LEDs light up. This basic setting ensures
that no accidental short circuit can occur between the MultiTool and the ground clamp.
Programs 1 and 3 to 6 are operated in automatic mode, whereby in program 4 it is possible to select between continuous
current and pulsing three times.
Program 2 can be executed in automatic mode (welding process is triggered on contact with the bare surface), as well as in
manual mode (welding process is triggered at the press of a button on the MultiTool).
Note that use of the SQ in Manual mode requires the optional MultiTool with probe (part number C1-06).
If the automatic mode is selected, the SQ switches to standby mode after 5 minutes of inactivity. To reactivate the SQ, one
of the programs must be selected.
For your consideration: By selecting the program indicated by the illuminated LED again, the previously adjusted values for
time or for power remain valid.
The pictures above show the easy handling of the pushbuttons of the SQ
to quickly recall the respective programs.

CBR-C PI | P S (VAS A/)
20
Important
For all work with the VAS 6321 A, make sure that the zinc coating is removed from the sheet metal without leaving
any residue. This should be done with nylon discs or similar at low speed to introduce as little heat as possible into
the sheet metal being machined.
8.3 Attaching the ground clamp with program 1
Important: To avoid damage to the vehicle electronics, the vehicle’s electrical system must be switched o according to the
vehicle manufacturer‘s specications before using the VAS 6321 A/13!
To establish a ground connection to the vehicle, you must plug the ground clamp with connection cable into the ground
socket on the SQ, switch on the SQ at the main switch and select program 1.
After switching on the SQ, select program “GROUND” and
press “AUTO” on the panel.
Important: To ensure optimum process reliability for all
work on the body panels, care must be taken to ensure that
the zinc coatings are removed without leaving any residue.
8.4 Welding on the ground clamp
Plug the MultiTool with connection cable into the Auto socket on the SQ and insert the pull-in tool into the MultiTool. The
ground clamp can be quickly and easily welded onto a bare surface with the welding tip. To do this, place the ground clamp
on the sheet metal so that the lower ring (contact surface) lies at. Press on the bolt of the ground clamp with the pull-in
tool. As soon as the welding tip of the bolt touches the bare body part, the automatic welding process starts - if you are
working in manual mode, you must trigger this process with a keystroke. By turning the knurled screw, the welded joint can
be released quickly and easily.
Important: With this type of ground connection, it must be ensured that the contact surface of the ground clamp lies
completely and at on the bare surface of the body part in order to avoid loss of performance, high wear/damage to the
ground clamp and damage to the body part!
Other manuals for VAS 6321 A
1
Table of contents
Other Volkswagen Tools manuals
Popular Tools manuals by other brands

Powerfix Profi
Powerfix Profi PMTR 4 A1 translation of original operation manual

Alemlube
Alemlube AdBlue 6820HAS Owner technical manual

BGS technic
BGS technic 69506 instruction manual

Trelawny
Trelawny Trident Neptune Operation and maintenance manual

Desoutter
Desoutter ERS2 user manual

Huskie Tools
Huskie Tools SL- 610 Operation manual