Von vorne einkleben!
Fensteraufsätze
Bitte zuerst
139146/43697 8
2. Montage
Mounting
Montage
RS
T
A
Blumenflocken
Flower flakes
Flocons des fleurs
138110
Tipp:
Möchten Sie das Modell von innen beleuchten, verwenden Sie bitte die Viessmann Art.-Nr. 6832 Hausbeleuchtungssockel mit Glühlampe E5,5, klar.
Möchten Sie die Fenster einzeln und individuell beleuchten, so empfehlen wir das Startset Etageninnenbeleuchtung Art.-Nr. 6045 von Viessmann.
Siehe Produkthinweis auf der letzten Seite.
Tip:
If you wish to illuminate the model from inside, please use Viessmann item-No. 6832 House illumination socket with bulb E5,5, clear.
For detailed illumination of each window and room, please use Viessmann starter floor interior lighting item-No. 6045.
See product information on the last page.
Tipp:
Möchten Sie die Fenster einzeln und individuell beleuchten, so empfehlen wir das Startset Etageninnenbeleuchtung Art.-Nr. 6045 von Viessmann.
Siehe Produkthinweis auf der letzten Seite.
Tip:
For detailed illumination of each window and room, please use Viessmann starter floor interior lighting item-No. 6045.
See product information on the last page.
Tipp:
Möchten Sie das Modell von innen beleuchten, verwenden Sie bitte die Viessmann Art.-Nr. 6832 Hausbeleuchtungssockel mit Glühlampe E5,5, klar.
Tip:
If you wish to illuminate the model from inside, please use Viessmann item-No. 6832 House illumination socket with bulb E5,5, clear.
Tipp:
Möchten Sie das Modell von innen beleuchten, verwenden Sie bitte die Viessmann Art.-Nr. 6832 Hausbeleuchtungssockel mit Glühlampe E5,5, klar.
Möchten Sie die Fenster einzeln und individuell beleuchten, so empfehlen wir das Hausbeleuchtungs-Startset Art.-Nr. 6005 von Viessmann.
Siehe Produkthinweis auf der letzten Seite.
Tip:
If you wish to illuminate the model from inside, please use Viessmann item-No. 6832 House illumination socket with bulb E5,5, clear.
For detailed illumination of each window and room, please use Viessmann item-No. 6005 House illumination start-set.
See product information on the last page.
Faden 10 cm
String
Ficelle
Kohle 136212 1
Coal
Charbon
Art.-Nr. 44113
Rauchgenerator
Smoke generator optional accessory
Générateur de fumée accessoire optionnel
Zusatzausrüstung
138653
Farbtablette
Colour tablet
Tablette de couleur
Aufbauvariante
Mounting variation
Variante de montage
Stein
Stone
Pierre
138410
Bitte zuerst Fensteraufsätze und Sockel von vorne aufkleben!
Please glue the window frame and base from the front first!
S'il vous plaît coller les segments de bardage d'abord!
Märklin-K, Fleischmann Modell Gleis, Roco LINE,
Hornby, Piko A-Gleis, Tillig Standard, Tillig Elite,
Bemo Standard Gleis, Bemo C70, Mehano Hobby Gleis,
Peco Setrack, Peco Streamline, Peco Streamline 83, Peco Finescale,
Kato Unitrack, Shinohara Code 70, Shinohara Code 83, JHM STS.
Für Modellgleise.
For model tracks.
Für Bettungsgleise.
For road bed track.
Märklin C-Gleis, Kato Unitrack H0,
Roco geoLINE, Trix C-Gleis,
Fleischmann Profi-Gleis.
Aufbauvariante 2
Alternative mounting 2
Aufbauvariante 1
Alternative mounting 1 Kleben
Glue
Coller
Außen
Outside
Extérieur
Innen
Inside
Intérieur
Betriebsspannung: 10 – 16 V AC ~
(Mit und ohne Viessmann Powermodul Art. 5215/5205)
14 – 24 V DC =
13 – 24 V Digitalsignal
Achtung:
Alle Anschluss- und Montagearbeiten nur bei abgeschalteter
Betriebsspannung durchführen!
Ausschließlich nach VDE/EN-gefertigte Modellbahntransfor-
matoren (z. B. Viessmann Art. 5200) verwenden!
Stromquellen unbedingt so absichern, dass es bei einem
Kurzschluss nicht zum Kabelbrand kommen kann.
Widerstand und Diode an den Enden der Anschlussdrähte
sind für die Funktion erforderlich. Keinesfalls entfernen!
Widerstand nicht mit Isolationsmaterial umhüllen, da sonst
keine ausreichende Kühlung möglich ist!
Power supply: 10 – 16 V AC ~
(with and without Viessmann power module 5215/5205)
14 – 24 V DC =
13 – 24 V Digital signal
Caution:
Make sure that the power supply is switched off when you
mount the device and connect the cables!
Only use VDE/EN tested special model train transformers
(e. g. Viessmann item 5200) for the power supply!
The power sources must be protected to prevent the risk of
burning cables.
Resistor and diode at the cables are needed for proper
function of the lamp. Never cut them off! Never cover resistor
or diode with insulation material, because they have to be
cooled by surrounding air!
4. Anschluss der LED-Beleuchtung 4. C L sonnection of ED
Schließen Sie die LED an den Lichtausgang eines Modell-
bahntransformators (z. B. Viessmann Art. 5200) an.
Gleichspannung: Verbinden Sie die Diode (rotes Bauteil mit
schwarzer Markierung) mit dem Plus-Pol des Netzteils, den
Widerstand mit dem Minus-Pol.
Wechselspannung: Beim Betrieb mit Wechselspannung
kann es zu leichtem Flackern kommen. Daher empfehlen wir
den Betrieb mit der Verteilerleiste mit Powermodul von
Viessmann, Art. 5205 (Abb. 1).
Die oben auf dem Modul gut zugängliche Steck-Verteiler-
leiste ermöglicht den bequemen lötfreien Anschluss von 12
Stromverbrauchern durch einfaches Einstecken ihrer Wider-
stände und Dioden in die Buchsen der Leiste.
Stecken Sie das Anschlusskabel mit der Diode in eine An-
schlussbuchse der braunen Anschlussleiste, das Anschluss-
kabel mit Widerstand in eine Anschlussbuchse der gelben
Anschlussleiste auf dem Powermodul.
Zum einfachen Ein- und Ausschalten der Beleuchtung ver-
wenden Sie einen Schalter (z. B. Viessmann Art. 5550).
Connect the LED to the light output of a model train
transformer (e. g. Viessmann item 5200).
DC voltage: Connect the diode (red part with black marking)
with the positive pole of the transformer, the resistor with the
negative pole.
AC voltage: While operation with AC voltage it may flicker
slightly.
Therefore, we recommend to use the Viessmann power
module with distribution strip item 5205 (fig. 1).
The distribution strip on the top allows a comfortable connec-
tion of 12 loads without soldering, just by plugging the leads of
the resistors and the diodes into the sockets of the distribution
strip.
Plug the connection cable with the diode into an output socket
of the brown connection rail, the connection cable with the
resistor into an output socket of the yellow connection rail on
top of the power module.
For easy on-off switching of the lighting use anon-off switch
(e. g. Viessmann item 5550).
gelb/yellow
braun
brown
Viessmann
Abb. 1
Fig. 1
z. B./e. g. 5550
z. B./e. g.
5205
z.B./e. g. 5200
gelb/yellow
braun/brown
braun/brown
6046, 6047 oder/or 6048
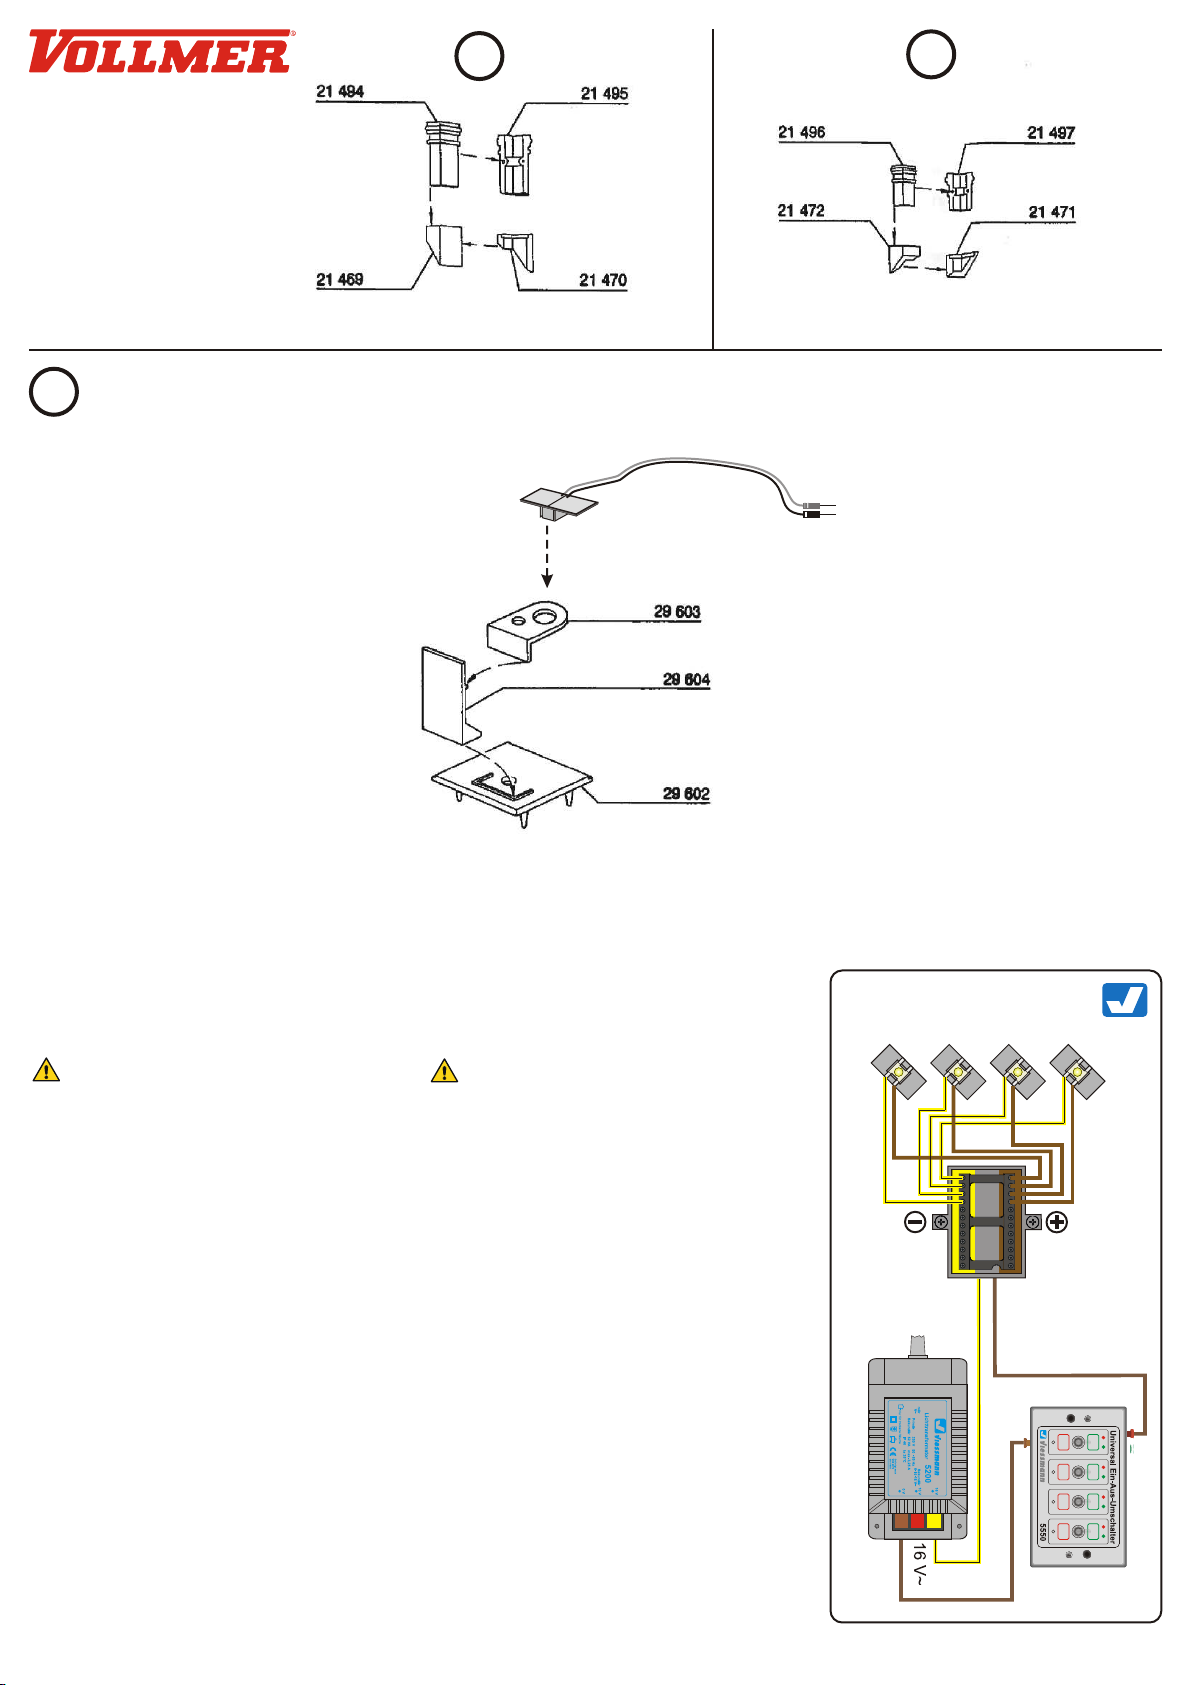
3. Einbau der LED-Beleuchtung
LEDs
Mounting of