VonHaus 2514047 User manual

01 0418
2500W 11 FIN OIL
FILLED RADIATOR
WITH TIMER
2514047/ 2500109 - Instruction Manual

CONTENTS
Safety Instructions 1
Safety Instructions, Safety Symbols 2
Product Specification 3
Base Assembly, Safety Features 4
Using the Timer 5

Safety Instructions 1
Safety Instructions, Safety Symbols 2
Product Specification 3
Base Assembly, Safety Features 4
Using the Timer 5
Operation, Controls 6
Cleaning & Care, Storage, Troubleshooting 7
Table 2 Information 8
User Notes 9
Warranty 10

WARNING
PLEASE READ THESE INSTRUCTIONS CAREFULLY AND KEEP FOR FUTURE REFERENCE
1
INTENDED USE.
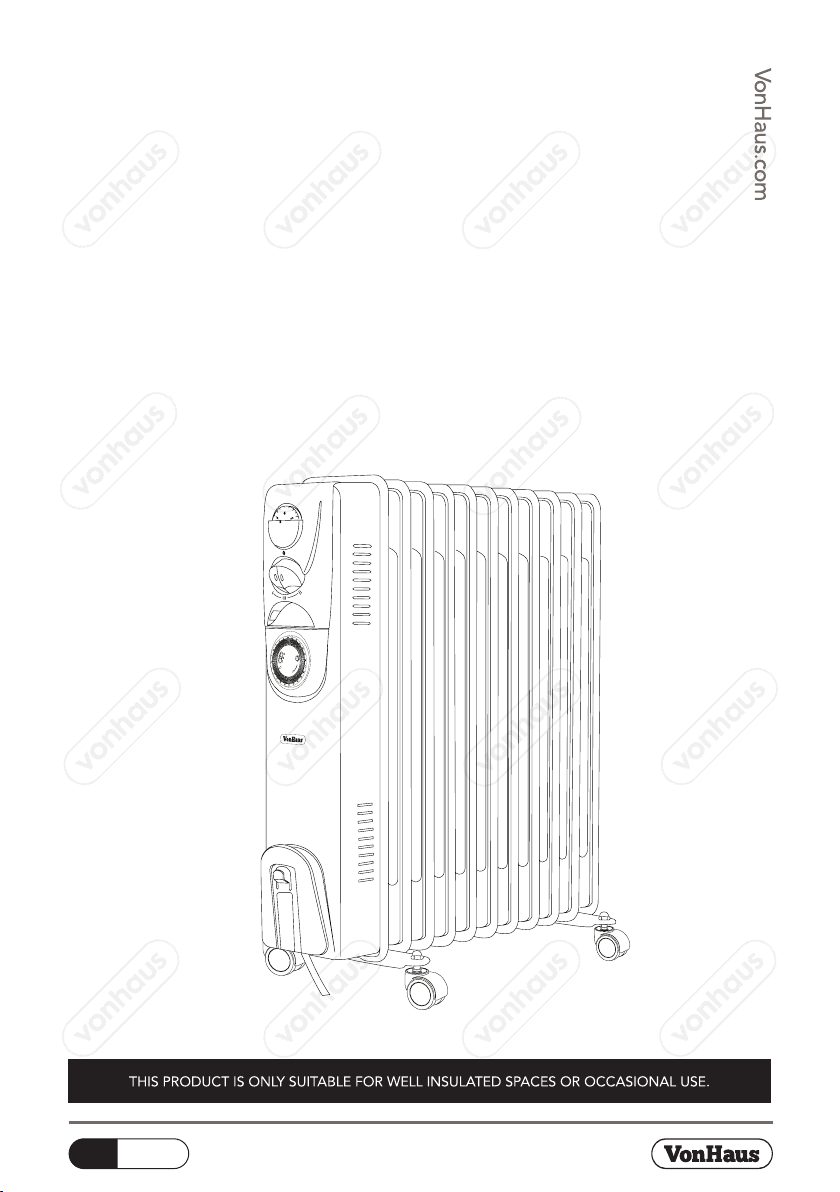
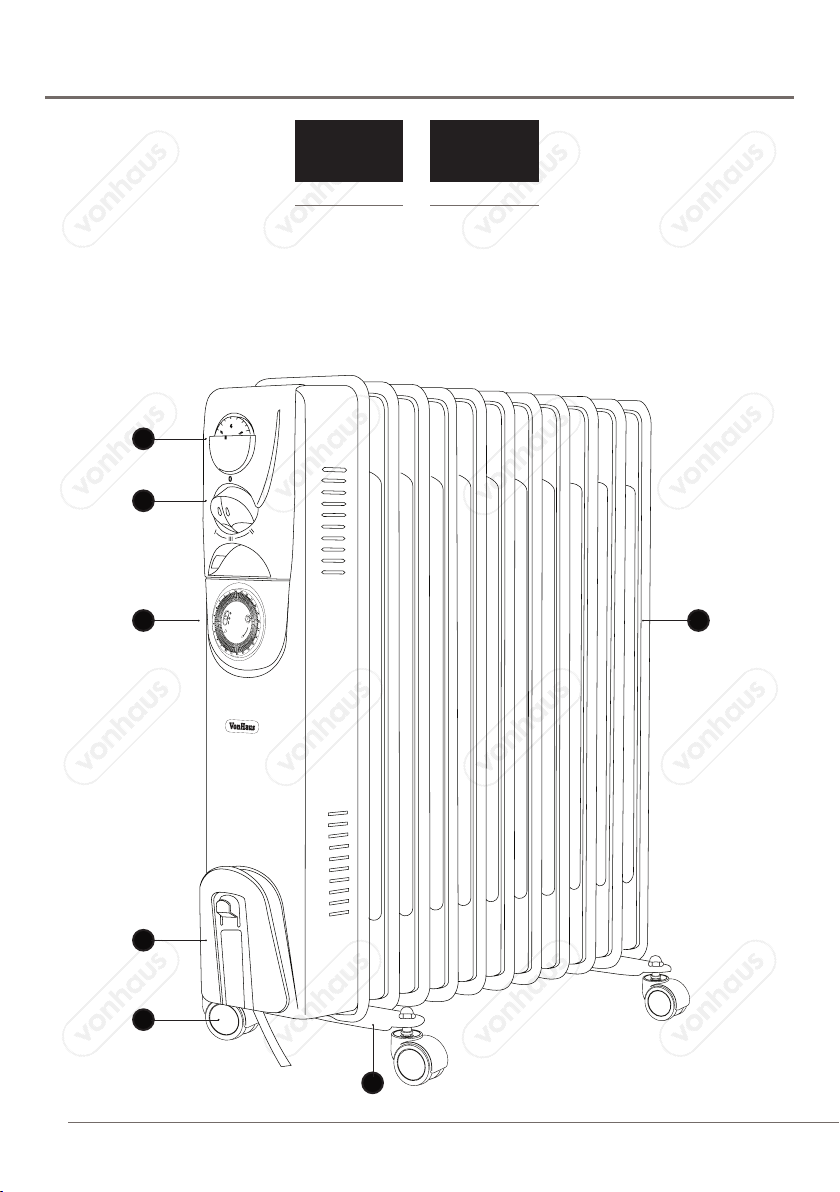
This 2500W 11 Fin Oil Filled Radiator with
Timer is designed for light domestic use
only. It is not intended for heavy duty,
commercial or industrial use, and is not
suitable for use outdoors.
WARNING! Do not use this appliance to
dry clothes.
This appliance is not intended for
use by children or infirm persons
without supervision. Extreme caution is
necessary when used near children, and
whenever the appliance is left operating
unattended. Take adequate precautions
if such persons are to be left alone in the
vicinity of the appliance.
WARNING! This product is not suitable
to be used on long pile carpets.
Use this appliance only as described
in this manual. Any other use is not
recommended by the manufacturer and
may cause fire, electric shock or injury.
PRIOR TO USE.
Remove the packaging and make sure
that the appliance is intact. If in doubt, do
not use the appliance and contact DOMU
Brands Customer Services.
Do not leave packaging materials such as
bags and staples within reach of children.
Dispose of packaging carefully and with
consideration for the environment.
It is recommended that you retain the
appliance box for seasonal storage.
For your convenience, record the date
you received the appliance on the
‘Warranty’ page of these instructions and
attach your proof of purchase. Retain this
information in the event that a warranty
service is required.
SAFETY INFORMATION.
When using any electrically-powered
appliance, basic safety precautions should
always be followed to reduce the risk of
fire, electrical shock, or injury to persons
or property.
CABLES AND PLUGS.
Check to ensure your electricity supply
matches that shown on the rating label of
the appliance. The appliance must only
be used as rated.
Do not operate any appliance with a
damaged cord or plug, or after the
appliance malfunctions or has been
dropped or damaged in any manner. Take
to a qualified electrical person for service
and repair.
Do not connect the appliance to the
mains voltage until completely assembled
and adjusted.
Unroll the cord before operating.
Operating with a coiled cord may cause
overheating and risk of fire.
The use of an extension cord with this
appliance is not recommended.
Do not allow the cord to come into
contact with the appliance surface during
operation.
Do not run the cord under carpeting,
mats or rugs etc. Arrange the cord away
from traffic areas so that it will not be
tripped over.
Do not twist, kink or wrap the cord
around the appliance as this may cause
the insulation to weaken and split.
Always unplug the appliance when not in
use. Do not leave unattended.
Always switch off the appliance before
unplugging from the power socket.
Always hold the plug when removing it
from the wall, do not pull the cord.
CAUTION: In order to avoid a hazard due
to inadvertent resetting of the thermal
cut-out, this appliance must not be
supplied through an external switching
device, such as a timer, or connected to
a circuit that is regularly switched on and
off.

WARNING
PLEASE READ THESE INSTRUCTIONS CAREFULLY AND KEEP FOR FUTURE REFERENCE
RISK OF PERSONAL INJURY.
Use this appliance only as described in
this manual.
Do not use this appliance with any type of
external timer.
Always operate upright, on a flat surface
only.
This appliance heats up when in use. To
avoid burns, do not touch the front of the
appliance or any of the grilles or vents.
WARNING! DO NOT COVER.
Do not cover in any manner as the
appliance may overheat and become a
fire risk.
Keep all objects at least 1 metre from the
front, side and rear of the appliance.
Do not operate the appliance with wet
hands.
Do not immerse in liquid or use the
appliance near water as this could create
an electrical shock hazard.
If the appliance accidentally comes into
contact with water, switch off the power
supply and do not touch the appliance.
Never attempt to remove the cover of the
appliance. Repairs requiring opening the
appliance or access to internal parts must
be carried out by a qualified electrician or
repair service professional. There are no
user-serviceable parts of this appliance
(excluding the plug fuse).
Before moving the appliance, switch it
off by unplugging it from the wall and
allowing it to cool.
POSITIONING YOUR RADIATOR.
This appliance is designed to be
placed on a hard, level surface. When
positioning, please keep the following
points in mind:
Do not locate in areas of high foot traffic.
To avoid accidents, always ensure that the
power cord and appliance are in full view.
Do not fit the appliance in confined
spaces such as cupboards or wardrobes.
Do not operate the appliance in areas
where gasoline, paint or other flammable
liquids are used or stored.
Do not operate the appliance in
bathrooms, laundry areas or similar
moist indoor locations. Do not use in
the immediate surroundings of a bath,
shower or swimming pool.
The appliance must not be located
immediately below or in front of a socket
outlet.
The socket must always be accessible in
order to disconnect the appliance from
the electrical supply for maintenance.
Store the Radiator carefully in a dust-free
area during the off season.
It is ideal to store the Radiator in the box
in which it was supplied.
Neatly wind the cord of the Radiator to
prevent damage.
Please ensure you understand their meanings before operating this product in
order to prevent personal injury and avoid damage to the appliance.
WARNING!
Pay attention to all
safety and guidance
Read manual
before use
WARNING!
Do not cover
SAFETY SYMBOLS

3
PRODUCT SPECIFICATION
220-240V ~50Hz
V
RATED
VOLTAGE
1000/1500/2500
W
RATED
POWER
1. Thermostat Knob
2. Power Selectors
3. Timer
4. Cord Storage
5. Wheels
6. Wheel Mounting Plates
7. Radiant Fins
2
3 7
4
5
6
1

BASE ASSEMBLY
Place the body of the Radiator upside down on a
scratch-free surface, making sure that it is stable and
will not fall.
Locate the U-Shaped Bars and remove the Wing
Nuts.
Locate the Bars at the front and rear of the Radiant
Fins.
Attach the Wheel Mounting Bracket onto the
U-Shaped Bar and secure into place using the
previously removed Wing Nuts.
Remove the End Cap Screw from the Wheel, thread
the Wheel onto the Wheel Mounting Bracket and
secure into place with the End Cap Screw.
Ensure everyting is tightend and secure before
turning upright.
IMPORTANT: After assembly, stand the Radiator
upright for 1 hour before switching on. This will allow
the oil to settle into the correct position.
If the item is missing these parts, please contact
customer services.
Spare base assembly parts
3000145: Black
3000144: White
SAFETY FEATURES
This Radiator is fitted with an overheat protection
switch (thermal cut-out) which will power off the
appliance automatically in case of overheating.
Should this occur, unplug the appliance and allow to
cool fully for approximately 30 minutes.
Follow the operation instructions to restart
the appliance after removing the source of the
overheating (poor ventilation, item covering the
Radiator etc.). The Radiator should function normally.
Should the problem persist, please contact DOMU
Brands Customer Services.
To avoid damage and to regulate the temperature,
this Radiator is fitted with a thermostatic safety
device. The safety device will activate and cut out
the power to the Radiator once a certain temperature
is reached. The Radiator will start again once the
temperature has lowered.
The Radiator is also fitted with a tip switch which
will cut off the power to the Radiator if it is knocked
over. Should this happen, disconnect at the mains
and allow to cool fully before attempting to move the
Radiator. Inspect the Radiator for damage. If - and
only if - the Radiator is free from damage, plug back
into the mains. The Radiator should function normally.

5
OPERATION
CONTROLS
CAUTION: Before using the Radiator, make sure that
it is on a flat and stable surface. Damage may occur if
it is placed on an incline or decline.
NOTE: When the Heater is switched on you will hear
a crackling/popping sound, this is completely normal
and not a fault , it is the oil settling.
Set all the controls to the off position and insert the
plug into a socket outlet, ensuring the plug fits firmly.
IMPORTANT: The TIMER switch must be set to the ‘I’
position for NON Timer operation.
Rotate the Thermostat Knob (1) clockwise to MAX
position and switch the Radiator on.
Once your room reaches the desired temperature,
slowly rotate the Thermostat Knob anticlockwise
until the pilot light goes out. It can now be left
at this setting. As soon as the room temperature
has dropped below the set temperature, the unit
will switch it self on automatically until the set
temperature has been reached again. In this way, the
room temperature remains constant with the most
economical use of electricity.
If you want to change the room temperature setting,
rotate the Thermostat Knob clockwise to raise the
temperature, or anticlockwise to lower it.
This Radiator is fitted with an overheat protection
system that shuts off the Radiator should parts of the
Radiator become excessively hot.
To completely shut the Radiator off, turn all the
controls to the off position and remove plug from the
socket outlet.
Powered Off Low Heat Medium Heat High Heat

1. Slide the switch to the position shown. You will
now be able to set the Timer Dial (3).
NOTE: Do not unplug the Radiator once you have set
the Timer Dial as this can cause the clock to stop.
IMPORTANT: The switch must be set to the ‘I’
position for normal operation. (NON TIMED)
2. To set the time of day, turn the Timer Dial
clockwise (indicated by the direction arrow) until the
marker arrow corresponds to the time of day.
NOTE: The Dial will only rotate clockwise, if you
accidently pass the time required you will need to
rotate the timer again.
3. Using your finger or a tip of a pen/pencil, push
segments in as required. Each segment is 15 mins.
You can select as many or as little heating periods as
desired within the 24 hour period.
USING THE TIMER
Pin Out.
Time set.
Pin In.
Time not
set.

7
TROUBLESHOOTING
PROBLEM SOLUTION
Ensure the Radiator is switched on and connected to
mains power.
Activate the Thermostat Knob and Power Selectors.
Make sure that the switch on the Thermostat Knob is set
to “I” for operation.
Ensure the Radiator is upright.
Check the fuse by replacement.
THE RADIATOR WILL NOT POWER ON
THE RADIATOR IS NOT HEATING UP
THE RADIATOR BECOMES DAMAGED
Check that the Radiator is plugged in and switched on at
the mains outlet.
The input and output airflow grilles may require cleaning.
Discontinue use and contact DOMU Brands Customer
Services.
STORAGE
Store the Radiator carefully in a dust-free area during
the off season.
It is ideal to store the Radiator in the box in which it
was supplied.
Neatly wind the cord of the Radiator to prevent
damage.
CLEANING & CARE
CAUTION: Switch off the Radiator and disconnect
the plug from the power socket. Wait for the Radiator
to cool completely before cleaning.
Vacuum-clean between the Radiant Fins to remove
dust from these areas.
To remove dust on external surfaces, wipe the
Radiator with a damp (not wet) lint-free cloth rinsed in
hot soapy water only.
CAUTION: Do not use any harsh detergent or
abrasive cleaners.
WARNING! Do not spray with any liquids or
submerge in liquid or water.
WARNING! Do not attempt to clean the inside of the
Radiator. Do not attempt to open the casing at any
time. There are no user-serviceable parts.

INFORMATION REQUIREMENTS FOR
ELETRIC LOCAL SPACE HEATERS
Item Symbol ValueU nitI temU nit
Heat Output Type of heat input for Electrical Storage Heaters
only (select one)
Nominal Heat
Output
Minimum Heat
Output (indicative)
Maximum
Continious Heat
Output
Manual heat charge control with
integrated thermostat.
Manual heat charge control with room
and/or outdoor temperature feedback.
Electronic heat charge control with
room and/or outdoor temperature
feedback
no0.9814
0.9814
0,0
0,0
0,0
no
no
no
no
no
no
yes
no
no
no
no
no
no
no
no
Auxiliary electricity consumption Fan assisted heat output
At nominal
heat output
At minimum
heat output
In standy mode
Model
Type of heat output/room temperature control
(select one)
2514047 / 2500109
Single stage heat output and no room
temperature control
Two or more manual stages, no room
temperature control
With mechanical thermostat room
temperature control
With electronic room temperature
control
Electronic room temperature control
plus day timer
Electronic room temperature control
plus week timer
Other control options (multiple selections possible)
room temperature control with
prescence detection
room temperature control with
open window detection
with distance control option
with adaptive start control
with working time limitation
with black bulb sensor
Contact Details
P
nom
P
min
P
max
EL
max
EL
min
EL
SB
kW
kW
kW
kW
kW
kW
DOMU Brands Ltd, 4th & 5th Floor, The Tower, Deva City Office Park, Salford, M3 7BF
N/A

USER NOTES
9

DISPOSAL INFORMATION
COPYRIGHT
WARRANTY
CUSTOMER SERVICE
Please recycle where facilities exist. Check with your local authority for recycling advice.
All material in this instruction manual are copyrighted
by DOMU Brands.
Any unauthorised use may violate worldwide
copyright, trademark, and other laws.
To register your product and find out if you qualify
for a free extended warranty please go to
www.Vonhaus.com/warranty.
Please retain a proof of purchase receipt or
statement as proof of the purchase date.
The warranty only applies if the product is used
solely in the manner indicated in the Warnings page
of this manual, and all other instructions have been
followed accurately. Any abuse of the product or
the manner in which it is used will invalidate the
warranty.
Returned goods will not be accepted unless re-
packaged in its original packaging and accompanied
by a relevant and completed returns form. This does
not affect your statutory rights.
No rights are given under this warranty to a
person acquiring the appliance second-hand or for
commercial or communal use.
If you are having difficulty using this product and require support, please contact [email protected]

VonHaus®is a registered trademark of DOMU Brands Ltd
Made in China for DOMU Brands Ltd M24 2RW
Thank you for purchasing the 2500W 11 Fin White Oil Filled
Radiator with Timer.
This manual suits for next models
1
Table of contents
Other VonHaus Heater manuals

VonHaus
VonHaus 2500108 User manual

VonHaus
VonHaus 2514011 User manual

VonHaus
VonHaus 2514025 User manual

VonHaus
VonHaus 2500107 User manual

VonHaus
VonHaus 2500453 User manual

VonHaus
VonHaus 2500463 User manual

VonHaus
VonHaus 2514041 User manual

VonHaus
VonHaus 2514086 User manual

VonHaus
VonHaus 2500106 User manual

VonHaus
VonHaus 2500887.1 User manual
Popular Heater manuals by other brands

Tekadoor
Tekadoor RAV-CT101BH-M Installation and owner's manual

Suntec Wellness
Suntec Wellness Klimatronic Heat Flow 2000 manual

Brink
Brink Flair 325 Plus Installation regulations

Baxi
Baxi KL installation instructions

Helo
Helo Havanna 450 D BWT Installation and user manual

Comfort Glow
Comfort Glow QWH2100 Operator's manual