Vornado 6303DC User manual

1
English
한국어 p. 15
Important Instructions ........................................................................ 2
Getting Started................................................................................... 5
Features .............................................................................................. 7
Controls............................................................................................... 8
How To Use ....................................................................................... 10
Remote Control................................................................................. 11
Grill & Blade Removal ....................................................................... 12
Cleaning ............................................................................................ 13
Troubleshooting ............................................................................... 14
CONTENTS
MODELS 5303DC, 6303DC, 6803DC, 7503DC OWNER’S GUIDE
5303DC, 6303DC, 6803DC, 7503DC 모델 사용자 가이드
5303DC 6303DC 6803DC 7503DC

3
English
2English
- Do Not allow the power supply (model 6803DC only) or power cord
to come in contact with water or wet locations.
- Do Not use this product near furnaces, replaces, stoves or other
high-temperature heat sources.
- Do Not place the power supply (model 6803DC only) or power cord
near heat sources, such as heaters or radiators.
- Do Not position this product too close to draperies or other loose
fabrics as they may be drawn into the product, cutting off airow and
damaging the motor.
- Do Not carry this product by the cord, or use the cord as a handle as
it can damage internal wiring. Do not unplug product by pulling on
cord or place the cord under strain. To unplug, grasp the plug, not
the power cord.
- Do Not run cord under carpeting. Do not cover cord with throw
rugs, runners or similar coverings. Do not route cord under furniture
or appliances. Arrange cord away from trafc area and where it will
not be tripped over. To avoid a tripping hazard, safely coil/store the
power cord.
- This unit requires one (1) lithium coin cell battery (CR2032), 3 Volt
(included). DO NOT DISPOSE OF BATTERIES IN FIRE. BATTERIES
MAY EXPLODE OR LEAK.
DANGER
Risk From Electrical Shock. Contact with wires or components that
are under voltage could be potentially fatal:
- Use only the detachable external power supply and cord that comes
with your product (model 6803DC only).
- Do Not touch the product with wet or damp hands.
- Do Not operate any product with a damaged cord or plug or after
the product malfunctions, has been dropped or damaged in any
manner. Discard product, or return to authorized service facility for
examination and/or repair in order to avoid a hazard.
- The detachable external power supply and cord (model 6803DC
only) have no user replaceable parts. If the power supply or cord
is damaged, it must be replaced by the manufacturer or its service
agent or a similarly qualied person in order to avoid a hazard.
- Do Not stretch the power cord or put the cord under strain.
- Do not insert or allow foreign objects to enter any input or output
opening as they may cause risk of electric shock or re or damage
the product.
- Turn off all controls before unplugging. Unplug from wall outlet if not
in use for extended periods of time.
- Do Not open motor housing. To avoid risk of shock, all service and/
or repairs must be done by a Vornado Authorized Service Center.
Only original replacement parts may be used.
- This appliance (US MODELS ONLY) has a polarized plug. (One blade
is wider than the other.) To reduce the risk of electrical shock, this
plug is intended to t in a polarized outlet only one way. If the plug
does not t fully in the outlet, reverse the plug. If it still does not
t, contact a qualied electrician. Do Not attempt to defeat this
safety feature.
- For safety reasons, always unplug the unit in the event of
a thunderstorm.
WARNING
Risk From Improper Installation. Please take care to follow these
guidelines to avoid risks to people or property:
- Ensure that wall power outlet is easily accessible so unit can be
disconnected during an emergency.
- To reduce the risk of re or electrical shock, do not use this product
This owner's guide and any additional inserts are considered part of
the product. They contain important information about safety, use and
disposal. Before using the product, please familiarize yourself with all
operating and safety instructions. Please keep all documents for future
reference and pass these documents on, together with the product,
to any future owner. Please refer to our website for the most current
version of our owner’s guide.
The following Warning messages are throughout this owner's guide:
DANGER
Indicates a hazard with a HIGH level of risk which, if not
avoided, will result in death or serious injury. Please pay special
attention to any instructions given to avoid this threateningly
dangerousrisk.
WARNING
Indicates a hazard with a MEDIUM level of risk which, if not
avoided, could result in death, serious injury, minor or moderate
injury or potential property damage.
IMPORTANT INSTRUCTIONS
Indicate additional information that will assist in the care of handling
of the device.
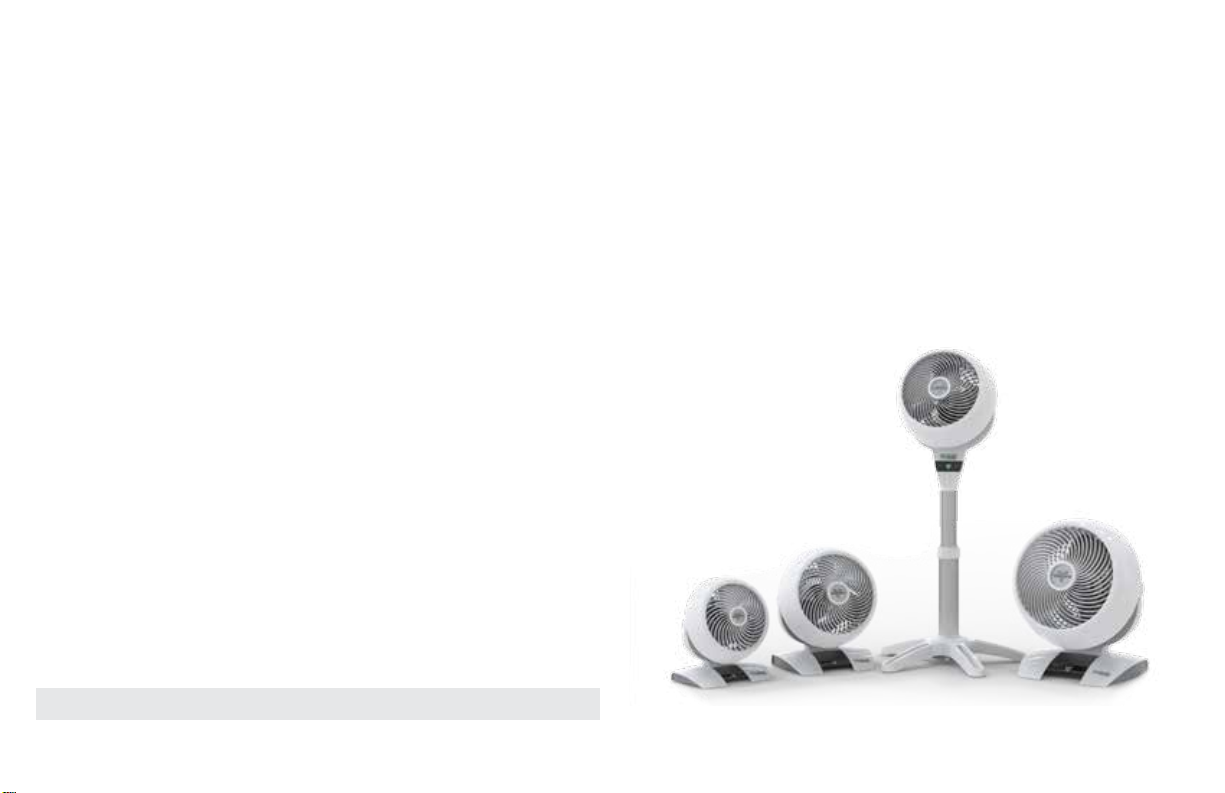
INTENDED USE: This product is intended to circulate the air in
indoor living spaces only. This product is not intended for commercial
or industrial uses. The power supply (model 6803DC only) is for home
appliances only.
The manufacturer assumes no responsibility for damage or injury
caused by failure to follow these instructions, improper product use, or
unauthorized product modication. Any such actions will invalidate the
product warranty.
WARNING – When using electrical appliances, basic precautions
should always be followed to reduce the risk of re, electric shock and
injury to persons, including the following:
WARNING
Risk From Unintended Use and Handling. Please take care to
follow these guidelines to avoid risks to people or property:
- Do Not tamper with or modify this product in any way.
- Do Not use this product outdoors or directly exposed to weather.
- Do Not use this device in tropical humid climates. If the product is
brought in from the cold to a warm area (e. g., during transport),
condensation can occur within the unit. Let the device reach room
temperature, before using it.
- Do Not use this product on wet surfaces. Do not use this product in
a bathtub, shower or locate product where it may fall into a bathtub,
laundry, swimming pool or other water container.
- Do Not immerse this product in water or allow water to drip into the
motor housing.
IMPORTANT INSTRUCTIONS
READ AND SAVE THESE INSTRUCTIONS

5
English
4English
DISPOSAL
Dispose of all packaging materials in an environmentally
responsible manner.
with any external (solid state) speed control device.
- To reduce the risk of re or electric shock and injury to persons, do
not use in a window.
- The plug portion of the adapter is used as a disconnect device.
Therefore, the appliance should be placed near the socket outlet
and easily accessible.
WARNING
Risk to Children and Other At-risk Groups ofPeople:
- This appliance can be used by children ages 12 years and above and
persons with reduced physical, sensory or mental capabilities or lack
of experience and knowledge if they have been given supervision
or instruction concerning use of the appliance in a safe way and
understand the hazards involved.
- Children shall not play with the appliance.
- Cleaning and user maintenance shall not be conducted by children
without supervision.
- This product and its packaging material are not toys and should be
kept out of reach of children.
WARNING: KEEP NEW AND USED BATTERIES AWAY FROM
CHILDREN. The remote control supplied with this product contains a
button cell battery. Leaking or damaged batteries can cause burns on
contact with skin. The battery could potentially be a choking hazard
for children. If the button cell battery is swallowed it can cause severe
internal burns in just 2 hours and can lead to death. If you think the
battery may have been swallowed or placed inside any part of the body
seek immediate medical attention.
Lock Release
Button
D
C
Installing Circulator Head (Model 6803DC Only)
No tools required!
1. Gently place the circulator head face down on the ground on a
soft cloth to avoid scratches or damages to the unit. Insert power
cord into the top of pole (A) and pull through the bottom (B). Align
the Lock Release Button (C) on circulator head with the hole (D)
located on the pole. Push the pole onto the circulator head until
the Lock Release Button snaps into place.
A
B
Stand Assembly (Model 6803DC Only)
1. The upper pole and lower pole are pre-assembled, with the
fastening nut (E) secured on the underside of the base. Rotate
fastening nut counter- clockwise to remove.
2. The legs are designed to t into the grooves (F) on the underside
of the base cap. Assemble all the legs onto the pole, then
replace fastening nut by rotating clockwise to secure all the legs
in place.
E
F
GETTING STARTED

7
English
6English
Adjusting Height (Model 6803DC Only)
1. Before adjusting the height of the circulator, support the
circulator head with one hand. Use your other hand to loosen the
height adjustment collar by gently rotating it counter-clockwise.
2. Slowly raise or lower the pole to the desired height and secure
into position by rotating the adjustment collar clockwise until tight.
Air Accelerator
G
Cord Management
1. Wrap cord around Air Accelerator, located on back of
unit. Secure cord with three clips (G) located at 2, 6 and 10
o'clock positions.
FEATURES
SILICON FEET
Non-marking feet added
for stability.
FINGER FRIENDLY
DESIGN
Resists curious ngers.
DIRECTABLE AIRFLOW
Direct the airow where
you want it.
CORD MANAGEMENT
Integrated cord wrap.
REMOTE CONTROL
Convenience at your ngertips.
ENERGY-SAVING TIMER
1–12 hour timer.
TOUCH-SENSITIVE
CONTROLS (99 SPEEDS)
A speed setting for every
comfort level.

9
English
8English
CONTROLS
Model 5303DC, 6303DC, 7503DC Only
SPEED/TIMER
ADJUSTMENT BUTTONS -/+
TIMER BUTTON
POWER ON/OFF
SPEED/TIMER
INDICATOR DISPLAY
TIMER BUTTON
POWER ON/OFF
1. Insert DC power cord plug
into port that extends from
the bottom of circulator.
2. Connect the AC power
cord to the power supply.
3. Plug the power cord into
a power outlet.
POWER SUPPLY
(24V DC/2.5 AMP)
CONTROLS
Model 6803DC Only
SPEED/TIMER
ADJUSTMENT
BUTTONS -/+
SPEED/TIMER
INDICATOR DISPLAY

11
English
10 English
HOW TO USE
4. To adjust timer, repeat Step Three.
5. To cancel timer, repeat Step Three and
set timer for 0.
CORD MANAGEMENT
1. Wrap cord around Air Accelerator,
located on back of unit. Secure cord with
three clips located at 2, 6 and 10 o'clock
positions.
1. Touch to power on.
Your circulator returns to last saved
memory setting.
2. Select desired speed by pressing -/+.
Press and hold -/+ to adjust speed up
or down in 5 speed increments. Speed is
indicated by number shown on Speed/
Timer Indicator Display.
3. Press to activate timer. The
illuminates and Speed/Timer Indicator
Display ashes 0to indicate Timer
Adjustment Mode. While in this mode,
select amount of time in one-hour
intervals by pressing -/+. After three
seconds, ashing stops and display shows
hours to indicate timer is set. The display
returns to the last speed selected. Touch
to quickly tell how many hours are
remaining on the timer.
REMOTE CONTROL
Screwdriver required.
1. For battery replacement, the remote
requires one coin style 3V CR2032 battery.
Always use the correct size and grade of
battery for this product.
2. To replace battery, open battery door on
the back side of the remote control (you
will need to loosen the small screw on
door using a #1 Phillips screwdriver). If
necessary, clean the battery contacts and
also those of the device prior to battery
installation. Remove any plastic protection
from the battery and place it in the
remote with the +side facing out. Ensure
the battery is installed correctly with
regard to polarity. Replace the battery
door and screw.
Note: Remove battery from the remote
control when not in use for an extended
period of time and always remove dead
battery immediately and replace with fresh.
Do not store dead battery in remote.
The remote control functions are the same as
the control panel on the circulator.
The remote requires a line-of-sight path to
allow for the signal to be received by the
circulator. Point the remote control at the
display panel for best reception.
Your circulator remote includes (1) coin style 3V CR2032 battery. Battery comes pre-installed. Remove battery pull tab before rst use.
POWER
TIMER
SPEED/TIMER
ADJUSTMENT -/+

13
English
12 English
GRILL & BLADE REMOVAL
REMOVABLE GRILL
1. Using a phillips head screwdriver, remove grill by unscrewing the
4 screws located along the perimeter of the inlet grill at roughly
2, 5, 7, and 10 o’clock positions. This will release the grill. To
reattach, position grill so the logo in the center of the grill is
straight. Align the Locator Pin to reconnect grill. Once aligned
replace screws.
2. Dust or wash with a mild dishwashing soap. Do not place grill in
the dishwasher. The excessive heat can distort the plastic.
BLADE REMOVAL
1. It is possible to remove the blade should something accidentally
get wrapped around the motor shaft. First, remove the nut from
the shaft. Turn the nut clockwise to loosen. Pull the blade straight
out from the shaft. When replacing, the blade can only go on the
shaft one way. Be certain the at side of the shaft aligns directly
with the corresponding at side on the blade’s socket. Push the
blade all the way on the shaft until it bottoms out. Do not use a
hammer as this could result in bearing damage. Reinstall nut.
2. Wipe blade with a damp cloth. If your Air Circulator is used in a
greasy environment, such as a kitchen, mild soap or a common
household cleaner may be necessary. Do not use solvents.
WARNING: To reduce the risk of electrical shock and injury to persons, unplug the circulator before removing blade.
Screw
ScrewScrew
Screw
Locator Pin
CLEANING
Because your product moves a substantial amount of air, it will need regular cleaning to remove lint, dust and grime. Never clean the product in
any manner other than instructed in this owner's guide.
WARNING
Observe the following safety information to avoid risks and
property damage.
Do unplug your product before cleaning.
Do Not use gasoline, thinners, solvents, ammonias or other
chemicals for cleaning.
Do Not attempt to repair or replace parts.
The motor is permanently lubricated and requires no oiling.
1. Dust or wipe the circulator with a damp cloth.
2. Use the brush attachment on your household vacuum cleaner to
vacuum any accumulated dust.

15
한국어
14 English
TROUBLESHOOTING
POSSIBLE CAUSE AND SOLUTIONPROBLEM
Unit is not plugged in. Plug Power Cord into electrical outlet. Model 6803DC Only - Ensure the AC power
cord is plugged into the power supply and ensure DC power cord is plugged into the circulator.
Ensure unit fan speed setting is selected.
Unit is damaged or in need of repair. Cease usage and unplug. Contact Consumer Service for assistance.
The outlet is worn or damaged. Try another outlet or contact a qualied electrician.
Unit set to a low speed setting. Adjust to a higher speed setting.
Airow is blocked. Remove obstruction.
Adjust direction of airow towards the user.
Under certain conditions, it is possible for a reset GFCI (Ground Fault Circuit Interrupter) outlet to trip
when the user is changing speeds on a Vornado circulator. In this event, change to an outlet that is not
connected to a GFCI device. It could also indicate a weak or defective GFCI outlet. Contact a qualied
electrician to check the GFCI outlet.
The battery is dead. Replace with (1) new 3 volt CR2032 battery. Refer to REMOTE CONTROL.
The remote requires a line-of-sight path to allow for the signal to be received by the unit. Position the unit
so the receiver lens (located inside the display panel) is visible from the remote control.
The unit fails to power on.
Airow is weak or slow.
GFCI has tripped.
Remote control is
notworking.
중요 설명 ............................................................................................ 16
시작하기 ............................................................................................. 19
특징.................................................................................................... 21
제어 장치 ............................................................................................ 22
사용 방법 ............................................................................................ 24
리모콘 ................................................................................................ 25
그릴 및 날 분리 ................................................................................... 26
청소.................................................................................................... 27
문제 해결 ............................................................................................ 28
목차

16 한국어 17
한국어
이 사용자 가이드와 모든 추가적 삽입 내용은 제품의 일부로 봅니다. 이
문서들은 안전, 사용 및 폐기에 관한 중요한 정보를 포함하고 있습니다.
제품을 사용하기 전에 모든 작동 및 안전 관련 설명을 파악해 주십시오.
나중에 참고할 수 있도록 모든 사용설명서를 보관하고, 다른 사람에게
제품을 양도할 때도 본 사용설명서를 제품과 함께 전달해 주십시오. 우리의
소유자의 가이드의 최신 버전에 대 한 우리의 웹사이트를 참조 하십시오.
다음의 경고 메시지가 이 사용자 가이드에서 사용됩니다.
위험
방지하지 않을 경우 사망 또는 심각한 상해를 유발할 수 있는 높은 수준의
위험을 나타냅니다. 이 높은 수준의 위험을 피하기 위한 설명에 특히
주의하십시오.
경고
방지하지 않을 경우 사망, 심각한 상해, 사소하거나 보통 수준의 상해 또는
자산 피해 가능성을 유발할 수 있는 중간 수준의 위험을 나타냅니다.
중요 설명
장치의 취급을 돕는 추가 정보를 나타냅니다.
사용 용도: 이 제품은 실내 거주 공간에서 공기를 순환시키는 용도로만
사용되어야 합니다. 이 제품은 영업용 또는 산업용이 아닙니다. 전원 공급
장치(6803DC 모델만 해당)는 가전 기구 전용입니다.
제조사는 이 설명의 미준수, 부적절한 제품 사용 또는 권한이 없는 제품
개조로 인한 피해 또는 상해에 대해 책임을 지지 않습니다. 이러한 경우 제품
보증이 무효화됩니다.
경고 – 전기 기구를 사용할 때는 화재 위험, 감전 및 인명 상해를 줄이기 위해
다음과 같은 기본적 예방 조치를 따라야 합니다.
경고
부적절한 사용 및 취급의 위험. 인명 또는 자산에 대한 위험을 방지하기 위해
이 지침을 따르십시오.
- 이 제품을 어떤 방법으로도 변경하거나 개조하지 마십시오.
- 이 제품을 실외 또는 외부 환경에 직접 노출된 곳에서 사용하지 마십시오.
- 이 장치를 열대의 습한 기후에서 사용하지 마십시오. 이 제품을 찬 곳에서
따뜻한 곳으로(운반 등에 의해) 옮길 경우, 장치 내부에 응결이 발생할
수 있습니다. 사용 전에 장치 온도가 실온에 도달하도록 하십시오.
- 이 제품을 물기가 있는 표면에서 사용하지 마십시오. 이 제품을 욕조,
샤워실에서 사용하거나, 욕조, 세탁실, 수영장 또는 기타 물이 담긴 곳에
빠질 수 있는 곳에 두지 마십시오.
- 이 제품을 물에 담그지 말고, 모터 외함 안으로 물이 흘러 들어가지 않도록
하십시오.
- 전원 공급 장치(6803DC 모델만 해당) 또는 전원 코드가 물 또는 물기
있는 장소에 접촉하지 않도록 하십시오.
- 이 제품을 노, 난로, 스토브 또는 기타 고온 열원 가까이에서 사용하지
마십시오.
- 전원 공급 장치 또는 (6803DC 모델만 해당) 전원 코드를 히터 또는
라디에이터 등의 열원 옆에 두지 마십시오.
중요 설명
설명서를 읽으신 후 보관하여 주십시오
- 이 제품을 커튼 또는 기타 늘어진 천 제품에 너무 가까이 두지 마십시오.
제품에 커튼이 끌려 들어가서 기류를 막아 모터가 손상될 수 있습니다.
- 코드 부분으로 본 제품을 들어 운반하거나 코드를 손잡이 삼아 사용하지
마십시오. 내부 배선이 손상될 수 있습니다. 코드를 당겨 플러그를
뽑거나 코드에 압력을 가하지 마십시오. 플러그를 뽑을 때는 코드를 잡지
않고 플러그를 잡습니다.
- 코드를 카펫 밑으로 지나가게 하지 마십시오. 코드를 깔개, 가구 덮개
또는 이와 유사한 덮개로 덮지 마십시오. 코드가 가구 또는 가전 기기
아래로 지나가지 않도록 하십시오. 코드는 통행 구역이 아니면서 걸려
넘어질 염려가 없는 곳으로 지나가야 합니다. 걸려 넘어질 위험을
방지하기 위해 전원 코드를 안전하게 말아 놓거나 보관합니다.
- 이 장치는 (1) 리튬 코인 셀 배터리를 (CR2032), 3 볼트 (포함) 필요
합니다. 배터리 폐기 하지 마십시오 화재에. 배터리 폭발 또는 누출 수
있습니다.
위험
감전의 위험. 전압이 인가된 전선이나 부품과 접촉할 경우 생명이 위험할 수
있습니다!
- 제품에 포함된 분리형 외부 전원 공급 장치와 코드만을 사용하십시오
(6803DC 모델만 해당).
- 물기가 있거나 습한 손으로 제품을 만지지 마십시오.
- 손상된 코드 또는 플러그와 함께 사용하거나 제품 오동작 후 또는 바닥에
떨어지거나 손상된 상태로 사용하지 마십시오. 제품을 폐기하거나 공인
정비 시설에 보내 점검 및/또는 수리를 받아 위험을 방지합니다.
- 분리형 외부 전원 공급 장치와 코드에는(6803DC 모델만 해당) 사용자가
교환하는 부품이 없습니다. 전원 공급 장치 또는 코드가 손상되면,
위험을 방지하기 위해 제조사 또는 서비스 대행사 또는 이와 동등한
유자격자가 교환해야 합니다.
- 전원 코드를 당기거나 압력을 가하지 마십시오.
- 이물질이 입구 또는 출구에 들어가지 않도록 하십시오. 감전, 화재의
위험이 있으며 제품이 손상될 수 있습니다.
- 플러그를 뽑기 전에 모든 제어 장치를 끕니다. 오랫동안 사용하지 않을
때는 벽 콘센트에서 플러그를 뽑아 놓습니다.
- 기구 외함을 열지 마십시오. 감전의 위험을 방지하기 위해 모든 정비 및/
또는 수리는 보네이도 공인 서비스 센터만이 시행할 수 있습니다. 정품
교환 부품만을 사용해야 합니다.
- 안전을 위해 뇌우 시에는 항상 장치의 플러그를 뽑아 놓으십시오.
경고
부적절한 설치의 위험. 인명 또는 자산에 대한 위험을 방지하기 위해 이
지침을 따르십시오.
- 벽 전원 콘센트에 쉽게 접근할 수 있어서 비상 시 장치를 분리할 수 있도록
해야 합니다.
- 화재 또는 감전의 위험을 줄이기 위해, 이 제품을 외부 (솔리드 스테이트)
속도 제어 장치와 함께 사용하지 마십시오.
- 화재 또는 감전 및 부상의 위험을 줄이기 위해, 창문 안에서 사용하지
마십시오.
- 어댑터의 플러그 부분이 분리 장치로 사용됩니다. 그러므로 콘센트 부근에
기구를 두어야 하며 쉽게 접근할 수 있어야 합니다.
경고
어린이 및 기타 위험군에 대한 위험
- 이 기구는 12세 이상의 어린이와 신체, 감각 또는 정신적 능력이
감소되거나 경험 및 지식이 부족한 사람이 지도를 받거나 기구의 안전한
사용 관련 설명을 듣고 관련 위험을 이해한 경우에 사용할 수 있습니다.
- 어린이가 이 기구를 가지고 놀아서는 안 됩니다.
- 청소 및 사용자 정비를 어린이가 지도를 받지 않는 상태에서 수행해서는

18 한국어 19
한국어
안 됩니다.
- 이 제품과 포장재는 장난감이 아니며, 어린이의 손이 닿지 않는 곳에
두어야 합니다.
경고: 새 전지나 사용한 전지는 어린이의 손에 닿지 않는 곳에 두십시오. 이
제품과 함께 제공되는 리모콘에는 단추형 전지가 들어 있습니다. 내용물이
새거나 손상된 전지는 피부 접촉 시 화상을 유발할 수 있습니다. 전지가
어린이의 질식을 유발할 위험도 있습니다. 단추형 전지를 삼킬 경우, 단 2
시간 이내에 심각한 내부 화상을 입어 사망에 이를 수도 있습니다. 전지를
삼켰을 수 있다고 판단되거나 신체 부위 안에 들어 갔을 경우 즉시 의료
조치를 받으십시오.
폐기
환경적 책임을 준수하는 방법으로 모든 포장재를 폐기하십시오.
잠금 해제 버튼
공기순환기 헤드의 설치(6803DC 모델만 해당)
공구는 필요가 없습니다.
공기순환기 헤드를 아래로 향하도록 하여 장치에 흠집이나 손상이 생기지
않도록 바닥 위 부드러운 천 위에 살짝 내려놓습니다. 전원 코드를 기둥의
상부(A)에 삽입하여 바닥(B)을 통과시켜 당깁니다. 공기순환기 헤드에 있는
잠금 해제 버튼(C)을 기둥에 있는 구멍(D)과 맞춥니다. 잠금 해제 버튼에서
딱 소리가 나면서 고정될 때까지 기둥을 공기순환기 헤드에 눌러 넣습니다.
스탠드 조립(6803DC 모델만 해당)
1.
기둥 상부와 하부는 미리 조립되어 있으며, 조임 너트(E)가 기초부
아래에 결합되어 있습니다. 조임 너트를 반시계 방향으로 돌려서
분리합니다.
기초부 캡의 아래에 있는 홈(F)에 다리가 결합되도록 설계되었습니다.
다리를 모두 기둥에 조립하고, 조임 너트를 시계 방향으로 돌려서 모든
다리를 제자리에 고정합니다.
E
F
시작하기
D
C
A
B

20 한국어 21
한국어
높이 조정(6803DC 모델만 해당)
1.
공기순환기의 높이를 조정하기 전에, 공기순환기 헤드를 한 손으로
지지합니다. 다른 손으로 높이 조정 고리를 반시계 방향으로 살살 돌려
풉니다.
2.
원하는 높이까지 기둥을 천천히 올리거나 내리고, 조정 고리가
빡빡해질 때까지 시계 방향으로 돌려 고정합니다.
공기순환기
G
코드 관리
1.
공기순환기의 뒤쪽에 코드를 감습니다. 2시, 6시, 10시 방향에 있는
클립 3개(G)로 코드를 고정합니다.
특징
하부 지지대
실리콘 재질로 바닥에 자국이
남지 않음.
안전한 설계
손가락이 들어가지
않습니다.
각도조절
원하는 방향으로
돌리십시오.
코드 관리
코드선을 감아 보관할 수
있습니다.
리모콘
손에 들고 편리하게 조작.
에너지 절약 타이머
1~12시간 타이머.
터치 감응 제어
1~99단계 속도 설정.

22 한국어 23
한국어
제어 장치
5303DC, 6303DC, 7503DC 모델만 해당
속도/타이머 조정 버튼 -/+
타이머 버튼
전원 ON/OFF
속도/타이머 표시 화면
1. DC 전원 코드 플러그를
공기순환기의 바닥에서
나오는 포트에 삽입합니다.
2. AC 전원 코드를 전원 공급
장치에 연결합니다.
3. 전원 코드를 전원 콘센트에
꽂습니다.
제어 장치
6803DC 모델만 해당
타이머 버튼
전원 ON/OFF
전원 공급 장치
(DC 24V, 2.5A)
속도/타이머 조정 버튼 -/+
속도/타이머 표시 화면

24 한국어 25
한국어
1. 을 터치하면 전원이 켜집니다.
전원을 켜면 마지막으 설정한 속도 단계로
작동합니다.로
2. -/+ 버튼을 눌러 원하는 속도를 선택합니다.
속도를 5단계씩 높이거나 낮추려면 -/+
버튼을 길게 누릅니다. 속도/타이머 표시
화면에 속도가 숫자로 표시됩니다.
3. 을 누르면 타이머가 작동됩니다.
이 켜지고 속도/타이머 표시 화면에 0이
점멸하여 타이머 조정 모드임을 나타냅니다.
이 모드에서 -/+ 버튼을 눌러 1시간 단위로
시간을 선택합니다. 3초 후에 점멸이 멈추고
타이머가 설정된 것을 표시하기 위해
타이머를 보여 줍니다. 화면이 마지막으로
선택된 속도로 돌아갑니다. 을 터치하면
타이머에 몇 시간이 남았는지를 빨리 알 수
있습니다.
사용 방법
4. 타이머를 조정하려면 다시 '3' 번의
작동법을 실행합니다.
5. 타이머를 취소하려면 다시 '3' 번의 작동법을
실행하여타이머를 0으로 설정합니다.
코드 관리
1. 보네이도 뒤쪽에 코드를 감습니다. 2시, 6
시, 10시 방향에 있는 클립 3개로 코드를
고정합니다.
리모콘
스크류 드라이버 필요입니다.
1. 리모콘 전지를 교환하려면 동전형 3V
CR2032 전지 1개가 필요합니다. 반드시 이
제품에 맞는 정확한 크기 및 등급의 전지를
사용하십시오.
2. 전지를 교환하려면 리모콘 뒤쪽의 전지
덮개를 엽니다(#1 스크류 드라이버로 덮개의
작은 나사를 풀어야 합니다.). 필요 시 전지
설치 전에 전지와 장치의 접점을 닦습니다.
전지에 플라스틱 보호 캡이 있으면 제거하고
+측을 바깥쪽으로 하여 리모콘에 넣습니다.
전지를 극성에 맞게 정확히 삽입해야 합니다.
전지 덮개 및 나사를 다시 설치합니다.
보네이도 리모콘에는 동전형 3V CR2032 전지가 포함됩니다(1). 전지는 삽입되어 있습니다. 최초 사용 전에 전지에서 탭을 제거하십시오.
전원 ON/OFF
타이머 버튼
속도/타이머 조정
버튼 -/+
주: 오래 사용하지 않을 때는 리모콘에서 전지를
빼고, 다 사용한 전지는 반드시 즉시 새 것으로
교환합니다. 다 사용한 전지를 리모콘 안에
두지 마십시오.
리모콘의 기능은 보네이도 제어 패널과
동일합니다.
보네이도가신호를 받을 수 있도록
리모콘으로부터 직선 경로가 형성되어야
합니다. 최상의 수신 상태를 위해서는 리모콘을
화면 패널 방향으로 향하십시오.

26 한국어 27
한국어
그릴 및 날개 분리
분리형 그릴
1. 드라이버로 흡기 그릴의 주위 대략 2시, 5시, 7시 및 10시 방향에
있는 나사 4개를 풀어 그릴을 분리합니다. 그러면 그릴이 분리됩니다.
다시 장착하려면 그릴의 중앙에 있는 로고가 똑바르게 되도록
결합합니다. 나사를 정렬하여 다시 그릴을 연결합니다. 정렬이 되면
나사를 다시 조입니다.
2. 주방용 세제로 먼지를 제거하고 세척합니다. 그릴을 식기 세척기에
넣지 마십시오. 과도한 열로 인해 플라스틱이 변형될 수 있습니다.
날개 분리
1. 뜻하지 않게 모터 축에 뭔가가 감겼을 경우 날을 분리할 수 있습니다.
먼저 축에서 너트를 분리합니다. 너트를 시계 방향으로 돌려 풉니다.
날을 축으로부터 똑바로 당겨서 분리합니다. 다시 설치할 때는 날이
축에 한 방향으로만 들어갈 수 있습니다. 축의 납작한 부분을 날
소켓에서 상응하는 납작한 부분과 맞춥니다. 축을 따라서 날을 바닥에
닿을 때까지 쭉 밀어 넣습니다. 베어링이 손상될 수 있기 때문에
망치는 사용하지 않습니다. 너트를 다시 설치합니다.
2. 날개를 젖은 천으로 닦습니다. 주방처럼 기름이 많은 환경에서
보네이도를 사용할 경우, 순한 비누 또는 일반 가정용 세제가 필요할
수 있습니다. 용매는 사용하지 마십시오.
경고: 감전 및 상해의 위험을 줄이기 위해, 날개를 분리하기 전에 보네이도의 플러그를 뽑으십시오.
나사
나사나사
나사
표시 핀
청소
제품에 많은 양의 공기가 유입됨으로 정기적인 청소로 먼지 등의 이물질을 제거해야 합니다. 이 사용자 가이드에 설명된 방법 외에 어떤 방법으로도
제품을 청소해서는 안 됩니다.
경고
위험 및 자산 피해를 방지하기 위해 다음 안전 정보를 준수하십시오.
청소 전에는 제품의 플러그를 뽑습니다.
휘발유, 시너, 솔벤트, 암모니아 또는 기타 화학 물질을 청소에 사용하지
마십시오.
부품의 수리 또는 교체를 시도하지 마십시오.
모터에는 윤활유를 투입할 필요가 없습니다.
1. 젖은 천으로 보네이도의 먼지를 제거하거나 닦습니다.
2. 솔 부품을 부착한 가정용 진공 청소기를 사용하여 먼지를 제거합니다.

28 한국어
문제 해결
가능한 원인 및 해결책문제
보네이도의 플러그가 꽂혀 있지 않습니다. 전원 코드를 전기 콘센트에 꽂습니다. 6803DC 모델만 해당 - AC
전원 코드가 전원 공급 장치에 꽂혀 있고 DC 전원 코드가 공기순환기에 꽂혀 있는지 확인합니다.
보네이도 팬 속도 설정이 설정되어 있는지 확인합니다.
보네이도가 손상되었거나 수리가 필요합니다. 사용을 중지하고 플러그를 뽑습니다. 고객 서비스 센터에
연락하여 도움을 받습니다.
콘센트가 닳거나 손상되었습니다. 다른 콘센트를 사용해 보거나 유자격 전기 기술자에게 연락합니다.
보네이도가 저속으로 설정되어 있습니다. 고속 설정으로 조정합니다.
바람이 차단되어 있습니다. 장애물을 제거합니다.
사용자를 향해 바람 방향을 조정합니다.
특정 조건에서는 사용자가 보네이도 보네이도의 속도를 변경할 때 누전 차단기 콘센트가 작동할 수 있습니다.
이런 경우 누전 차단기에 연결되지 않은 콘센트로 바꿉니다. 누전 차단기 콘센트가 약하거나 결함이 있을 수
있습니다. 유자격 전기 기술자를 통해 누전 차단기 콘센트를 점검합니다.
배터리가 모두 소모되었습니다. 3 V CR2032 배터리를 새 것으로 교체합니다(1). '리모콘' 참조.
보네이도가 신호를 받을 수 있도록 리모콘으로부터 직선 경로가 형성되어야 합니다. 수신기 렌즈(화면 패널 안에
위치)가 리모콘으로부터 보이도록 장치를 놓습니다.
보네이도의 전원이 켜지지
않습니다.
바람이 약하거나 느립니다.
누전 차단기가 작동했습니다.
리모콘이 작동하지 않습니다.
This manual suits for next models
3
Table of contents
Languages: