VR Avionics LSI User manual

LSI
Log Sync Interface
user guide
Updated: 28 September 2021
Copyright 2021 by VR Avionics

LSI user guide
© 2021 VR Avionics Inc.
All rights reserved.
This User and Installation uide and the information contained herein is the proprietary data of
VR Avionics. No part of this manual may be reproduced, copied, transmitted, disseminated or stored in
any storage medium, for any purpose without the express written permission of VR Avionics, Inc.
VR Avionics hereby grants permission to download a single copy of this manual and of any revision to
this manual onto a hard drive or other electronic storage medium to be viewed for personal use,
provided that such electronic or printed copy of this manual or revision must contain the complete text
of this copyright notice and provided further that any unauthorized commercial distribution of this
manual or any revision hereto is strictly prohibited. Information in this document is subject to change
without notice. VR Avionics reserves the right to change or improve its products and to make changes in
the content without obligation to notify any person or organization of such changes. Visit the
VR Avionics website (www.vravionics.com) for current updates and supplemental information concerning
the use and operation of this and other VR Avionics products.
VR Avionics
www.vravionics.com
09/28/21 © 2021 VR Avionics page 2 of 11

LSI user guide
Contents
Operation......................................................................................................................4
Logging Data......................................................................................................................................................................4
Synchronizing History.......................................................................................................................................................5
Interfacing via USB.............................................................................................................................................................6
Doing Diagnostic Tests...............................................................................................................................................7
Adjusting Configuration Settings.............................................................................................................................8
Updating Firmware.......................................................................................................................................................9
Installation..................................................................................................................10
Electrical Connection.......................................................................................................................................................10
Mounting Considerations..............................................................................................................................................10
Configuration...............................................................................................................11
eneral Settings................................................................................................................................................................11
CAN Bus Interface Speed..........................................................................................................................................11
Log File Incremental Reference Number..............................................................................................................11
09/28/21 © 2021 VR Avionics page 3 of 11

LSI user guide
Operation
The LSI is a handy accessory that logs, synchronizes, and interfaces with any CAN bus equipped VR LRU.
VR Avionics line-replaceable units (LRU's) constantly send out detailed operational information over CAN
bus, and the LSI is able to capture and log all of it to memory card – a micro SD card in this case. This
card can be left in the LSI without much worry of running out of memory, and should something of
interest have occurred during a passed flight, the card can then be extracted and the log file
conveniently inspected on a PC.
Additional to this, the LSI can retrieve and clear data that was recorded on a LRU itself, for example TSLM
history logs. This synchronization can easily be done using the same micro SD card used for logging.
For more maintenance related operations, the LSI can also directly connect to a PC via USB cable. This
enables troubleshooting tasks such as diagnostic testing of different components, but also firmware
updating to unlock future features and settings adjustment to fine tune operation.
Besides an electrical connector, a slot for a micro SD card, and a slot for a USB cable, the LSI comes
equipped with LO and SYNC lights to provide helpful feedback.
Logging Data
To log operational data you need a FAT32 formatted micro SD card with enough free space, and the
following folder structure:
●Root folder named “LSI”,
●Folder named “LO ” within the “LSI” folder
Note that should you wish to temporarily disable logging at any point while leaving the card in the LSI,
you may simply rename the LO folder to something different, such as “#LO ”, and when you want to
resume logging again rename it back to “LO ”.
Only when a FAT32 formatted micro SD card with the prescribed folder structure is present in a powered
LSI, will logging be performed. The LO light will indicate whenever logging is in progress.
The LSI will create a new log file inside the LO folder at power-up and continue to log all operational
data of any connected VR LRU to that file until power down. Each log file is named LO #####.VRL
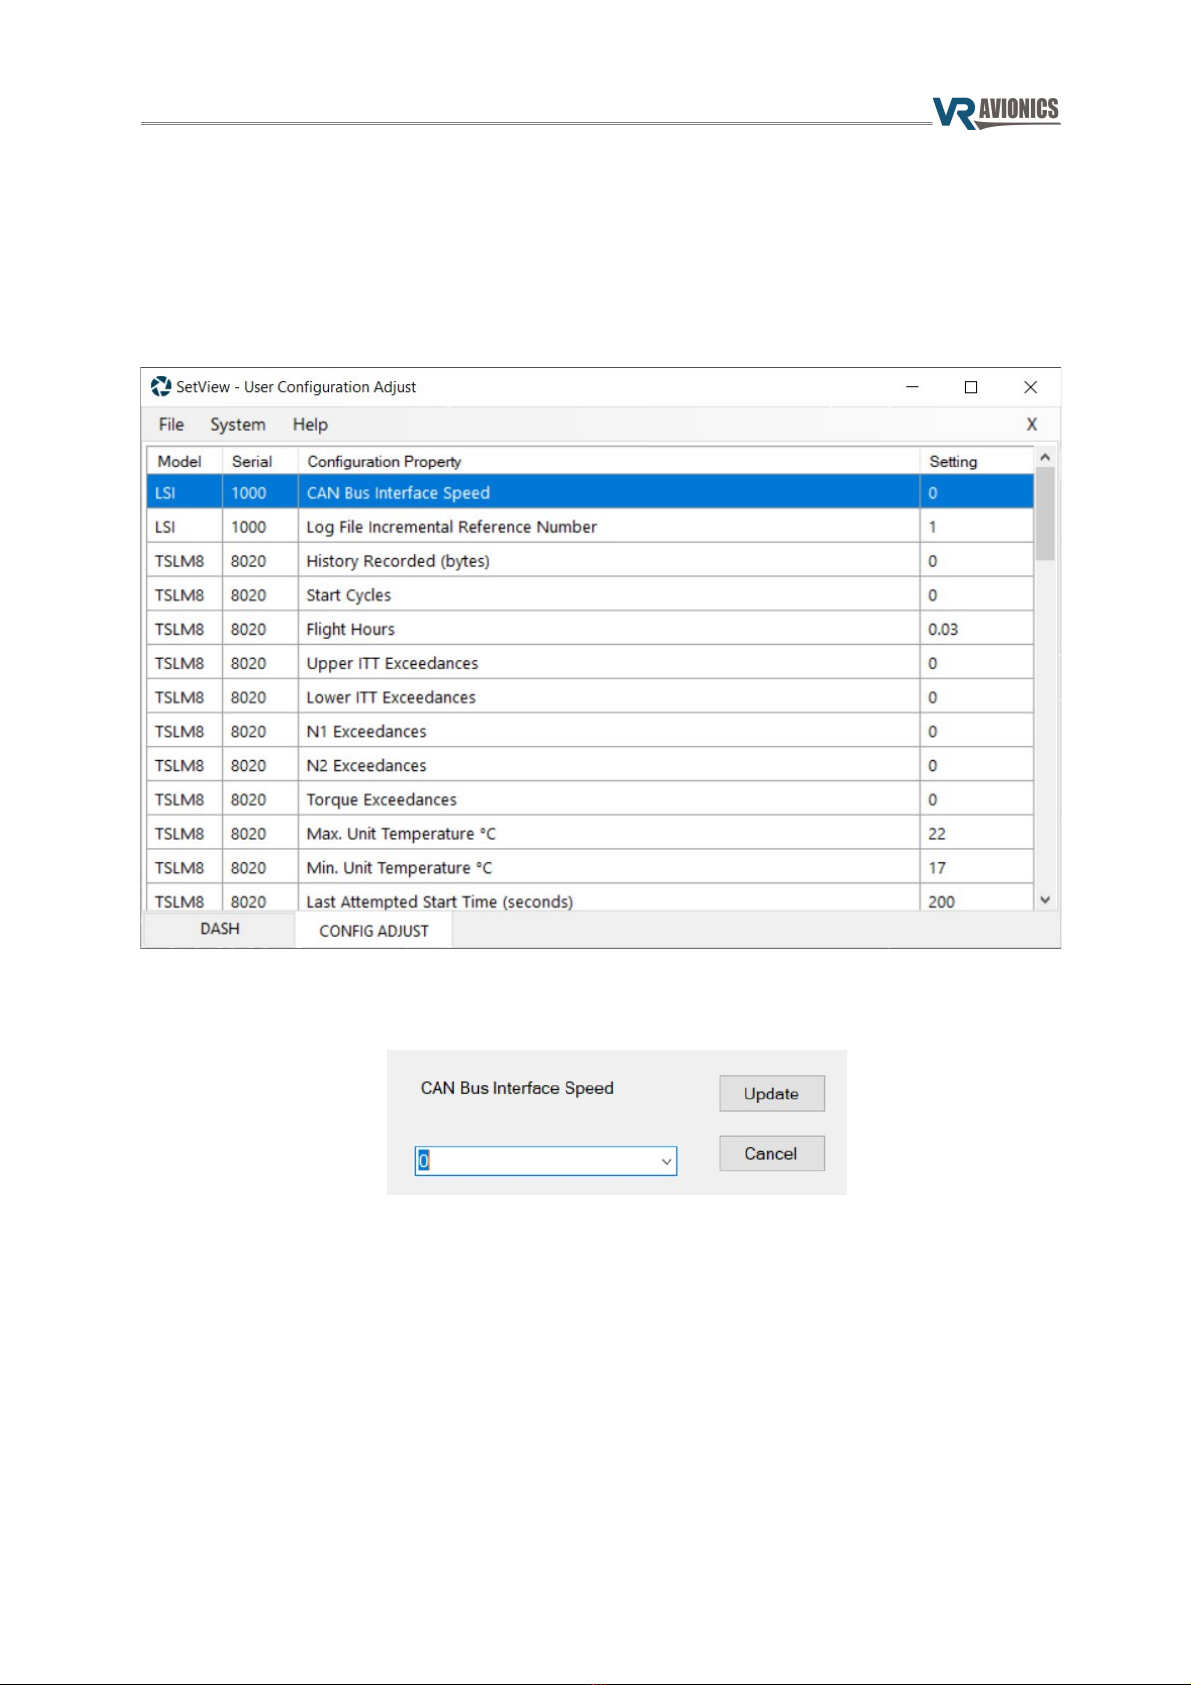
where ##### constitutes a number from 0 to 99999. This number corresponds to a LSI configuration
setting called Log File Incremental Reference Number. Each new power up this number is automatically
incremented. You may override this configuration setting or any other as explained later in this guide.
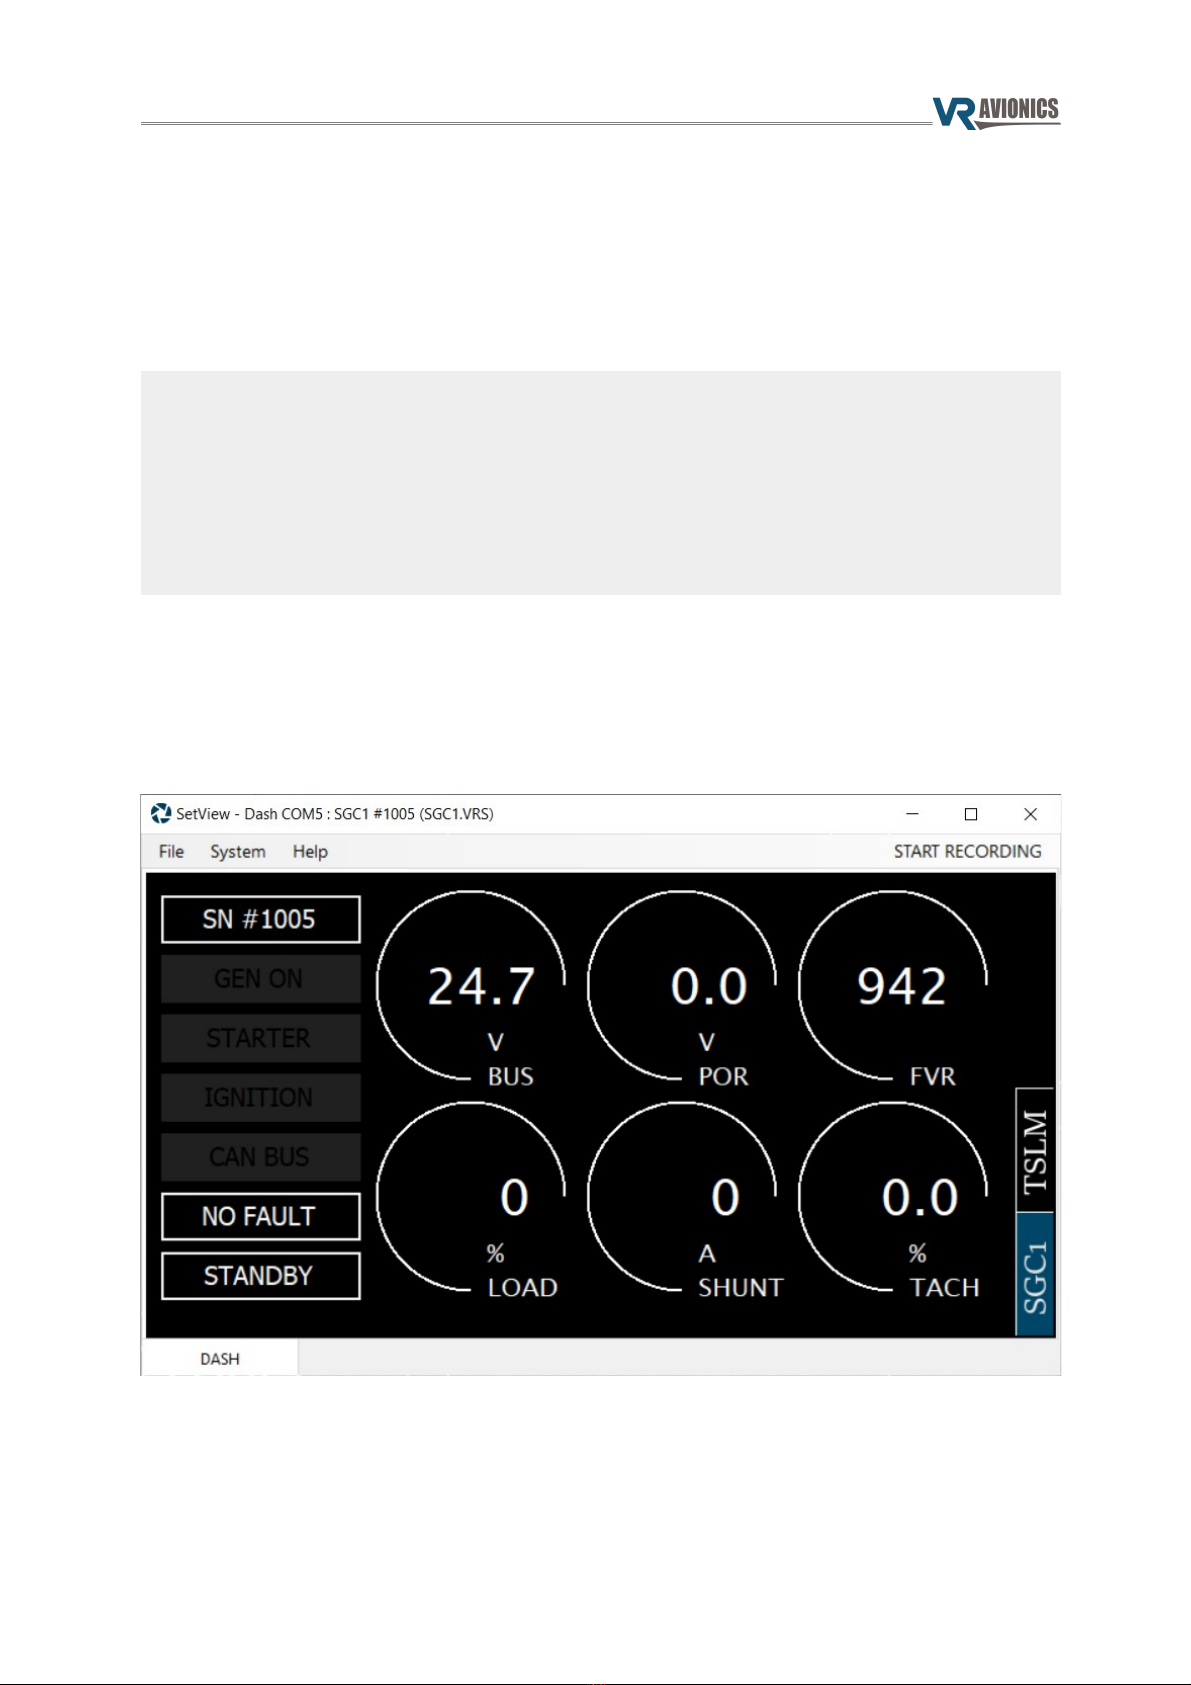
To view any log file, open SetView and select File → Open Log File... from the top menu. Then browse to
the log file you want to view and select Open.
09/28/21 © 2021 VR Avionics page 4 of 11

LSI user guide
Synchronizing History
To synchronize LRU recorded logs you need a FAT32 formatted micro SD card with enough free space,
and the following folder structure:
●Root folder named “LSI”,
●Folder named “SYNC” within the “LSI” folder
●Folder named “HIST” or “HIST#” within the “SYNC” folder
Note that the micro SD card used for logging can also be used for synchronization.
Right after power up the LSI will check to see if a folder named “HIST” or “HIST#” exists within the SYNC
folder, and if so activate the SYNC light to indicate that a synchronization operation is in progress.
During synchronization the recorded logs on each connected LRU are retrieved to a history file in the
HIST folder and then cleared on the LRU. On completion of this the SYNC light turns off and operation
resumes as normal.
Also at completion, should the HIST folder have been named “HIST”, the LSI will automatically rename
this folder to “#HIST”. The purpose of changing the name is to ensure that synchronization takes place
only once, and that the next time the LSI powers up no synchronization will be done. This necessitates
the user to actively rename the “#HIST” back to “HIST” (or “HIST#”) to enable another synchronization.
Note that with the HIST folder named “HIST#” synchronization will be performed at each power up
before resuming normal operation.
The LSI will create a new history file inside the HIST folder only if logs with a size larger than zero was
retrieved. Each history file is named MMMMSSSS_#.VRH where MMMM constitutes the LRU name (for
example “TSLM”), SSSS constitutes the LRU serial number, and # a unique number that automatically
increments every time.
To view any history file, open SetView and select File → Open History File... from the top menu. Then
browse to the history file you want to view and select Open.
09/28/21 © 2021 VR Avionics page 5 of 11

LSI user guide
Interfacing via USB
To perform certain maintenance tasks a USB cable may be used to connect the LSI to a Windows PC
(laptop, desktop, or tablet). The LSI accepts a micro USB type B plug.
On the PC, our SetView software (available from vravionics.com) should be installed. Plugging in the USB
cable will introduce a new COM port (for example “COM5”). After starting up SetView make sure this
new COM port is selected by clicking on the top menu System → Serial Port.
If the COM port does not show up in SetView, you need to install the following driver on your PC:
Universal Windows Driver for USB Interfacing to the LSI
Click on the link above to download the driver zip file to your PC's Downloads folder. When complete,
double-click on the file to open it in Windows File Explorer. Click on the Extract All button to extract
(unzip) the contents into a new folder. From this folder, double-click on CP210xVCPInstaller_x86.exe if
you have 32-bit Windows, or CP210xVCPInstaller_x64.exe if you have 64-bit Windows. Follow the
instructions until the driver installation is complete.
With the correct COM port selected in SetView, and the LRU system powered (including the LSI), the
Dash panel should appear on SetView similar to that shown below.
A tab will appear (in the lower right side) for each VR LRU present on the CAN bus. You can click on
these tab(s) to select and view other LRU Dash instruments.
The example below shows the Dash panel for S C1, with a optional TSLM tab to that LRU's Dash.
From here maintenance tasks may be performed as described in the next sections.
09/28/21 © 2021 VR Avionics page 6 of 11

LSI user guide
Doing Diagnostic Tests
To perform a diagnostic test for a particular LRU, ensure this LRU's tab is selected on the bottom right
side of the Dash panel in SetView (see example in previous section).
Now select the diagnostic test you want performed from the SetView top menu:
System → Diagnostic Function → (test you want performed)
The example below shows a diagnostic test being performed on the interrupter valve via a TSLM.
09/28/21 © 2021 VR Avionics page 7 of 11

LSI user guide
Adjusting Configuration Settings
To make adjustments to the configuration settings of any LRU (including that of the LSI), select from the
SetView top menu:
System → Adjust Configuration
The example below shows the configuration adjust tab for a LSI with connected TSLM.
You may double click on or scroll to the setting you want adjusted and hit enter. The example below
shows that done for the CAN Bus Interface Speed setting for the LSI.
09/28/21 © 2021 VR Avionics page 8 of 11

LSI user guide
Updating Firm are
To update LRU firmware (or change the application running on it), select from the SetView top menu:
System → Change Application
Starting with a dialog box asking whether to update the LSI firmware, subsequent dialog boxes will ask
the same for those LRU's. Below is an example of a dialog box for a TSLM with serial number 8020:
Click Update to update, and Cancel to skip updating specific LRU firmware.
The example below shows the progress bar to expect after clicking “Update” to a dialog box.
When the process of doing or skipping updates have been completed for each connected LRU, the Dash
panel (similar that shown here) should again appear.
09/28/21 © 2021 VR Avionics page 9 of 11

LSI user guide
Installation
Electrical Connection
Electrical connection of the LSI is via only four wires – power and ground as well as the two CAN bus
lines, CAN-H and CAN-L. It works from 12V or 24V aircraft electrical systems and draws very little current.
The circuit below shows how to hook up the LSI to any theoretical system.
The pins used for CAN-H and CAN-L are specified in each LRU's operational and installation manual.
Mounting Considerations
The LSI can be mounted anywhere that is convenient to reach, whether to plug in a USB cable or to
insert (or extract) a micro SD card. Since the unit is housed in a plastic enclosure, locations exposing it to
excessive heat should be avoided.
09/28/21 © 2021 VR Avionics page 10 of 11

LSI user guide
Configuration
The LSI have adjustable configuration settings that determine how it functions. These settings can be
accessed by Windows laptop or PC running our SetView software connected via USB cable to the LSI.
These settings can be viewed by performing from SetView a “Synchronize”, and adjusted by performing
an “Adjust Configuration” operation (as described earlier).
General Settings
# Configuration Setting Minimum Maximum Factory
1 CAN Bus Interface Speed 0 4 0
2 og File Incremental Reference Number 0 99999 0
CAN Bus Interface Speed
This sets the speed in Kbps (kilo bits per second) of the CAN bus interface. Options are as follows:
For LRU's to communicate with each other
all of them need to run at the same speed.
Log File Incremental Reference Number
This sets the number (#####) in the log file name (shown below) for the next time logging is performed.
Note that this number is automatically incremented after a new log file was created, meaning this setting
typically does not need any adjustment.
LO #####.VRL
For example, if this number is 123, the next log file name will be LO 00123.VRL
09/28/21 © 2021 VR Avionics page 11 of 11
Setting CAN Bus Speed (Kbps)
0 142.8 (default)
1 125
2 250
3 500
4 1000
Table of contents