WALDENT ENDO PRO SMART-TOUCH User manual

ENDO PRO SMART-TOUCH
USER MANUAL
W A L D E N T
TM

Contents
1 Introduction..........................................................................................................1
1.1 Product introduction......................................................................................1
1.2 Model, Dimensions and Weight of the main unit ...............................................2
1.3 Structure......................................................................................................2
1.4 Intended use ………………………….……………………………………………………2
1.5 Contraindications .........................................................................................2
1.6 Components ................................................................................................3
1.7 Classification of the device.......................................................................……5
1.8 Technical specifications....................................................................…………5
2 Notice……………………………………………………………………...………………………5
3 Installation.. ………………………………………………………………..……….……………6
3.1 Connecting the Contra-angle and Motor handpiece............ ...…….. ……………6
3.2 Connecting the Main unit and Handpiece
3.2 Connecting the Main unit and Handpiec3.2 Connecting the Main unit and Handpiece............…….……………………………...6
3.3 Connecting the Main unit and Components............…….……………………………7
3.4 Automatic shutdown …. …...……………………………………………………….…….7
4 Equipment instructions...……………………………………………………………...……..…7
4.1 Instructions for root canal length-measurement mode……..…….....………………7
4.2 Root canal length mode operating instruction……………………….........…………9
4.3 Instructions for the usage of Endo Motor …………………………………………… 9
4.4 Operation Instructions…………………………………………………....……..…......13
5 Troubleshooting……. .…………………………………………………………………………15
6 Cleaning and sterilization ..…….. ……………………………………………………………16
7 Storage, maintenance and transportation ………………………………………………….16
7.1 Storage ……………………………………………………………………………………16
7.2 Maintenance ……………………………………………………………………………16
7.3 Transportation .........……………………………………………………………………16
8 Environmental Protection……. ………………………………………………………………17
9 Standard symbols………………………………………………………………………………17
10 Statement………………………………………………………………………………………17

1. Introduction
1.1 Product introduction
Endo Motor is a supporting device of endodontic treatment, through enlarging the root-canal, helping the
dentists to finish the endodontic treatment. This endo motor is built with apex locator, which can achieve both
enlarging-and-measuring.
1.1.1 Main features:
1) Equipped with multi-frequency root canal measurement technology, enable both length measurement
and enlargement.
2) Large touch LED screen.
3) 330 degrees rotary contra-angle.
4) Built-in different files systems.
5) 4 working modes:
A Forward rotation Symbol:
Intelligent sensing the surface pressure of a NiTi file, when the torque reaches the setting limit, the motor will
auto-reverse. Once the surface pressure is removed, the NiTi file will rotate continuously in the original direction.
B Reverse rotation Symbol:
6) Six functions: Apex Locator, Reciprocating rotary motion, Automatic deceleration in apical zone,
Automatic reversion in apical zone, Automatic reversion of torque, Root-canal length measuring
and enlargement simultaneously.
7) The main accessories (Contra-angle, File Clip, Lip Hook, Touch Probe,handpiece base and
Rubber Case) could be sterilized in high temperature and pressure to avoid cross infection.
1.2 Model, Dimensions and Weight of the main unit
Model: EndoPro Smart-Touch
1.3 Structure
EndoPro Smart-Touch is composed of main unit, motor handpiece, contra-angle, measuring wire, file clip,
lip hook, touch probe,rubber case, handpiece base and adapter.
1.4 Intended use
EndoPro Smart-Touch is an electronic device used for enlarging root canal. This product is only used in
hospital, clinics or dental offices by qualified dental personnel.
1.5 Contraindications
The EndoPro Smart-Touch is not recommended for use:
a) On patients with pacemakers or other implanted electrical devices, or those who have been cautioned by
their physicians against the use of small electric appliances such as shavers, hair dryers, etc.
b) On patients allergic to metals.
c) On children.
C Reciprocating motion Symbol:
D Auto-torque control Symbol:
Intelligent sensing the surface pressure of a NiTi file, when the torque reaches the setting
limit, the motor will reciprocate rotation instead of the reverse mode until the stress is reduced.
Once the surface pressure is below the preset torque value, the NiTi file will rotate continuously
in the original direction.
The reciprocating motion angle is adjustable, 30º、60º、90º、150º、180º、210º、250º、
370º for clockwise and anticlockwise, and combination freely.
Dimensions of Main Unit :82×99×127mm
Weight of Main Unit: 306g
12

1.6 Components
1)The structure figure of the device(Fig.1 )
Fig.1 Product appearance structure
ON/OFF Button
Screen
Charging Indicator
Charging Port
Handpiece port
Measuring Port
Battery cover
2)The figures of the main accessories. (Fig.2)
i Adapter
Fig. 2 The figure of the main accessories
34
Motor handpiece
j handpiece base

1.7 The classification of the device
1) Type of protection against electric shock: Class II internally powered equipment.
2) Degree of protection against electric shock: Type B applied part.
3) Degree of protection against harmful liquid immersion: Ordinary equipment (IPX0).
4) Device not suitable for use in the presence of flammable anesthetic mixtures with air, oxygen
or nitrous oxide.
5) Operation mode: Continuous operation.
1.8 The main technical specifications
7.4/1500mAh
DC10.0V
The buzzer will alert when the files less than 2mm closed to the apex
Battery
Power
Revolving speed
Operation condition
Buzzer alert
Environment temperature
Relative humidity
Atmospheric pressure
2. Notice
2.1 Please read the user manual carefully before the operation.
2.2 While being in function, the scale indicator on the EndoPro Smart-Touch screen does not
represent a distinct length or distance in mm or other linear units. It simply indicates the file progression
moves toward the apex.
2.3 While being in function, the following patient's related factors may influence accurate readings:
Blocked root canals, Cracked root canals, Perforated root canals, Root fracture or perforation, Metal
crowns or bridges contact with the file or the lip file, The inner liquid link to the outer liquid of root canals,
Very dry root canals, The file or the file clip contact with other metal or instruments.
2.4 Inaccurate or incorrect readings due to the environment are likely to occur in the following cases:
a) Presence of portable or movable radio frequency transmitters in the surroundings.
b) Electromagnetic interference could cause improper operation of the device.
2.5 This device has electromagnetic interference which is similar to other devices, patients or doctors
with pacemakers are forbidden to use this device.
2.6 While being in operation, the apical position is located to the place apex locator screen indicates
“0.0”,as a safety precaution in order to avoid over-instrumentation, it is recommended to subtract
0.5 mm-1.0mm to determine the working length for shaping.
2.7 Do not use the files that are broken, crooked and those-that don’t Meet ISO standards to avoid any
kind of dangers.
2.8 Check the device for any loose connections, abnormal vibrations, noise or excessive heating
before usage. In such , stop using the device and contact the agent or manufacturer. an event
2.9 Please recharge the battery when the battery power is low when indicated.
2.10 Only use original accessories when using this device.
3. Installation
3.1 Connecting the Contra-angIe and Motor Handpiece(Fig. 3)
Locating point Locating point
Fig. 3 Explanation of connecting the contra- angle and handpiece
3.2 Connecting the Main unit and Handpiece(Fig. 4)
Torque
150rpm-1000rpm
0.6N.cm-4.6N.cm
0~40℃
10~85%RH
70kPa~106kPa
56
Triangle
symbol
Twin
arrow
Handpiece
port
The twin arrow of the handle tail plug is aligned with the triangular arrow above the plus
base on the left side of the main unit, and then inserted to connect the handle and the main unit.
When pulling out the handle connecting line, first press the gray plastic of the plus base with your
hand, and then pull the handle line out of the Handpiece port in the direction of the arrow.
Pull out
Insert
Fig. 4
1) Before using this instrument, clean all the parts which may have direct contact with patients.
2) Match the locating points of both contra-angle handpiece and motor handpiece to ensure good fit.

3.3 Connecting the Main unit and Components(Fig. 5)
Touch probe
Measuring wire
Main unit
File clip
Lip hook
Handpiece
base
Motor Handpiece
Single-head
measuring wire
Contra-angle Handpiece
Fig. 5 Explanation of connecting the main unit
3.4 Charge the battery
When the power indicator flashes, stop using the device and recharge the battery.
a) Connect the AC adapter with the right side socket of the device properly, and insert the AC
adapter plug to the power socket.
b) The green indicator light on the right side is on when charging, and the green indicator light is
off after charging It may take 4 hours for charging.
Attention: Don't use the device when it is charging.
3.5 Automatic shutdown
When not used for 4 minutes, this device will automatically shut down and all the display and
function will stop.
4. Equipment instructions
4.1 Instructions for root canal length-measurement mode
4.1.1 Length-measurement mode user and Connecting measuring wire
1) Press the ON/OFF button, turn it on.
2) Click the“Apex”on the screen.
3) , click the sound button icon on the right side of the After entering the root canal length mode
screen to turn on / off ( / ) the tip position prompt sound. This operation is only effective in the
root canal length Measuring mode
4) Insert the plug of measuring wire into the left side socket of main unit.
5) Insert the file clip and the lip hook into the two sockets of the measuring line.(Fig. 6)
6) Make the lip hook touch the file clip (as shown in Figure 7), the display
shows " " and reaches the " " area, indicating that the machine is in normal operation - - OVER
(Fig. 7). If there is no display,it means the file clip or measuring wire is damaged and must be
replaced.
fig.6 fig.7 fig.8
4.1.2 Instruction of the “APEX” Screen Display
A) When the File is far from the apical foramen: the blue indication bars are displayed. (Fig. 9)
b) When the File is near by the apical foramen, the green bars displayed.(Fig. 10)
c) When the file extrudes the apical foramen, the red bars are displayed.(Fig. 11)
d) The number of bars does not represent the distance till the apex, but only the proximity to
the apex.
fig.9fig.10 fig.11
78

4.2 Root canal length mode operating instruction
Insert the plug of measuring wire into the left side measuring port of main unit. Turn it on.
Click on the screen "Apex" to enter the mode of root canal length-measurement.
The instrument will automatically shut down after 4 minutes without operation. Press the volume
button to control volume of beep sound.
Hang the lip hook on the lip, and make sure that it contacts the oral mucosa as a reference
electrode.(Fig. 12)
Clip the metal part near the file shank vertically with the file clip, and then push the file
towards to the apex slowly, the continuous alarm will sound when the distance is less than 2mm.
Corner of mouth
Lip hook
File clip
push
File handle
Metallic part of file
Working and moving part of file
(Do not clamp on this part)
fig.12
abc
910
When the file reaches the apical position, adjust the measuring stop of the file set to the reference
point (incisal edge or fossa edge), then pull out the file, measure the length between the file tip and the
stop. And the length is the working length of the tooth. File clip can be replaced by touch probe
if it is inconvenient to measure the back teeth. (Fig.13)
Fig.13
File clip Measuring
file
Rubber stopper piece
Or
4.3 Instructions of Endo Motor
4.3.1 Instruction of the screen
Program1~9
Speed setting
APEX OFF/ON
File system built
Home page
Battery sign
Working mode
Torque setting
Setting of
apical zone
Root canal length
measuring area
1)Screen of “Program”
Fig.14

Fig.15
File Brand
Files name
File sizes
Clockwise angle Counter clockwise
angle
Working mode
Battery sign
3)Screen of “Recipro” and other functions(Fig.16)
Fig.16
2) Screen of “Rotary” (Fig. 15)
File Brand
Files name
Color of files
Speed
Working mode
Change File sizes
Torque
11 12
PREMIUM TAPER
W A L D E N T
TM
F2(25/08)
F3(30/09) F4(40/06) F5(50/05
W A L D E N T
TM
WAL-FLEX ONE
20/07
45/0525/07 35/06
3.2

WALFLEX GOLD
PREMIUM TAPER
WALFLEX GLIDE PATH
RETREATMENT FILE
WAL-FLEX ONE
REC
W A L D E N T
TM
4) Screen of “HOME” and “FILE system” (Fig. 17)
Introduction of
EndoPro
Smart-Touch
Brightness
File brand
File name
Calibration
Back to
factory setting
a: " " b: " "
Fig.17
4.4 Operation Instructions
1) Turn on the main unit, the screen shows the file system or parameters last time automatically.With memory
function. The instrument will automatically shut down after 4 minutes without operation.
2) Click the menu bar at the top of the screen to enter each interface to select operations.
3)Click "Program ", for entering user-defined parameters settings. Click the blue button " " to self-define and
store 9 programs, click the " "and " "keys to change the setting and parameters, and click " " to select
4 file working modes. If the "Apex " icon is " " it means the instrument enters root canal enlargement
function; and when the "Apex " icon is " " it means both length-measurement and enlargement.
When using the function of the combination of ENDO enlargement with apex locator, the motor speed will decelerate
automatically and faster beeps would be heard when near the apical zone, the motor will
automatically set in the auto reverse mode.
A Speed setting: Speed is from 150rpm to 1000rpm
B Torque setting: Torque is from 0.6N.cm to 4.6N.cm
Notice: If use the function of combination ENDO enlargement with apex locator, the
contra-angle must be covered by the rubber case.
4)Click " " to select different built-in file systems. After selecting the corresponding brand file,
click " " to select 4 different file working modes. If the "Apex" icon is " ",it means the
instrument enters root canal enlargement function; and when the "Apex" icon is " ",it means
both length-measurement and enlargement.
5)Insert the single head measuring wire plug into the measuring hole at the bottom of the handle,
insert the lip hook into the hole of the single head measuring wire, and insert the endodontic file
into the contra angle head. (Fig 18)
13
off
off
Insert into single
head measuring line hole
Insert the handle
into the tail line hole
7) Click the " " button in the lower right corner of the screen, and then click " " to adjust
the screen brightness;
8) Click the " " button in the lower right corner of the screen, and then click " " to enter
Fig.18 Fig.19
14
6) Turn the apex mode on and press the handIe button to make the motor
work. Use the bending head of the lip hook on the single head measuring wire to contact the
metal shaft of the part of the file (Fig. 18). The screen should display ’--" and reach the apical
area, accompanied by a quick beep. This means it can both measure root canal length and
also enlarge the canal in this mode. (Fig.19)

7. Storage, maintenance and transportation
7.1 Storage
1) Handle with care, far away from vibration source. Install or store in a cool, dry, well-ventilated area.
2) Do not store with toxic, corrosive, flammable, explosive items.
3) Store in environment of relative humidity no more than 85%, atmospheric pressure 70kPa ~ 106kPa,
temperature -10℃~ +50℃.
7.2 Maintenance
15
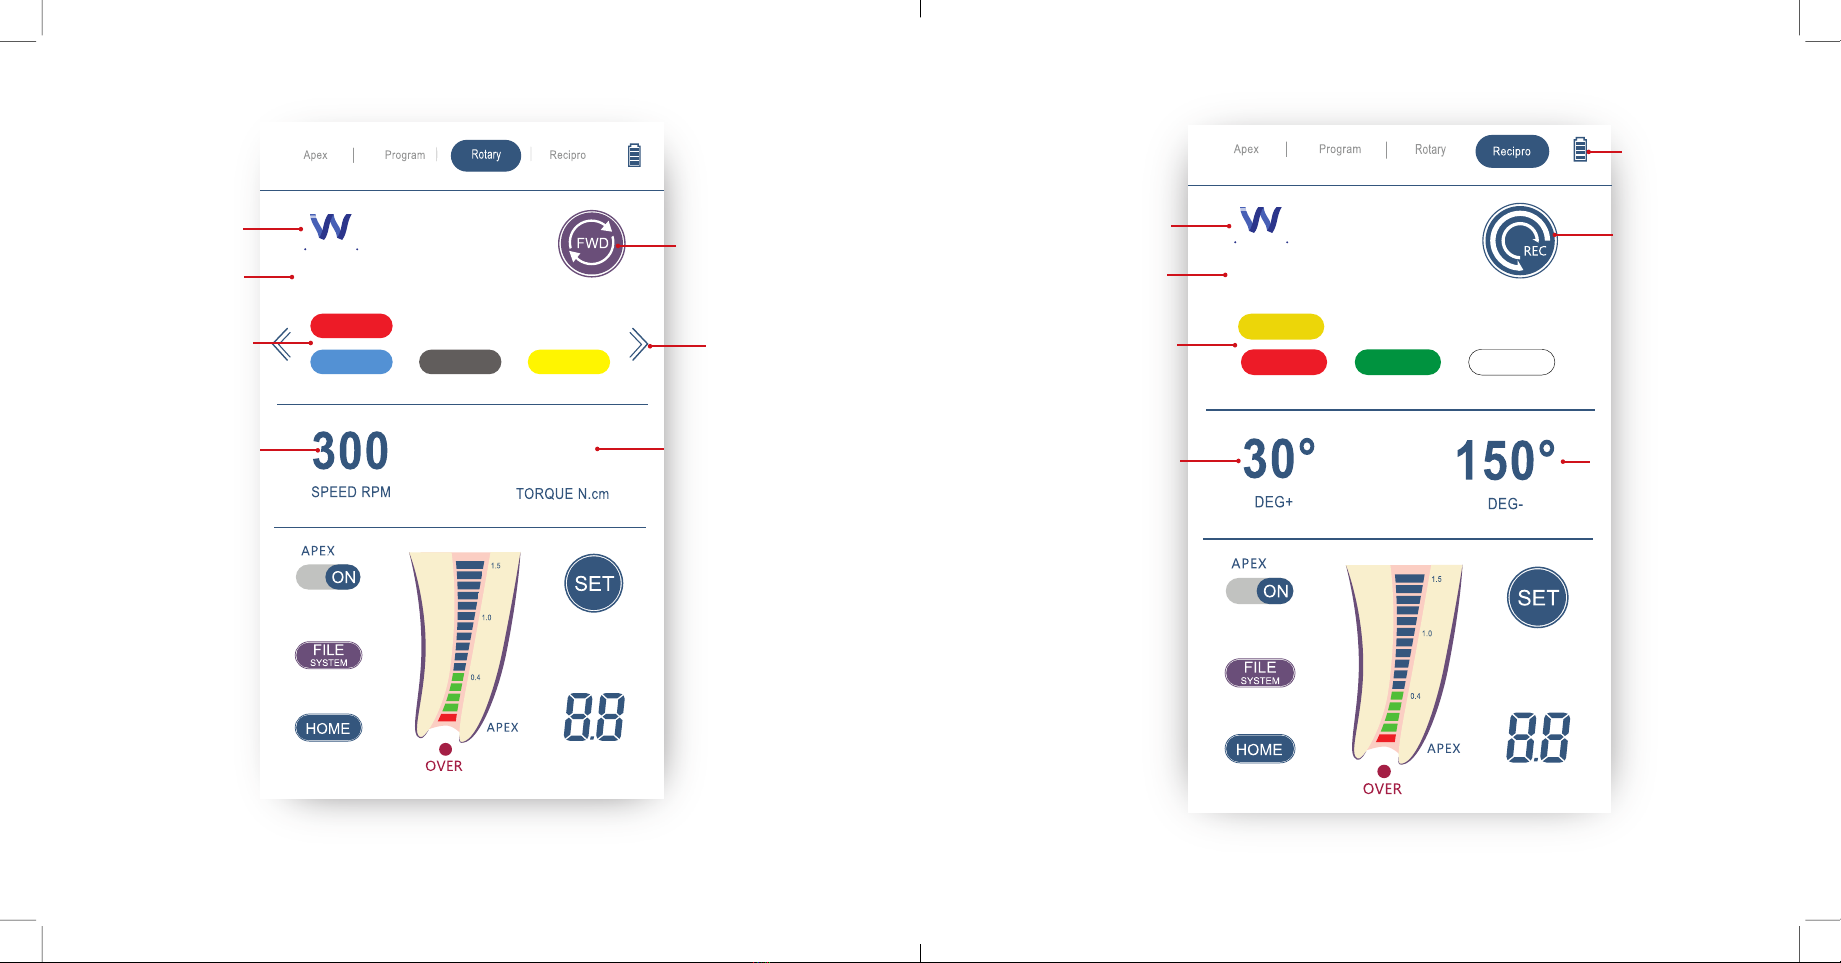
the automatic calibration, which is used when changing the contra-angle;
9) Click the " " button in the lower right corner of the screen, and then click " " to restore
factory settings.
10) Click the " " button in the lower right corner of the screen, then click " " to
enter the user guide, and press the "Quit" button to exit.
5. Troubleshooting
6Endo file doesn't work in
combination Enlargement with
apex locator mode
1. Root canal is too dry.
2. A poor connection of file clip or
measuring wire.
3. Oral mucosa is too dry.
4. The doubIe-head measuring
wire is connected to main unit.
5.Electromagnetic interference.
6.Poor conductivity of endo file
1. Lubricate the canal.
2. Secure the connection first.
3. Wet oral mucosa.
4. Replace with a single-head measuring
wire.
5 Please check the equipment used
nearby, away from interference sources.
6.Use endo file with good
conductivity.
No display on the screen after
turning it on
1
1. The incorrect battery
installation.
2. Low power.
1.Install the battery correctly.
2. Recharge the battery.
2
3
4
5
File is not working
1.The contra-angle handpiece
is not connected correctly.
2.Defective contra-angle handpiece
1.Reconnect the contra-angle
2.Replace the contra-angle
Endo file stops 1. Resistance is too large
2. Root canal not in ideal condition
1. Set a higher torque
2. Change to non-root-canal measuring mode.
Root canal measurement values
are inaccurate
1. Root canal in a bad Situation
2. Electromagnetic interference
1. Removal of liquid and residual pulp
2. Please check the equipment used
nearby, and be away from interference
Endo file does not reverse rotate
1. The mode with automatic
positive / reverse rotation
function is not selected.
2. A too large torque value was
set
3. Endo file does not reach the
root tip region.
1. Select automatic positive/reverse
rotation model
2. Set a lower torque value
3. Endo file will automatically rotate
when reaching root tip.
7File reversed too frequently
1. Resistance is too large
2. Root canal not in ideal condition
3. Root canal is narrow
4. Endo file is oversized
5. Electromagnetic interference
1. Set a higher torque
2. Removal of liquid and residual pulp
or change to non-root-canal measuring
model.
3. Root-canal enlarge
4. Replace with a smaller size file
5. Please check the equipment used
nearby, away from interference sources.
6. Cleaning and Sterilization
1) After use, all parts that have contacted with the patients should be wiped by sterilized towel.
2) Cleaning with chemical reagents may cause damage to the instrument.
3) Contra-angle, lip hook, clip, handpiece base,rubber case and probe must be autoclaved
before use.
4) Main unit, handpiece and measuring wire can't be autoclaved high temperature andunder
pressure.
1) The product does not contain any user-serviceable accessories. Instrument maintenance
should only be carried out by the professional trained maintenance personal.
2) If the battery is fully charged but does not allow the instrument to function for at least one day,
the battery must be replaced as soon as possible. Please use the original accessories, so as
not to cause damage to the instrument.
7.3 Transportation
Avoid excessive shock during transport, handle with care, keep away from dangerous goods
and avoid sun and rain. 16
Notice: lf the problem can't be solved , please contact the local distributors or manufacturer.

Manufacturer information:
UM-EMP-W20211222-Ver1.0
17
8. Environmental Protection
The product does not contain harmful ingredients. Please handle wastes on local disposal policy.
9. Standard symbols
IPX0
SN
Power on/off Used indoor only
Manufacturer
Date of manufacture
Serial number Attention, consult
accompanying document
Class II equipment Type B applied part
Direct current Ordinary equipment
10. Statement
All rights of modifying the product are reserved with the manufacturer without further notice.
The pictures are only for reference.
-10ºC
+50ºC
Recycle Keep dry
Handle with care Storage relative humidity
less than 85%RH
Storage atmospheric
pressure at 70kPa~106kPa Storage temperature at
-10℃~+50℃
Deal with the product according to the WEEE (2002/96/EC)
Table of contents
Other WALDENT Dental Equipment manuals
Popular Dental Equipment manuals by other brands

Eighteeth
Eighteeth Fast-Pack user manual

KaVo
KaVo MASTER lase Short instructions for use

Pelton & Crane
Pelton & Crane Spirit 3000 Series installation instructions

Jorvet
Jorvet J0453 user manual

Ivoclar Vivadent
Ivoclar Vivadent SR Ivocap operating instructions

Dentsply Sirona
Dentsply Sirona Midwest Stylus Plus operating instructions

Fona
Fona CDRelite B2272100 user guide

Mikrona
Mikrona MIGMA 200-E PLANNING / MOUNTING GUIDELINES

Saeyang
Saeyang Marathon Multi600 manual

Sirona
Sirona Sinius CS Installation requirements

KaVo
KaVo INTRA PROPHYwiz 181 P Instructions for use

Dentsply Sirona
Dentsply Sirona CEREC Omnicam AC operating instructions