D
GmbH &Co.KG · Weissenhorner Str. 2 · 89250 Senden · Germany
Tel. (+49) 0 73 09 / 8 72-22 · Fax (+49) 0 73 09 / 8 72-24
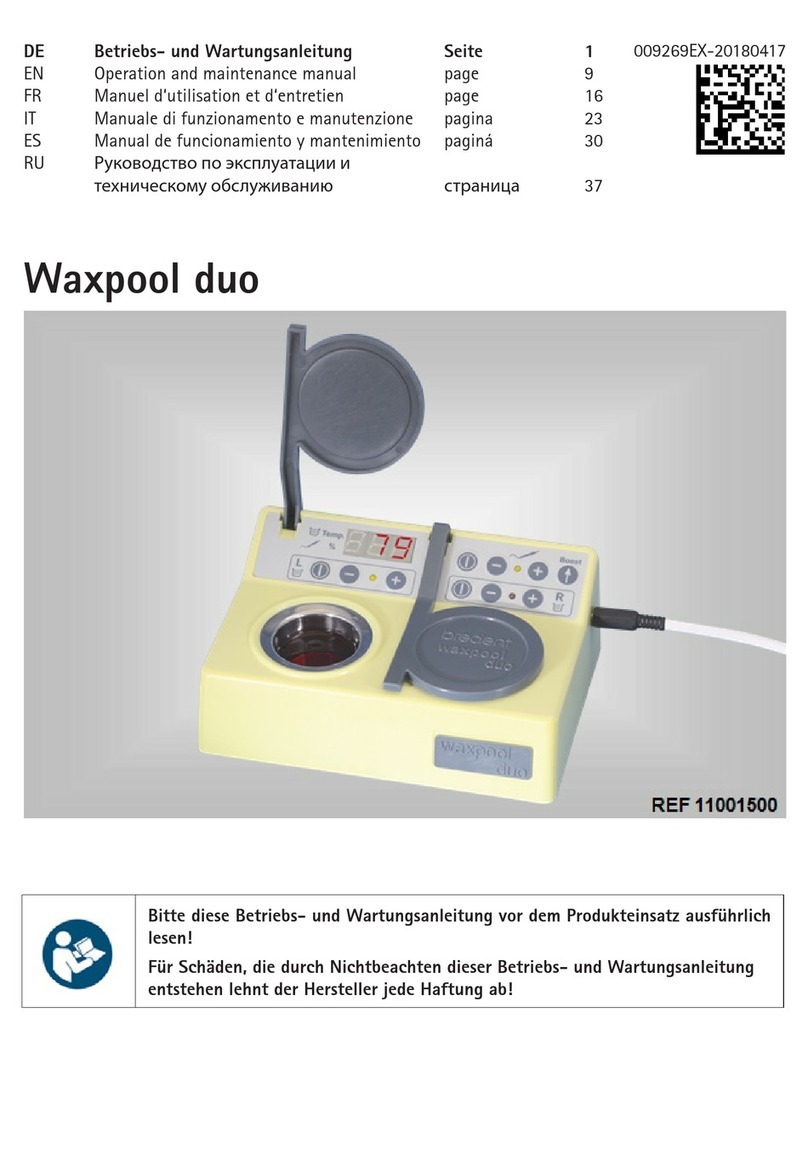
Waxpool duo
Bitte diese Gebrauchsanweisung vor dem Produkteinsatz ausführlich lesen!
1. Einsatz und Gebrauch
Der Waxpool duo ist für den Einsatz im Dental-Labor bestimmt. Es können Wachse erwärmt und durch das seitlich
anzubringende Wachsmesser gleichzeitig modelliert werden.
2. Technische Daten
Länge / Breite / Höhe 150 / 109 / 55 mm
Volt Input 100 bis 240 V / Output 24 V
Watt 34 W
Temperatur Tauchbecken 20 bis 120° C / 68 bis 148° F
Temperatur Wachsmesser 0 bis 240° C (Anzeige 0 bis 100)
GB
Instructions for use
Waxpool duo
Befor using the product, please read these instructions for use carefully!
1. Indication range
The Waxpool duo unit is intended for the use in the dental laboratory. It is used to heat waxes and also allows shaping
wax using the wax knife attached to the side of the unit.
2. Technical data
Length / Width / Height 150 / 109 / 55 mm
Voltage Input 100 to 240 V / Output 24 V
Wattage 34 W
Temperature - dipping basin 20 to 120° C / 68 to 148° F
Temperature - wax knife 0 to 240° C (display: 0 to 100)
Gebrauchsanweisung Mode d’emploi
Waxpool duo
Veuillez lire attentivement ce mode d’emploi avant d’utiliser le produit
1. Application
Le Waxpool duo est destiné à une utilisation en laboratoire de prothèse dentaire. Il permet de chauffer les cires et simul-
tanément de les sculpter à l’aide de la spatule.
2. Données techniques
Longueur / largeur / hauteur 150 / 109 / 55 mm
Volt Input 100 à 240 V / Output 24 V
Watt 34 W
Température Bac de trempage 20 à 120° C / 68 à 148° F
Température Spatule à cire 0 à 240° C (Affichage 0 à 100)
F
1a – 1c Starttaste
2, 4 und 6 Temperaturverringerung
3, 5 und 7 Temperaturerhöhung
8 Boost-Taste
9, 10 und 11 Kontrollleuchte
12 LED-Anzeige
13 und 14 Tauchbecken
15 Anschlussbuchse für Wachsmesser
16 Anschluss für Netzkabel
3. Allgemeine Hinweise
3.1 Prüfen, ob Netzdaten mit den Angaben auf dem Typenschild (siehe Gerätunterseite) übereinstimmen.
3.2 Der Waxpool duo ist nicht für den Einsatz in explosionsgefährdeter Umgebung bestimmt.
3.3 Bei Benutzung sind die einschlägigen Bestimmungen der Berufsgenossenschaft zu beachten (stets
Arbeitskleidung und Schutzbrille tragen).
3.4 Den Waxpool duo keinesfalls mit Druckluft reinigen.
3.5 Reparaturen dürfen nur von bredent oder von einem autorisierten Händler vorgenommen werden.
Bitte beachten:
- Die Oberfläche des Waxpool duo kann heiß werden – Verbrennungsgefahr!
- Auf dem Wachsmesser stets eine Modellierklinge aufsetzen. Das Heizelement kann sehr heiß werden –
Verbrennungsgefahr!
4. Aufstellen des Gerätes
Den Waxpool duo auf einer ebenen Fläche in Arbeitshöhe aufstellen. Auf sicheren Stand achten! Vorsicht – heißes Wachs
kann bei Schräghaltung auslaufen.
5. Inbetriebnahme
Das Kabel des Netzsteckers auf der Rückseite (16) des Gerätes einstecken und an eine Stromversorgung entsprechend den
Angaben des Typenschildes anschließen. Das Gerät macht einen Selbsttest, dabei leuchten die Kontrolllampen (9, 10 und
11) und die digitale Anzeige (12) kurz auf. Es wird die derzeitige Einstellung von °C oder °F angezeigt.
5.1 Digitalanzeige
Die Digitalanzeige zeigt immer den Wert des im Moment betätigten Arbeitsteils an. Blinkt die Kontrolllampe, so heizt das
entsprechende Arbeitsteil, leuchtet sie konstant, so ist die eingestellte Temperatur erreicht.
5.2 °C oder °F
Während des Selbsttestes wird die derzeit eingestellte Einheit (°C oder °F) angezeigt und bleibt für ca. 5 Sekunden sichtbar.
Durch das Betätigen der Tastenkombination 2 und 5 für 5 Sekunden wird die Einheit umgestellt.
5.3 Tauchgerät
Die Becken (13 und 14) des Waxpool duo zu 2/3 mit Wachs befüllen.
Die Tastenfelder mit der Umrahmung sind für die Tauchbecken vorgesehen. Den Heizvorgang der Tauchbecken durch
Betätigung der Taste „I“ (1a und 1b) für eine Sekunde drücken und starten, es wird die letzte Einstellung angezeigt, die
Kontrolllampe blinkt. Die Temperaturanzeige im Display erlischt nach 3 Sekunden. Die gewünschte Temperatur mit den
Tasten „-“ (2 und 4) und „+“ (3 und 5) einstellen. Nach erreichen der Temperatur leuchtet die Kontrolllampe konstant.
Die Tauchbecken können bis zu 120° C (148° F) aufgeheizt werden, dabei mit dem Finger die „+“-Taste gedrückt halten.
Beim Absenken der Temperatur mit dem Finger auf die „-“-Taste drücken und halten.
5.4 Wachsmesser
Das Kabel des Wachsmessers seitlich in die vorgesehene Buchse (15) einstecken. Den Heizvorgang des Wachsmessers
durch Betätigung der Taste „I“ (1c) für eine Sekunde drücken und starten, der zuletzt eingestellte Wert wird angezeigt.
Hier ist keine Temperaturanzeige vorhanden, sondern eine Wertangabe von 0 bis 100. Der Wert 100 entspricht einer
Temperatur von ca. 240° C, abhängig von der Klingenstärke. Die gewünschte Temperatur mit den Tasten „-“ und „+“ (6
und 7) einstellen. Ist nicht die höchstmögliche Temperatur eingestellt, so kann durch Betätigung der Taste „↑“ (Boost-
Taste, 8) die Endtemperatur eingestellt werden. Diese hält für 20 Sekunden die Temperatur und stellt sich anschließend
wieder automatisch auf den letzten Wert ein.
6. Reinigung
Das Gerät von außen nur mit einem feuchten Tuch bei gezogenem Netzstecker reinigen. Übergelaufenes Wachs und die
Tauchbecken mit einem Baumwolltuch abwischen. Die Deckel der Tauchbecken können im geöffneten Zustand entnommen
und gereinigt werden.
7. Sonstige Hinweise
Die Angaben dieser Gebrauchsanweisung werden stets den aktuellsten Ergebnissen und Erfahrungen angepasst. Wir
empfehlen daher, vor Benutzung eines neuen Gerätes, die Gebrauchsanweisung zu lesen. Diese unverbindlichen Anwender-
empfehlungen beruhen auf eigenen Erfahrungen. Der Benutzer ist für die Anwendung des Produktes selbst verantwortlich.
Für fehlerhafte Ergebnisse wird nicht gehaftet, da bredent keinen Einfluss auf die Weiterverarbeitung hat. Eventuell dennoch
auftretende Schadenersatzansprüche beziehen sich ausschließlich auf den Warenwert unserer Produkte.
Ausgabe: 22.10.07/0D
16 12 1c 6 11 7 8
15
5
10
4
1b
1a
2
9
3
16 12 1c 6 11 7 8
15
5
10
4
1b
1a
2
9
3
1a – 1c Start key
2, 4 and 6 Keys to reduce the temperature
3, 5 and 7 Keys to increase temperature
8 Boost key
9, 10 and 11 Control lamps
12 LED display
13 and 14 Dipping basins
15 Connection socket for wax knife
16 Connection for power cord
3. General information
3.1 Check whether mains voltage corresponds with the value/s printed on the type plate (see bottom of the unit).
3.2 The Waxpool duo unit is not intended for the use in areas subject to explosion hazard.
3.3 When working with the unit, the standard guidelines of the Association of Dentists and Dental laboratories must
be observed (working clothes and safety goggles must be worn).
3.4 The Waxpool duo unit must not be cleaned with compressed air.
3.5 Repair may only be carried out by bredent or an authorized dealer of bredent.
Please note:
- The surface of the Waxpool duo unit may become hot – risk of burns!
- Always attach a contouring blade onto the wax knife. The heating element may become very hot – risk of burns!
4. Setting up the unit
The Waxpool duo unit should be placed on a flat surface at working height. Stable position must be ensured. Caution
– hot wax may leak if the unit is not in a straight position.
5. Starting up
Plug the power cord into the socket at the rear (16) of the unit and connect the unit to the mains supply in accordance
with the values indicated on the type plate. The unit performs a self-test routine, the control lamps (9, 10 and 11) are lit
and the digital display (12) is lit for a short moment. The current setting for °C or °F is displayed.
5.1 Digital display
The digital display always shows the value of the working element that is being activated. If the control lamp flashes, the
respective working element is heated; if it is lit constantly, the set temperature has been reached.
5.2 °C or °F
During the self-test routine the currently set unit (°C or °F) is displayed for approx. 5 seconds. If keys 2 and 5 are pressed
for 5 seconds, the unit will be changed.
5.3 Dipping unit
Fill the basins (13 and 14) of the Waxpool duo unit - 2/3 – with wax.
The key pads with the border are used for the dipping basins. Press key „I“ (1a and 1b) for one second to start heating
up the dipping basins; the last setting is displayed and the control lamp flashes. After 3 seconds the temperature is no
longer displayed. Set the desired temperature using keys „-“ (2 and 4) and „+“ (3 and 5). When the temperature is reached,
the control lamp is lit constantly.
The dipping basins can be heated up to 120° C (148° F); while heating up, keep „+“ key pressed. When lowering the
temperature, keep „-“ key pressed.
5.4 Wax knife
Insert the plug of the cable of the wax knife into the respective socket (15) on the side of the unit. Press key „I“ (1c) for
one second to start heating up the wax knife; the last setting is displayed. No temperature is displayed but a value from
0 to 100. The value 100 corresponds to a temperature of approx. 240° C depending on the thickness of the blade. Set
the desired temperature using keys „-“ and „+“ (6 and 7). If the highest possible temperature has not been set, the end
temperature can be set by pressing the „↑“ (Boost key, 8). The temperature is maintained for 20 seconds and then the last
value (temperature) is adjusted again automatically.
6. Cleaning
The unit should only be cleaned on the outside with a damp cloth after it has been unplugged. Use a cotton cloth to remove
overflown wax and to clean the dipping basins. The lids of the dipping basins can be removed and cleaned.
7. Additional information
The information contained in these instructions for use is always updated according to the latest knowledge and expe-
rience. Therefore we recommend reading the instructions for use again before using a new unit. These non-binding user
recommendations are based on our own experience. The user himself is responsible for processing the product. Liability
for incorrect results shall be excluded since bredent does not have any influence on further processing. Any occurring
claims for damages may only be made up to the value of our products.
edition: 22.10.07/GB
16 12 1c 6 11 7 8
15
5
10
4
1b
1a
2
9
3
1a – 1c Touche mise en marche
2, 4 et 6 Baisse de la température
3, 5 et 7 Augmentation de la température
8 Touche Boost (accélération)
9, 10 et 11 Voyant témoin
12 Affichage à diodes
13 et 14 Bacs de trempage
15 Branchement spatule à cire
16 Branchement câble électrique
3. Généralités
3.1 Vérifier que la tension réseau soit conforme aux indications figurant sur la plaque d‘immatriculation située à l‘arrière
de l‘appareil.
3.2 Le Waxpool duo n’est pas destiné à une utilisation dans un environnement à risques explosifs.
3.3 Utiliser l‘appareil en respectant les consignes professionnelles (toujours porter une blouse et des lunettes).
3.4 Ne surtout pas nettoyer le Waxpool duo à l’air comprimé.
3.5 Seule la société bredent ou ses revendeurs agréés sont habilités à effectuer des réparations sur l‘appareil.
Observations:
- La surface du Waxpool duo peut être très chaude – risques de brûlure!
- Toujours mettre une lame en place sur la spatule. L’élément chauffant peut monter à une très haute température!
4. Installation de l’appareil
Installer le Waxpool duo sur une surface plane à la hauteur de travail requise. Veiller à ce qu’il soit bien stable afin
d’éviter des coulures de cire chaude!
5. Mise en route
Brancher le câble électrique sur l’arrière de l’appareil (16) et brancher la prise électrique sur une alimentation électrique
alimentée en courant correspondant à celui indiqué sur la plaque signalétique de l’appareil. L’appareil effectue un
autotest et les voyants (9, 10 et 11) et l’affichage numérique (12) s’allument un court instant. Le réglage en °C ou F°
sera alors affiché.
5.1 Affichage numérique
L’affichage numérique indique toujours la température actuelle de la spatule. Si le voyant témoin clignote, cela signifie
que la spatule est en cours de chauffe, s’il est allumé en fixe, cela signifie que la température réglée est atteinte.
5.2 °C ou °F
Au cours de l’autotest, l’unité de température paramétrée (°C ou F°) est affichée pendant 5 secondes. En appuyant sur
les touches 2 et 5 pendant 5 secondes, l’appareil se règle sur l’autre unité de température.
5.3 Appareil de trempage
Remplir de cire au 2/3 les bacs (13 et 14) du Waxpool duo.
Les touches avec un cadre concernent les bacs. Lancer le cycle de chauffe des bacs en appuyant sur la touche „I“ (1a
et 1b) pendant une seconde. Le dernier réglage s’affiche alors et le voyant clignote. La température demeure affichée
à l’écran pendant 3 secondes. Régler la température souhaitée avec les touches „-“ (2 et 4) et „+“ (3 et 5). Une fois la
température atteinte, le voyant est allumé en fixe. Les bacs peuvent être chauffés jusqu’à 120° C (148° F) en maintenant
enfoncée la touche „+“. Pour diminuer la température, maintenir enfoncée la touche „-“.
5.4 Spatule
Brancher le câble de la spatule sur le côté de l’appareil (15). Lancer le cycle de chauffe de la spatule en appuyant sur la
touche „I“ (1c) pendant une seconde. Le dernier réglage s’affiche alors, pas sous la forme d’une température mais sous
la forme de chiffres de 0 à 100. La valeur 100 correspond à une température d’environ 240° C en fonction de l’épaisseur
de la lame. Régler la température souhaitée avec les touches „-“ et „+“ (6 et 7). Si la plus haute température n’a pas été
paramétrée, appuyer sur la touche „↑“ (Touche Boost, 8) pour obtenir la température maximale. Cette température sera
maintenue pendant 20 secondes puis redescendra automatiquement à la dernière valeur paramétrée.
6. Nettoyage
Débrancher la prise puis nettoyer l’extérieur de l’appareil avec un chiffon humide. Essuyer les coulures de cire et les bacs
avec un chiffon en coton. Les couvercles des bacs en position relevée peuvent être retirés pour le nettoyage.
7. Divers
Les indications contenues dans ce mode d’emploi sont constamment révisées en fonction des dernières connaissances
et expériences acquises. Nous vous conseillons donc de relire le mode d’emploi avant d’utiliser un nouvel appareil. Les
conseils d’utilisation donnés n’ont qu’une valeur indicative et reposent sur notre propre expérience. L’utilisateur est seul
responsable de l’utilisation du produit. Aucune responsabilité du fabricant ne pourra être engagée en cas de résultats
défectueux, bredent n’ayant aucune influence sur les étapes ultérieures de mise en œuvre. Toute indemnisation éventuelle
se limitera à la valeur du produit.
édition: 22.10.07/0F
I
Istruzioni d´uso
Waxpool duo
Leggere attentamente le istruzioni prima dell’utilizzo del prodotto.
1. Campo d’utilizzo ed uso
L’apparecchio Waxpool duo è indicato per un utilizzo in laboratorio odontotecnico. È possibile riscaldare le cere e, grazie
alla spatola posta lateralmente, contemporaneamente modellarle.
2. Dati Tecnici
Lunghezza / larghezza / altezza 150 / 109 / 55 mm
Volt Input da 100 a 240 V / Output 24 V
Watt 34 W
Temperatura recipiente da immersione da 20 a 120° C / da 68 a 148° F
Temperatura spatola da 0 a 240° C (Indicazione da 0 a 100)
16 12 1c 6 11 7 8
15
5
10
4
1b
1a
2
9
3
1a – 1c Tasto avvio
2, 4 e 6 Riduzione della temperatura
3, 5 e 7 Aumento della temperatura
8 Tasto Boost
9, 10 e 11 Luci di controllo
12 Indicatore LED
13 e 14 Recipienti da immersione
15 Presa di allacciamento per la spatola
16 Innesto del cavo elettrico
3. Avvertenze generali
3.1 Verificare che i dati della rete concordino con i parametri tecnici indicati sulla targhetta di identificazione
dell’apparecchio (posta sulla parte inferiore dell’apparecchio).
3.2 L’apparecchio Waxpool duo non è indicato per un utilizzo in un ambiente a rischio di esplosione.
3.3 Durante l’uso si devono osservare le norme previste dall’associazione di categoria (indossare sempre
abbigliamento ed occhiali protettivi).
3.4 Non pulire mai l’apparecchio Waxpool duo con aria compressa.
3.5 Eventuali riparazioni devono essere effettuate dalla bredent o da un concessionario autorizzato.
Attenzione:
- Le superfici dell’apparecchio Waxpool duo possono diventare calde – pericolo di scottature!
- Applicare sempre una punta da modellazione sulla spatola. L’elemento riscaldante può diventare molto
caldo – pericolo di scottature!
4. Collocazione dell’apparecchio
Posizionare l’apparecchio Waxpool duo su una superficie piana e ad altezza del piano di lavoro. Assicurarsi che sia posi-
zionato in modo stabile! Prudenza – la cera calda, se l’apparecchio fosse inclinato può fuoriuscire.
5. Messa in funzione
Inserire il cavo di rete sulla parte posteriore dell’apparecchio (16) ed inserire la spina ad una presa di corrente, conforme ai
dati della rete indicati nella targhetta identificativa. L’apparecchio esegue un autotest, e pertanto in questa fase si illuminano
brevemente le luci di controllo (9, 10 e 11) e l’indicatore digitale (12). Appare l’attuale regolazione in °C od in °F.
5.1 Indicatore digitale
L’indicatore digitale indica sempre il valore dell’elemento dell’apparecchio che al momento è in funzione. Quando la luce
di controllo lampeggia, significa che l’elemento corrispondente si sta scaldando, quando la luce è fissa, la temperatura
selezionata è stata raggiunta.
5.2 °C oppure °F
Durante l’autotest viene indicata l’unità di misura attualmente presente (°C oppure °F) e rimane visibile per ca. 5 secondi.
Eseguendo la combinazione dei tasti 2 e 5, per 5 secondi, si modifica il tipo di unità di misura.
5.3 Apparecchio da immersione
Riempire i recipienti (13 e 14) dell’apparecchio Waxpool duo per 2/3 con la cera.
I tasti incorniciati sono relativi ai recipienti da immersione. La fase di riscaldamento dei recipienti da immersione si
avvia azionando il tasto „I“ (1a e 1b) e tenendolo premuto per un secondo, apparirà l’ultima I recipienti da immersione
possono essere riscaldati fino 120° C (148° F), tenendo premuto con il dito il tasto „+“. Per ridurre la temperatura tenere
premuto con il dito il tasto „-“.
5.4 Spatola
Inserire il cavo della spatola nell’apposita presa d’allacciamento, posta lateralmente sull’apparecchio (15). Dare inizio
alla fase di riscaldamento della spatola azionando il tasto „I“ (1c) e tenendo premuto per un secondo, apparirà l’ultimo
valore selezionato. Non viene indicata la temperatura, ma un valore che va da 0 a 100. Il valore 100 corrisponde ad una
temperatura di ca. 240° C, in base allo spessore della punta da modellazione. Impostare la temperatura desiderata con
i tasti „-“ e „+“ (6 e 7). Quando la temperatura massima non è impostata, è possibile impostare la temperatura finale,
selezionando il tasto „↑“ (tasto Boost, 8). Questa funzione mantiene la temperatura per 20 secondi e successivamente
reimposta l’ultimo valore selezionato.
6. Pulizia e manutenzione
Staccare la presa di corrente e pulire l’esterno dell’apparecchio solo con un panno umido. Rimuovere la cera fuoriuscita
ed i recipienti da immersione con un panno in cotone. I coperchi dei recipienti, quando sono aperti, possono essere
rimossi e puliti.
7. Ulteriori indicazioni
I consigli e le avvertenze contenute in queste istruzioni d’uso sono aggiornati di continuo alle nuove conoscenze ed
esperienze. Vi consigliamo quindi di leggere nuovamente le istruzioni d’uso del prodotto prima di utilizzare un nuovo
apparecchio. Questi consigli all’utente non sono vincolanti e si basano sulle esperienze aziendali. L’utente è personalmente
responsabile dell’utilizzo del prodotto. La bredent non si assume alcuna responsabilità per risultati non conformi, poiché
non ha alcuna influenza sulle lavorazioni successive. Nel caso in cui, tuttavia, fosse richiesto un risarcimento dei danni,
questo sarà commisurato esclusivamente al valore commerciale dei nostri prodotti
edizione: 22.10.07/0I


