Wallpro CG-600L User manual

OPERATING
INSTRUCTIONS
model CG-600l
CORDLESS
CAULKING GUN

1. The appliance is not intended for use by young children or inrmed persons unless they have been
adequately trained by a responsible adult to ensure that they can use the appliance safely and
without supervision.
2. Young children should be supervised to ensure that they do not play with the appliance.
3. Consider work area environment. Do not expose tools to rain. Do not use tool in damp or wet
locations. Keep work area well lit. Do not use tools in the presence of ammable liquids or gasses.
4. When using the charger, to guard against electric shock, avoid contact with live terminals.
5. Keep children away. Do not let visitors touch the tool or extension cord. All visitors should be kept
away from the work area.
6. Store idle tools. When not in use, tools should be stored in a dry secure place, out of reach of
children.
7. Do not force the tool. It will do the job better and more safely at the rate for which it was intended.
8. Stay alert. Watch what you are doing and use common sense. Do not operate too when you are
tired.
9. Check damaged parts. Before further use of the tool, a guard or other damaged parts should be
carefully checked to determine that it will operate properly and perform its intended function.
10. Check for alignment of moving parts, jamming of moving parts, breakage of parts, mounting and any
other condition that may affect its operation.
11. A guard or other part that is damaged should be properly repaired or replaced by an authorised
service centre unless otherwise indicated in the instruction manual. Have defective switches
replaced by an authorised service centre. Do not use tool if switch does not turn it on.
12. To ensure the designed operational integrity of the power tool, do not remove installed cover or
screws.
13. Do not touch movable parts or accessories until the power source has been disconnected.
14. Do not wipe plastic parts with solvent. Solvents such as gasoline, thinner, benzine, carbon
tetrachloride, alcohol, ammonia and oil containing chloic annex may damage and crack plastic parts.
Wipe plastic parts with a soft cloth lightly dampened with soap and water.
15. Dress properly when operating the machine. Do not wear loose clothing or jewellery. Contain long
hair. Keep you hair, clothing, and gloves away from moving parts.
16. Use safety equipment. Always wear eye protection, non-skid safety shoes, hard hat and hearing
protection.
17. Do not overreach. Proper footing and balance enables better control of the tool in unexpected
situations.
18. Use clamps of other practical ways to secure and support the work piece to a stable platform.
19. Use only accessories that are recommended by the manufacturer for your model.
20. Over loading current protection:
• PCBwillautomaticallycutoffthecurrentsupplywhenthemotorisoverloadedtoprotectitfrom
damage.
• Checkifthesilicageliscongested.Releasetriggerswitchandpressagaintore-activate.
General Operational Precautions

1. Caution: To reduce risk of injury, change only specic type rechargeable batteries. Other types of
batteries may burst causing personal injury and damage.
2. Before using battery charger, read all instructions and cautionary markings on the batteries and
chargers.
3. Do not expose charger to rain or snow.
4. To reduce the risk of damage to electric plug and cord, pull by plug rather than cord when
disconnecting charger.
5. Use of an attachment not recommended or sold by the battery charger manufacturer may result in
re, electric shock or injury to persons.
6. Make sure cord is located so that it will not be stepped on, tripped on, tripped over or otherwise
subjected to damage or stress.
7. Donotoperatechargerwithdamagedcordorpug.Replacethemimmediately.
8. Do not operate charger if it has received a sharp blow, been dropped, or otherwise damaged in any
way – take it to a qualied repair centre.
9. To reduce risk of electric shock, unplug charger from outlet before attempting any maintenance or
cleaning. Turning off controls will not reduce this risk.
10. Do not disassemble charger or battery cartridge, take it to a qualied service centre when a repair is
required. Incorrect reassembling may result in electric shock or re.
1. Do not charge battery cartridge when temperature is below 10°C (50°F) or above 40°C (104°F).
2. Do not attempt to use a set-up transformer, an engine generator or DC power receptacle.
3. Do not allow anything to cover or clog the charger vents.
4. Always cover the battery terminals with the battery cover when the battery cartridge is not used.
5. Do not short the battery cartridge: Do not touch the terminals with any conductive material. Avoid
storing battery cartridge in a container with other metal objects such as nails, coins etc. Do not
expose battery cartridge to water or rain. A battery short can cause large current ow, overheating,
possible burns and even a breakdown.
6. Do not store the machine and battery cartridge in locations where the temperature may reach or
exceed 50°C (122°F).
7. Do not incinerate the battery cartridge even if it is severely damaged or completely worn out. The
battery cartridges can explode in a re.
8. Be careful not to drop, shake or strike battery.
9. Do not charge inside a bot or container of any kind. The battery must be placed in a well-ventilated
area during charging.
10. For maximum battery lifetime, the lithium-ion battery is designed with a protection feature to stop
battery damage. In the cases described below, when using this product, even if you are operating
the switch, the motor may stop. This is not a malfunction but the results of the protection feature:
• Whenthebatterypowerremainingrunsout,themotorstops.
• Ifthefoolisoverloaded,themotormaystop.Inthiscase,releasetheswitchandeliminatethe
cause of the overload. After that you can use it again.
• Ifthebatteryisoverheatedduetoworkoverload,thebatterypowermaystop.Inthiscasestop
using the battery and let the battery cool. After that you can use again.
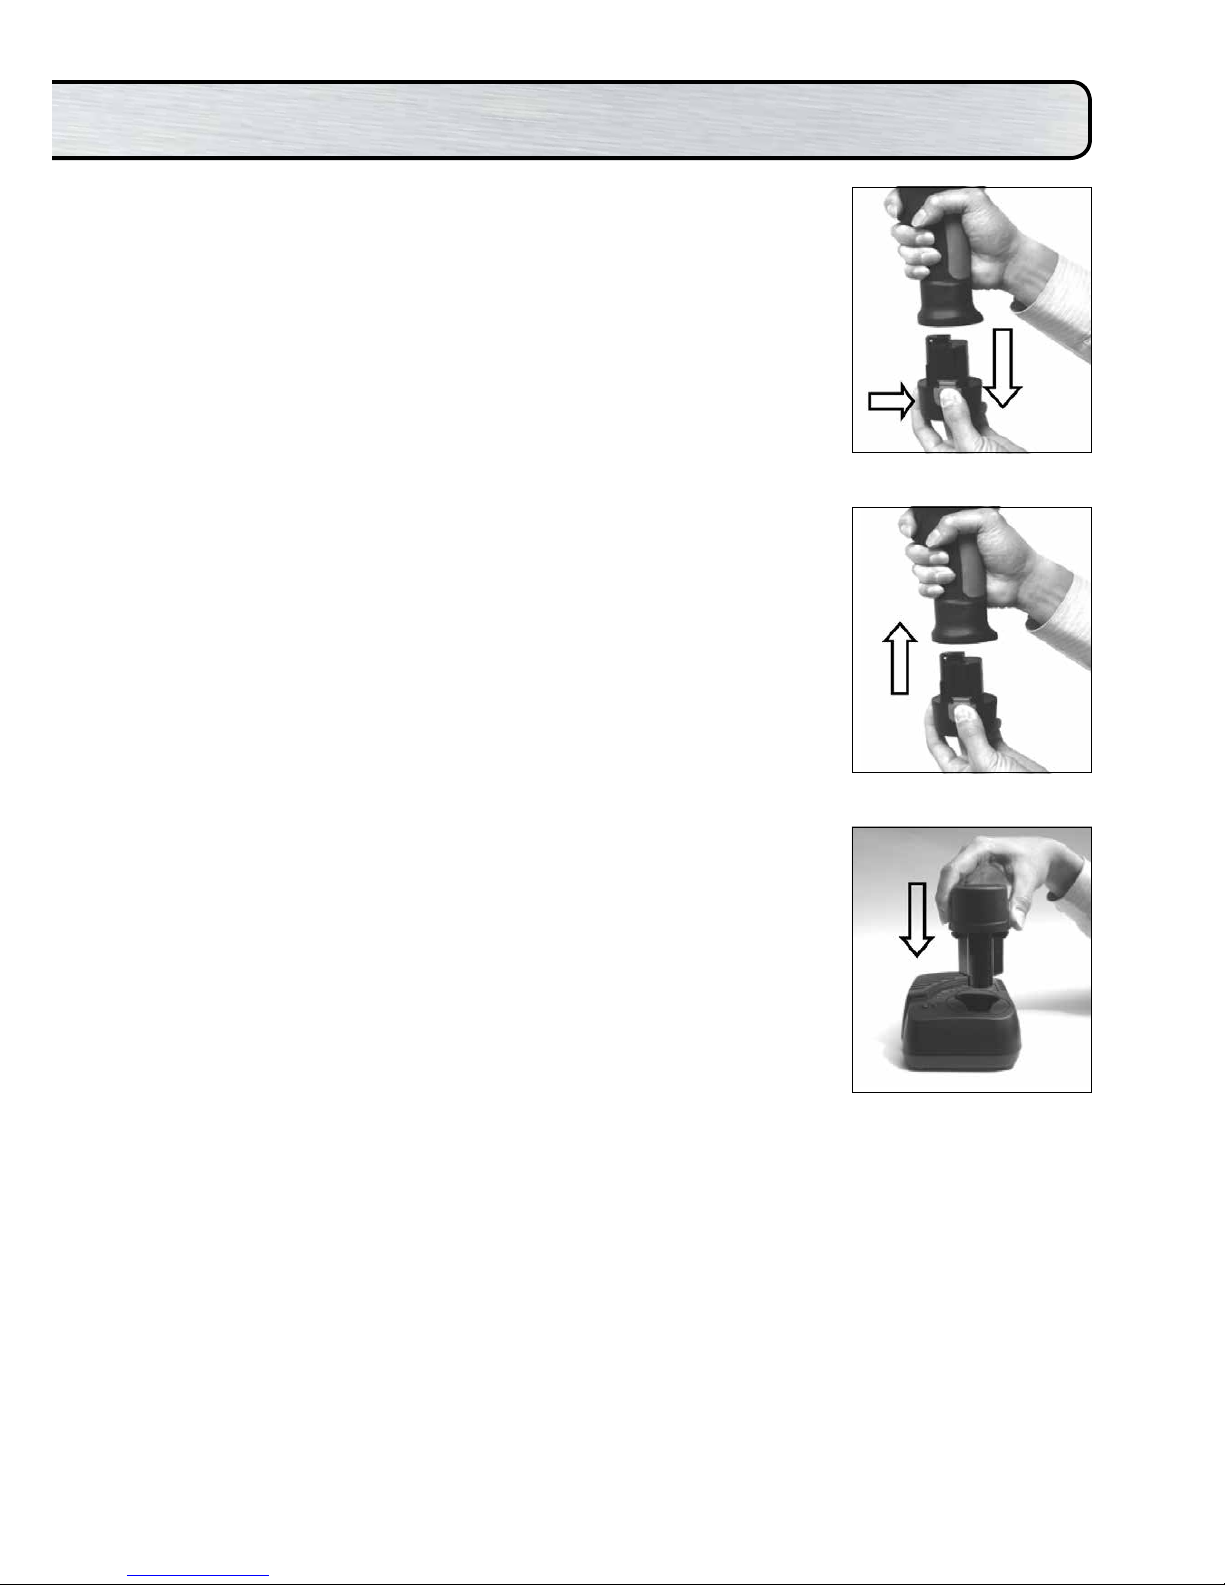
Important Safety Instructions for Charger & Battery Cartridge
Additional Safety Rules for Charger & Battery Cartridge

View of the Major Components & Accessories
Model No CG-600L
Voltage 10.8V DC
Capacity 600ml
Expel Force 392kgf
Impacts Per Minute 3000
Tool weight
(with battery)
2.335kg
(battery 0.185kg)
No Load Speed 6.1mm/sec
Charging Time 35 minutes – Auto Cut-off
Performance 45 tubes of 225mm (9”) silicone for a fully charged battery at room temperature
Specifications
Charger
Front Cap Compound Holder Bush
Speed Control Dial
Connecting Cap
RackRearKnob
Rack
Main Switch
M8X16L Screw
Plastic Plunger Disk
Plunger Disk
Battery Pack

Operating Instructions
Installing or Removing Battery Pack (See Fig.1 Fig.2 )
1. Always switch off the machine before insertion or removal of the battery
pack.
2. To remove the battery pack, pull out the set plate on the machine and
grasp both sides of the battery pack while withdrawing it from the
machine.
3. To insert the battery pack, align the tongue in the battery pack with the
groove in the housing and slip it into place. Snap the set plate back into
place. Be sure to close the set plate fully before using the machine.
4. Do not use force when inserting the battery pack. If the battery pack
does not slide in easily, it is not being inserted correctly.
Charging The Battery Pack (See Fig.3)
1. Your new battery pack is not charged. You will need to charge it before
use.
2. If you try to charge a battery pack from a just-operated machine,
sometimes the charging light will not come on. If this occurs, let the
battery pack cool off for a while. Then reinsert it and try to charge it
once more.
3. When you charge a new battery pack or a battery pack which has not
been used for a long period, it may not accept a full charge. This is a
normal condition and does not indicate a problem. You can recharge
the battery pack fully after discharging it completely a couple of times.
4. If you wish to charge two battery packs, allow 15 minutes between
charging on the fast charger.
5. Plug the fast charger into you source. Insert battery pack so that the
plus and minus terminals on the battery pack are in the same slides as
their respective markings on the fast charger.
6. The charging light will come on and charging will begin. If the charging
light goes out quickly, remove the battery pack from the charger and let
it cool off for more than one minute. Then reinsert it and try to charge it
once more.
7. If the charging light goes out within one minute even after repeating this
procedureacoupleoftimes,thebatterypackisdead.Replaceitwith
a new one. When the charging light goes out after about one hour, you
may remove the fully charged battery pack.
8. After charging, unplug the charger from the power source.
Fig. 1
Fig. 2
Fig. 3

The LED Light on the Charger
Power On (Green light ashes slowly)
BatteryLow(Redlightstaysilluminated)
Battery charged 80% (Green light ashes rapidly)
Battery charged 100% (Green light stays illuminated)
BatteryPacktemperatureistoohotortoocold(Redlightashesslowly)
BatteryPackmalfunction(RedandGreenlightsstayilluminated)
WARNING
1. Charger is plugged into a 100-240V a.c outlet only.
2. If the battery pack is too hot or too cold, the charger will not fast charge the battery pack and the red
indicator light will “blink”. When the battery pack temperature returns to between 0°C (32°F) and 50°C
(122°F), the charger will automatically begin charging.
3. If both red and green indicator lights are “ON” the battery pack either does not comply or is defective.
Please contact your retailer.
4. Do not charge the battery pack in the rain, snow or high temperature environment.
5. Do not charge battery pack when environment temperature is below 0°C (32°F)or above 40°C
(104°F).
6. When charging a cool battery pack (below 0°C) allow the battery to warm up for one hour in a warm
area before starting the charging cycle. A cool battery may not charge fully.
7. Removetheplugafternishingthecharge.
8. The charger should be cooled at least one hour after three continuous charging cycles.
9. Do not use a generator for charging the battery pack.

Tool Operation – for Sausage Bag Application
1. Cut a hole in one end of the sausage bag as shown in the gure below.
2. Removethefrontcap.Fitthenozzleinsidethefrontcapandcutoffthetipatapointsuitableforthe
job.
3. Insert the sausage bag into the compound holder. Screw the front cap on tight. It is not necessary to
pull back the rack by hand. Make sure the sausage bag is inserted properly and sits up tight on the
plastic plunger disk.
4. PushtheRearKnobforwardgentlytoforcetheracktotightenbehindthesausagebag.
Plastic Plunger Disk
Approx. 2cm across
Front Cap
Nozzle
Plunger Disk

Tool Operation – for Cartridge Application
1. Loosen and remove compound holder.
2. Loosen M8 Screw then remove the plastic plunger disk.
Rack
Plunger Disk
Front Cap
Compound Holder
Plastic Plunger Disk
Rack
Plunger Disk
M8x16 Screw

5. Use a sharp knife to cut the tip of caulking tube at least 3
mm in diameter. This will allow the tool to provide a optima
seam width for most of applications.
6. Use the sharp tip to jab the aluminum seal on the caulking
tube.
7. If you are using a previously opened tube, use a steel wire
to remove the solid part inside the tube before re-use.
8. Insert the cartridge into the compound holder. Screw the
front cap on tight. The rack will directly go back. It is not
necessary to pull back the rack by hand. Make sure the
cartridge is inserted properly and sits up tight on the steel
head.
9. Push the rack rear knob forward to force the rack to tighten
behind the cartridge
3. Fit M8 Screw back into the plunger disk and tighten it.
4. Screw back on the compound holder back on then remove the front cap.
Plastic Plunger Disk
Plunger Disk
Rack
M8x16 Screw

Parts & Assembly
NO. PARTSNAME
CG6-1 Front Cap
CG6-2 Compound Holder
CG6-3 Plunger Screw
CG6-4 C-Ring
CG6-5 Plunger Disk Brush
CG6-6 Plastic Plunger Disk
CG6-7 Plunger Disk
CG6-8 Spring
CG6-9 Plunger Adaptor Screw
CG6-10 ConnectionRingScrew
CG6-11 Connector
CG6-12 Fixed Cap Screw
CG6-13 Connecting Cap
CG6-14 Rack
CG6-15 Fixed Cap
NO. PARTSNAME
CG6-16 Gear Box Assembly
CG6-17 Gear
CG6-18 C-Ring
CG6-19 Housing
CG6-21 Speed Control Dial
CG6-23 PCB Assembly
CG6-24 Motor Screw
CG6-25 MotorFixingRing
CG6-26 Motor Assembly
CG6-27 Screw
CG6-28 RackRearKnob
CG6-29 RackRearKnobScrew
CG6-30 Housing Screw
WLB-10.8V Battery Pack 10.8v Li-Ion
WLC-UNI Battery Charger Universal

Warranty
Wallboard Tool Co Pty Ltd warrants that this product will be free from any defect in materials or workmanship for twelve
(12) months from your Purchase Date (noted on your invoice or receipt).
At its discretion, Wallboard Tool Co Pty Ltd will either repair or replace your product, if it is found on inspection by
Wallboard Tool Co Pty Ltd or a registered and approved Wallpro Service Agent to have any such defect.
Warranty Claim Procedure
To make a claim under this Warranty, you must:
•First contact the Wallboard Tool Co Pty Ltd distributor where you purchased the product
•Returntheproducttothedistributoraccompaniedbytheproofofpurchase(invoiceorreceipt)
You will be responsible for the delivery to and collection of the product from the distributor.
Warranty Application
This Warranty applies only:
1. To a product sold to you by Wallboard Tool Co Pty Ltd or by a Wallboard Tool Co Pty Ltd distributor
2. If you use the product for your private or business purposes
Warranty Exclusions
This Warranty will not apply if any of the following occurs during the relevant warranty period:
1. The product is serviced or repaired by anyone other than by a registered and approved Wallpro service agent
2. You use a Product contrary to the technical or operating environment guidelines recommended in its user guide
or manual;
3. Any wear parts included in your product, (for example: including but without limitation: Velcro Foam Adaptors,
Bearings, Bit Tips, Carbon Brushes, etc), reaches the end of its service life;
4. A product’s malfunction or failure to perform to Wallboard Tool Co Pty Ltd specications results from:
1. deliberate or accidental damage; or
2. neglect or modication; or
3. incorrect voltage or a power surge; or
4. use of non-genuine replacement parts or accessories.
Non-genuine Items
If you use non-genuine replacement parts in the product, you may damage the product and may invalidate this warranty.
Our goods come with guarantees that cannot be excluded under the Australian Consumer Law. You are entitled to a
replacement or refund for a major failure and for compensation for any other reasonably foreseeable loss or damage. You
are also entitled to have the goods repaired or replaced if the goods fail to be of acceptable quality and the failure does
not amount to a major failure.
Details of the company giving this warranty:
Wallboard Tool Co Pty Ltd
30 Leda Drive, West Burleigh, Qld 4220, Australia
Phone: +61 7 5535 7655
Email: inf[email protected]
The Wallboard Tools and Wallpro names as well as the Wallboard Tools and Wallpro Trade Tools logos are registered
Trade Marks of Wallboard Tool Co Pty Ltd

CUSTOMER SERVICE
1300 653 177
Table of contents