W&H Osstell Beacon User manual

osstell.com
USER MANUAL
Osstell Beacon
US
US only


25087-05 US
3
Note!
Any serious incident that has occurred in relation to the medical device
should be reported to the manufacturer and the competent authority!
2) Warnings and Precautions
Warnings:
Read all instructions before operating the Osstell Beacon.
Theinstrumentemitsanalternatingmagneticeldthatpotentially
could interfere with cardiac pacemakers! Keep the instrument away
from implanted electronic devices. Do not place the instrument on
the patient’s body.
A transparent, barrier sleeve must be used to cover the Osstell
Beacon when used on patients. See section 11 for recommended
sleeves and section 15 for information on recommended cleaning
and disinfection procedure before attaching a new sleeve.
Onlyusetheacceptablecleaninganddisinfectantuidslistedin
section 15 when cleaning and disinfecting the instrument. Using
notacceptablecleaninganddisinfectantuids,coulddamagethe
device enclosure.
Do not autoclave the instrument.
The SmartPeg Mount must be sterilized before use.
Theinstrumentwillashred-yellow-greenduringstart-upasa
functional test of the color indication. If any or all colors are not
shown, the instrument must not be used. Contact the local sales
representative or distributor for further instructions.
Alwaysperformameasurementintwodirections,Buccal-Lingual
andMesial-Distal,asguidedbytheinstrument.Thisisimportantto
detect the lowest implant stability.
Table of content
1) Table of content 3
2) Warnings and Precautions 3
3) Intended Use 4
4) Indications for Use 4
5) Description 5
6) Safety Symbols 6
7) Before You Start 7
8) Operation of the Osstell Beacon Instrument 7
9) TestPeg 7
10) SmartPeg 7
11) How to Measure 8
12) How to Measure on an Abutment 10
13) Interpret the Result 10
14) Data Connection to Osstell Connect 10
15) Cleaning and Maintenance 10
16) Technical information 12
17) Troubleshooting 14
18) Service and Support 15
19) Waste and Disposal 15
Welcome
Congratulations on the purchase of your new Osstell® Beacon.
Before you start using your Osstell Beacon, please read through
the entire manual.

25087-05 US
4
The SmartPegs are disposable and should only be used for one
or multiple measurements at one treatment session, for a single
patientonly(toavoidcross-contamination).Repeatedre-usemay
resultinfalsereadingsduetowearandtearofthesoaluminum
SmartPeg threads.Do not use if the product sterile barrier system or
its packaging is compromised.
Do not expose the instrument to extreme high temp, e.g. leaving it
in the car dashboard on a warm sunny day.
TheOsstellBeaconisnotprotectedfromingressofuids,e.g.
water,attheUSBconnector(IP20classied).
Mains-operatedpowersuppliesorUSBcableusedforcharging,
shall not be reachable by the patient.
Precautions:
To avoid interference with other equipment, the instrument should
not be held close to electronic devices.
Do not use the instrument in the presence of explosive or
ammablematerials.
See section 4, 5 and 10 for information about approved and com-
patible accessories.
3) Intended Use
Osstell Beacon is intended for use as a Dental Implant Stability Analyzer.
4) Indication for use
Osstell Beacon is indicated for use in measuring the stability of implants
in the oral cavity and maxillofacial region.
Conditions
Surgically placed implants or abutments for which there is space
to attach a compatible SmartPeg.
Reasons for use
The Osstell Beacon can add important information to the evaluation
of implant stability and can be used as part of an overall treatment
evaluationprogram.Thenalimplanttreatmentdecisionsarethe
responsibility of the clinician.
Contraindications
Osstell Beacon is contraindicated for implant systems to which the
SmartPeg could not be attached for mechanical incompatibility reasons.
See section 10 for more information about SmartPegs.Osstell Beacon is
contraindicated when used together with Pegs not approved by Osstell.
Osstell Beacon is contraindicated where it is not possible to attach the
SmartPegduetolackofspace,orwhereitimpingesonotherarticialor
anatomical structures.

25087-05 US
5
1 2 345 6
5) Description
The Osstell Beacon is a handheld instrument that involves the use
ofthenon-invasivetechnique,ResonanceFrequencyAnalysis.
The system involves the use of a SmartPeg attached to the dental implant
or abutment by means of an integrated screw. The SmartPeg is excited by
a magnetic pulse from the instrument tip.
The resonance frequency, which is the measure of implant stability, is
calculated from the response signal. Results are displayed on the instru-
ment as the Implant Stability Quotient (ISQ). The ISQ is scaled from 1 to
100. It is a measurement of the stability of the implant and is derived from
the resonance frequency value obtained from the SmartPeg. The higher
thenumber,thegreaterthestability.Theinstrumentsowarecanbe
updatedbyusingtheOsstellUSBcable,typeA-C.
Your Osstell Beacon system includes the
following items:
1Osstell Beacon Instrument
2OsstellUSBcable,typeA-C
3Osstell SmartPeg Mount
4Osstell TestPeg
5Osstell Key
6Osstell Beacon User Manual
Applied Parts: Osstell Beacon instrument tip and thin part of body.

25087-05 US
6
Caution
Followinstructionsforuse
Consult instructions for use
See section 2) Warnings and Precautions
TypeBFappliedpart
Manufacturer
YYYY-MM-DD
Date of manufacture
Serial number
Donotdisposeofwithdomesticwaste.Li-ionbattery.
CEmarkwithidenticationnumberofthenotiedbody.
ThiselectronicproductisapprovedbyFederal
CommunicationsComission(FCC)
FCCID:QOQBLE113,IC:5123A-BGTBLE113
Non-ionizingelectromagneticradiation
Not Sterilizable
Sterilizable up to 135 degrees Celsius
Temperature limitation
Humidity limitation
Atmospheric pressure limitation
IP20 Protected against solid foreign objects of 12.5mm Øand
greater. No protection against water.
Use by date
Lot/batch code
Sterilized using irradiation
Rx ONLY
ForUSmarketonly:Prescriptionuseonly.U.S.FederalLaw
restricts this device to sale by or on the order of a licensed
practitioner
Catalog Number
Do not reuse
Regulatory Compliance Mark (RCM) indicates compliance
with the Australian and New Zealand electrical safety, EMC,
EME and telecommunications requirements.
Medical device
6) Safety Symbols

25087-05 US
7
7) Before You Start
The Osstell Beacon is delivered from factory in a “transport” mode,
wherethebuilt-inmotionsensorisdeactivated.
Tode-activatethetransportmodeandstartcharging,connectthesmall
USBconnectoroftheOsstellUSBcable,typeA-C,towideendofthe
instrument. Connect the large USB connector to a standard USB type A
outlet of a PC, laptop or charger.
TheOsstellBeaconwillstart-upandenterchargingmode.Chargethe
Osstell Beacon for at least 3 hours or until the Osstell Beacon indicates
fullcharge.RemovetheOsstellUSBcable,typeA-C.
Note! It is not possible to perform an ISQ measurement during charging.
8) Operation of the Osstell Beacon
Instrument
TheOsstellBeaconisactivatedbyabuilt-inmotionsensor.Assoonas
themotionsensordetectsmovement,theOsstellBeaconwillstart-up,
ashred-yellow-greenandshortlyshowbatterystatusinthelower
display and then be ready for measurement in the BL (Buccal – Lingual)
direction, which is indicated in the upper display.
The Osstell Beacon will start to measure, indicated by an audible sound,
whennearanOsstellSmartpegorTestpegduetoabuilt-inmagnetic
detector that senses the magnet on the top of the Osstell Smartpeg/
TestPeg. Measured data will be shown in the upper display combined
with a colored light indication below the instrument tip.
The red, yellow and green color indications are to be used only as visual
aid in what range the measured ISQ values are, where red is the lower
range, yellow is the middle range and green is the higher range of the
ISQscale.Aer60secondsofnomotion,theOsstellBeaconwillturno
automatically.
9) TestPeg
The Osstell TestPeg may be used for testing and learning how to
use the system. Place the Osstell TestPeg on the table or hold it in your
hand. Activate the Osstell Beacon by moving it and hold the
instrumenttipapproximately2-4mmawayfromthetopoftheOsstell
TestPeg. The Osstell Beacon should start to measure and present an ISQ
valueof55+/-2ISQ.
10) SmartPeg
TheSmartPegisavailablewithdierentconnectiongeometriestotall
majorimplantproductsonthemarket.Youcanndall
available SmartPegs on osstell.com/smartpegguide.
The SmartPegs are disposable and should only be used for one or
multiple measurement at one treatment session, for a single patient
only(toavoidcross-contamination).Repeatedre-usemayresultinfalse
readingsduetowearandtearofthesoaluminiumSmartPegthreads.

25087-05 US
8
11) How to Measure
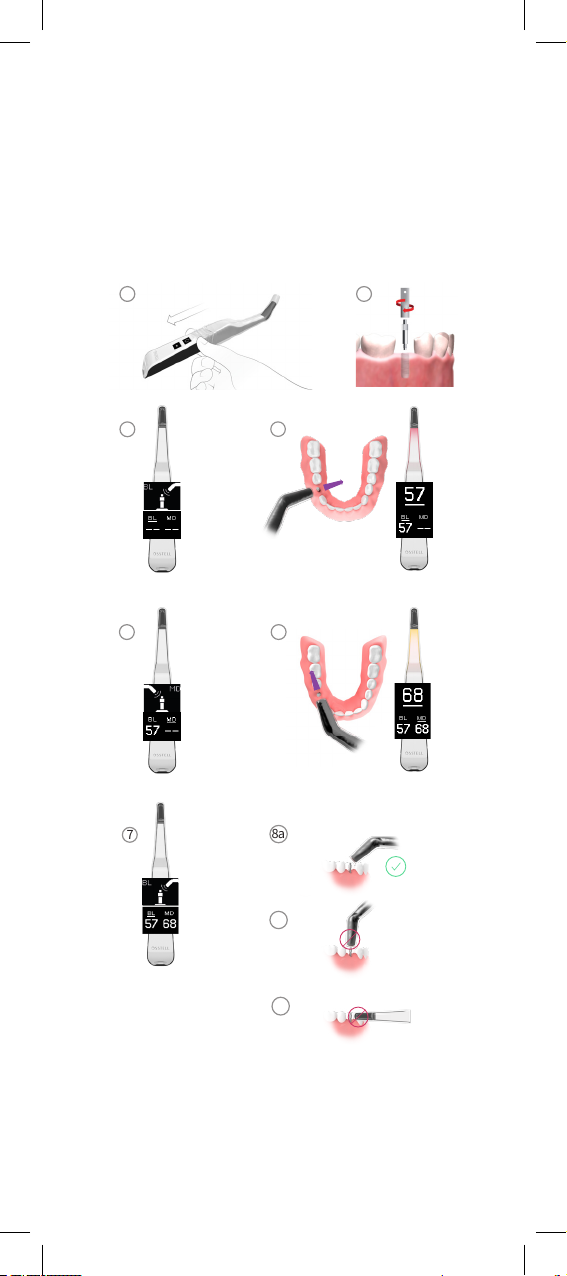
Prior to use on a patient, place a barrier sleeve over the Osstell Beacon.
Thebarriersleevehelpspreventcross-contaminationandhelpskeep
dental composite material from adhering to the surface of the instru-
ment tip and body, and discoloration and degradations from cleaning
solutions.
Note:
• Barrier sleeves are single patient use only.
•Discardusedbarriersleevesinstandardwasteaereachpatient.
• Do not leave barrier sleeves on the instrument for extended periods.
• See below for recommended barrier sleeves.
TIDIshield, Art no: 21021, Art no: 20987. www.tidiproducts.com
PremiumPlus: 123, Small short 123, Small
Please also see additional recommended barrier sleeves on:
osstell.com/get-started-beacon-us.
• The Osstell Beacon instrument must be cleaned and disinfected with
appropriatecleaninganddisinfectantuidsaereachpatient.See
section 15) Cleaning and Maintenance for acceptable agents.
Arstmeasurementshouldbetakenatimplantplacementtogeta
baseline for future measurements throughout the healing process.
Beforethenalrestoration,anothermeasurementistakenwhichmakes
it possible to observe the stability development of the implant.
ItisrecommendedtomeasureinbothBuccal-LingualandMesial-
Distaldirectiontondtheloweststability.Therefore,theOsstellBeacon
prompts the user to measure in both these directions.
We recommend you studying the more detailed information (videos and
quick guides) available on osstell.com/get-started-beacon-us,
to utilize the full functionality of your Osstell Beacon.
1. Activate the Osstell Beacon by picking it up. The instrument will
start-upandaershowingthebatterystatus,theinstrumentwillbe
ready for measurement in the BL (Buccal – Lingual) direction, which is
prompted in the upper display as well as optimal angle of the instru-
ment tip towards the Smartpeg.
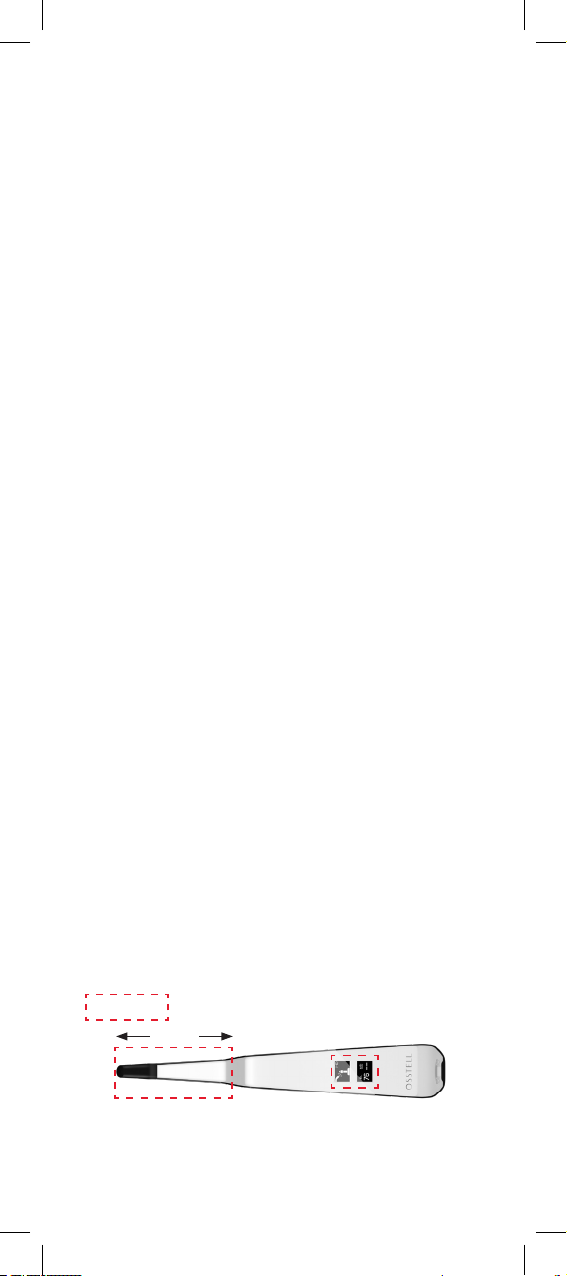
2. Place a barrier sleeve over the Osstell Beacon instrument. See g 1.
3. Place the SmartPeg into the SmartPeg Mount. The SmartPeg is
magnetic, and the SmartPeg Mount will hold the SmartPeg.
See g 2. Attach the SmartPeg to the implant or abutment by screw-
ingtheSmartPegMountusingngerforceofapproximately4-6Ncm.
Donotover-tighten,toavoiddamagingtheSmartPegthreads.
4. Bring the instrument inside the mouth and hold the instrument tip
close(2-4mm)tothetopoftheSmartPegwithouttouchingit.
Hold the tip at approx. 45º angle towards the SmartPeg top as indicat-
ed in the upper display and shown in g 3 and g 8a. Do not measure
in the ways indicated in g 8b or g 8c.
An audible sound indicates when measurement has started, and
measured data will be shown in the upper display combined with a
colored light indication below the instrument tip. See g 4. Bring the
instrument out of the mouth to clearly read the ISQ value and the
colored indication.
The measured ISQ values will be displayed in the upper display for a
couple of seconds and then switch to indicate ready for measurement
inMesial-Distaldirection.See g 5.
Note! Do not bring the instrument back in the mouth until the display
has switch to the next direction.

25087-05 US
9
5.Repeatstep4tomeasureintheMesial-Distaldirection,see g. 6,
and then the sequence starts over and the Osstell Beacon is ready for
measurementintheBL(Buccal-Lingual)directionagain.See g 7.
6. When measurements in both directions are performed, remove the
SmartPeg by using the SmartPeg Mount.
7.Theinstrumentisautomaticallyturnedoaer60secondsofno
motion.
8b
8a
8c
MD
2
1
6
3
BL
4
5
7
approx. 45º
2-4mm

25087-05 US
10
12) How to Measure on an Abutment
When a measurement is made on an abutment or on an implant with a
“built-in”abutment,theISQvaluewillbelowercomparedtoameasure-
mentmadeontheimplant.Thisisduetothedierenceinheightabove
bonelevel.TondouttheISQdierencetothemeasurementperformed
at implant level, a measurement should be taken on the implant before
the abutment is attached and then a second measurement on the
abutment.
13) Interpret the Result
Implant Stability
Animplantcanhavedierentstabilityindierentdirections.The
stabilityoftheimplantisdependentofthesurroundingbonecong-
uration.Thereisoenadirectionwherethestabilityislowest,anda
direction where the stability is highest and these two directions are most
oenperpendiculartoeachother.
Tondtheloweststability(lowestISQvalue)itisrecommendedto
measurefromtwodierentdirections.Theloweststabilityisinmost
casesfoundintheBuccal-Lingualdirection.Thehigheststabilityisin
mostcasesfoundintheMesial-Distaldirection.
The ISQ Value
Assuming there is access to the implant, ISQ measurements should be
performed at implant placement and before the implant is loaded or
theabutmentisconnected.Aereachmeasurement,theISQvaluesare
used as the baseline for the next
measurementperformed.AchangeintheISQvaluereectsachangein
implant stability. In general, an increase in ISQ values from one meas-
urement time to the next indicates a progression towards higher implant
stability while a decrease in ISQ values indicates a loss in stability and,
possibly, implant failure. A stable ISQ value would indicate no change
in stability. ISQ values have not been correlated with other methodes of
mobility measurements.
Note!Thenalimplanttreatmentdecisionsaretheresponsibilityofthe
clinician.
14) Data Connection to Osstell Connect
The Osstell Connect is an online service for data transfer, storage, display
and overview of your data.You can have your Osstell Beacon online
connected to Osstell Connect by the Osstell Key.
Before you can start using connection to Osstell Connect you have to
register your Osstell Beacon. The serial number can be found on the
backoftheinstrument.Forregistrationassistance,pleasevisit:
osstell.com/get-started-beacon-us.
15) Cleaning and Maintenance
Aereachuse,followthebelowcleaninganddesinfectionprocedures.
Note! Do not autoclave the Osstell Beacon instrument.
Routinely check the surface of the instrument tip and overall surface for
possible cracks and residuals.
7,5 cm
Critical sites

25087-05 US
11
Steps General Cleaning Instruction
1 Remove and dispose of used barrier sleeve.
2SoakclothinMedizimeLFenzymaticcleaner.Paying
particular attention to critical sites, wipe down the housing
of the device for at least one (1) minute.
3 Visually inspect Osstell Beacon for contamination and
visible debris. If contamination or visible debris is present,
removeitwithasobristlebrush,cottonswab,orsoaked
cloth depending on location of the soil.
4 Soak cloth with distilled water. Pay particular attention to
critical sites. Wipe down device for at least one (1) minute.
5 Inspect device again and repeat steps 2 and 3 if soil persist.
6Wipedowndevicewithsoclothdampenedwith70%IPA
to help remove moisture.
7 Allow device to air dry completely before next use (mini-
mum three (3) minutes).
Steps General Disinfection Procedure
1 According to manufacturer’s instructions, the minimum
exposure time for the CIDEX® OPA disinfectant is twelve
(12) minutes. Disinfectant application should be performed
by placing the device in a cup with the tip faced down, see
gurebelow.FillthecupwithCIDEX®OPAtoalevelwhich
will allow immersion to 7.5 cm (3 inches), which is the
levelwheretheinstrumentneckbends,seegurebelow.
Leave the device immersed for a minimum exposure time
of twelve (12) minutes. Upon completion of the exposure
time,lithedevicefromthecupwiththetipstillfaced
down and use a clean cloth to manually wipe the device.
2Toremoveanyresidualdisinfectant,llanewcupwith
distilled water to a level which will allow immersion to 7.5
cm (3 inches) and leave the device immersed for a mini-
mum of one (1) minute.
3 Repeat the one (1) minute distilled water immersion two
(2) additional times using fresh water for a total of three
(3) rinses.
4Followingremovalofthedevicefromwaterimmersion,
thoroughly ensure disinfectant residue removal by wiping
downthedevicewithasoclothdampenedwith70%IPA.
5Repeatthe70%IPAwipeproceduretwo(2)additional
times, for a total of three (3) alcohol wipes.
6 Allow devices to air dry out of exposure to direct sunlight.
Osstell has validated the High Level Disinfection for up to 5000 processing
cycles without damage to the Beacon.

25087-05 US
12
Acceptable Cleaning uids:
Low foaming, neutral pH, enzymatic detergents like:
MedizimeLF
Enzol
Acceptable disinfectant uids:
CIDEX ® OPA Solution
Do not use:
Acidic or phenolic based cleaners/disinfectants.
Strong alkali detergent of any type, including hand soaps and dish soaps
Bleach based cleaners
Hydrogen Peroxide based cleaners
Abrasive cleaners
Acetone of hydrocarbon based cleaners
MEK (Methyl Ethyl Ketone)
Birex
Gluteraldehyde
QuaternaryAmmoniumChloridesalt-basedcleaners
The instrument does not require regular maintenance. In the event of
an instrument malfunction, contact the local sales representative or
distributor for further instructions.
SmartPegs: Delivered sterile. The SmartPegs are disposable and
should only be used for one or multiple measurements at one
treatmentsession,forasinglepatientonly(toavoidcross-contami-
nation).
TestPeg:Isnotusedintra-orally,doesnotrequiresterilization.
The Smartpeg Mount should be cleaned and sterilized before each use
according to the instructions below.
SmartPeg Mount: Must be autoclaved according to the recommended
sterilization method, validated to sterility assurance levels (SAL),
accordingtoISO17665-1andISO17664.TheSmartPegMountshould
beplacedinaFDAclearedautoclavebagsuchas:
PeelVue – Ref# 31610, size 3.5 x 5.25 or equivalent bag.
Sterilization Exposure Exposure
Method: temperature time
Pre-vacuum 132°C(270°F) 4min
Pre-vacuum 134°C(273°F) 3min
Gravity 134°C(273°F) 10min
Warnings: donotexceed135°C(275°F).Dryingtime:30minutes
Carefully inspect the Smartpeg Mount for damage or wear. Hand
wash the Smartpeg Mount using a neutral instrument detergent.
Rinse and dry; carefully inspect the Smartpeg Mount for damage and
wear. Do not wash in dishwasher.
Storesterilegoodsdust-freeanddry.
16) Technical information
Technical description
OsstellBeaconisCE-markedaccordingtoMDDinEurope(ClassIIa,
internallypowered,typeBFappliedparts.NotAPorAPGequipment,not
protected against ingress of water).
Osstell Beacon is in accordance with applicable parts of
IEC60601-1/ANSI/AAMIES60601-1.
Thesymbolsused,followtheEuropeanstandardEN60601-1and
ISO 15223 as far as possible.

25087-05 US
13
Notes on electromagnetic compatibility (EMC)
Medical electrical equipment is subjected to particular precautions with
regards to EMC and must be put into operation in accordance with the
EMC notes included below:
Osstell guarantees the compliance of the device with the EMC require-
ments only when used with original accessories and spare parts. The use
of other accessories / other spare parts can lead to an increased emis-
sion of electromagnetic interference or to a reduced resistance against
electromagnetic interference.
YoucanndthecurrentEMCmanufacturer’sdeclarationonourwebsite
atosstell.com/products/Osstell-BeaconunderTechnical Specica-
tions/EMC Declaration.
Alternatively, you can obtain it directly from your local sales representa-
tive or distributor.
The Osstell Beacon contains a Bluetooth module.
FCCID:QOQBLE113,IC:5123A-BGTBLE113
Bluetooth communication
The Osstell Beacon contains a built in Bluetooth 4.0 low energy module
for communication with a PC/Laptop via the Osstell Key. The Osstell Key
should be within a radius of 6m in an open area from the Osstell Beacon
tobeabletoconnect.ThedataistransmittedencryptedusingAES-128.
When the Osstell Key is connecting to the Osstell Beacon, the Beacon
will animate a connection symbol ( ) in the upper display. When the
connection is successfully established the animation will stop and the
symbolshowninfull.Formoreinformationaboutusingthe
Osstell Beacon with Bluetooth connection, please visit:
osstell.com/get-started-beacon-us.
Battery
Theinstrumentcontainsarechargeablelithium-ionbattery.
TheinstrumentshouldbechargedusingtheOsstellUSBcable,typeA-C,
connected to a standard USB 2.0 or 3.0 type A outlet. Battery status and
charging is indicated in the lower display with a battery symbol having
4levels:100%(fullycharged),75%,50%andlessthan25%.Whenthe
levelislessthan10%,theOsstellBeaconwillchangethebatterysymbol
to alert that it is time to charge the instrument.
Note! It is not possible to perform an ISQ measurement during charging.
Transport mode
Transportmodecanbeusedwhen,e.g.traveltodierentplacesoutside
the clinic and thereby frequently move the Osstell Beacon, which will
wake up the instrument more frequent than regular use and thereby
draining the battery faster.
The transport mode is activated by connecting the Osstell USB cable,
typeA-C,(whenconnectedtoanUSBport)andremovingitwithin5
secondsasillustratedbyacount-downsequenceinthelowerdisplay.
The two displays will turn dark and the instrument will no longer wake
up by motion.
IftheOsstellUSBcable,typeA-C,isnotremovedwithinthese5seconds,
the instrument will enter charging mode.
To deactivate transport mode, connect the cable again, as is described
section 7.
Accuracy
TheOsstellBeaconinstrumenthasanISQaccuracy/resolutionof+/-1
ISQ. When the SmartPeg is attached to an implant, the ISQ value can
vary up to 2 ISQ depending on SmartPeg attachment torque.

25087-05 US
14
Power, weight & size:
Lithium-ionbattery: 3.7 VDC
Charging: Use only Osstell USB cable (USB type C / USB
type A) connected to standard USB 2.0 or 3.0
(type A) port (Max 5,2 VDC).
Instrument size: 210 x 35 x 25 mm
Package size: 272 x 140,2 x 74,60 mm
Instrument weight: 0,07 kg
Grossweight: 0,75 kg
Environmental conditions during transport:
Temperature: -40ºCto+70ºC
Relative humidity: 10%to95%
Pressure: 500 hPa to 1060 hPa
Environmental conditions during use:
Temperature: +10 ºC to +35 ºC
Relative humidity: 30%to75%
Pressure: 700 hPa to 1060 hPa
IP class: IP20
17) Troubleshooting
No measurement or unexpected value
Re-Used SmartPeg.
The SmartPegs are disposable and should only be used for one or
multiple measurement at one treatment session, for a single patient
only.Repeatedre-usemayresultinfalsereadingsduetowearand
tearofthesoaluminiumSmartPegthreads.
Wrong SmartPeg type selected for the Implant.
See SmartPeg reference list, osstell.com/smartpegguide
Bone or so tissue in between SmartPeg and Implant.
Make sure to clean the Implant prosthetic connection before
attaching the SmartPeg.
Electromagnetic interference.
Remove the source of electromagnetic interference.
Instrument tip is held too far away from the SmartPeg.
Normallyitissuicienttoholdtheinstrumenttip2-4mmawayfrom
the SmartPeg, but in some cases as close as 1 mm is necessary.
Instrument does not sense the SmartPeg, hence no measurement.
Perform a 2 cm circular movement of the instrument and then try to
measure again.
Unit is not charging when USB cable is connected
Wrong USB cable used.
OnlyuseOsstellUSBcable,typeA-C,connectedtoastandardUSB2.0
or 3.0 (type A) port (Max 5,2 VDC).

25087-05 US
15
Instrument does not start
Uncharged battery.
Charge the Osstell Beacon.
Instrument in transport mode.
Seesection7forinstructiononhowtode-activatetransportmode.
Instrument starts up with
Self-tests failed
Contact the local sales representative or distributor for further
instructions.
The instrument does not show red-green-yellow color
during start-upn
Theinstrumentwillashred-yellow-greenduringstart-upasafunc-
tional test of the color indication. If any or all colors are not shown,
the instrument must not be used. Contact the local sales representa-
tive or distributor for further instructions.
Diicult to measure in an exact recommended directionn
No space, e.g. due to adjacent teeth.
Trytomeasureataslightlydierentdirection.
Diiculties attaching the SmartPeg
Wrong SmartPeg
Ensure that the SmartPeg is compatible with the implant system.
18) Service and Support
In the event of an instrument malfunction contact the local sales repre-
sentative or distributor for further instructions.
19) Waste and Disposal
The Osstell Beacon instrument should be recycled as electrical equip-
ment. SmartPegs should be recycled as metal. Whenever possible, the
battery should be disposed in a discharged state to avoid heat genera-
tionthroughinadvertentshort-circuiting.
Followyourlocalandcountry-speciclaws,directives,standardsand
guidelines for disposal.
• Waste electrical equipment
• Accessories and spare parts
• Packaging

Osstell AB
Stampgatan14,41101Göteborg,Sweden
Phone: +46 31 340 82 50
Osstell AB Date of issue: 2020-01-01 25087-05 US
Osstell Beacon User Manual

osstell.com
USER MANUAL
Osstell Beacon
GB
Outside US


25087-03 GB
3
Note!
Any serious incident that has occurred in relation to the medical device
should be reported to the manufacturer and the competent authority!
2) Warnings and Precautions
Warnings:
Read all instructions before operating the Osstell Beacon.
Theinstrumentemitsanalternatingmagneticeldthatpotentially
could interfere with cardiac pacemakers! Keep the instrument away
from implanted electronic devices. Do not place the instrument on
the patient’s body.
A transparent, barrier sleeve must be used to cover the Osstell
Beacon when used on patients. See section 11 for recommended
sleeves and section 15 for information on recommended cleaning.
Onlyusetherecommendedcleaninguidslistedinsection15
whencleaningtheinstrument.Othercleaninguids,mayperma-
nently damage the device enclosure.
Do not autoclave the instrument.
The SmartPeg Mount must be sterilized before use.
Theinstrumentwillashred-yellow-greenduringstart-upasa
functional test of the color indication. If any or all colors are not
shown, the instrument must not be used. Contact the local sales
representative or distributor for further instructions.
Always perform a measurement in two directions, Buccal-Lingual
and Mesial-Distal, as guided by the instrument. This is important to
detect the lowest implant stability.
Table of content
1) Table of content 3
2) Warnings and Precautions 3
3) Intended Use 4
4) Indications for Use 4
5) Description 5
6) Safety Symbols 6
7) Before You Start 7
8) Operation of the Osstell Beacon Instrument 7
9) TestPeg 7
10) SmartPeg 7
11) How to Measure 8
12) How to Measure on an Abutment 10
13) Interpret the Result 10
14) Data Connection to Osstell Connect 10
15) Cleaning and Maintenance 10
16) Technical information 12
17) Troubleshooting 13
18) Service and Support 15
19) Waste and Disposal 15
Welcome
Congratulations on the purchase of your new Osstell® Beacon.
Before you start using your Osstell Beacon, please read through
the entire manual.

25087-03 GB
4
The SmartPegs are disposable and should only be used for one
or multiple measurements at one treatment session, for a single
patient only (to avoid cross-contamination). Repeated re-use may
resultinfalsereadingsduetowearandtearofthesoaluminum
SmartPeg threads. Do not use if the product sterile barrier system
or its packaging is compromised.
Do not expose the instrument to extreme high temp, e.g. leaving it
in the car dashboard on a warm sunny day.
TheOsstellBeaconisnotprotectedfromingressofuids,e.g.
water,attheUSBconnector(IP20classied).
Mains-operated power supplies or USB cable used for charging,
shall not be reachable by the patient.
Always charge the instrument, using the supplied Osstell USB-ca-
ble, directly connected to a 5 Volt USB type A port.
Splitter cables must never be used as these can lead to
permanent damage to the device.
Precautions:
To avoid interference with other equipment, the instrument should
not be held close to electronic devices.
Onlyusetheacceptablecleaninguidslistedinsection15
when cleaning the instrument.
Do not use the instrument in the presence of explosive or
ammablematerials.
See section 4, 5 and 10 for information about approved and com-
patible accessories.
3) Intended Use
Osstell Beacon is intended for use as a Dental Implant Stability Analyzer.
4) Indication for use
Osstell Beacon is indicated for use in measuring the stability of implants
in the oral cavity and craniofacial region.
Conditions
Surgically placed implants or abutments for which there is space
to attach a compatible SmartPeg.
Reasons for use
The Osstell Beacon can add important information to the evaluation
of implant stability and can be used as part of an overall treatment
evaluationprogram.Thenalimplanttreatmentdecisionsarethe
responsibility of the clinician.
Contraindications
Osstell Beacon is contraindicated for implant systems to which the
SmartPeg could not be attached for mechanical incompatibility reasons.
See section 10 for more information about SmartPegs.Osstell Beacon is
contraindicated when used together with Pegs not approved by Osstell.
Osstell Beacon is contraindicated where it is not possible to attach the
SmartPegduetolackofspace,orwhereitimpingesonotherarticialor
anatomical structures.
Other manuals for Osstell Beacon
1
Table of contents
Other W&H Dental Equipment manuals

W&H
W&H assistina MB-300 User manual

W&H
W&H proxeo TWIST PL-40 H User manual

W&H
W&H Assistina MB-302 User manual

W&H
W&H proxeo TWIST User manual

W&H
W&H SURGICAL WS-56 L User manual

W&H
W&H assistina 301 plus User manual

W&H
W&H Roto Quick RQ-03 User manual

W&H
W&H 945 User manual

W&H
W&H proxeo TWIST PL-40 HW User manual

W&H
W&H S-11 L G User manual
Popular Dental Equipment manuals by other brands

Ivoclar Vivadent
Ivoclar Vivadent Wieland Zenotec Select Hybrid Cleaning instructions

Candulor
Candulor CA 3.0 Instructions for use

mectron
mectron Starlight Pro Use and maintenance manual

KaVo
KaVo INTRAflex LUX 2 Series Instructions for use

KaVo
KaVo SURGmatic S11 L Instructions for use

NSK
NSK Ti-Max NL400 CDE installation manual