W&H assistina 301 plus User manual

Instructions for Use
301 plus

2
Contents
Symbols.......................................................................................................................................................................................................... 4
In the instructions for use.................................................................................................................................................................... 4
On the medical device .......................................................................................................................................................................... 5
On the packaging/cartridge ................................................................................................................................................................. 6
1. Introduction ............................................................................................................................................................................................... 7
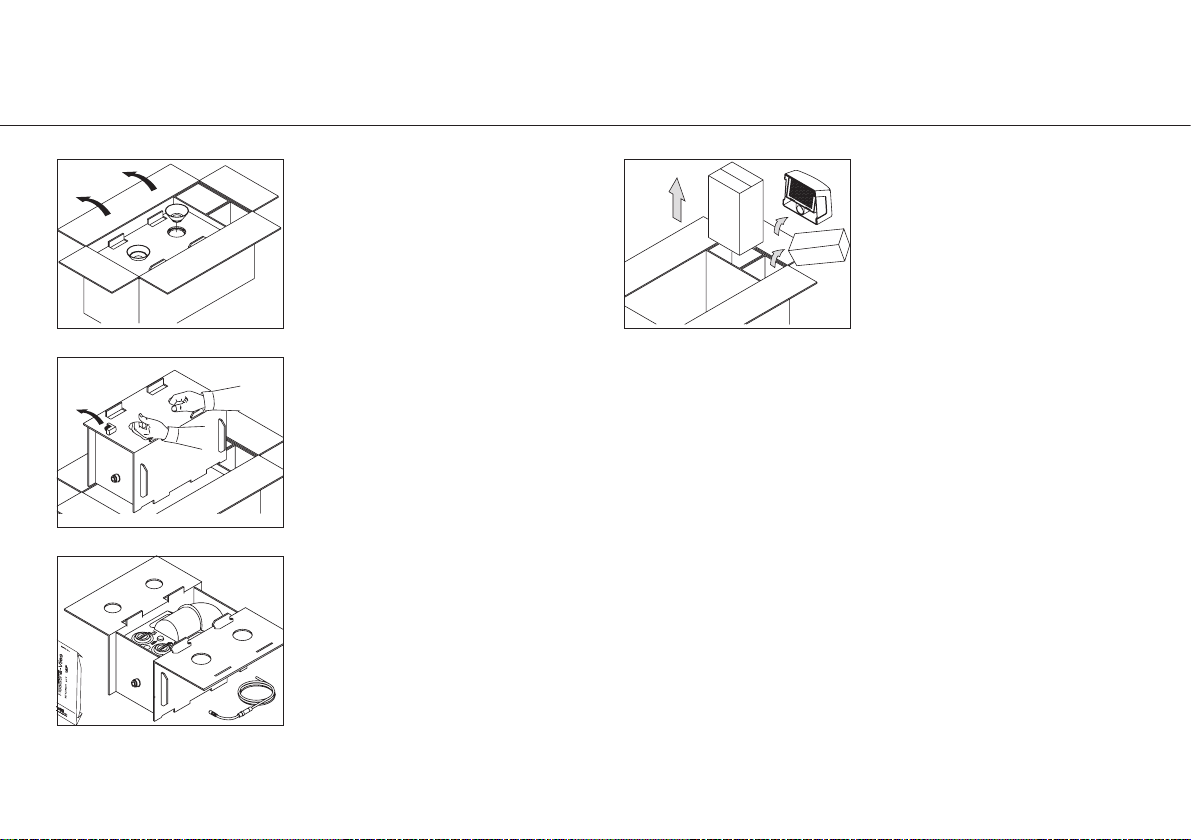
2. Unpacking .................................................................................................................................................................................................. 9
3. Scope of delivery..................................................................................................................................................................................... 10
4. Safety notes ............................................................................................................................................................................................ 11
5. Description................................................................................................................................................................................................12
Front side .............................................................................................................................................................................................12
Rear side...............................................................................................................................................................................................13
6. Start-up .....................................................................................................................................................................................................14
Initial filling ..........................................................................................................................................................................................17
7. Operation .................................................................................................................................................................................................. 20
Maintenance process ......................................................................................................................................................................... 20
Attaching / removing the adaptor .......................................................................................................................................................21
Maintenance process ......................................................................................................................................................................... 22
Lubrication of chucking system......................................................................................................................................................... 24
8. Cleaning.................................................................................................................................................................................................... 25
9. W&H accessories..................................................................................................................................................................................... 26

3
10. Maintenance .......................................................................................................................................................................................... 28
O-rings replacement ........................................................................................................................................................................... 29
Filter replacement............................................................................................................................................................................... 30
Air filter replacement .......................................................................................................................................................................... 31
11. Servicing ................................................................................................................................................................................................ 32
Returns................................................................................................................................................................................................ 32
Preparation of returns ........................................................................................................................................................................ 33
12. Technical data........................................................................................................................................................................................ 34
13. Disposal.................................................................................................................................................................................................. 35
Explanation of warranty terms................................................................................................................................................................... 36
Authorised W&H service partners ............................................................................................................................................................. 37

4
Symbols In the instructions for use
ATTENTION!
(to prevent damage occurring)
ATTENTION!
General explanations
with no danger to persons or property
WARNING!
(risk of injury)
Do not dispose with domestic waste WARNING!
Flammable liquid and vapour
CE mark

5
Symbols On the medical device
Catalogue number
Serial number
DataMatrix Code
for product information
including UDI (Unique
Device Identification)
Consult instructions for use
Date of manufacture
CE mark
Medical device
Manufacturer

6
Symbols On the packaging/cartridge
This way up
Fragile, handle with care
Keep dry
Permitted temperature
range for storage
CE mark
Keep away from heat
Use by
“Der Grüne Punkt” (The Green
Dot) trademark of Duales
System Deutschland GmbH
Trademark of RESY OfW GmbH
for identification of recyclable
transport and outer packaging
of paper and cardboard
Medical device WARNING!
Flammable liquid and vapour
EUH210 safety data sheet
available on request
SDS
Consult instructions for use
Manufacturer
Caution! According to Federal law, this medical device may only be
sold by or on the order of a dentist, physician or any other
medical practitioner licensed by the law of the State in which he
or she practices and who intends to use or order the use of this
medical device.

7
1. Introduction
For your safety and the safety of your patients
Prior to initial use please read the Instructions for use. These explain how to use your medical device and guarantee a smooth and
efficient operation.
Observe the safety notes.
Intended use
Unit for cleaning the spray channels and lubricating the moving parts of dental transmission instruments, turbines, air motors and
air-driven dental scalers.
Misuse may damage the medical device and hence cause risks and hazards for patient, user and third parties.
When transmission instruments are prepared with the medical device, they are neither disinfected nor sterilized. After
cleaning of the spray channels and lubrication of the transmission instruments with the medical device, they subsequently
need to be disinfected and sterilized.
Qualifications of the user
We have based the development and design of the medical device on the target group of dentists, dental hygienists and dental
assistants.

8
Introduction
Production according to EU Directive
The medical device meets the requirements of Regulation (EU) 2017/745
Responsibility of the manufacturer
The manufacturer can only accept responsibility for the safety, reliability and performance of the medical device when it is used in
compliance with the following directions:
> The medical device must be used in accordance with these Instructions for Use.
> The medical device has no components that can be repaired by the user (with exception of replacing the o-rings, cartridges,
filter and air filter). Assembly, modifications or repairs must only be undertaken by an authorised W&H service partner.
(see page 37)
> Unauthorized opening of the medical device invalidates all claims under warranty and any other claims.
Improper use, unauthorized assembly, modification or repair to the medical device, non-compliance with our instructions or the
use of accessories and spare parts which are not approved by W&H, invalidates all claims under warranty and any other claims.
Any serious incident that has occurred in relation to the medical device should be reported to the manufacturer and the
competent authority!

9
2. Unpacking
The W&H packaging is environmentally friendly and can be
disposed of through specialist recycling organizations.
However, we recommend that you keep the original
packaging.
Have the Instructions for Use at
hand. Take out the white and
green funnels.
Remove the basic adaptor.
Liftoutthe Assistinainthefibre-
board box.
Open the box at the tucked-in
closure and remove the air hose
from the cover. Remove the
initial accessories.
Takeouttheserviceoil,cleaning
liquid, suction filter and the
optional accessories from the
side compartments.

10
3. Scope of delivery
> W&H Assistina maintenance unit (REF 00030125, 00030140)
> Suction filter, complete
> Basic adaptor REF 02685000
> Funnel, white, REF 02689300
> Funnel, green, REF 02689400
> Air connection hose 2 m, REF 02697000, complete
> Initial provision of 5 layers of fleece REF 02690300
> 2 spare seals REF 02680600 and
2 spare O-rings REF 02695700
> Instructions for Use with warranty card

11
4. Safety notes
Please observe the following instructions under all circumstances
> Only set up the product in suffiently well ventilated rooms!
> Keep the device closed during the maintenance process!
GHS02 WARNING!
H226 Flammable liquid and vapour
> P210 Keep away from heat, hot surfaces, sparks, open flames and other ignition sources. No smoking.
> P233 Keep container tightly closed.
> P280 Wear protective gloves / eye protection.
> P403 + P235 Store in a well-ventilated place. Keep cool.
> P 501 Dispose of contens / container in accordance with local / regional / national / international regulations.
> Place the medical device on a flat, level surface.

12
5. Description Front side
Fill level of cleaning
liquid
Indicator window
for cleaning liquid
Indicator window
for service oil
Fill level of
service oil
Waste disposal
tray
Recess for
adaptor
Cover
Filler hole /
storage container
for cleaning liquid
Filler hole /
storage container
for service oil
W&H service oil
Button to cleaning /
maintenance process
W&H cleaning
liquid

13
Description Rear side
Suction filter
Quick release
coupling for
compressed air

14
6. Start-up
> Service oil must be at room temperature when it is poured in.
> Never reverse funnels (white to white, green to green) and store them in a dust-free environment!
> Check the filling level indicator!
Unscrew the two caps and remove the two
transport seals (malfunction!)!

15
Start-up
Unscrew the cap from the
white storage container.
Insert the white funnel.
Add 250 ml of service oil.
Unscrew the cap from the
green storage container.
Insert the green funnel.
Add 250 ml of cleaning liquid.
Close the storage containers
for the service oil and
cleaning liquid.

16
Start-up General
The built-in air filter in the connecting hose is only a fine filter.
It cannot clean unfiltered and possibly contaminated compressor air.
Dirty fine filters must be replaced.
> Use only non-contaminated,oil-free,dry and filtered compressed air according to ISO 7494-2.
Fit the suction filter so that it
is leak-tight.
Push the quick release coupling of
the connecting hose into the
coupling socket on the Assistina.
Connect the compressed air line.
02697000

17
Start-up Initial filling
If no fluid can be seen or detected on the waste disposal tray, the supply lines are not yet completely full.
>Do not connect any transmission instrument, turbine, air motor or dental scaler during the test!
> If the adaptor is fitted on the maintenance attachment, remove it.
Pull the drip guard off the
maintenance attachment and
store it safely.
Close the cover.
Press the start button about
15 times for 2 seconds with a
pause of 2 seconds between
each actuation.
Press the start button
10 times for 2 seconds.
15 x
2 secs.
10 x
2 secs.

18
Start-up
Check that the fleece inlay is damp to ensure correct function.
If it is not damp, repeat the process 2 to 3 times.
Dispose of saturated fleece inlays as with cloths for surface disinfection.
In the event of operating malfunctions (e.g., vibrations, unusual noise, overheating, failure or leakage) stop the medical
device immediately and contact an authorized W&H service partner.
Place a fleece inlay in the
waste disposal tray.
Close the cover and waste
disposal tray.
Press the start button once for
2 seconds.
1 x
2 secs.

19
Start-up
Function display
Continuously monitor the function display!
> Press the start button for 2 seconds.
A green ball for the cleaning liquid appears in the right-hand window.
> Release the start button.
A green ball for the service oil appears in the left-hand window.
After a few seconds, both balls will drop down again.
Correct operation of the maintenance process is indicated by these two function displays.
If ever the balls disappear during a program cycle, this indicates a malfunction.
Function check of the mechanical drive
> Fit a transmission instrument with a rotary instrument inserted onto the Assistina
maintenance attachment.
> Press the start button for 2 seconds.
The maintenance cycle begins and the rotary instrument turns.
If the rotary instrument does not turn, there is a malfunction.

20
7. Operation
> Wear protective clothing, saftey glasses, face mask and gloves.
> Refer to the »hygiene and maintenance« instructions in the Instructions for Use of the transmission instruments.
Transmission instruments with ISO coupling
The maintenance program will be completed in about 35 seconds.
> Pull down cover.
Press the green release
button and pull off
the basic adaptor.
Keep the adaptor in
the recess.
With its spray exit nozzle
directed downwards, push
the transmission instrument
onto the maintenance
attachment up to the limit
stop. Close the cover and
the waste disposal tray.
Press the start button once
for about 2 seconds. Open
the cover at the end of the
maintenance cycle.
Press the green release button
of the maintenance
attachment while at the
same time removing the
transmission instrument.
1 x
2 sec.
Maintenance process
Other manuals for assistina 301 plus
1
Table of contents