Wantegrity HAWK-800 User manual

HAWK-800
Construction and Installation
Instructions
!"#$%&
'("(("")"
Table of Contents
Construction and Installation Instructions.................................................................................................2
Introduction................................................................................................................................................2
IMPORTANT: Kit Versions 1.5, 1.5b and 1.5c..........................................................................................2
Con ratulations!.........................................................................................................................................2
WARNING and DISCLAIMER.................................................................................................................2
Special final WARNING!..........................................................................................................................2
Safety First.................................................................................................................................................2
Before you Be in.......................................................................................................................................2
Preparation.................................................................................................................................................3
Read the Instructions..................................................................................................................................3
Required Tools and Supplies......................................................................................................................3
Tape Features.............................................................................................................................................4
Loss of MK2 Lar e Sequence Size Feature...............................................................................................4
Backup Patch and Sequencer Data.............................................................................................................4
Construction...............................................................................................................................................5
Assemblin the HAWK-800 Board...........................................................................................................5
Modifyin the Poly-800 Main Board.........................................................................................................9
Special Section for the Poly-800 MK2 (II)..............................................................................................12
Special Section for the Poly-800 (ori inal version).................................................................................19
Special Section for the EX-800 Synthe Module......................................................................................21
Testin ......................................................................................................................................................24
Addendums..............................................................................................................................................26
HAWK-800 Kit Mountin Hardware for the PS-800..............................................................................26
Troubleshootin the HAWK-800 Kit Installation....................................................................................26
ROM chip positions.................................................................................................................................28
Revertin Back to Ori inal Operation.....................................................................................................29
1 Of 29

Introduction
'""(")"*$+%,-."(&/$&/!&/0"(&/(
!"1((1(1%&&'""(2"."(&/!(!"1((1(3"%&%
""(2."(&/(!"1((1(32%&4(5"""!""""."(&/$
&/!&/!""6(("71"('((("(1"!"("("1
*26*87$"*26*87",-2""
!
12")""9('((.("2*2$*2+%,-
(2"":(1"!(("8"")""()
""")""""$""""
"#$%&'
;")"(!((2)2"$1$!12$"1$((1(1("9(4
< '"$("("9("2""((1""(!((2)
2"2")2"$("((
'(("=(""".)")"(*26+%7,-("((!
6*>?7'("=("."""("((()2.""("=(""."&#(
%(4*""2.""""""@!)2;("!"!""
29=(9""(((2"'"")()((("*2+%"=(""."
"(">""("2"))""A
%()"#!
;<,0,B"("((9.(1(""")2""
""2*2( <C;"(("4< '"(""
("("('!"1"()2*2!""":""2(D()
((!"()2"(!(("("(4< '"(A"""2(
"(E(2."))")")2*2("
(("E")"("()"(
%*+,
,:"("(")"2""(1()((
Before you Begin
"2""2(2.""(9""("*2+&(6*7,-(6
,-7*2+%(6+%7((2(""2!("""($
2""(.")""("(")""2(1)2(1"F""
!()"("("(""""(."!""("""!"!"
"""(!!""!"""(""")"(2""
2 Of 29

( %*(""!" &#*(""!"
! " "
# " "
$% " "
(
'"!("(.."("")")(@""
& B"1""(""22")""=(""
% ""()"(."2)"2(21"
G !()""""("
H )""""("((!
/ +()2""(!C+/I#6C+&G%)"+%7
# "!(22"(J"
K B"("(1(1!!"!(22"(J"
F1""9"("2"(J"
I '")("1"2"(J"
& >"1((121"2"(J"
-
(."2(2")"21""(!")"!"1((12'((1(."2
1"(1)""(.."("@")2""("2L)
(":)2)""('(@""=("""!%""6G
)"+%7;1(."2")H2.""2)")"4< '
2"((@"(!"""":"(")((122"(J"""9(
.%((
'(((("=("6((7")(1
& *(("(."
% 86%/7M!""(."
G 8(""
H 81"("
/ C1(""J"6".(17
# 8(!"8"(1(6%H(9""(17
K 0""(16,:"B(8+"#H%I1N#H%I7""(1!!"
"(1?"?
;(""!(")(1("
& 4""(1!(6,:"B(8+"#H%I1N#H%I
% B(""#H))""(:G%O(""
G "((1"((1(*26",-+%."(7$((""2!(
3 Of 29

2("((!58""""P+1"((22"(J"O)
"""((22"(J"
(,
B<<Q'"1"((1."()2(1""="")"(1(
1*2,-"< '+%""=""'"+F8'!"(1!
R"."(%(1"""."()2)""((")32%
".("(!."(%(1"(!("(32%.""(!"
1"."(%(1"("$"2(!"!""."()2'")""
"< '"!2"R"""""".")""
&*/&%.%0,
B<<Q'"2))"*2+%(""R"2("1"((
!""1"+%"=""(J"'"1"("(1(1*2"=""(J")
:()%/#"."'"(""(.""="")+%2":!'"+%""(."
"="")",-!6""""=""%/#".":(7""(("."$
"1"(."""=""!2.((1K((.("="")%/#".""
12(-%.$
B<<Q;CC")2"=""(1"(";!2
"(1"()"B")"")(1!")".(!").(1
""(12(!2
!"&'()*+$"
*2+" >+" B""+"
*2(1(&" 8.""(6(1
".")""7
B"""6(1")""7
,- 8.""(12":
$8.""
(6(1"."
)""7
B"""(1".",-2":$
"""6(1")""7
*2+% 8.""(12":
B"""(12":<""=""
)+%2":(< '""""=""
!""""+%1"
"=""(J"
4 Of 29

Construction
Assembling the HAWK-800 Board
Step 1 Prepare a work space
S($2""""(!""S(M)"("!"!";
(""M"!&""="6G)"":G)""7""(1R(."")"("
.((122"(J"
Step 2 Install all components into the HAWK-800 board
●S("("((!")2(""!)1"$!"F"
""""!1"(""""6T/07"(
()2(2."("9"2""!"("!
●C"9."6/7)"%(""6&7)"&#("
●"""6G7)"KH&G$")KH$")KHG%")KH&KH
●,S")(1$"":"""2""1((!2"((
"(!2"".((1"(
●F(1"("!"1("$("1(("&#("'""("""
"(")"((("(""(&(""(""
(("("'"""("("(("P0O
●F(1"("!"1("$("9."6/7)"%("<"")"%(
"(!"("(""('"""("("(("P0O
●'""""()(""1"!)"("((!
5 Of 29

Step 3 Install the Capacitors and Resistors into the HAWK-800 Board
●")(&"("(")"!'")"
(.("(12("(5""."()"!0"(&/!."(
"""2")")""((
●F""("!"""!."(2."
●'"9("(""."(&/!P0&/O()(""(1")"!
●'""("(""."(&/!!P0&/!O()("!(1")"
!
●'"(("(""."(&/!P0&/O()("!(1")"!
6 Of 29

-)./*&
<"+%""("((("6"(17)2"((1"(*2+%(
(""()2"+%"5"!"('""(6"
(17
Step 4 Install the Memory Chips
●,S")(1$"":"""2"""2(!2"
("(!2"".((1"(
●">B +6(2!"((1"!"."(7F""("!"(")2
("(6")""R7
●"#%#HB+((")(1(
●"6%7%%/#M"2((""((1("(
8 Of 29

*+-+34551
(($""!"1(()2"*2(((!8)$"""=("
""")2"2")(()$2""22"(J"""2
("!"'($2!"22"(J""("(!")2"")2!((2
22)"2(".(1""!2=(9"""("((
Step 5a Opening the Poly-800 or Poly-800 MK2
)2"((1"((,-"@"/!
●*""*26+%7)"6"2!7("")(12
●B".""G")")"1")""2!
●B".""I"("1")""("")""2!
●B".""H""")"!)""2!
●8"""("""")""""2(!"("
●")2(R"(1""!")"*2(1(."!(1(2,"
2("("!"@("!""")""2!
●B".""1("1""("""")""""2(!"("
Step 5b Opening the EX-800
)2"1(1,-"")(1
●B"."")6H7!")""""1")",-
●B"."")6H7!")""R(1(")",-
●8"("""()""""2(!"("
Step 6 - Remove the main board
●C""(!C+/I#6)"+%"(!(C+&G%7!"2!
6C+#&7("CC!""!("".""1"2".""
9 Of 29

(!"2!)"*2
●8"(""I"()"""""2(!"("
●")2".""(!61("BS("7"2!1""
●4(""BS(""(("()""""((!"("
Step 7 Remove IC 29 from the main board
4((%I(KH&GG)""1((("""""(")"("'(
(!""."""(&#(4*"'("(!!""!"")
("""!".("""KH&G(("("%I((""")"
)"."$22"."((("1()""
(9"8$()2""1"("".(1((""(!""")"1()"""
B, ++,<4,4"""(1)"(.""(1"."%I",*B +"
*""")"(.""(1()2."""
< ',4< '."""(< '""(""!(((!"."""
1"!("""9!"1!;""&""("
"(1(1")"!%")"!""2"&
"""(1
●2"(1(((".""1"""
●C"%I)(((J"2")(((("(1")!)"!62?
".""1("""("!"""(%I1"2")"""7
●F"""(1!(".""(1
".""(!")"
"""(")"!
●;29"2."".")
"""("2("
!22"((1)"')"""
($")2(11""(((1")
""(1(@(1"."2)"
"1,."2$!2(11(1""1(""
"(""$""1(!"")""
●"2""""1()""$"21
(""J"6"M!""(."7
1"2".""()")")"*>
F' <F"."2(")"(""1".""()"!)"((.""("2
2."")"(1"((")2")"$2(("2("
5)"(!'(!"("A'"2"4?(A8"""("!."(1%I
"."
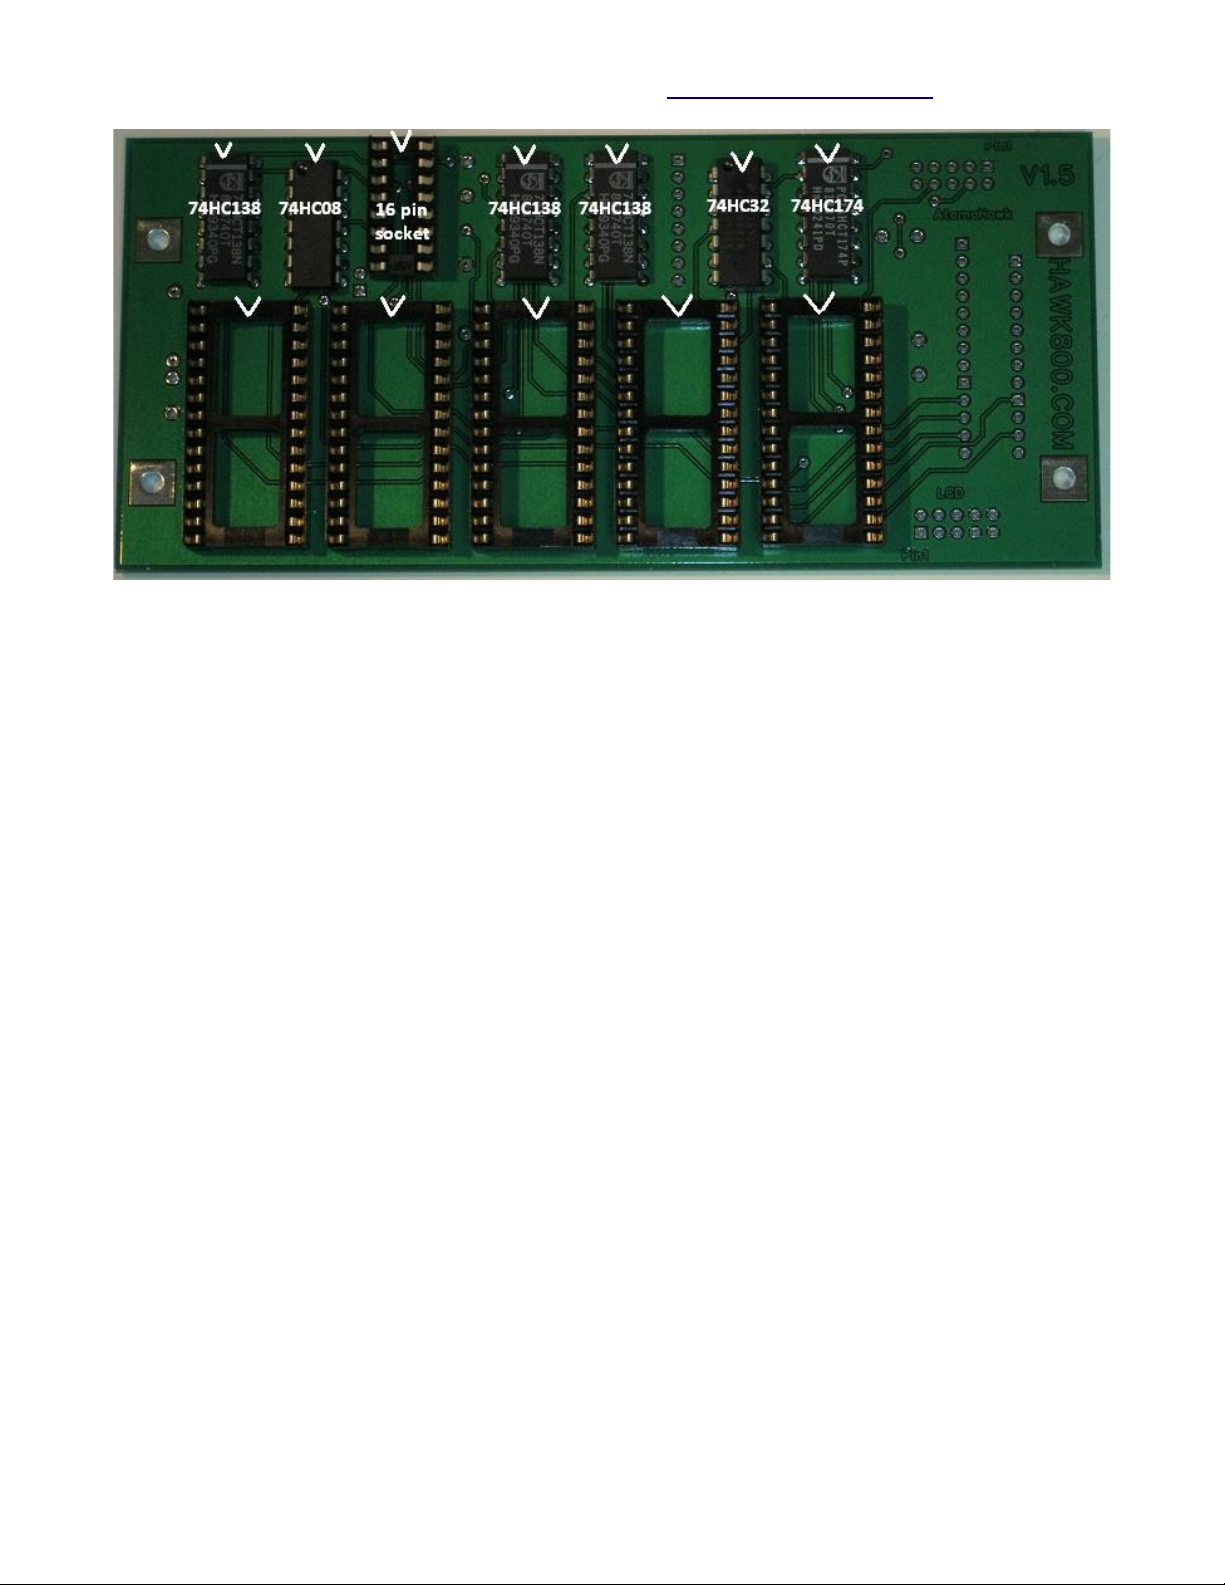
Step 8 Installing the IC29 16 pin DIP Socket
<(&#(4*"""%I6"KH&G7"F""
("!"""(""(")"""")""
(("("""("""(&)"(
!";""""21""(""
●")2("&#(4*"(")%I,"
")"""""!(")8""
"("!"
10 Of 29

●"2."")2(""""$""!)"!""&#("
1"("".""""")"("."")""4
"(12."9"&#("1"")2"2
●,"""(92""""(12("(4!""""(
""""2"")"")"(
Step 9A Removing the IC22 EPROM socket
)2"((1"((*2+%"1"I>)2"((1"(((1(
*2,-""":"(".""%%,*B +"'((""2!"""":(1
""."2(1("("(((!")4*""!"""21(
●")2"%%,*B +"
●B"."",*B +"(2""(()"""
●B"."""( 1"".""2""("""""""">
":"("1""21""!(")2)"1"
●,"%("""")"2"""":"
Step 9B Remove main board connectors CN13A and CN14A
)2"((1"((*2+%""":"("."""@("
(!""5"!'""""""(""(!""%%)(
"(1(,-."(
●'""<&G<&H!"".")"+%(!6C+&G%7
●B<<Q>"")21""<&G<&H"!"""2!!"
"""!'"""."""("1"1(1"
('"":"""21"2)"""("((!
●"2.""."""!""("""B""2((1."
"")""
●8""<&G<&H"("""2?""
●<""%"("("""(!"""2")
"(""""(%("((
Step 10 Installing the 28 pin DIP Socket
<(%(4*""""%%,*B +"@"."6)"+%""<&G<&H
"""@"."7F""("!"""(""(")"""")"
"(("("""("""(&)"(!";""""2
1""(""
●4!""""%""""2")"""!"(""
(!"(1(1."2)"%(
●")2("%(4*"(","")""""("
!"
●"2."")2(""""$""!)"!""%("
1"("".""""")"("."")""4
"(12."9"%("1"""2")"
(."(12")""(")
11 Of 29

●,"""(92""""(12("(4!""""(
""""2"")"")"(+""2(""""2(
"("("!"
Step 11 Remove the lithium battery from the main board
)"(!((!"2"("(""!""."
●B".""!((!"2F""("!"(")22(((!"2("(*2
Step 12 Install the “Write” Jumper
4(((($"""""@"(""!)"(!(".("
"""9!("*F(""2(1'"@""(%"%%,*B +"
%&B+#&&#(%&'"("!"()"!)+&(!F""("!"(")2
""("()"@"("
●"P("O@"(""!)"(!
Special Section for the Poly-800 MK2 II)
NOTE: Steps 13 through to 21 are for a MK2 installation only
)2"((12(((1(*2,-2()"%%S"&G
1%&)+%(
Step 13 - Remove the effects board
●C""+%"5"!6C+KKI7("CC!""!("".""1"
2"."""5"!)"*2+%8"""5"!(2"
12 Of 29

Step 14 Remove Three Chips from the Effects Board
●B"."",*B +(6%H7)"%("""5"!F"()""J"
"(."".""('"B +("""""(("!2""
,*B +()""(!""1(()"""
●4"""."%%%G)""5"!F""("!"1("
●,"2"2"")""5"!(("$"(!"
Step 15 Install the Effects Board Jumper
●<(@""!)""5"!("("!">"2"(
2""1"@"""(("(""""@""(!2
""(1""6")((1""7"@"(""
2""("!
●'(@"(()""")"+%"5"!8()2"(."2"5"
"(1":"""!""(@"
13 Of 29

Step 16 Reinstall the Effects board into the Poly-800 MK2 Synthesizer
●B"(""5"!!("+%2"(J"
●B"(!1""1(""
●,"2""!"":(1!"<&/
●$!+0.+ )& 11 2)+.;256"(!
17"9."("""<&/<&/("9."("9."("
"1""$2"$1"$"!)2"(""."""("6"""7
"""2"2"""!"!4 < '1(("<&/1""5"!
Step 17 Install CN13A and CN14A Connectors in the HAWK-800 PCB
●<""<&G<&H"""".")"(!("6("
"("7("!
●F""("!"1(")""(")"""2""(2."
"(""$""("(1"(")2("""
"")2"""!
14 Of 29

+* B'<'8""1"K)("(1"+%"5"!"("(!."(&/
Step 18 - Install the Main Board back into the MK2 Synthesizer
●B"("+%(!6C+&G%74< '("C+#&!("
●B"((!1""1(""
●,"2""!""(!6!.(221""<&G<&H
!""(!!"""1"("("!7
Step 19 - Install the KLM-601 and HAWK board into the MK2 Synthesizer
●'"C+#&!!"("("(9P"O28"""("!"
"C+#&!")"6"("((1(1"7"!
"!."(
●S($"C+#&!)"6("7(2"(1"8"""
("!"
15 Of 29

●<":$"")U(2"("("(""((("
("!"
●<":$"")"("("(
●*""!((.""2"D:""(""!(
(8"""("!"
16 Of 29

< ','"C+#&!()"2"""!)2)"@"(
""""("C+#&!""!""."'""C+#&
!!""."(@"'"$""@""
"""!!"""("!."
Step 20 Install CN13, CN14 Cables
●"<&G<&H!")""5"!"!"1!")"
!""=("(1""2(""
●*2"(""(")"<&G<&H!" "!$!<&G(&
<&H(&"("""5"!(&(!)!"
17 Of 29

Step 21 Install the 28 pin and 16 pin header cables
●C"("%(""!""!2>"")"""("(""2(
""!""((."2"2("2(1"1(""""1""""
2!"."2)"(2(""1(""8"""("!"
●C"("&#(""!""!2>"")"""("(""2(
""!""((."2"2("2(1"1(""""1""""
2!"."2)"(2(""1(""8"""("!"
18 Of 29

●;.""%#
Special Section for the Poly-800 original version)
NOTE: Steps 22 through to step 25 are for an original Poly-800 HAWK
installation only
Step 22 - Install the Main Board back into the original Poly-800 Synthesizer
●B"("(1((!6C+/I#7
●B"((!1""1(""
●,"2""!""(!
Step 23 - Install the KLM-601 board into the original Poly-800 Synthesizer
●B"("C+#&!(1"(1("
19 Of 29

Step 24 - Mounting the HAWK board in an original Poly 800
●)("((!56("7"("((!()"6
("7""5&H((1("!("
●F(1(!"1(1""$12"""("*2""""!(!"
"
●F(1"(""1"1"(!"":2((!"1"$"!""
●'""2("!(((")""("""1!"
"6"""("!"7C("""1")"!("(!
(J2(1""R(1("(!("("
●"2)")"1"2"!")""1""1";?
2."".""!"("?)""
Step 25 Install the 28 pin and 16 pin header cables
●C"("%(""!""!2>"")"""("(""2(
""!""((."2"2("2(1"1(""""1""""
20 Of 29
Other manuals for HAWK-800
1
This manual suits for next models
3
Table of contents
Popular Control Unit manuals by other brands

Leadshine Technology
Leadshine Technology CS-D507E user manual

Plymovent
Plymovent ES-90 user manual

steute
steute RF BF 74 SW868 Mounting and wiring instructions

Festo
Festo VZBA-...-63-T-22-...-V4V4T series operating instructions

Directed Electronics
Directed Electronics 556L manual

Advantech
Advantech ADAM-3750 3-Wire Series Startup manual