WARDRAY PREMISE Pure Sound II User manual

March 2020 GEN.S.20/266
MR200
Pure Sound II
Audio Relaxation System
OPERATORS MANUAL

2
Introduction
Thank you for purchasing this MR Conditional product. Manufactured and tested to the highest
standards it is guaranteed MR Conditional to 7.0T for the parts installed inside the MR scan
room.
The unit has also been tested to the following standards:
EMC Directive 2004/108/EC, Low Voltage Directive 2006, 95/EC and RoHS
Directive 2011/65/EU
The Harmonised standards that have been applied are: EN60950-
1:2001+A12:2011
CE Certified
EMC Test Standards EN6100-6-3:2007 Radiated disturbance - CISPR16
inc A1:2001 - Conducted disturbance - CISPR16
EN61000-3-2:2006 - Mains harmonics - Class A
EN61000-3-3:2009 - Mains Voltage flicker (dmax=4%)
Product Complies with RoHS Directive 2011/65/EU
To ensure that you obtain maximum benefit from your product, please take a few minutes to read
the enclosed information regarding operation, service and maintenance.
If you have any problems in the meantime or would like any advice about this or any other
products from the Wardray Premise range, please contact us at our Head Office:
Wardray Premise Limited, Hampton Court Estate, Summer Road,
Thames Ditton, Surrey, KT7 0SP, UK
Tel: +44 (0) 20 8398 9911
Fax: +44 (0) 20 8398 8032
E-mail: sales@wardray-premise.com
Kindly note:
If you modify a Wardray Premise product you will invalidate your warranty.
Unless you have our express written permission to modify a product, we transfer all liabilities for
modified products to you.

3
New Safety Definitions for MRI as Defined by International
Standard F2503-20
MR SAFE:
An item that poses no known hazards resulting from exposure to any MR
environment. MR SAFE items are composed of materials that are electrically
nonconductive, non-metallic, and nonmagnetic.
MR CONDITIONAL:
MR Conditional – an item with demonstrated safety in the MR environment within
defined conditions including conditions for the static magnetic field, the time-
varying gradient magnetic fields and the radiofrequency fields.
Supplementary marking – additional information that, in association with marking
as “MR CONDITIONAL,” states via additional language the conditions in which an
item can be used safely within the MR environment.
MR UNSAFE:
An item which poses unacceptable risks to the patient, medical staff or other
persons within the MR environment.

4
Specification
The MR200 is MR Conditional to 7.0T for the parts installed inside the MR scan room:
Audio Control Unit - MR Unsafe
Microphone - MR Unsafe
DVD/CD Player - MR Unsafe
Noise Reducing Headphones - MR Conditional to 7T
Earphones - MR Conditional to 7T
Stereo Acoustic Converter - MR Conditional to 7T
Important note: Equipment should be set up in accordance with the layout diagram
(page 15).
MR Unsafe items must not be taken into the MR scan room.
Width
mm
250
Depth
mm
300
Height
mm
100
Weight
Kg
2.5
Width
mm
190
Depth
mm
190
Height (max)
mm
500
Weight
Kg
1
Width
mm
120
Depth
mm
170
Height
mm
500
Weight
Kg
0.5
Audio Control Unit
Microphone
Stereo Acoustic Convertor

5
General Information
Contents and Cabling included
Item:
DVD/ CD Player
Noise Reducing Headphones (MR125) / Earphones (MR151) - Including:
100 pairs of disposable Headphone covers and 20 pairs of disposable Ear tips
Pure Sound II Audio Control Unit
Pure Sound II Microphone with attached cable
Pure Sound II Stereo Acoustic Converter
3.5mm male to male cable
Power Cable (3amp)
2.5mm to 3.5mm jack
2m left / right phono cable (male to male)
30m Audio Cable 4Core screened with plug to headset socket
20m Audio Cable 4Core screened with plug to Stereo Acoustic converter
2 x Velcro Strips for securing Stereo Acoustic Convertor to Scanner if required
2 x Euro Plugs if required
For MR Installations only: MR120A RF Filter Kit
4 x RF Filters (50-60Hz / 10 Amp / 250 VAC)
1 x 12mm Drill Bit
8 x Ring Connectors for the RF filter
Important note: For use in the MR environment, a filter kit must be installed. See Page 15 for
installation guide. A competent / qualified person should install the electrical filters. If in
doubt guidance should be sought from Wardray Premise Limited.
We recommend that this equipment is PAT (Portable Appliance Test) tested every 2—3
years to verify it’s continued electrical safety.

6
Operating Instructions
Unit Usage – Important Information
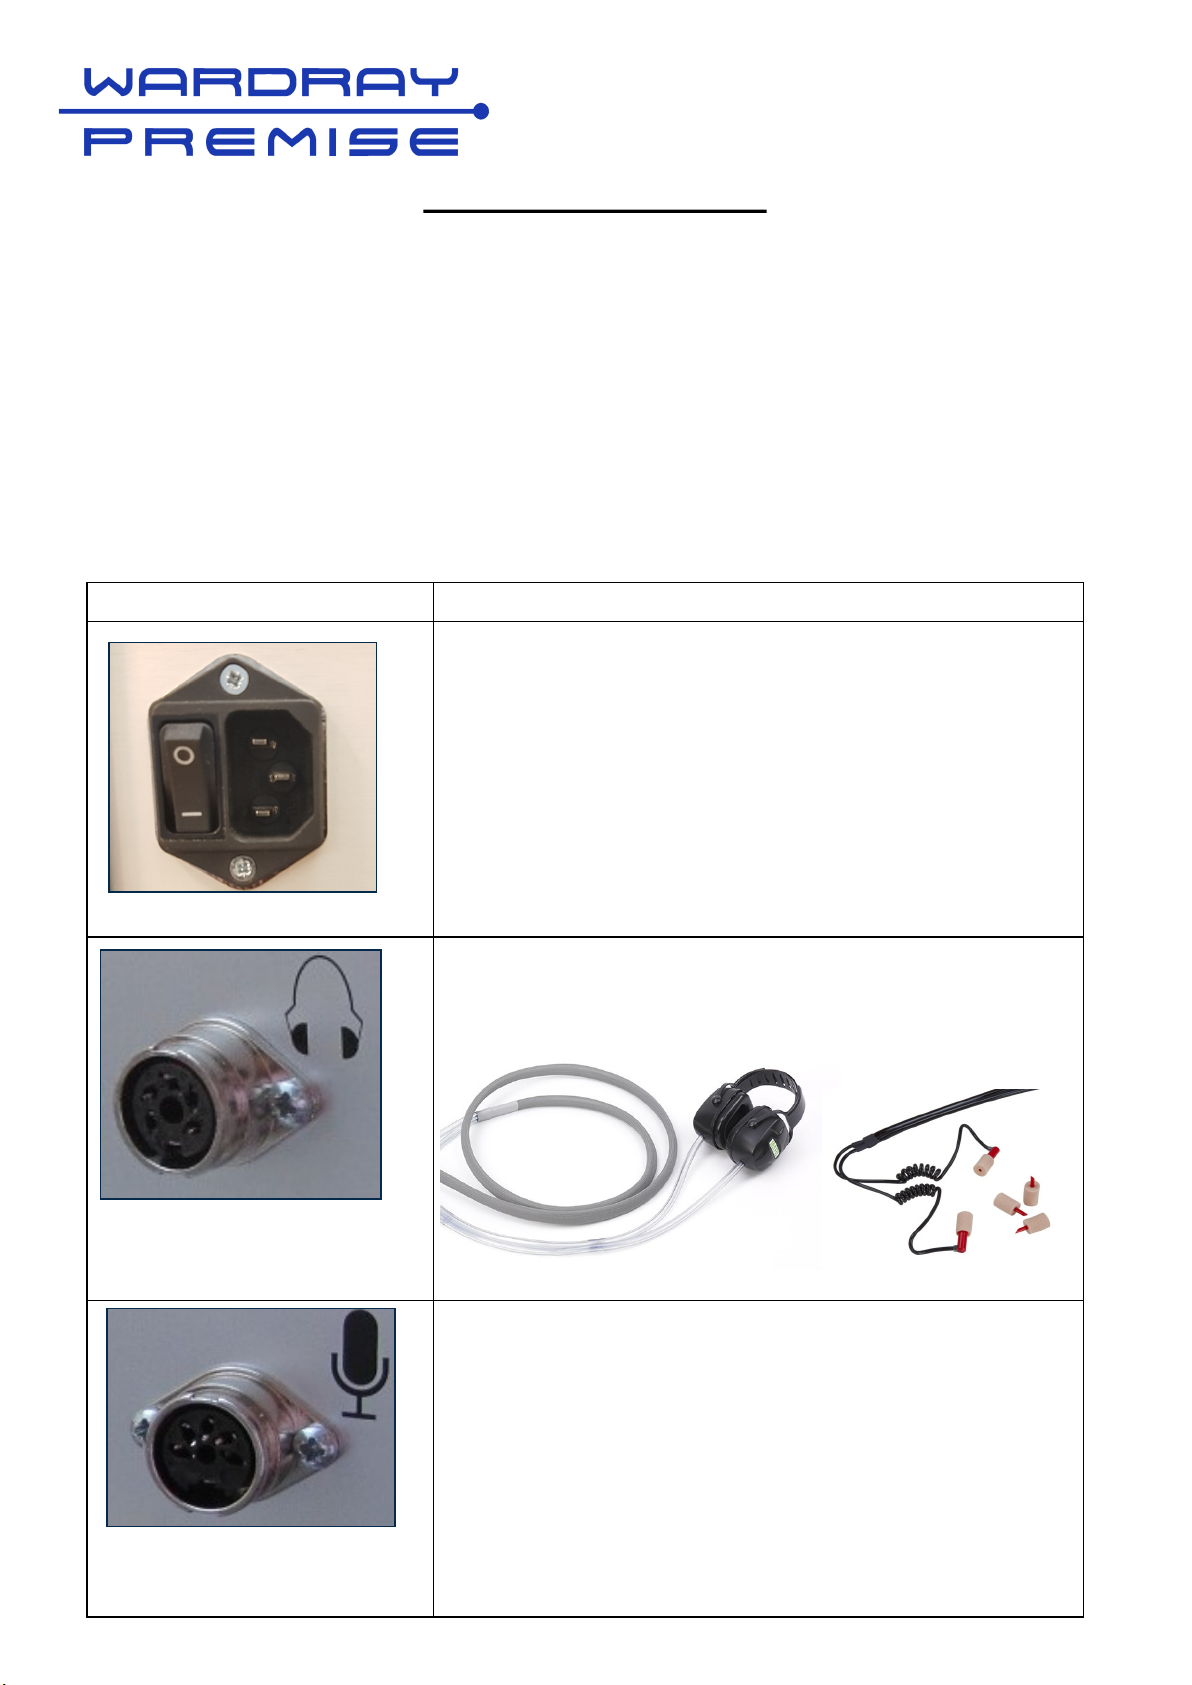
Power Requirements: 100-240V, 0.5A, 50/60Hz – suitable for use in all markets.
Mains current: 120w maximum.
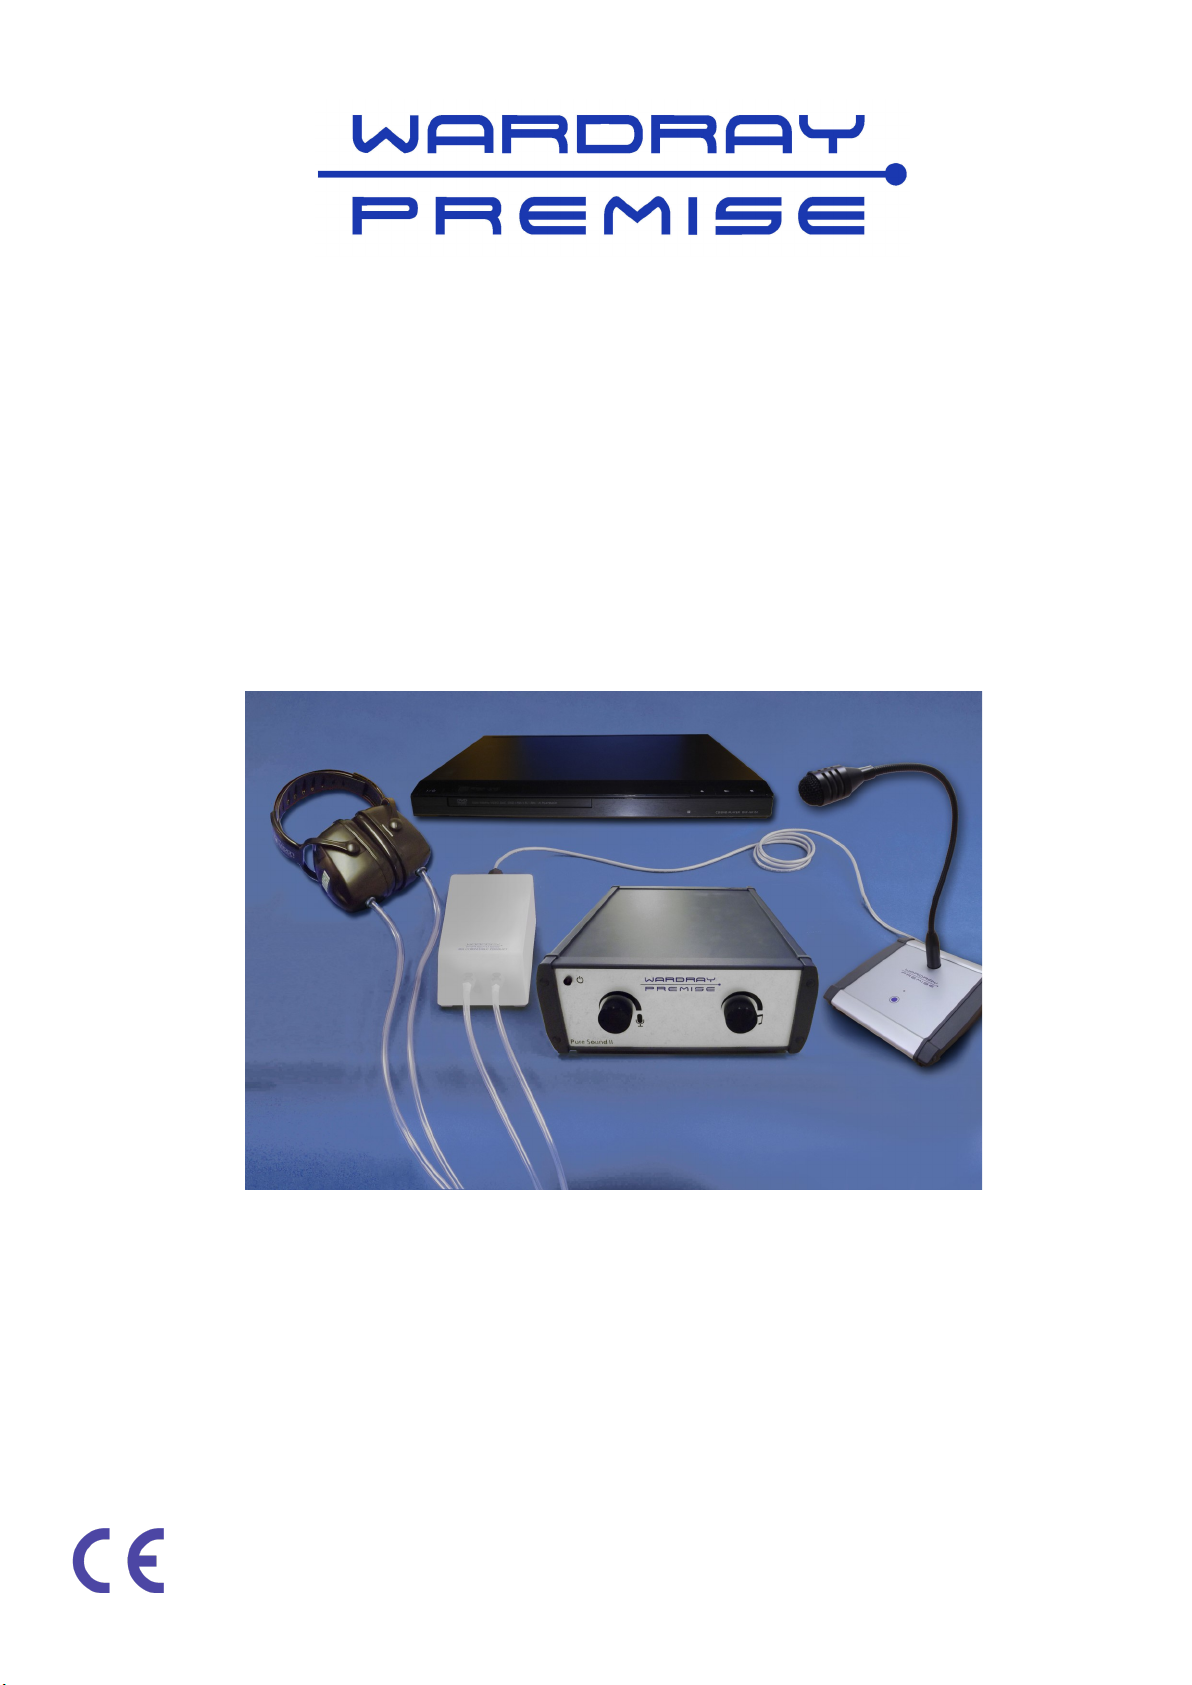
Inputs: DVD / CD player, Mobile Phone, IPod, Microphone.
Outputs: Stereo Acoustic Convertor, Speakers (not supplied, source locally).
Microphone to patient: Push button to talk.
Muting: Automatically mute when microphone is not in use.
Environmental Requirements: The system is designed for use in environments with a
maximum ambient operating temperature of 40°C, in an ordinary ‘office’ environment, with particular
attention to avoiding excessive levels of humidity and dust.
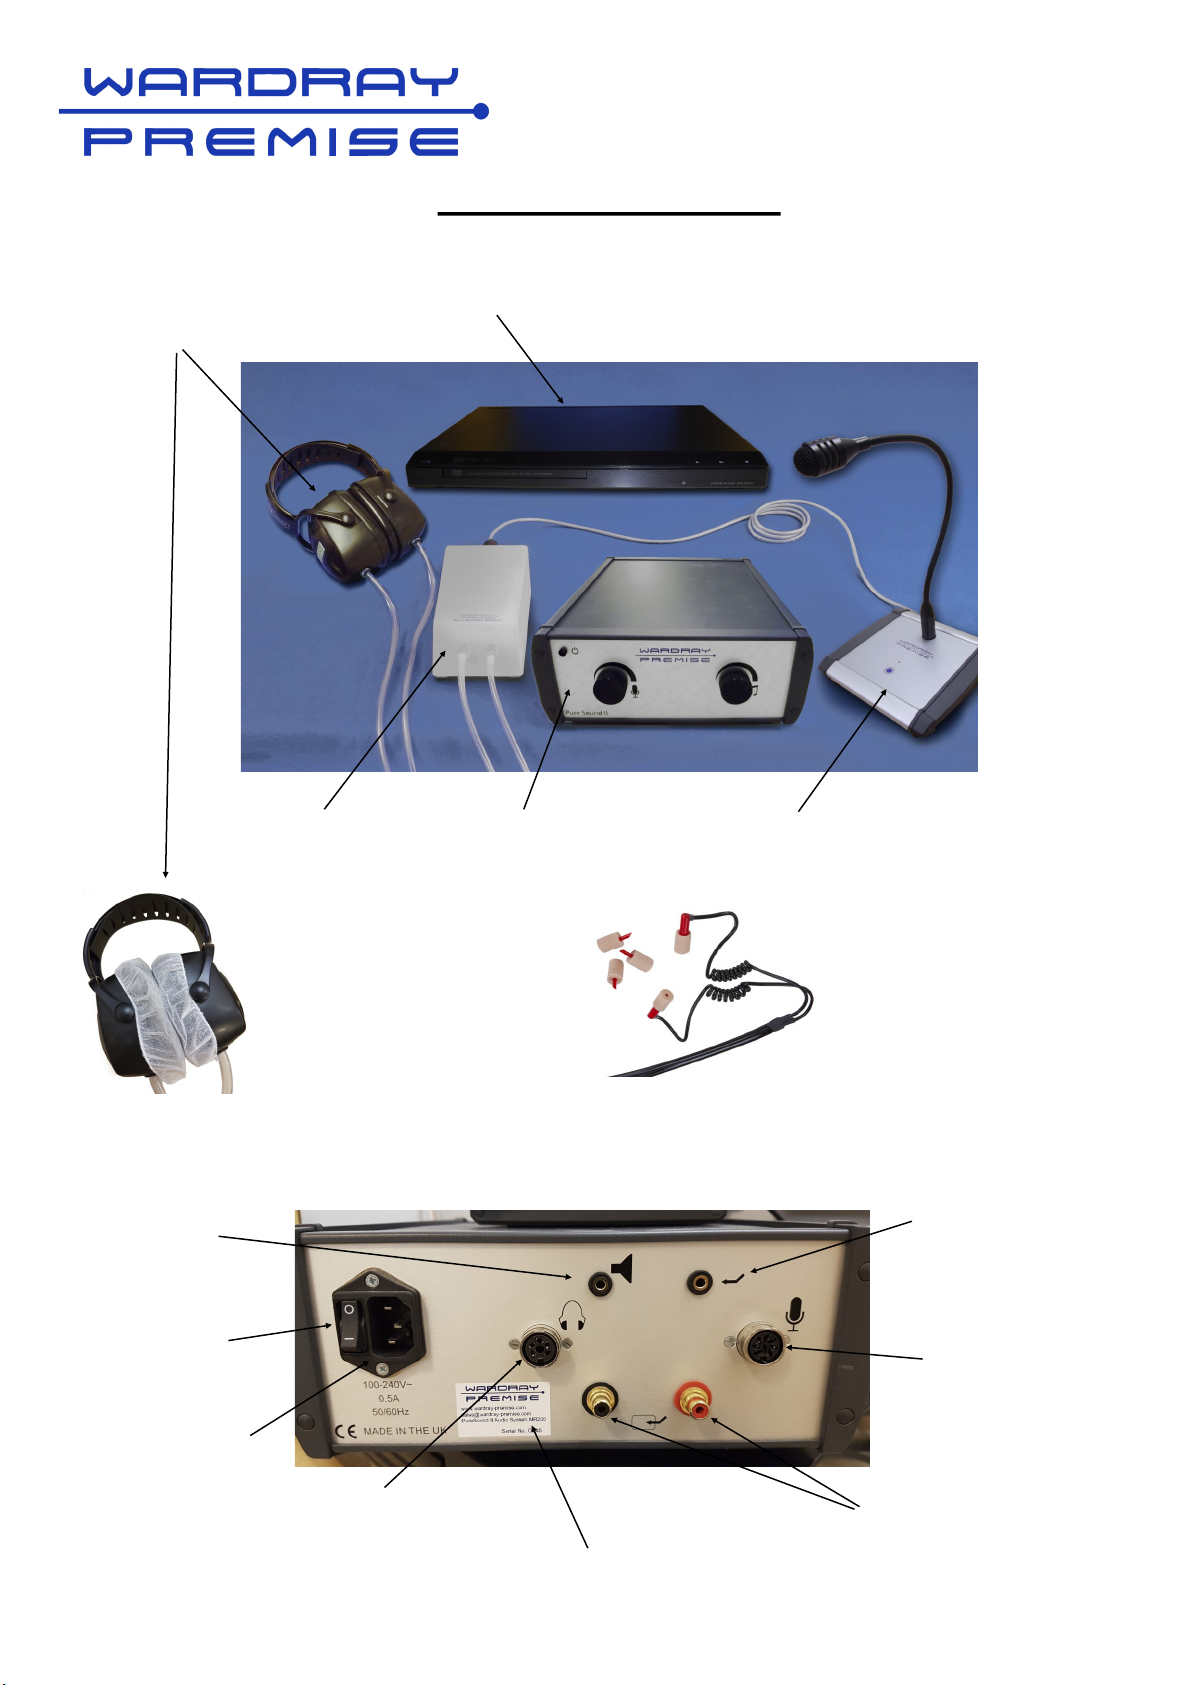
The Audio Control Unit is located and operated from the MRI control room.
The Audio Control Unit MUST be positioned to allow operator access to the on/off power switch at
the rear of the unit and requires the free flow of air around the unit.
The Audio Control Unit, Microphone and optional DVD/CD player units in the control room are
designed for desk and/or shelf mounting.
Pure Sound II is designed to receive audio media via the 3.5mm jack (Fig 1, page 12) from a mobile
phone or digital music device. NB: In order to use a mobile phone for the replay of audio media, the
phone must be set to a ‘flight only’ state otherwise interference with the device and other units is
possible.
Pure Sound II can also receive audio media via the optional DVD/CD unit.
In all cases of Audio Input via either 3.5mm Jack or DVD input, the volume of the supplying device
should be set to a ‘mid’ volume level and the volume adjustment to be made via the Audio Control
Unit volume dial ONLY (see page 11). This is to avoid ‘clipping’ or ‘distortion’ of the audio media.
The Headphone playback is designed only for short periods of time as defined as the time for an
MRI Scan. Repeated or longer term usage of the headphone output at high volume can cause
damage to the hearing of the patient. If for any reason the headphone playback is to be used for a
long term treatment, the volume needs to be set to a low level to avoid damage to the patient.
Important note: At all times this product must be used in accordance with this operator
manual and by appropriately trained staff who understand the risk to patients’ hearing if
incorrectly used.

7
MR200 parts reference
DVD/CD PlayerMR125
Noise Reduction Headphones
Stereo Acoustic
Convertor
Audio Control Unit Soft Touch Microphone
Rear of Audio Control Unit
Power Socket
Patient Headphone
Output
Audio Input Socket
Audio Input from
(optional) DVD
Operator Microphone
Input Socket
Power Speaker
Output
On / Off
Power Switch
MR151
Earphones
(inc. 20 pairs of disposable
ear tips)
MR125
(inc. 100 pairs of
disposable covers)
Product Serial No.

8
Operating Instructions
General Information
Pure Sound II is designed specifically for the replay of audio material to patients whilst undergoing
MRI Procedures and allows one way communication with the patient (from the operator to the
patient) via the supplied microphone unit and the optional replay of the unit output via powered
speakers to either a waiting room or control room.
Please note that powered speakers are NOT included/supplied, they need to be sourced locally.
The control unit has 7 connections on the rear panel.
Connection (Icon) Description
Power Socket and switch
A 3 pin power socket with unit on/off power switch
(Power Lead included).
Patient Headphone Output
Socket
A Patient Headphone Output (via the Stereo Acoustic
Convertor) multi pin socket (Cables included).
(Noise Reducing Headphones and Earphones included)
Operator Microphone Input
Socket
Operator Microphone Input multi pin socket (microphone
supplied).

9
Operating Instructions
General Information
Connection (Icon) Description
Power Speaker Output Socket
(3.5mm)
Power speaker output (speakers not included) for use in
operator room or waiting room.
Audio Input Socket (3.5mm)
3.5mm audio input. (eg: Mobile Phone or other audio) To be
used with the 3.5mm male to male extension lead (supplied)
to allow easy changing between audio inputs.
Audio Input Sockets from
(optional) DVD
Pair of input sockets to be connected to (optional) DVD
player (lead supplied).

10
Operating Instructions
General Information
Connection Description
7 Pin Connector Plug
Stereo Acoustic Convertor Unit - Power
Push to connect (It can only locate one way - Do not force).
Tighten the outer ring in a clockwise direction to secure.
Airline Connector
Patient Headphones Airline Connectors
Depress silver colour disc and push the airline into the
opening. Releasing the clip will secure the airline in place.
Repeat with the second airline.
Headphones and Earphones Recommended
The disposable headphone covers or disposable ear tips
should be replaced between patients.
100 pairs of headphone covers included.
Replacement covers are available in packs of 100
(MR150) pairs.
20 pairs of ear tips are included.
Replacement ear tips are also available in packs of 20
(MR152) 50 (MR153) and 100 (MR154) pairs.

11
Operating Instructions
General Information
Control/Indicator Description
Power on LED
A power on LED repeater. This will illuminate when the power cable
is connected, power is present AND the power switch on the rear of
the unit is turned on.
Operator Microphone Volume
Dial
Volume control for the microphone output. Turning the dial
clockwise will increase the volume, anti-clockwise will decrease the
volume.
Audio Output Volume Dial
Volume control for the audio output. Turning the dial clockwise will
increase the volume, anti-clockwise will decrease the volume.

12
Operating Instructions
Playing music to the patient
Power on the unit by first turning on power (at the wall socket) to the power cable and then turning
on the on/off switch at the rear of the unit.
Connect the patients choice of music:
If by personal music device (MP3/iPod/Mobile Phone etc)
Connect the device to the 3.5mm jack (if the device requires a 2.5mm jack, please
use the supplied adaptor*) (Fig 1).
If the device is a mobile phone, ensure the phone is set to ‘Airplane Mode’.
Set the device volume to a mid-point
Familiarise yourself with how to start the music playlist
Once the patient is in place, adjust the playback volume by using the Pure Sound II
volume control ONLY.
If by CD/DVD input (via optional DVD player)
Place the music media into the DVD player
If the optional DVD player has a volume control, ensure this is set to a mid-point
Once the patient is in place, adjust the playback volume by using the Pure Sound II
volume control ONLY.
Important Note: The Patient playback via headphones is ONLY for the duration of the patient
undertaking MRI processes. The Unit can play at high volumes (to overcome the noise of the
MRI operation) and long periods of exposure to high volumes may cause discomfort or
damage to the patients hearing.
Playing Music via Powered Speakers
Whether located in the MRI control room or an adjacent waiting room, music playback can be
achieved by connecting the ‘input’ of a powered speaker system to the 3.5mm speaker output on
the rear of the Pure Sound II Unit.
The volume of the playback can be adjusted by both the Pure Sound II volume control or the volume
control on the powered speakers (not supplied). It is recommended that the volume control on the
Pure Sound II unit is used in preference.
Fig 1
*Please note that for Apple
IPhone 5 and above, a
‘Lightning Adaptor’ (Fig 2) is
required.
(Not supplied, source locally)
Fig 2

13

14
Operating Instructions
Communicating with the patient
Ensure that the Pure Sound II is turned on (check the red LED on the front panel) Fig 1.
Set the microphone volume dial to the mid-point (the dial cut out pointing vertically) Fig 2.
To test the volume of the microphone output, press the button on the microphone unit, when
the circuit is open to talk, an LED will light on the microphone base (Fig 3).
Talk at a normal volume to the patient and confirm that the level of the transmission is
acceptable. If not, adjust microphone volume up/down accordingly and retest.
Care must be taken to check that the microphone is not ‘open’ (e.g. transmitting to the
patient) when discussing anything that may be worrying, offensive or inappropriate. While the
LED illumination is a guide, it is not recommended that this be taken as a definitive guide and
that discretion is used at all times when a patient is being examined.
Fig 1 Fig 2
Fig 3

15

16
General Maintenance
It is strongly recommended that the following checks are carried out on a weekly basis by
trained personnel, to ensure trouble free operation of the unit.
Check cables for obvious signs of damage or contamination. Report any damage found.
Check headphones for any sign of damage or contamination. Report damage or clean
where necessary following your local guidelines or instructions.
Please register your product with us, via the Warranty Registration Form (see page 22), for ease
of contact in case of urgent upgrades or recalls.
If the unit or any of the parts are damaged please do not attempt to repair as this
could invalidate your warranty and could compromise its safety, please call or
email Wardray Premise Limited:
T: +44 (0) 20 8398 9911
F: +44 (0) 20 8398 8032
E-MAIL: sales@wardray-premise.com
Please include the product code and the product’s serial number when
contacting Wardray Premise.

17
General Information
Cleaning
Cleaning is limited to wiping down the control unit with a clean dry cloth for the removal of dust /
debris.
There are NO SERVICEABLE PARTS WITHIN THE CONTROL UNIT OR STEREO / ACOUSTIC
CONVERTER. Any attempt to open the unit parts will invalidate the warranty.
Any removal of covers or connections to the unit requires turning the unit OFF, AND the complete
removal of the power lead.
If any of the above give cause for concern, please contact your Wardray Premise service
provider.
EU Declarations of Conformity and Magnetic Testing
Documentation is available upon request.

18

19

20
This manual suits for next models
1
Table of contents
Popular Personal Care Product manuals by other brands

Presso Plus
Presso Plus PRESSOPLUS03FR user manual

RECLAR
RECLAR Ritual peeler Plus manual

Direct Healthcare Services
Direct Healthcare Services Dyna-Form Air Pro-Plus user manual

Progetto
Progetto CIRQUE Series installation instructions

InstaMagic
InstaMagic HQT-906 quick start guide

SOMNOmedics
SOMNOmedics SOMNOtouch RESP PLM instruction manual