Waring PRO JEX450 User manual

JUICERATOR®
For your safety and continued enjoyment of this product,
always read the instruction book carefully before using.
JEX450

CONTENTS
Important Unpacking/Repacking Instructions . . . . . . . 1–2
Important Safeguards . . . . . . . . . . . . . . . . . . . . . . . . . . . . 2
Introduction . . . . . . . . . . . . . . . . . . . . . . . . . . . . . . . . . . . . 5
Parts . . . . . . . . . . . . . . . . . . . . . . . . . . . . . . . . . . . . . . . . . 6
Assembling Your Waring Pro®Juicerator®. . . . . . . . . . . . 7
Disassembling Your Waring Pro®Juicerator®. . . . . . . . . . 8
Operation . . . . . . . . . . . . . . . . . . . . . . . . . . . . . . . . . . . . . 9
Thermal Protector . . . . . . . . . . . . . . . . . . . . . . . . . . . . . . 10
Care and Cleaning/Troubleshooting Guide . . . . . . . . . . .11
Tips on Juicing . . . . . . . . . . . . . . . . . . . . . . . . . . . . . . . . 13
Vegetables and their Vitamin and Mineral Content . . . . 16
Fruits and their Vitamin and Mineral Content . . . . . . . . . 17
Recipes . . . . . . . . . . . . . . . . . . . . . . . . . . . . . . . . . . . . . . 18
IMPORTANT UNPACKING
INSTRUCTIONS
Caution: The filter basket/shredder disc has sharp edges.
Handle carefully.
1. Place the box on a large, sturdy, flat surface.
2. Remove the instruction book and any other literature.
3. Put one hand on each side of the Styrofoam®inserts
and carefully lift the Styrofoam®inserts out of the box.
4. Separate Styrofoam®inserts to remove components.
5. Remove unit base, top cover, pulp container, juice cup
and pusher from Styrofoam®mold.
6. Remove top cover of juice extractor. Carefully remove
all protective shipping material.
Keep all plastic bags away from children.
1

REPACKING INSTRUCTIONS
1. Place filter basket/shredder disc inside of filter bowl.
2. Place filter bowl and juice cover onto motor housing.
Lock juice cover into place by turning left to right.
3. Insert motor housing, top cover and pulp container
into Styrofoam®insert.
4. Place food pusher and juice cup into Styrofoam®
insert.
5. Place empty Styrofoam®insert over insert holding
components.
6. Put one hand on each side of the Styrofoam®inserts
and place contents into box.
7. Close box cover.
IMPORTANT SAFEGUARDS
When using electrical appliances, basic safety precautions
should always be followed, including the following:
1. READ ALL INSTRUCTIONS.
2. Always use the appliance on a dry, level surface.
3. Do not push produce into the feed chute with your
fingers. Always use the food pusher provided.
4. Do not touch the small cutting blades in the base of
the stainless steel filter basket.
5. Do not leave the juice extractor unattended when in
use. Close supervision is necessary when this
appliance is being used near children. Do not allow
children to use this appliance.
6. Always make sure the juice extractor is properly and
completely assembled before operating. The unit will
not turn on unless properly assembled.
7 . Always disconnect the juice extractor from the power
outlet when not in use or when assembling.
8. Always make sure juice extractor cover is securely in
place before motor is turned on. Be sure to turn
2

switch to off position after each use for your juicer.
Make sure the motor stops completely before
dissembling.
9. Do not put your fingers or any other object into the
juicer opening while it is in operation. If food becomes
lodged in opening, use food pusher or another piece
of fruit or vegetable to push it down. When this
method is not possible turn the motor off and disas-
semble juicer to remove the remaining food.
10. Do not operate any electrical appliance with a
damaged cord or plug or after the appliance has
malfunctioned or been damaged in any manner.
If damaged, immediately stop use and call Waring
Customer Service at (800) 269-6640 for examination,
adjustment or repair.
11. Do not immerse power cord or motor base in water or
any other liquid.
12. Do not let the cord hang over the edge of the table or
counter, or touch hot surfaces or become knotted.
13. Do not place this appliance on or near a hot gas or
electric burner, or where it could touch a heated oven.
14. Always turn appliance off at the power point and
remove cord
- if the appliance is left unattended
- if not in use
- before cleaning
- before attempting to move the appliance
15. For any maintenance other than cleaning call
(800) 269-6640.
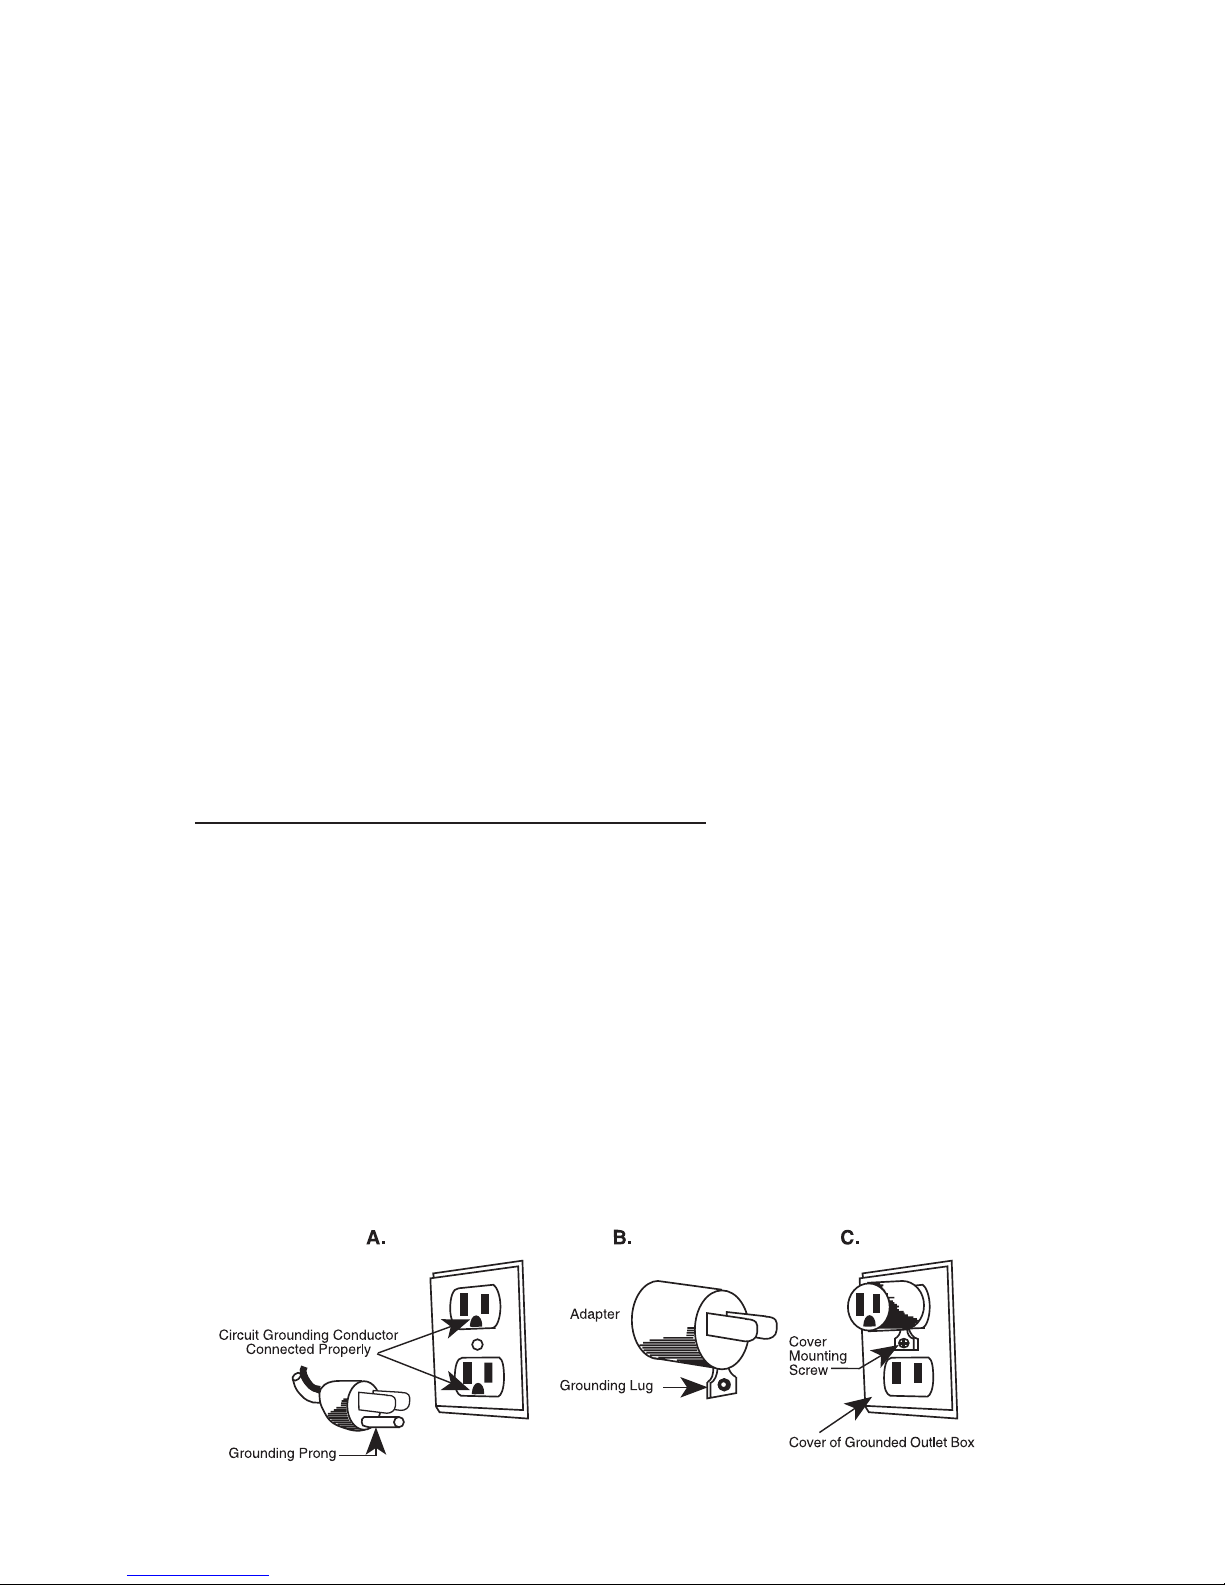
16. This appliance has a 3-prong grounded plug . To
reduce the risk of electric shock, this plug is intended
to fit into a grounded outlet only one way. If the plug
does not fit, contact a qualified electrician. Do not
attempt to modify the plug in any way.
17. To protect against risk of electrical shock do not put
motor, unit housing and power cord in water or other
liquid.
18. Unplug from outlet when not in use, before putting on
3

or taking off parts, and before cleaning.
19. Avoid contacting moving parts.
20. The use of attachments not recommended or sold by
the manufacturer may cause fire, electric shock or
injury.
21. Do not use outdoors.
22. Always make sure juicer cover is clamped securely in
place before motor is turned on. Do not unfasten
clamps while juicer is in operation.
23. Be sure to turn switch to OFF position after each use
of your juicer. Make sure the motor stops completely
before disassembling.
24. Do not use the appliance if the rotating sleeve is dam-
aged.
SAVE THESE INSTRUCTIONS
FOR HOUSEHOLD USE ONLY
GROUNDING INSTRUCTIONS
This appliance must be grounded while in use to protect
the operator from electrical shock. The appliance is
equipped with a 3-conductor cord and 3-prong grounding-
type plug to fit the proper grounding-type receptacle. The
appliance has a plug that looks like sketch A. An adapter,
sketch B, should be used for connecting sketch-A plugs to
two-prong receptacles. The grounding tab which extends
from the adapter must be connected to a permanent
ground such as a properly grounded outlet box as shown in
sketch C using a metal screw.
4

GROUNDING METHOD
EXTENSION CORDS
Use only 3-wire extension cords which have 3-prong
grounding-type plugs and 3-pole cord connectors that
accept the plug from the appliance. Use only extension
cords which are intended for indoor use. Use only extension
cords having an electrical rating not less than the rating of
the appliance. Do not use damaged extension cords.
Examine extension cord before using and replace if dam-
aged. Do not abuse extension cord and do not yank on
any cord to disconnect. Keep cord away from heat and
sharp edges.
INTRODUCTION
Raw juices derived from fresh fruits and vegetables are
invaluable as an aid in maintaining a balanced diet.
Raw juice contains, in its most natural and complete form,
precious vitamins, minerals, bioflavonoids and enzymes.
Nutritional authorities claim that raw juice is food in one of
its most easily digestible forms.
Be sure to use your Waring Pro®Juicerator®daily, or as
often as you can manage, in the manner recommended in
this instruction manual.
Because of the cleansing and rebuilding properties
contained in juices, it is recommended that you use juices
in small amounts in the first week and then gradually
increase amounts as you can comfortably enjoy them.
We recommend that juices be taken alone, between meals,
and at room temperature – not with meals.
The Waring Pro®Juicerator ®is the result of intensive
research and engineering efforts, and we are sure you will
be delighted with its performance.
5

1
2
3
4
5
6
10
10
11
9
8
7
PARTS
1. Food Pusher
2. Extra-Wide Feed Chute
3. Top Cover
4. Stainless Steel
Filter Basket and
Shredder Disc
5. Filter Bowl
6. Motor Housing
7. Pulp Container
10-Cup Capacity
(dishwasher-safe)
8. Pulp Container Lip
9. Lo/Off/High Toggle
Switch
10. Juice Collector Cup
and Cover
11. Froth/foam separator
(ensures juice froth is
separated from juice
when poured into glass)
12. Rest Button (not
shown) located under
unit base
6
12

Assembling Your Waring Pro®Juicerator®
NOTE: The juice extractor will not operate
until the pulp container is locked into
position. To assemble this unit the
following steps must be followed in the
order given.
Step 1
Place filter bowl on top of the motor housing.
Step 2
Place the stainless steel filter basket
inside the center of the filter bowl. Make
sure it snaps into hub. Press firmly on the
stainless rim of the filter basket. To avoid
injury do not press on shredder disk.
Note: Before switching the juicer on,
ensure the stainless steel filter basket is
pushed down firmly until it clicks into
place.
Step 3
Place the Juicerator®top cover over the
top of the motor housing by positioning
it over the center of the filter and lower
into position.
Step 4
Lock juice cover into place by turning
left to right (counterclockwise) until cover
locks into position. Follow instructional
arrows on top cover.
Step 5
Slide the food pusher down the feed chute
by aligning the flat area of the food pusher
with the flat area of the feed chute. Food pusher is
marked with an arrow for easy lineup. Continue to
slide the food pusher down the feed chute.
7
Step 1 and 2
Step 3
Step 4
Step 5

Step 6
Place the pulp container into position by grasping the lip
of the pulp container with one hand and tilting the pulp
container slightly. Place under top cover until it locks
into position.
Step 7
Place the juice collector cup provided under the spout of
the filter bowl.
Disassembling Your Waring Pro®Juicerator®
Step 1
Turn the Waring Pro Juicerator ®toggle switch to the off
position. Remove the plug from the power outlet.
Step 2
Remove juice cup.
Step 3
Remove the pulp container by tilting slightly to remove from
base.
Step 4
Remove the lid by twisting right to left (clockwise) as far as
it will go to disengage then lift up cover.
Step 5
Remove stainless steel filter basket and filter bowl at the
same time by holding onto the filter bowl spout and pulp
container lip while putting pressure with your thumbs on the
top rim of housing and pulling gently in an upward motion.
For best cleaning results, we recommend cleaning the filter
basket with an Oxo®cleaning brush.
THE STAINLESS STEEL FILTER BASKET
CONTAINS SMALL SHARP BLADES TO CUT
AND PROCESS FRUITS AND VEGETABLES.
DO NOT TOUCH BLADES WHEN HANDLING
THE FILTER BASKET.
8

Step 6
To remove the stainless steel filter basket, lift up from
juicer bowl.
Caution: Sharp blades
OPERATION
Note: The juice extractor will not operate until the pulp
container is locked into position. See page 8.
Step 1
Wash your selection of fruit and vegetables for juicing.
Note: Most fruit and vegetables such as apples, carrots
and cucumbers will not need to be cut to size as they will
fit into the feed chute whole.
Step 2
Ensure that the Juicerator ®is correctly assembled and
that the juice collector cup is placed under the spout
while juicing.
Step 3
Plug the power cord into a power outlet. For softer fruits
and vegetables such as melons, spinach, pears, etc., use
the low setting. For harder fruits and vegetables such as
carrots, beets, cabbage, etc., use the high setting.
Toggle to the low or to the high position depending on the
fruit or vegetable being processed. Toggle to the off posi-
tion when process is completed.
Step 4
With the motor running place food down the feed chute.
Using the food pusher, gently guide food down the chute.
To extract maximum juice always push the food pusher
down slowly. Make sure flat area of food pusher is aligned
to flat area of feed chute. The food pusher is marked with
an arrow for easy lineup.
9

Step 5
Juice will flow into the juice collector cup and the separat-
ed pulp will accumulate in the pulp container.
Note: The pulp container can be emptied during juicing by
turning the juice extractor to the off position, then carefully
removing the pulp container. You can reserve the pulp for
soups, sauces or cakes. Or, you can discard the pulp.
For your convenience, the juice cup is equipped with a
froth/foam separator. To remove, simply pull up. To insert,
slide down. This part is not dishwasher-safe.
NEVER USE FINGERS TO PUSH FOOD
DOWN THE FEED CHUTE OR TO
CLEAR THE FEED CHUTE.
ALWAYS USE THE FOOD
PUSHER PROVIDED.
Note: Do not allow the pulp container to
overfill as this may prevent correct operation
or damage the unit.
Cleanup tip: For easy cleaning, immediately after each use
wash the Juicerator®removable parts with soap and water
under running water to remove wet sticky pulp. Removable
parts (except the froth/foam separator) can be air dried or
can also be cleaned by placing on top shelf of dishwasher.
Step 6
Replace the pulp container by tilting it slightly, grasping the
pulp container lip, then push lightly until it snaps into place.
Thermal Protector
For your safety and protection, this juice extractor is
equipped with a thermal protector. Should the juice
extractor overheat, the motor will automatically shut off.
To restart, follow these steps:
10

Move the toggle switch to the off position.
Unplug the juice extractor from electrical outlet.
Let motor cool down for approximately 5 to 10 minutes.
Press the black reset button located
on the bottom of the unit base.
Once the motor has cooled down, plug
unit into electrical outlet.
Move toggle switch to either low or
high to continue juicing.
CARE AND CLEANING/
TROUBLESHOOTING GUIDE
For easy cleaning: immediately after each use rinse
removable parts with hot soapy water to remove wet pulp.
Rinse with clean water. Allow parts to air dry. Or, place
removable parts on top shelf only of dishwasher. Note:
Froth/foam attachment is not dishwasher-safe and must be
washed by hand. Waring Pro®juice cover, filter bowl, pulp
container, filter basket and juice container are dishwasher
safe (top shelf only).
Wipe the motor base with a damp cloth.
Before washing juice collector cup, remove froth/foam
attachment and rinse under running water.
Note: Froth/foam attachment is not dishwasher-safe.
A nylon washing brush is the most effective way to clean
the filter basket. Using the brush, hold the filter basket
under cold running water and brush from the outside of the
basket. Then clean the filter basket in warm soapy water.
Always treat the filter basket with care as it can be easily
damaged. We recommend using an Oxo®cleaning brush.
11

POSSIBLE PROBLEM SOLUTION
Machine will not work
when switched on
Make sure unit is plugged into
proper power supply source. Make
sure all parts are in the proper
working position. Press the red reset
button on bottom of unit. Check your
home circuit breaker or fuse panel to
make sure they are live.
Motor appears to stall
when juicing
Wet pulp can build up under the cover
if the juicing action is too vigorous.
Try slower juicing action by pushing
the food pusher down more slowly.
Excess pulp building
up in the filter basket
Stop the juicing process. Remove
the juicer cover and scrape off pulp.
Re-assemble and begin juicing again.
Try alternating (soft and hard)
vegetable and fruit varieties.
Pulp too wet
and insufficient
Change to low or high speed. Try a
slower juicing action. Remove mesh
filter basket and clean mesh walls
with a fine brush in a solution of 70%
water and 30% bleach. This will
remove excess fiber buildup (from
fruit or vegetables) which could be
inhibiting the juice flow.
Juice leaks between the
rim of the juicer cover
and the filter bowl
Try a slower juicing action by pushing
the food pusher down more slowly.
Make sure unit is clean before use.
Filter bowl – juice sprays
out from spout
Try a slower juicing action by pushing
the food pusher down more slowly.
Make sure juice cup is in proper
position.
12

Discoloration of the plastic may occur with strongly colored
fruit and vegetables. To help prevent this, wash parts
immediately after use.
If discoloration does occur the plastic parts can be soaked
in bleach and water. Using 1 tablespoon of bleach to 1
quart of water, soak plastic parts for a maximum of 5 min-
utes, then rinse thoroughly. Do not soak the filter basket in
bleach. DO NOT IMMERSE THE MOTOR BASE IN
WATER OR ANY OTHER LIQUID. THE CENTER OF
THE FILTER BASKET AND FEED CHUTE CONTAIN
SMALL SHARP BLADES TO PROCESS FRUIT AND
VEGETABLES DURING THE JUICING FUNCTION. DO
NOT TOUCH BLADES WHEN HANDLING THE FILTER
BASKET OR FEED CHUTE AS BLADES HAVE SHARP
EDGES.
Note: To assist with cleaning, soak the stainless steel filter
basket in hot soapy water for approximately 10 minutes
immediately after juicing is completed. If pulp is left to dry
on the filter it may clog the fine pores of the filter mesh,
thereby lessening the effectiveness of the juicer.
TIPS ON JUICING
Extracted juice from fresh fruits and vegetables contains
95% of their nutrients. Drinking extracted juices is the
fastest way to digest fruits and vegetables so that your
body can absorb all of those nutrients. When you make
your own juices, you have complete control over what you
include. You select the ingredients and decide if you need
to use sugar, salt or other flavoring agents. Freshly extract-
ed juices should be drunk just after they have been made
to avoid a loss of vitamin content.
Always use fresh, seasonal produce. Always juice fresh
fruits and vegetables soon after purchasing. The longer
produce is held, the more nutrients they lose.
13

One tip is to wash all vegetables immediately after
purchasing and store in the refrigerator. This way they
are ready to juice at any time.
Fresh juices should be consumed immediately. They lose
nutrients as they sit.
Certain fruits need to be peeled first before juicing.
Examples of such fruits are pineapples, melons, mangoes,
and papayas – any fruit with skin that you cannot eat.
Also remove all pits and hard seeds from fruit such as
peaches, cherries, mangoes, etc.
Citrus fruit juice is delicious and creamy, and more nutrient-
rich than citrus juice that is manually pressed. It is essential
to remove the peel from all citrus fruits first before juicing.
Hint: It is best to refrigerate oranges before juicing.
If cucumbers are waxy, peel them before you juice them.
When juicing, softer ingredients should be juiced before
the harder ones. As a rule, softer ingredients should be
juiced at the low speed, while harder ingredients are
juiced on high.
Use your taste to guide you on fruit and vegetable
combinations for juices. The recipes provided are a
guideline but the possibilities are endless. Experiment
to see what your favorite combinations are.
Carrots make a great and tasty base for vegetable juices
and apples do the same for fruit juices.
Beets and carrot both have naturally high sugar contents
so when added to vegetable juices they balance out any
bitter flavors juiced vegetables may have.
It is great to use your juicer in tandem with your blender.
Blend fresh juices with ingredients like bananas, yogurt,
and protein powders for super delicious power smoothies.
14

It is also possible to make a healthier, fresher version of
your favorite cocktail with fresh juices. For a fresh mimosa,
juice two peeled oranges and add about an ounce to five
champagne glasses. Carefully fill with champagne, sip,
and enjoy.
Or, juice a pineapple (skin removed) and half a peeled lime
and place the juices in a blender with a banana, 4 ounces
of dark rum, and 1 cup of ice cubes. Blend for a delicious
daiquiri. Finally blend fruit juices with sparkling water or
seltzer to make a natural soda.
Most fruits and vegetables can be stored at cool room
temperature. The more delicate and perishable items such
as tomatoes, berries, leafy greens, celery, cucumbers and
herbs should be stored in the refrigerator until required.
All fruit and vegetables produce different amounts of liq-
uids. This varies within the same group – i.e., one batch of
tomatoes can produce more juice than another batch.
Since juice recipes are not exact, and juicing is not a sci-
ence, the
precise quantities of any juice are not crucial to the
success of a particular mixture.
NOTE
To extract the maximum amount of juice always push the
food pusher down slowly.
USING THE PULP
The pulp left after juicing fruit or vegetables is mostly fiber
and cellulose which, like the juice, contains vital nutrients
necessary for the daily diet and can be used in many ways.
However, like the juice, pulp should be used that day to
avoid loss of vitamins.
Pulp can be used to thicken casseroles or soups. Carrot
pulp can be used for making carrot cake. Pulp is also great
used in the garden for compost.
15

Vegetables and their Vitamin and Mineral Content
Asparagus High in vitamins A, B-1 (thiamine), C,
choline, folic acid; high in the mineral potassium
Beets and
Beet Greens
High in vitamins A, C, and chlorophyll
High in alkaline minerals such as calcium and potassium
Also contains vitamin B-6 and minerals choline and iron
Cabbage High in vitamins B-6, C
High in minerals chlorine, iodine, potassium, and sulfur
Carrots
High in vitamins A, C
High in potassium, calcium, and phosphorus
High in carotenes
Celery High concentration of organic alkaline minerals
(balances blood pH levels)
Cucumbers Good diuretic
Rich in potassium
Fennel Similar to celery – high in alkaline minerals
High calcium and magnesium content
Kale High in vitamins A and chlorophyll
High in calcium
Parsley
High in vitamins A, C, and chlorophyll
High in calcium, magnesium, phosphorous,
Potassium, sulfur
Parsnips High in vitamins C
High in chlorine, phosphorus, potassium
Radish High in vitamins C
Contains iron, magnesium, and potassium
Spinach
High in vitamins A, B complex, chlorophyll
High in calcium, iron, magnesium,
phosphorous, potassium
Summer Squash High in B-1, B-2, niacin
Peppers High in vitamins A, C
High in potassium
Tomatoes High in vitamins C, calcium
Watercress
High in vitamins C, chlorophyll
High in calcium, potassium, chlorine,
phosphorous, sulfur
16
Source: 1. Juicing Therapy by Dr. Bernard Jensen, 2000, Keats Publishing
2. Getting the Best Out of Your Juicer, William H. Lee, 1992, Keats Publishing

Fruits and their Vitamin and Mineral Content
Apples
Contain vitamins A, B-1, B-2, B-6, biotin, folic acid,
pantothenic acid. High in chlorine, copper, iron,
magnesium, manganese, phosphorous, potassium,
silicon, sodium, sulfur
Cherries
Contain vitamins A, C, B-1, B-2, folic acid, niacin
Contain calcium, cobalt, iron, magnesium,
phosphorous, potassium
Contains powerful alkalizing properties
Cranberries
High in vitamins A, C, B-complex, folic acid
High in calcium, iron, phosphorous, potassium
Contains live enzymes
Grapes
Contains vitamins A, B-1, B-2, C, niacin
Contains calcium, chlorine, copper, iron, magnesium,
manganese, phosphorous
Grapefruit
High in vitamin C
High in calcium, phosphorous, potassium
Contains some Vitamin B-complex, E, K,
biotin, inositol
Lemons High in vitamin C and citric acid
Acts as a very strong cleanser
Limes Same as lemons but not as acidic
Melons High in vitamin A, B-complex, C
High in enzymes
Oranges
High in vitamin A, C
Contains B-1, B-2 B-6, E, K, biotin, folic acid, niacin
Contains calcium, chlorine, copper, fluorine,
iron manganese,magnesium, phosphorous,
potassium, silicon, zinc
17
Source: 1. Juicing Therapy by Dr. Bernard Jensen, 2000, Keats Publishing
2. Getting the Best Out of Your Juicer, William H. Lee, 1992, Keats Publishing

RECIPES
Although the juice drinks contained in this booklet were
developed with flavor, texture and aroma at the forefront,
the health benefits certainly add to the pleasurable taste
experience. For further information on the consumption of
juices, we recommend that you visit your local bookstore
and pick up one or more of the many juice books available
on this subject.
STRAWBERRY CITRUS BLAST
Makes one 8-ounce serving
1 medium orange, peeled
1⁄2pound strawberries, hulls removed
1 cup grapes
Put all ingredients in order listed through the Juicerator®on
low speed. Serve immediately.
Nutritional information per 8-ounce serving:
Calories 192 (7% from fat) • carb. 48g • pro. 3g • fat 2g • sat. fat 0g
• chol. 0mg • sod. 4mg • calc. 101mg • fiber 9g
Notable nutrients:
Vitamin A 384 IU • Vitamin C 219mg • potassium 806mg
TROPICAL POWER JUICE
Makes two 6-ounce servings
1 medium orange, peeled
1 mango, peeled and pit removed
1 peach, pit removed
6 strawberries, hulls removed
1 tablespoon protein powder
Put all ingredients through the Juicerator®on low speed.
18

Place juice in a blender or sealable container. Blend or
shake. Serve immediately.
Nutritional information per 6-ounce serving:
Calories 262 (8% from fat) • carb. 38g • pro. 15g • fat 2g • sat. fat 0g
• chol. 0mg • sod. 4mg • calc. 356mg • fiber 7g
Notable nutrients:
Vitamin A 6171 IU • Vitamin C 156mg • potassium 557mg
DETOX EXPRESS
This purifying drink is a delicious and zesty cooler.
Makes two 8-ounce servings
1⁄2lemon peeled
1 cucumber (peeled if waxy)
1 medium apple
1 2-inch piece of ginger
2 medium carrots
Put the lemon and cucumber through the Juicerator®at
low speed. Turn to high and juice the apple, ginger, and
carrots. Serve immediately.
Nutritional information per 8-ounce serving:
Calories 117 (6% from fat) • carb. 28g • pro. 3g • fat 1g • sat. fat 0g
• chol. 0mg • sod. 32mg • calc. 57mg • fiber 6g
Notable nutrients:
Vitamin A 20628 IU • Vitamin C 31mg • potassium 682mg • iron
1mg
19
This manual suits for next models
1
Table of contents
Other Waring Juicer manuals