Washtech CD240 User manual

CD240
RACK CONVEYOR
OPERATOR MANUAL

Warnings
Before installation and commissioning, you must read the safety instructions and
warnings carefully and all the warning labels attached to the equipment.
Equipment contains dangerous voltages and can be hazardous if installed or
operated incorrectly. Non-compliance with warnings or failure to follow the
instructions contained in this manual can result in loss of life, severe personal
injury or serious damage to property.
Before installation or repair, you must read the instructions and warnings
carefully and all the warning labels attached to the equipment.
All service/repair work must be carried out by qualified personnel only and
ensure compliance with all local codes and standards including AS/NZS 3500.1.
Important Information
Failure to comply (even partially) with the instructions given in this manual will
invalidate the product warranty and relieves the manufacturer of any
responsibility.
The alteration of machine operation, design or the replacement of parts not
approved by the manufacturer may void warranties and approvals.
This machine is intended for commercial use only.
This machine is designed for the cleaning of fresh food waste from crockery,
cutlery, containers and food preparation and manufacturing equipment. Consult
the manufacturer regarding suitability of the machine for other applications. It is
not a waste disposal unit, and it is essential that significant loose soil or waste is
removed from washware by pre-rinsing or scraping, before it is placed in the
machine.
The information contained in this document is checked, reviewed and updated regularly to
ensure that it is accurate and relevant to the model described. However discrepancies and
errors can occur. We welcome your feedback.
Document subject to change without prior notice.
Information supplied in this manual is copyright. No part of this work may be reproduced or
copied in any form or by any means, electronic or mechanical without the express permission of
Washtech.
12/5/2022 2Washtech CD240L Operator Manual

12/5/2022 3
2. Warning
3. Contents
4. Safety Instructions
5. Installation Diagrams
6. Installation Instructions
8. Installation Checklist
9. Installation Troubleshooting
10. Operator Use Guide
11. Operator Care –Prewash Zone
12. Operator Care –Wash Zone
13. Operator Care –Rinse Zone
14. Operator Care –Curtains
15. Operator Troubleshooting
16. Schematic Diagram
17. Accessories
18. Notes
Contents
Washtech CD240L Operator Manual

12/5/2022 4
Installation
•Use qualified, skilled personnel.
•Follow installation instructions.
•Connect to correct voltage and supply current.
•Provide fully accessible Electrical Isolation Switch & water supply valves.
Training and Supervision
•Read and Understand the Operating instructions and train all staff.
•This appliance must not be operated by children or infirm persons.
•Machine panels must only be removed by suitably qualified and trained personnel–internal
hazards include live electrics and very hot surfaces.
•No part of this appliance is not intended for use as a stepladder –do not stand on open door.
Hot Surfaces
•Some surfaces may be hot or very hot.
Chemicals
•Commercial dishwashing detergents are hazardous –handle with care.
•Read and follow the safety information found on the labels of detergent containers and
Material Safety Data Sheets.
•Use protective eyewear and clothing if decanting containers.
Hot Water
•Do not put hands in wash water which may be over 60°C and contain hazardous caustic
detergent.
•Rinse water can be over 90°C.
•Door safety switches are designed for emergency use only.
Cleaning
•Do not hose down the machine or splash water over the exterior.
•Watch for broken glass etc. when cleaning the inside of the machine.
Warnings
Equipment contains dangerous voltages and can be hazardous if installed or
operated incorrectly. Non-compliance with Warnings or failure to follow the
instructions contained in this manual can result in loss of life, severe personal
injury or serious damage to property.
Installation and servicing must be carried out by a suitably qualified person in
compliance with all local codes and standards including AS/NZS 3500.1.
Safety Instructions
Washtech CD240L Operator Manual

12/5/2022 5
Installation Diagram
CD240L Installation
•Part #: CD240L
•Date: 23-06-2022
•Version: 3-A
Washtech CD240L Operator Manual

12/5/2022 6
Machine Positioning
•Unpack machine, check for damage and complete delivery.
•Install machine on sound waterproof self-draining floor and use adjustable feet to level
machine.
NOTE: Failure to level the machine correctly may result in leaking during the cycle,
overflowing from the door sill, poor hygiene through the wash tank not being able to
drain correctly.
•Allow room for detergent to one side of machine or in adjacent cupboard. 20 litre container
requires approximately 450H x 250W x 350D, but smaller containers are available from many
suppliers.
Ventilation
•15 m³/min = 250 l/sec –refer installation diagram –extraction via connected ducts or
overhead canopy.
Inlet Water Operation
Incoming water should be within the following standard requirements:
•Temperature: 65 °C.
•Connection: 20 mm (3/4” BSP) male.
NOTE: Flush supply line before connection. Poor quality supply or excessive water
hardness may affect performance or damage machine –filtration and/or softening is
recommended.
•Flow rate: minimum 20 litres per minute.
•Water Consumption: 3 litres per minute.
•Pressure: between 200 and 350 kPa.
NOTE: This machine is not equipped with a rinse booster pump and relies on incoming
water pressure to drive the rinse cycle.
NOTE: If above 350 kPa fit pressure limiter valve (LPV). Do not use small diameter plastic
supply lines.
•Backflow prevention: Dual Check Valve (DCV) fitted standard.
Water Quality Requirements
The incoming water should also be within the following parameters:
Hardness ppm pH
min 20 7
max 100 8
Ions Cl-SO4Fe Mn Cu Cl2
Max mg/L 100 400 0.1 0.5 0.05 0.1
NOTE: Levels above or below the stated requirements can be expected to increase
component wear and reduce the expected useful life of the dishwasher. If in doubt, it is
best to consult a water specialist and have the incoming water professionally tested and
treated if necessary.
Installation Instructions
Washtech CD240L Operator Manual

12/5/2022 7
Power
•Electrical supply required is 3p/32A 415V 50Hz via switched outlet adjacent to machine.
NOTE: Equipment contains dangerous voltages and can be hazardous if installed or
operated incorrectly. Non –compliance with warnings or failure to follow the
instructions contained in this manual can result in loss of life, severe personal injury or
serious damage to property.
Chemical
•Detergent and rinse aid pumps are not supplied with the CD100. We recommend you consult
your chemical supplier and/or a local chemical expert for their recommended detergent and
Rinse Fluid injector pumps.
NOTE: Commercial detergents can be hazardous –read instructions, store safely and
handle with care. Care needs to be taken when changing chemicals, ensuring that the
detergent is not accidentally connected to the rinse fluid inlet line.
NOTE: If uncertain, please consult a chemical specialist for assistance in selecting the
right chemicals and calibrating machine settings to suit this along with your unique site
conditions and requirements.
Waste
•40mm connection required to point B as specified on install diagram. An S-trap must be fitted
on each of these points.
NOTE: Either copper or P.V.C. may be used for the waste connection –P.V.C. is more
resistant to some harsh detergents. Some authorities however suggest that copper is
required because the machine rinses at up to 90°C. It is important to note that rinse
water mixes with the 65°C wash water before discharge and then flows into the trap
where the water is further cooled before entering the drainage plumbing. We
recommend consulting your local authority to ensure your site remains compliant.
Installation Checklist
•Complete attached Installation Checklist to ensure machine is installed and running correctly,
and operator is familiar with operating procedures.
Installation Instructions
Washtech CD240L Operator Manual

Check Notes
DELIVERY
SUPPLIED COMPLETE? CHECK THERE HAS NOT BEEN ANY TRANSIT DAMAGE
POSITION
LEVEL AND STABLE? ON SOUND, WATERPROOF, SELF-DRAINING FLOOR
WATER
ISOLATOR VALVE FITTED? ACCESSIBLE, ALL FITTINGS SOUND, AND NO LEAKS
TEMPERATURE CORRECT HOT WATER INLET 65˚C
PRESSURE CORRECT (200 –350 kPa)? LIMITER FITTED IF ABOVE RANGE, RINSE PUMP IF BELOW
FLOW RATE CORRECT (> 20L per min)? RINSE PUMP FITTED IF BELOW REQUIREMENT
QUALITY WITHIN REQUIREMENTS? FILTER OR SOFTENER IN PLACE IF OUTSIDE REQUIREMENTS
POWER
ISOLATING SWITCH FITTED, FUNCTIONAL AND ACCESSIBLE
CORRECT SUPPLY VOLTAGE, CURRENT, CIRCUIT BREAKER ALL CORRECT
WASTE
CONNECTION TO 50mm PIPE? CORRECT CONNECTION TO PLUMBING
CHEMICALS
CHEMICAL NAME CONTAINER NO LEAKS PRIMED CALIBRATED
DETERGENT
RINSE FLUID
MACHINE OPERATION
MACHINE RUNNING CORRECTLY? MULTIPLE CYCLES RUN, NO ISSUES
CHEMICAL DOSAGE CORRECT? CORRECTLY FLOWING INTO MACHINE, NO FOAMING
ALL OPERATIONS CORRECT? FILL LEVEL CORRECT, NO DRAINAGE ISSUES
OPERATOR TRAINING
ENSURE THAT THE CUSTOMER HAS BEEN GIVEN THE OPERATION MANUAL AND WALL CHART, AND IS AWARE OF THE
IMPORTANCE OF BOTH USING AND CLEANING THE MACHINE CORRECTLY
START UP
PRE-RINSE AND RACKING BETTER TO RINSE PLATES THAN REMOVE WASTE FROM MACHINE
DRAINING THE MACHINE DRAIN THE MACHINE DAILY
SHUT-DOWN AND DAILY CLEANING CHECK WASH ELEMENTS HAVE COOLED BEFORE CLEANING
WEEKLY MAINTENANCE FULL MACHINE CLEAN INCLUDING WASH/RINSE ARMS
PLANNED SERVICNG IMPORTANCE OF HAVING MACHINE SERVICED REGULARLY
12/5/2022 8
Installation Checklist
Washtech CD240L Operator Manual

12/5/2022 9
Installation Troubleshooting
Machine not starting or filling
•Ensure water supply to machine is turned on.
•Ensure power supply to machine is turned on.
•Check that the water inlet hose isn’t twisted or kinked.
Poor wash results
•Check that there are adequate pre-rinse processes in place.
•Ensure high quality non-foaming commercial dishwasher detergent has been connected at
the correct dosage for your site, water quality and application. If uncertain, consult a
chemical specialist.
•Ensure that the wash temperature is between 60°C and 65°C.
Chemical residue on items after the cycle
•Check water pressure, this is likely too low and below the minimum 200kPa required.
•Check that nothing is obstructing the wash & rinse arms.
•Check the rinse fluid dosage is not too high. If uncertain, please consult a chemical specialist.
Dishwasher is foaming
•Ensure high quality non-foaming commercial dishwasher detergent has been connected at
the correct dosage for your site and application. If uncertain, please consult a chemical
specialist.
•Allow wash water to heat to at least 60˚C prior to starting the first cycle as some commercial
dishwasher chemical will foam at low temperatures.
•Low water pressure can result in above average detergent concentrations. As low water
pressure also impacts rinse results, we recommended this is solved by installing a rinse pump
rather than compensating by reducing chemical dosages.
Other equipment in the kitchen has needed filters or has scale
•Due to the high temperatures in dishwashers, scale will build up in the wash tank, on the arms
and in the rinse tank. The incoming water should be treated. If uncertain, please consult a
water specialist.
•As with a Combi-Oven, high chloride levels will do irreversible damage to a number of the
components inside a commercial dishwasher. The incoming water should be appropriately
treated. If uncertain, please consult a water specialist.
Pawl drive not operating
•Clear the area around the limit switch on the roller table.
•Adjust the clutch tension of the Pawl Drive motor, the Pawl drive clutch tension can be
tightened by turning the 2 nuts at the bottom of the pawl drive shaft clockwise or loosened
by turning the 2 nuts anticlockwise.
(Note: the tension must be at a level where a person can grab the pawl drive with both hands
and stop the pawl drive motion).
Grinding noise escaping from the machine
•Wash pump rotation must be checked after installation to ensure correct direction (excessive
noise and damage with incorrect direction). Change phase connection if required.
Machine stops and refills during the commissioning stage
•Fit the curtains according to the Curtain labels on the front of the machine.
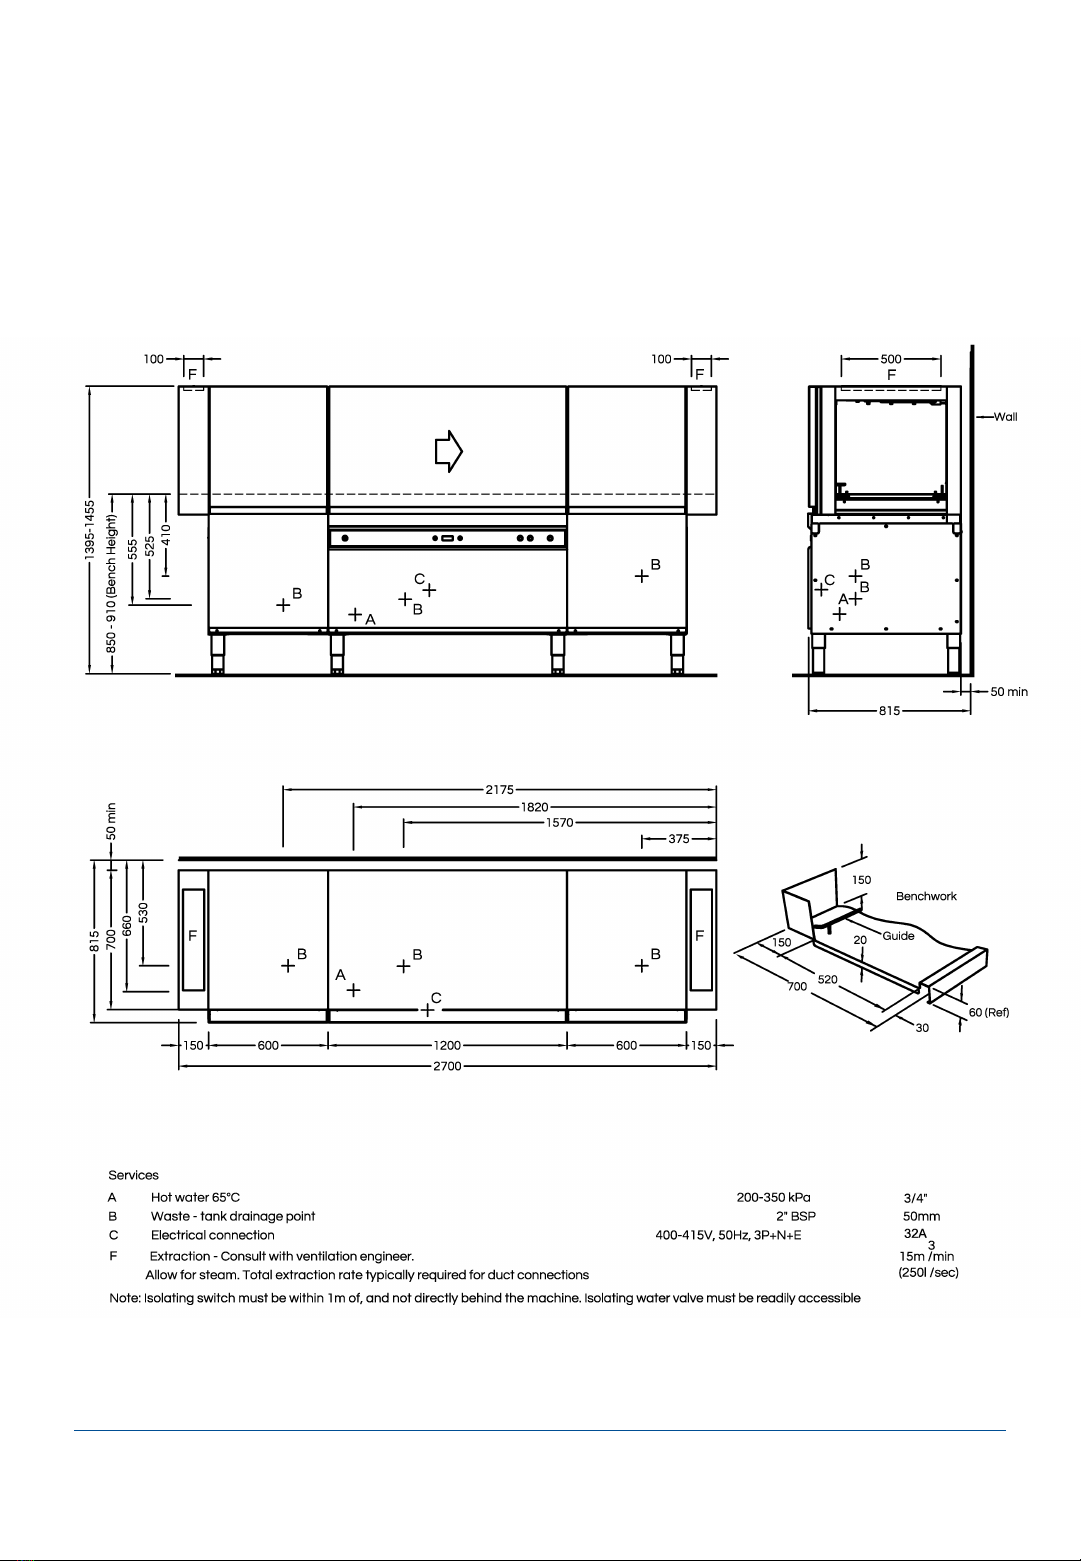
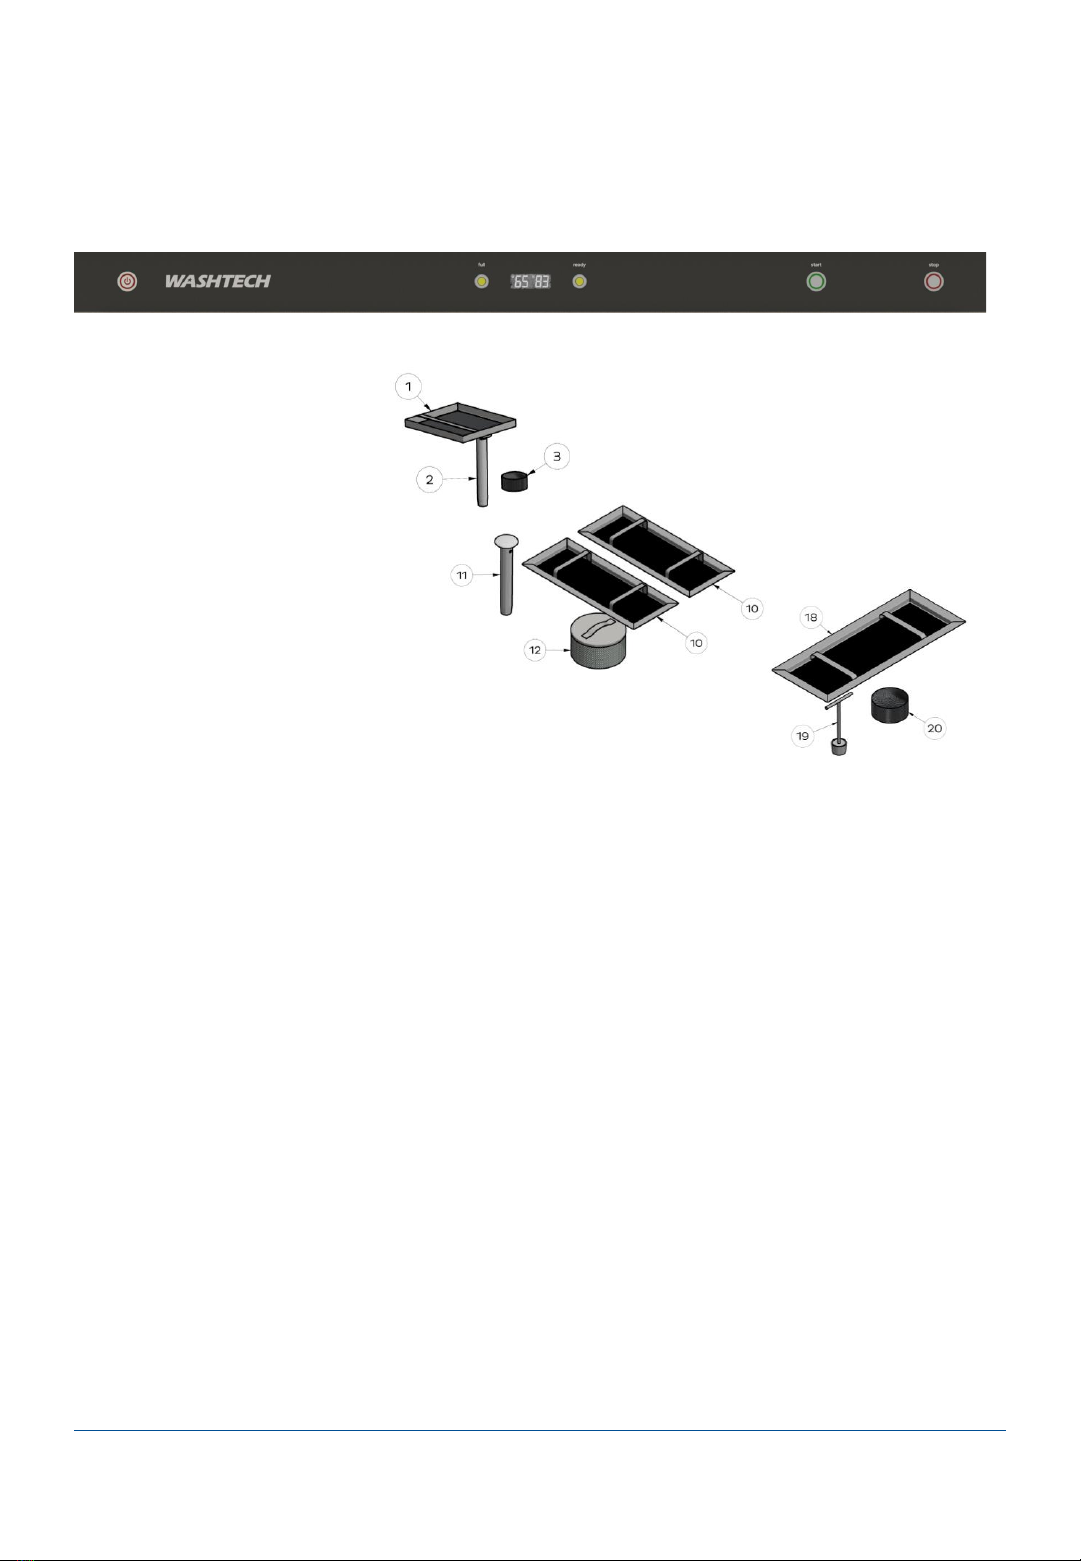
•Ensure the Scrap Trays are fitted in the Wash, Prewash and Rinse Zones.
Washtech CD240L Operator Manual

START
•Turn on at wall.
•Prewash Zone:
Fit Wash Pump Filter (3)
Fit Drain Upstand(2).
Fit Scrap Tray (1).
•Wash Zone:
Fit Wash Pump Filter (12).
Fit Drain Upstand (11) .
Fit Scrap Trays (10).
•Rinse Zone:
Fit Rinse Pump Filter (20).
Fit Drain Plug (19).
Fit Scrap Tray (18).
•Shut all doors and turn wall and Machine Power on.
•Machine begins filling. Full light glows amber when tanks are full.
•Ready light glows amber when the machine is up to required temperature.
OPERATION
•Press Start button to operate machine.
•Cycle light glows green while machine operates.
•Stack one rack with items. Push the rack fully into the inlet zone of the machine. Ensure
the rack is pushed fully into the inlet to engage pawl drive.
•Repeat for all consecutive racks
NOTE: Pumps and conveyor will stop operating if the machine is left idle for 2 minutes. To
restart the pump and conveyor simply feed a new rack into the inlet of the machine.
SHUT DOWN –END OF EACH DAY
•Press Stop button.
•Switch Power button off.
•Take out Drain Upstands and Drain Plug to gravity drain the machine.
•Proceed with Operator Care cleaning instructions.
SUGGESTED BEST PRACTICE
Pre-rinse Scrape and/or rinse trays, plates & glasses in cool water
Chemical Use a good quality non foaming commercial detergent and drying agent –do
not use domestic detergents which will cause the wash tank to foam
12/5/2022 Washtech CD240L Operator Manual 10
Operator Use Guide

12/5/2022 Washtech CD240L Operator Manual 11
Operator Care –Prewash Zone
CD240 Prewash Zone
•Part #: CD240 Prewash Zone
•Date: 22/04/2022
•Version: 1-A
Daily Cleaning
•Remove Scrap Tray (1) and clean with a brush and water to clear grid.
•Remove Prewash Pump Inlet Filter (3) and clean with a brush and water to clear grid.
•Return Drain Upstand (2), Prewash Pump Inlet Filter (3) and Scrap Tray (1) to the machine.
Weekly Cleaning
•To be done in conjunction with Daily cleaning.
•Remove Lower Wash Arms (4) –lift up to unhook the arm and then withdraw.
•Remove Upper Wash Arms (5) –push the locking bar up and then withdraw the arm.
•Check to ensure arms are clear of obstructions. Remove end caps to clear if not.
•Flush Arms (4 & 5) with water. Use a toothpick or paper clip if necessary to clear jets.
•Return Prewash Pump Inlet Filter (3), Drain Upstand (2), Scrap Tray (1),
Lower Wash Arms (4) and Upper Wash Arms (5) to the machine.

12/5/2022 Washtech CD240L Operator Manual 12
Operator Care –Wash Zone
CD240 Wash Zone
•Part #: CD240 Wash Zone
•Date: 22/04/2022
•Version: 1-A
Daily Cleaning
•Remove Scrap Trays (10) and clean with a brush and water to clear grid.
•Remove Wash Pump Inlet Filter (12) and clean with a brush and water to clear grid.
•Return Drain Upstand (11), Wash Pump Inlet Filter (12) and Scrap Trays (10) to the machine.
Weekly Cleaning
•To be done in conjunction with Daily cleaning.
•Remove Lower Wash Arms (8) –lift up to unhook the arm and then withdraw.
•Remove Upper Wash Arms (7) –push the locking bar up and then withdraw.
•Check to ensure arms are clear of obstructions. Remove end caps to clear if not.
•Flush Arms (7 & 8) with water. Use a toothpick or paper clip if necessary to clear jets.
•Return the Wash Pump Inlet Filter (12), the Drain Plug (11), Scrap Trays (10),
Lower Wash Arms (8) and Upper Wash Arms (7) to the machine.

12/5/2022 Washtech CD240L Operator Manual 13
Operator Care –Rinse Zone
CD240 Rinse Zone
•Part #: CD240 Rinse Zone
•Date: 23/06/2022
•Version: 1-A
Daily Cleaning
•Remove Scrap Trays (18) and clean with a brush and water to clear grid.
•Remove Drain Plug (19) , Rinse Pump Filter (20) and clean with a brush and water to clear grid.
•Return Scrap Trays (18) and Pump Inlet Filter (20) to the machine.
Weekly Cleaning
•To be done in conjunction with Daily cleaning.
•Remove Lower Rinse Arms (16 & 17) –lift up to unhook the arm and then withdraw.
•Remove Upper Rinse Arms (13 & 14) –push the clip up and then withdraw.
•Check to ensure arms are clear of obstructions. Remove end caps (15) to clear if not.
•Flush Arms (13, 14, 16, 17) with water. Use a toothpick or paper clip if necessary to clear jets.
•Return the Drain Plug (19), Pump Inlet Filter (20), Scrap Trays (18), Lower Rinse Arms (16 & 17) and
Upper Rinse Arms (13 & 14) to the machine.

12/5/2022 14
Operator Care - Curtains
CD240L Curtains
•Part #: CD240L CURTAINS
•Date: 23/06/2022
•Version: 1-A
Washtech CD240L Operator Manual

12/5/2022 15
Operator Troubleshooting
Issue Cause
POOR PRE-SCRAPING
CARRY OVER OF SOAP FROM SINK
OVERLOADING RACKS
POOR MACHINE CARE
JETS BLOCKED OR ARMS OBSTRUCTED
CURTAINS NOT FITTED CORRECTLY
WATER SUPPLY PRESSURE LOW
POOR WATER QUALITY*
RINSE TEMPERATURE LOW <75˚C
LIMIT SWITCH ACTIVATED
WASH ARM NOT FITTED PROPERLY
DISHES NOT CLEAN ⚫ ⚫
STAINING ⚫ ⚫
FOAMING ⚫
PROTEIN BLOOM ⚫ ⚫
DIRTY MACHINE ⚫ ⚫
FOOD RESIDUE ON WARE ⚫ ⚫
FILM/SPOTS ON WARE ⚫
DETERGENT RESIDUE ⚫
GREASY FILM/NO FIZZ ⚫
WET WASHWARE ⚫
SCALE BUILD UP IN MACHINE ⚫
FILTERS ON OTHER EQUIPMENT ⚫
PAWL DRIVE NOT OPERATING ⚫
CRASHING SOUND AGAINST DOOR ⚫
MACHINE STOPS & REFILLS CONSTANTLY ⚫
⚫Likely cause Possible cause
* For issues that are likely due to poor water quality (scale building up, filters being required on
other kitchen equipment etc.), we recommend you consult a local water specialist prior to
calling in a dishwasher technician.
IF PROBLEMS PERSIST CONTACT MOFFAT SERVICE ON 1300 264 217
Washtech CD240L Operator Manual

12/5/2022 16
Schematic Diagram
CD240 Schematic Diagram
•Part #: 260107
•Date: 5-12-2022
•Version: 1-B
Washtech CD240L Operator Manual

12/5/2022 17
Accessories
CD240 Accessories
•Part #: CD240 ACW
•Date: 24-05-2022
•Version: 1-A
Washtech CD240L Operator Manual

12/5/2022 18
Notes
Washtech CD240L Operator Manual

12/5/2022 19
Notes
Washtech CD240L Operator Manual

Information supplied in this manual is copyright. No
part of this work may be reproduced or copied in any
form or by any means, electronic or
mechanical without the express permission of the
author/publisher
Distributed in Australia by Moffat Pty Limited
740 Springvale Road
Mulgrave 3170
Victoria
Australia
24HR Service 1300 264 217
Parts 1300 263 107
Tel 03 9518 3888
Fax 03 9518 3818
E-mail [email protected]
web www.moffat.com.au
ISO9001
All Washtech products are designed and
manufactured by Washtech using the
internationally recognised ISO9001 quality
management system, covering design,
manufacture and final inspection, ensuring
consistent high quality at all times.
In line with policy to continually develop and
improve its products, Washtech Ltd reserves the
right to change specifications and design without
prior notice.
This manual suits for next models
1
Table of contents
Other Washtech Accessories manuals
Popular Accessories manuals by other brands

Denon
Denon DN-HC4500 - DJ Mixer USB Controller operating instructions

Interlogix
Interlogix International Shock Sensor installation instructions

SUNPRO
SUNPRO Retractable Awning installation manual

Atom
Atom AT4100/PIR instruction manual

Alphacool
Alphacool GPX-A 470-M01 instruction manual

Tecknet
Tecknet iEP330 user manual