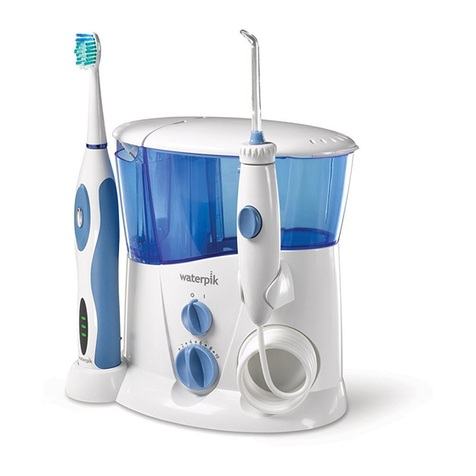
Waterpik Technologies WP-250 User manual

12
3
I
O
Waterpik® Water Flosser
Models WP–250/260/270/300
Hydropropulseur Waterpik®
Modèles WP–250/260/270/300
Irrigador bucal Waterpik®
Modelos WP–250/260/270/300
.................
www.waterpik.com


ENGLISH
3
Congratulations! By selecting the Waterpik®Water
Flosser you are now on your way to better gum health,
and a healthier smile!
With a clinically proven combination of water pressure
and pulsations, the Waterpik®Water Flosser removes
harmful bacteria deep between teeth and below the
gumline – where brushing alone won’t reach.
We are so convinced that you will be happy with your
new Waterpik®Water Flosser, that we back it up with a
14-day guarantee. If you aren’t satisfied that your gums
are healthier after using the Waterpik®Water Flosser for
14 consecutive days, feel free to return it to us for
a full refund.
Thank you for choosing the Waterpik®Water Flosser.
Oral Care With The Waterpik®
Water Flosser
Traditional brushing
can’t easily reach
hidden food debris and
harmful bacteria.
Flossing has limited
access below the
gumline.
The Waterpik®Water
Flosser removes trapped
food debris and harmful
bacteria.
WELCOME
Traditional Oral Care

4
TABLE OF CONTENTS
Important Safeguards 5
Product Description 7
Getting Started 9
Care of Your Waterpik® Water Flosser 14
Troubleshooting Guide 16
Limited Two-Year Warranty 17

ENGLISH
5
IMPORTANT SAFEGUARDS
When using electrical products, especially when children are
present, the basic safety precautions below should always
be followed.
READ ALL INSTRUCTIONS
BEFORE USING.
DANGER:
To reduce the risk of electrocution:
• Alwaysunplugproductafterusing.
• Donothandleplugwithwethands.
• Donotimmerseinwaterorotherliquid.
• Donotusewhilebathing.
• Donotplaceorstoreproductwhereitcanfall
or be pulled into a tub, shower stall or sink.
• Donotreachforaproductthathasfallenintoanyliquid.
Unplug immediately.
• Checkthepowersupplycordfordamagebeforetherst
use and during the life of the product.
WARNING:
To reduce the risk of burns, electric
shock, fire, serious injury or damage to
tissue:
• Donotplugthisdeviceintoavoltagesystemthatis
different from the voltage system specified on the device
or charger.
•
Donotusethisproductifithasadamagedcordorplug,
if it is not working properly, if it has been dropped or
damaged,ordroppedintoanyliquid.ContactWaterPik,
Inc. or your local distributor which can be found at
www.waterpik.com.
• Donotdirectwaterunderthetongue,intotheear,noseor
other delicate areas. This product is capable of producing
pressures that may cause serious damage in these areas.
See operating instructions for correct usage.
• Usethisproductonlyasindicatedintheseinstructionsor
as recommended by your dental professional.
• Onlyusetipsandaccessoriesrecommendedby
WaterPik,Inc.
• Donotdroporinsertanyforeignobjectintoanyopening
or hose.

6
• Keepelectricalcordawayfromheatedsurfaces.
• Donotoperatewhereoxygenoraerosolspraysare
being used.
• Donotuseiodine,bleach,orwaterinsolubleconcentrated
essential oils in this product. Use of these can reduce
product performance and will shorten the life of the
product.
• Fillreservoirwithwaterorotherdentalprofessional
recommended solution only.
• Donotusewhilewearinganyoraljewelry.Removejewelry
prior to use.
• Donotuseifyouhaveanopenwoundonyourtongueor
in your mouth.
• Ifyourphysicianorcardiologisthasadvisedyoutoreceive
antibiotic premedication before dental procedures, you
should consult your dentist before using this instrument or
any other oral hygiene aid.
• Forhouseholduseonly.Donotuseoutdoors.
• Closelyinstructandsupervisechildrenandindividuals
with special needs in the proper use of this product.
• DonotremovethePikPocketTMexibletipfromtheclear
shaft. If it separates for any reason, discard both the tip
andshaftandreplacewithanewPikPocketTMTip.Pik
PocketTM Tip not included in all models.
• Donotusethisproductformorethan5minutesineach
two-hour period. Longer usage can overheat the motor
and cause product failure as well as void the warranty.
• Childrenshouldbesupervisedtoensurethattheydonot
play with the appliance.
•Thisappliancehasapolarizedplug(onebladeiswider
thantheother).Asasafetyfeature,thisplugisintendedto
tintoapolarizedoutletonlyoneway.Iftheplugdoesnot
fit fully into the outlet, reverse the plug. If it still does not
t,contactaqualiedelectrician.Donotattempttomodify
the plug in any way.
SAVE THESE INSTRUCTIONS.

ENGLISH
7
12
3
I
O
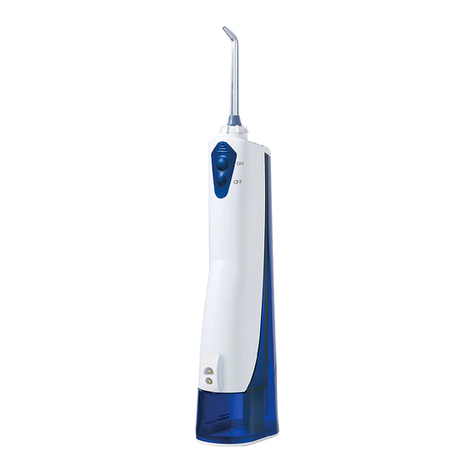
Reservoir
Tip
Handle
Pressure
control knob
On/Off switch
Base
Tip
eject button
PRODUCT DESCRIPTION
Reservoir valve

8
Orthodontic
Tip
Classic Jet
Tip
Pik Pocket™
Tip
Tongue
Cleaner Tip
Toothbrush
Tip
Plaque Seeker®
Tip
NOTE: all tips not included in all models.

ENGLISH
9
Insert
NO
Gap
Slide
Button
Up
Eject
Plugthecordintoanelectricaloutlet.Iftheoutletis
controlled by a wall switch, be sure it is turned on.
Preparing the Reservoir
Fillthereservoirwithlukewarmwater.Replacethe
reservoir over the base and press down firmly.
Inserting and Removing Tips
Insert tip into the center of the Water Flosser handle. The
colored ring will be flush with the top of the handle if the tip
is correctly locked into place. Gently pull on tip to confirm it
is seated properly and locked in place.
Toremovetipfromthehandleslidethetipejectbuttonup
towards the top of the handle and lift tip from handle.
GETTING STARTED
Fill
Replace
12
3
I
O
Tip Insertion Tip Removal

10
ON
12
3
I
O
12
3
O
Placement in Mouth
Lean low over sink and place the tip in mouth.
Aimthetiptowardteeth.
Set pressure at desired setting. With your free hand,
turn the unit on.
Adjusting the Pressure Setting
Turn the pressure control dial on the base of the unit to the
lowestsetting(pressuresettingNo.1)forrst-timeuse.
Gradually increase pressure over time to the setting you
prefer – or as instructed by your dental professional.
Prime Unit (First Time Use Only)
PriortoVeryFirstUseofUnit,PrimeUnit:Setpressurecontrol
dial on base to high, point the handle and tip into sink. Turn
unitONuntilwaterowsfromthetip.TurnunitOFF.
Low
I
12
3
O
12
3
I
O
High
I
12
3
O

ENGLISH
11
Recommended Technique
Directthestreamata90-degreeangletoyourgumline.Slightly close
lips to avoid splashing but allow water to flow freely from mouth into the
sink.Forbestresults,startinthemolararea(backteeth)workingtoward
the front teeth. Glide tip along gumline and pause briefly between teeth.
Continue process until you have cleaned the inside and outside of both
the upper and lower teeth.
When Finished
Turntheunitoff.Emptyanyliquidleftinthereservoir.Unplugtheunit.
1
2
3
4
OFF
12
3
I
O

12
TIP USAGE
Pik Pocket
TM
Tip
ThePikPocket
TM
Tip is specifically
designed to deliver water or
anti-bacterial solutions deep
into periodontal pockets.
It is not intended for
general use.
TousethePikPocket
TM
Tip, set the unit to the
lowest pressure setting.
Lean low over your sink
and place the soft tip
againstatoothata45-degreeangleandgentlyplacethe
tip under the gum line, into the pocket. Turn the unit on
and continue tracing along the gum line until
all periodontal pockets are treated.
NOTE:ThistipmustbeusedonlywiththePressure
Control set to 1. Use on a higher setting will shorten life
of tip and
power handle.
Tongue Cleaner Tip
To use the tongue cleaner tip, set the
unit to the lowest pressure setting.
Gently place the tongue cleaner in the
center/midline of your tongue, about
halfway back and start the Water
Flosser. With light pressure pull
forward. You can increase pressure
as you prefer.
Orthodontic Tip
ThespecialOrthodontic
Tipisuniquelydesignedto
simultaneously brush and rinse
hard-to-reach areas around
braces and other dental work.
Startonthelastmolar(backtooth).Aimwaterstreamat90
degrees to the tooth at the gumline. Gently glide tip along
gumline, pausing briefly to lightly brush area between teeth and
allaroundorthodonticbracket,beforeproceedingtothenext
tooth. Continue process until you have cleaned the inside and
outside of both the upper and lower teeth.

ENGLISH
13
Toothbrush Tip
Placethetoothbrushtipinmouthwiththebrushheadon
the tooth at the gum line. The toothbrush tip can be used
with or without toothpaste. Turn the Water Flosser on
so water flows through the tip. Using a light pressure
(bristlesshouldnotbend)massagethebrushbackand
forth with very short strokes – much like you would with a
manualtoothbrush.Repeatonadjacentteeth.Waterwill
flow through the brush, to help simultaneously clean and
rinse the tooth surface.
Plaque Seeker® Tip
Direct the jet stream at a 90-degree angle to your gumline.
Close lips slightly to avoid splashing but allow water to flow
freely from mouth into sink. Start in the molar (back teeth)
area working toward the front teeth. Place the tip close to the
teeth so that the bristles are gently touching the teeth.
Gently glide tip along gumline, pausing briefly between
teeth to gently brush and allow the water to flow between
the teeth. Continue until all areas around and between
the teeth both inside and outside, top and bottom have
been cleaned.
Using Mouthwash and Other Solutions
Your Waterpik®Water Flosser can be used to deliver
mouthwashandantibacterialsolutions.Askyourdental
professional to recommend the appropriate solution for
you. Note: use of some antibacterial solutions could
shorten the life of your Waterpik®Water Flosser, see
warnings section for details.

14
Cleaning Your Waterpik® Water Flosser
Clean the product when necessary by using a soft cloth
and mild non-abrasive cleanser.
Before cleaning, unplug from the electrical outlet.
BeforeexposingtheWaterFlossertofreezing
temperatures, remove the reservoir and run the
unit until completely empty.
12
I
O
12
3
CARE OF YOUR WATERPIK® WATER FLOSSER
Afterusinganyspecialsolutioninthereservoir,takea
momentaftereveryusetorinsetheunit.Partiallyllthe
reservoirwithwarmtapwater.Aimthejettipintoyoursink.
Turn on the unit and let it run until empty. This will help keep
the tip from clogging and help your unit to last longer.

ENGLISH
15
RECOMMENDED TIP
REPLACEMENT INTERVALS
Service Maintenance
Waterpik®Water Flossers have no consumer-serviceable
electricalitemsanddonotrequireroutineservicemaintenance.
For all accessories go to www.waterpik.com.
You may also call our toll-free customer service number at
1-800-525-2774(
USA)or1-888-226-3042(Canada).
036
Classic
Jet Tip
Orthodontic
Tip
PikPocket™
Tip
Toothbrush
Tip
Plaque
Seeker®Tip
Tongue Cleaner
Tip
Replace Every
3 Months
Replace Every
6 Months
Refertotheserialandmodelnumbersinall
correspondence. These numbers are located on the
bottom of your unit.
Replacementtips/attachmentsmaybepurchased
directlyfromWaterPik,Inc.Call1-800-525-2774
(USA)or1-888-226-3042(Canada)orvisitour
web site at www.waterpik.com.

16
PROBL
E
M
Tips
Leakage between the tip and handle knob.
Pik PocketTM Tip
Tear in soft tip.
Water Flosser Base
Hose to the handle leaks.
Reservoirleaks.
Inadequatepressure.
Unit doesn’t start.
TROUBLESHOOTING GUIDE
CAUSE
1) Tip not fully engaged.
1) Tip is worn.
2)Tipissplit.
1)Damagetothehose.
1) Missing black reservoir valve.
2)Blackreservoirvalveisupsidedown.
1)Reservoirnotpositionedproperly.
2)Tipiscloggedwithdebris.
3)Blackreservoirvalveisclogged.
4) Hard water deposits.
1) Motor not running.
CORRECTIVE ACTION
1)Removetipandreinstall.
1)Replacewithnewtip.
2)ReplacewithnewtipanduseONLYonlowestpressure.
1)Visitwww.waterpik.comorcontactWaterPik,Inc.customerservice
for a self service repair kit.
1)Replacereservoirvalve.ContactWaterPik,Inc.
customer service for a replacement valve.
2)Ensurevalveisright-sideup(seeimagetoright).
1)Re-positionreservoir.Pressdownrmlyonthereservoir.
2)Flushtipunderfaucetorreplacetip.
3)Removereservoirvalveandcleanbymassagingthevalve
under warm running water and place back into reservoir.
Ensurethevalveisright-sideup(seeaboveimage).
4)Add2tablespoonsofwhitevinegartoafullreservoirofwarm
water. Set pressure control dial to high, point the handle and tip
intosink.TurnunitONandrununtilreservoirisempty.Rinse
by repeating with a full reservoir of clean warm water.
1) Be sure outlet is functioning; test with another appliance
(checkelectricalresetbuttonand/orwallswitch).
Stillhavequestions?Gotowww.waterpik.comorcallWaterPik,Inc.CustomerService.
Toll-FreeNumber:
1-800-525-2774(U.S.A.)1-888-226-3042(Canada).
LIMITED TWO-YEAR WARRANTY

ENGLISH
17
TROUBLESHOOTING GUIDE
WaterPik,Inc.warrantstotheoriginalpurchaser/ownerofthisnewproductthatitisfreefromdefectsinmaterials
and workmanship for two years from date of purchase. Save your receipt as your proof of purchase date. Water
Pik,Inc.reservestherighttorequesttheproducttobereturned,attheownersexpense,foranalysistoconrmthe
claim falls within our warranty policy. We will replace any part of the product, which in our opinion is defective,
provided the product has not been abused, misused, altered or damaged after purchase and was used according to
theseinstructions.Thislimitedwarrantyexcludesaccessoriesorconsumablepartssuchastips,etc.
This warranty gives you specific legal rights. You may also have other rights that vary depending on the law in your
place of residence.
LIMITED TWO-YEAR WARRANTY


19
FRANçAIS
Toutesnosfélicitations!Vousavezchoisi
l’hydropropulseur Waterpik®quicontribueraàrendre
vos gencives plus saines et votre sourire plus éclatant!
Grâceàuneassociationcliniquementprouvéedela
pression d’eau et de pulsations, l’hydropropulseur
Waterpik®élimine les bactéries nocives des espaces
interdentairesetàlabasedesgencives-làoùlabrosse
àdentsnepeutpasatteindre.
Noussommestellementconvaincusdelasatisfaction
quevousapporteralenouvelhydropropulseur
Waterpik®,quenousl’assortissonsd’unegarantiede14
jours.Sivousn’êtespassatisfaitdelameilleuresanté
de vos gencives après avoir utilisé l’hydropropulseur
Waterpik®pendant14joursconsécutifs,vous
pouvezlibrementnouslerenvoyeretrecevoirun
remboursement total.
Merci d’avoir choisi l’hydropropulseur Waterpik®.
Soins bucco-dentaires avec
l’hydropropulseur Waterpik®
Labrosseàdentsne
peut pas atteindre les
résidus de nourriture
incrustés et les
bactéries nocives.
Le fil dentaire a un
accèslimitéàlabase
de la gencive.
L’hydropropulseur
Waterpik®élimine les
résidus alimentaires
coincés et les bactéries
nocives.
BIENVENUE
Soins buccaux traditionnels

20
TABLE DES MATIERES
Précautions d’emploi 21
Description de l’article 23
Première utilisation 25
Entretien de votre hydropropulseur Waterpik® 31
Solutions aux problèmes courants 32
Garantie limitée de deux ans 33
This manual suits for next models
3
Table of contents
Languages:
Other Waterpik Technologies Electric Toothbrush manuals

Waterpik Technologies
Waterpik Technologies 7500 User manual

Waterpik Technologies
Waterpik Technologies Waterflosser WP-360 User manual

Waterpik Technologies
Waterpik Technologies WP-100 User manual

Waterpik Technologies
Waterpik Technologies WP-900 User manual

Waterpik Technologies
Waterpik Technologies WP-900 User manual